Chapter 17
Recording and Editing Videos
Your iPad is a very capable video recorder. You can record and export HD video up to 720p. You can then publish that video straight to YouTube or MobileMe or even send it to an email recipient. In this chapter, we will also show you how to shoot and quickly trim your videos, as well as upload them.
Video Recording and Editing
New to the iPad this year is the capability to record videos using the Camera app and to edit videos with the iMovie app that Mac users have been using for some time. With iMovie, you can actually create movies by joining movie clips, adding pictures and transitions, and then adding your own audio track. When you're finished, you can upload the movie to the Web.
In the next section, you will learn how to add video clips, audio, pictures, and transitions. You will also learn how to produce a high quality, high definition video right on your iPad.
Starting the Video Recorder
The software for the video recorder is actually part of the Camera app (see Figure 17–1). Follow these steps to use the built-in video recorder:
- Start the Camera app (see Chapter 16: “iPad Photography” for more information on how to do this).
- Move the slider in the lower-right corner from the Camera icon to the Video Recorder icon.
- Try to keep the iPad steady as you record your scene.
- Touch the Stop button when you are done recording.

Figure 17–1. The layout and controls of the video recorder
Adjust Point of White Balance
TheiPad video camera is fixed focus. You can adjust the point of white balance of the video based on the subject. Follow these steps to take advantage of this feature:
- To focus on something in the foreground of the video, touch the screen in the foreground. This brings up a small box that shows the area of white balance.
- To switch the white balance to a subject in the background, touch another part of the screen. The box will temporarily display the new area of white balance.
Trimming the Video
TheiPad allows you to perform edits on your video right on the phone. Once the video has been recorded and you press the Stop button, the video immediately goes into your Camera Roll.
Touch the small image of the video in the lower-left corner to bring up the video. At the top of the screen, you will see a timeline with all the frames of your video at the top of the screen (see Figure 17–2). Follow these steps to edit your just recorded video:
- Drag either end of the timeline and you will see that the video goes into Trim mode.
- Drag the ends of the video on either end until it is the length you desire.
- When the video is the correct length, touch the Trim button in the upper-right corner.
- Next, select either Trim Original or Save as New Clip. The latter option saves another version of the newly trimmed video.

Figure 17–2. Trimming a video
NOTE: Videos are much larger than pictures; make sure you keep an eye on your storage space if you save many videos to the Camera Roll.
Sending the Video
As with photos, you have several options for using your iPad to send recorded video to others. Follow these steps to send a video from your iPad:
- Touch the Send icon
 in the upper-right corner.
 - Choose your preferred option for sending the video: Email, MMS, MobileMe, YouTube, or Copy.
- The next screen you see will depend on the choice you made in Step 2. If you selected Email, your Email app will launch.
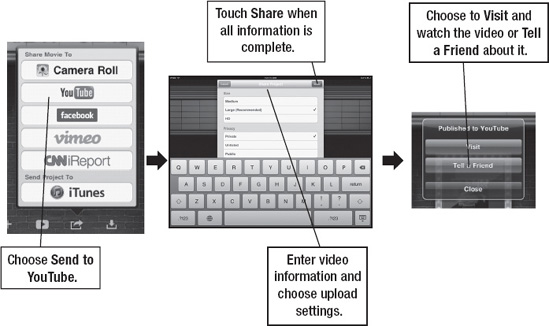
Uploading to YouTube
TheiPad allows you to upload an HD (720p) video right to your YouTube account. You just need to be connected to a Wi-Fi network. Follow these steps to upload a video to YouTube:
- Locate the video you wish to upload in your Camera Roll.
- Touch the Send icon.
- Choose Send to YouTube.
- Enter a title, description, and tags for the video.
- Choose Standard Definition or HD.
- Choose a category for the video.

Figure 17–3. Uploading a video to YouTube
NOTE: To upload a video to MobileMe or YouTube, you need to have an account with the site you want to upload to (see Chapter 4: “Other Sync Methods” to learn more about MobileMe).
Using iMovie
Mac users have been enjoying the iMovie app for years. This app lets you combine movie clips with pictures and music, enabling you to add fancy transitions between scenes to make a professional-looking movie.

One great feature of the new iPad is that users can enjoy the power of iMovie right on their iPad. The iMovie app is a US $4.99 download from the App Store. It is usually listed under either the Featured apps or the Enhanced for iPad 2 apps sections. You can also just search the App Store for “iMovie” to go straight to the download page (see Chapter 21: “The Amazing App Store” for more information on searching the App Store for content).

Getting Started with iMovie
The iMovie app works with projects. If you have stored projects, they appear on the Projects page. This will most likely be your first time using the app, so you won't have any projects. Follow these steps to start an iMovie project:
- Tap the Plus sign icon
 to start a new project.
 - Touch the Settings icon and select a theme for the project. Glide through the available themes. Current themes include Modern, Bright, Travel, Playful, Neon, Travel, Simple, News, and CNN Report.
- Select Theme Music ON if you want to use specific music designed for that theme.
- Tap one of the Insert Media icons to choose media for your movie. To choose a video, touch the Video soft key at the left. To choose photos, touch the Photos soft key next to it. Finally, to choose a sound track from your own music files, touch the Audio soft key and navigate to the song desired (see Figure 17–4).

Figure 17–4. Choosing media to add to your iMovie project
Constructing Your Movie
Creating a movie in iMovie is as simple as adding new content, transitions, and audio. Follow these steps to build your movie:
- Tap the Insert Media button again and choose a movie clip or photo from your Photos app.
- Adjust the length of the clip by moving the Yellow Dots at either end towards the center. Notice the time of the clip changes as it is adjusted.
- Tap the Blue Arrow when you are ready to add the clip to the Project timeline.
- Add another video clip or photo to the timeline, repeating the steps described previously.
- There is now a small Double Arrow icon between the different media in the project. This is the Transition icon. Double-tap the Transition icon to bring up the Transitions Settings menu (see Figure 17–5).
- Choose a transition (currently there are only three choices: None, Cross Dissolve, and Theme).
- Choose a transition length. These can range from.5 seconds to 2.0 seconds.
- Next, touch either the Up Arrow or Down Arrow below the Transition icon to adjust the overlap and transition from one clip or photo into another.
- Touch the Transition icon to exit the menu.
- Add music by touching the Audio button and choosing a soundtrack from your Music library.
- Touch the Waveform button to see the actual audio waveforms and where they will be in the video.
- Touch the Record button to add a voice over recording to the video.
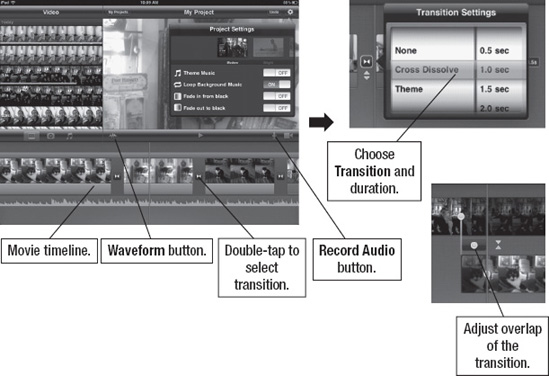
Figure 17–5. Adding transitions to the iMovie project
Follow these steps to preview the movie:
- Slide the Timeline control at the bottom to the beginning, and then touch the Play
 button.
 - When you are done, touch the MyProjects
 button in the top center of your screen. This will return you to the Projects screen.
Sharing Your Movie
Touch the Share button and iMovie gives you the option to share your movie to YouTube, Facebook, Vimeo, or CNNiReport. It also gives you the option to send the project to iTunes.

Choose the site to which you wish to share the project. An options screen will appear that lets you choose the export size of the movie. You can choose to export your movie as an HD (720p), large (540p), or medium (360p) movie file.
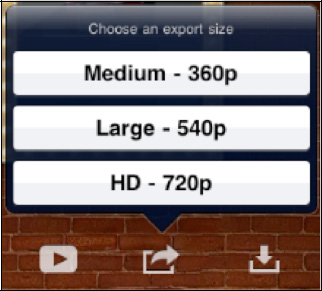
NOTE: HD 720p movies have the best quality; however, these can be quite large, depending on the length of the movie. Obviously, it will take longer to email or upload an HD movie than an equivalent-length large- or medium-sized movie.
The Export screen marks the progress of the movie export. Follow these steps to share a project from your Camera Roll:
- Choose Camera Roll from the options in the Share menu.
- Go to your Camera Roll (see Chapter 16: “iPad Photography” for more information on how to do this).
- Find the new movie in the Camera Roll. You will see a Video icon at the bottom of the picture; the image will also show the length of the video.
- Touch the video from the Camera Roll.
- Choose Share from the soft keys at the bottom.
- Choose to send your project through one of the following methods: Email, MobileMe, YouTube, or Copy.
NOTE: To maintain your high quality 720p video, you should sync it back to your computer. Manual uploads over Wi-Fi will possibly let you share your movie at the highest quality. Syncing your movies to iTunes will ensure that the original quality is preserved.
Uploading to YouTube
TheiPad allows you to upload an HD (720p) iMovie project right to your YouTube account. You just need to be connected to a Wi-Fi network. Follow these steps to upload a video to YouTube:
- Locate the project you wish to upload in your iMovie projects.
- Touch the Share icon.
- Choose YouTube.
- Enter a Title, Description, and Tags for the video.
- Choose Medium, Large, or HD for the Size.
- Choose a Category for the video.
- Touch the Share button when done.
- Finally, choose to either View on YouTube or to Tell a Friend (via email) that the video has been published (see Figure 17–6).