
Chapter 11
Surf the Web with Safari
Now we'll take you through one of the most fun things to do on your iPad: surfing the web. You may have heard web surfing on the iPad is a more intimate experience than ever before—we agree! We'll show you how to touch, zoom around, and interact with the Web like never before with Safari on your iPad. You'll learn how to set and use bookmarks, quickly find things with the search engine, open and switch between multiple browser windows, and even easily copy text and graphics from web pages.
Web Browsing on the iPad
You can browse the web to your heart's content via Wi-Fi or with your iPad's 3G connection (on Wi-Fi + 3G models.) The iPad has what many feel is the most capable mobile browsing experience available today. Web pages look very much like web pages on your computer. With the iPad's ability to zoom in, you don't even have to worry about the smaller screen size inhibiting your web browsing experience. In short, web browsing is a much more personal experience on the iPad.
You can browse in portrait or landscape mode, whichever you prefer. You can also quickly zoom into a video by double-tapping it or pinching open on it, which is natural to you because those are the motions to zoom in text and graphics.
Why Do Some Videos and Sites Not Appear? (Flash Player Required)

Some web sites are designed with Adobe Flash player, and as of publishing time, the iPad does not support Adobe Flash. Apple seems to have made a decision to not support the Flash Player. If you tap on a video and the video does not play, or you see something like “Flash Plugin Required,” “Download the Latest Flash Plugin to view this video,” or “Adobe Flash Required to view this site,” you will not be able to view the video or web page.
There are now browsers in the App Store like Skyfire and iSwifter that transcode Flash into H.264 video on the server side so they work on iPad.
An Internet Connection Is Required
You do need a live Internet connection on your iPad—either Wi-Fi or 3G (cellular data)—in order to browse the web. Check out the "Connectivity" section in Chapter 5 to learn more.
Launching the Web Browser
You should find the Safari icon on your Home Screen; this is your web browser. Usually, the Safari icon is in the lower left of the Bottom Dock.

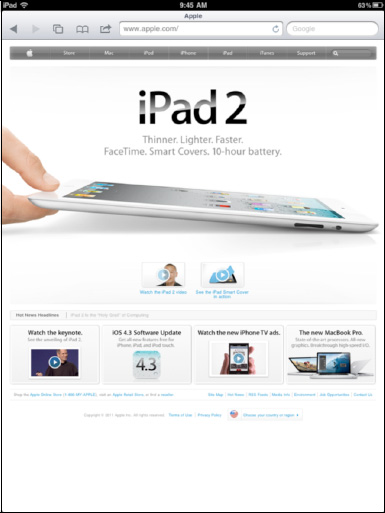
Touch the Safari icon and you will be taken to the browser's home page. Most likely, this will be Apple's iPad page.
As you find web sites you like, you can set bookmarks to easily jump to them at a later date. We will show you how later in this chapter.
Layout of Safari Web Browser Screen
Figure 11-1 shows how a web page looks in Safari, and the different actions you can take in the browser.
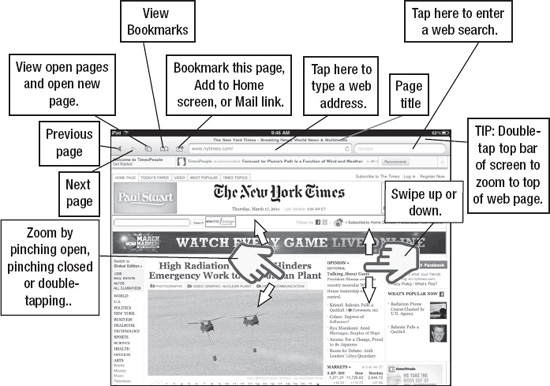
Figure 11-1. Safari web browser page layout
As you look at your screen, notice that the Address Bar is in the upper left side of the screen. This displays the current web address. To the right is the Search window. By default, this is set to Google search, but you can change it if you want.
At the top of the screen are five icons; Back, Forward, Open Pages, Bookmarks, and the Action button.
Typing a Web Address
The first thing you'll want to learn is how to get to your favorite web pages. Just as you would on your computer, you type in the web address (URL) into the browser. To start, tap the Address Bar at the top of the browser, as shown in Figure 11-2. The keyboard will appear and the window for the browser will expand. Start typing and press the Go key to go to that page.
TIP: Remember to use the colon, forward slash, underscore, dot, and .com keys at the bottom to save time.

Figure 11-2. Typing in a web address
TIP: Press and hold the .com key to see all the options: .org, .edu, .net, .de, etc.
Moving Backward or Forward Through Open Web Pages
Now that you know how to enter web addresses, you'll probably be jumping to various web sites. The Forward and Back arrows make it very easy to go to recently visited pages in either direction, as Figure 11-3 shows. If the Back arrow is grayed out, the section below about using the Open Pages button can help.

Figure 11-3. Returning to a previously viewed web page
Let's say you were looking at the news on the New York Times web site, then you jumped to ESPN to check sports scores. To go back to the New York Times page, just hit the Back arrow. To return to the ESPN site again, touch the Forward arrow.
Moving Between Web Pages
Sometimes when you click a link, the web page you were viewing moves to the background and a new window pops up with new content (another web page, a video, etc.). In such cases, the Back arrow in the new browser may not work!
Instead, you have to tap the Open Pages icon (just to the right of the arrows) to see a list of open web pages and then tap the one you want. In Figure 11-4, we touched a link that opened a new browser window. The best way to get back to the old one is to tap the Open Pages icon and select the desired page.
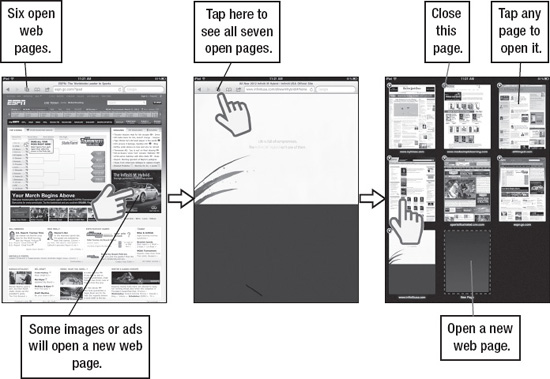
Figure 11-4.Jumping between open web pages
Jumping to the Top of the Web Page
Sometimes web pages can be quite long, which can make scrolling back to the top of the page a bit laborious. One easy trick is to just tap on the black title bar of the web page and you'll automatically jump to the top of the page, as shown in Figure 11-5.

Figure 11-5.Jump quickly to the top of a web page by tapping at the top
Emailing a Web Page
Sometimes you find a page so compelling that you just have to send it to a friend. Touch the Action button ![]() next to the Address Bar and select Mail Link to this Page (see Figure 11-6). This creates an email message with the link that you can send.
next to the Address Bar and select Mail Link to this Page (see Figure 11-6). This creates an email message with the link that you can send.

Figure 11-6. Email a link to a web page
How to Print a Web Page
The iPad now comes with a built-in Print command. If you have an AirPrint compatible printer (a full list of compatible printers can be found at www.apple.com/ipad/features/airprint.html) just connect your printer to your home network and select Print from the menu displayed when you touch the Action button. If you don't have an AirPrint-compatible printer, you still have a few options, but none of them are quite as simple as AirPrint.
NOTE: Both the iPad and the printer need to be on the same Wi-Fi network. In other words, the iPad can't be on 3G.
Option 1: Email yourself or a colleague the web page link and print it from that printer. If you are traveling and staying at a hotel with a business center, you may be able to send it to someone at the business center or front desk to print the page.
Option 2: Buy a network printing app from the App Store that allows you to print to a networked printer. Of course, this only works if you have access to a networked printer. It's usually best if you do this from your home or office network and can get help setting up, as it can be quite challenging.
Adding Bookmarks
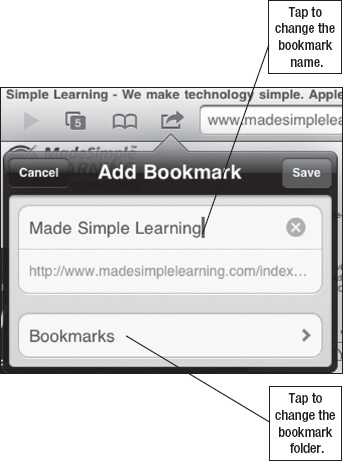
Just like on your home computer, you can set bookmarks on your iPad. To add a new bookmark, simply touch the plus sign(+)at the top of the web screen.
After touching ![]() you'll see three options. Choose Add Bookmark to add a new bookmark.
you'll see three options. Choose Add Bookmark to add a new bookmark.

After adding the new bookmark, you can edit its name (the web address is shown underneath the editing window). You can also choose the folder where you'd like the bookmark to appear. By default, it will go in your Bookmarks folder, but you can place it in any folder available to you, such as News or Popular.

Press Save to save your changes.
TIP: If you add a bookmark to the Bookmark Bar, it will appear when you activate the URL field. Similar to desktop Safari, it gives you a drop-down menu of sites—very handy for quickly finding where you want to go.
Using Your Bookmarks
Once bookmarks are set, simply touch the Bookmarks icon from any web page to see them.
When you touch the Bookmarks icon, you'll find tabs for your History, Bookmarks Bar, and Bookmarks Menu. Under that you'll see preinstalled bookmarks for your iPad.

Bookmarks you add will, by default, go into your Bookmarks Bar unless you specify another spot.
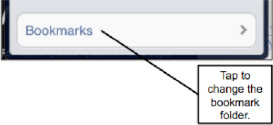
TIP: When you are creating your bookmarks, adjust the folder where the bookmark is stored by tapping the Folder name under the name of the Bookmark.
Searching the Web
Sometimes, you need to search for a particular topic, item, or web page. Searching the web couldn't be easier on the iPad.
The following steps show you how to set your default search engine in the Safari settings. When you first get your iPad, the default search engine is Google.
The Searchbar is right next to the Web Address Bar. To perform a web search, follow these steps:
- Touch the Search bar and the keyboard will appear.
- Type in the name, web site, or topic you wish to search.
- If a match pops up, just touch it to jump to the page or touch the Search key on the keyboard.
- Your search results will be displayed using the default search engine (see Figure 11-7).
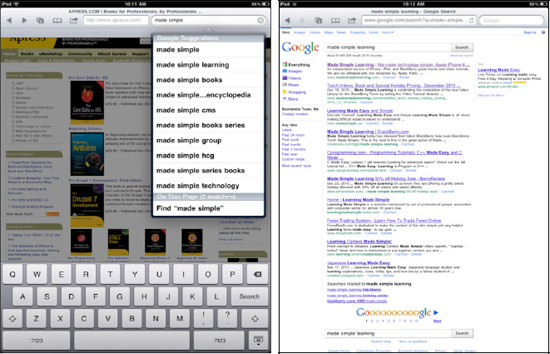
Figure 11-7. Perform a web search using the Search bar in Safari
TIP: There's also the “On this page” listing at the bottom of the search results which lets you find words on the web page currently loaded in Safari (like cmd/ctl+F on the desktop).
Adding a Web Page Icon to Your Home Screen
If you love a web site or page, it's very easy to add it as an icon to your Home Screen. That way, you can instantly access the web page without going through the Safari ![]() Bookmarks
Bookmarks ![]() select bookmark process. You'll save lots of steps by putting the icon on your Home Screen (see Figure 11-8). This is especially good for quickly launching web apps, like Gmail or Buzz from Google, or web app games.
select bookmark process. You'll save lots of steps by putting the icon on your Home Screen (see Figure 11-8). This is especially good for quickly launching web apps, like Gmail or Buzz from Google, or web app games.
Here's how to add the icon:
- Touch the Action button
 next to the address bar in the top of the browser.
 - Touch Add to Home Screen.
- Adjust the name. You may want to put in the name of the site, but keep it short because there's not much room below the icons.
- Tap the Add button in the upper right corner.
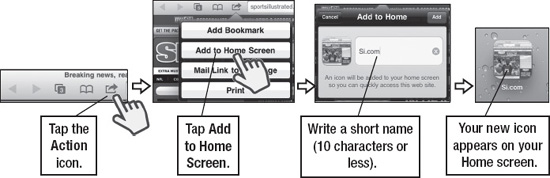
Figure 11-8. How to add an icon for a web page to your Home Screen
Browsing from Web History
A very useful tool on your iPad is the ability to browse the web from your History, just as you would on a computer.
Touch the Bookmarks icon and you'll see a tab marked History.

Touch the History tab and your recent web travels will be listed. If you haven't cleared your history lately, you may see one tab that says Earlier Today and another for other dates with stored history.
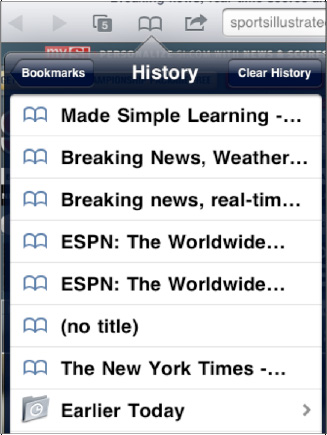
Just touch the name of a web site on the list, and Safari will load that page in the browser window.

To remove all the sites in your History, touch the Clear History button in the upper right, then the red Clear History button.
Adding Folders, Editing and Deleting Bookmarks
It's very easy to accumulate quite a collection of bookmarks since it's so easy to set them up. You may find you no longer need a particular bookmark, or you may want to organize them by adding new folders.
To manage your bookmarks, tap the Edit button at the bottom left corner of your Bookmarks menu.
You will notice that a red minus sign (-) appears to the left, and each bookmark turns into a tab that can be touched (see Figure 11-9).

Figure 11-9. Reorder and delete bookmarks
To delete the bookmark, just touch the red minus sign and you'll see the Delete button pop up. Touch Delete, confirm the delete, and the bookmark will disappear from your menu.
To reorder bookmarks, just touch the icon at the right edge of each bookmark and drag up or down as you like.
To add a new folder, touch the New Folder button in the upper left corner. Type the name of the folder, select the location (folder) in which to place your new folder, and click Done.
Using the New Pages Button
On our home computers, many of us have come to rely on tabbed browsing— it allows us to have more than one web page open at a time so we can quickly move from one to another. The iPad has a similar feature you can access by touching the New Page icon at the top left of the of the web status bar. (This is the same icon you used to move through open pages earlier in this chapter.)

When you first touch this button, the web page you are currently viewing becomes small and moves to the left side of the screen.
Touch the New Page button and the browser will load a blank page, ready for you to input a new web address.

Now, just add a web address by touching the Address Bar, which brings up the keyboard. Type in the web address you want. Notice that there's no space bar on this keyboard—just touch the period (.) for the dot, or the .com button to fill out the address if the site has “com” at the end of the name.

Now when you touch the New Page icon, you can just touch the page you wish to view and it will load into the screen. As you did before, you can also touch the New Page button to load yet another new page into the browser window.

Zooming In and Out in Web Pages
Zooming in and out of web pages is very easy on the iPad. There are two primary ways of zooming—double-tapping and pinching.
Double-tapping: If you tap twice on a column of a web page, the page will zoom in on that particular column. This lets you home in on exactly the right place on the web page, which is very helpful for pages that aren't formatted for a mobile screen.
To zoom out, just double-tap once more. See how this looks graphically in the Quick Start Guide.
Pinching: This technique lets you zoom in on a particular section of a page. It takes a little bit of practice, but will soon become second nature. Take a look in the Quick Start Guide to see how it looks graphically.
Use your thumb and forefinger and place them close together at the section of the web page you wish to zoom into. Slowly pinch out, separating your fingers. You will see the web page zoom in (note that it may takes a couple of seconds for the web page to focus).
To zoom out to where you were before, just start with your fingers apart and move them slowly together; the page will zoom out to its original size.
Activating Links from Web Pages
When you're surfing the Web, often you'll come across a link that will take you to another web site. Because Safari is a full-function browser, you can just touch the link and you will jump to a new page.
If you want to return to the previous page, just press the Back arrow as shown earlier.

Adjusting Browser Settings
As with other settings you've adjusted so far, the settings for Safari are found in the Settings app.
To access this app, touch the Settings icon and then touch Safari.

Changing the Search Engine
By default, the search engine for the Safari browser is Google. To change this to Yahoo, just touch the Search Engine tab and then choose Yahoo. You can also choose Bing as your default search engine.

Adjusting Security Options
Under the Security heading, JavaScript, and Block Pop-ups should, by default, be set to ON. You can modify either of these by just sliding the switch to OFF.
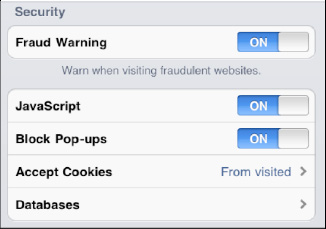
NOTE: Many popular sites like Facebook require JavaScript to be ON.
You'll also see the Accept Cookies tab here, which you can adjust to accept cookies Always, Never, or From visited.

Speed Up Your Browser: Clear History and Cookies
On the bottom of the Safari Settings screen, you can see the Clear History and Clear Cookies buttons.
If you notice your web browsing getting sluggish, it's probably a good time to clear out both your History and Cookies.
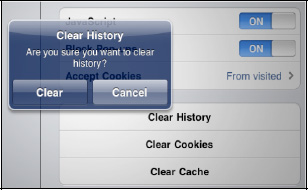
TIP: This is also a good privacy measure as it prevents others from seeing where you've been browsing.
To preempt that sluggishness, it's a good idea to clear out your history and cookies on a fairly regular basis.
AutoFill Name, Password, Email, Address, and More
AutoFill is a convenient way to have the browser automatically fill out web page forms that ask for your name, address, phone number, or even username and password.
To enable AutoFill, touch the AutoFill tab in the Safari Settings. To use AutoFill to input your contact information, move the slider next to Use Contact Info to the On position.
To have AutoFill fill in names and passwords, move the slider next to Names and Passwords to On.
To set the correct Contact Info, touch the My Info tab and your contact list will be displayed. Choose your own contact information, as shown in Figure 11-10.

Figure 11-10. Setting up My Info in AutoFill
Once AutoFill is enabled, just go to any web page that has a field to fill out. As soon as you touch the field, the keyboard will come up at the bottom of the screen. At the top of the keyboard, you will see a small button that says AutoFill. Touch it and the web form should be filled out automatically (Figure 11-11).
CAUTION: Setting your name and password to be entered automatically means that anyone who picks up your iPad will be able to access your personal sites and information.

Figure 11-11. Using Auto Fill to automatically enter an email address and password
Saving or Copying Text and Graphics from a Web Site
From time to time you may see text or a graphic you want to copy from a web site. We tell you briefly how to do this in this section, but to see graphically how to get it done, including using the Cut and Paste functions, please see the "Copy and Paste" section in Chapter 2. Here's a quick look:
To copy a single word, touch and hold the word until you see it highlighted and the Copy button appears. Then tap Copy.
To copy a few words or entire paragraph, touch and hold a word until it is highlighted. Then drag the blue dots left or right to select more text. You can flick up or down to select an entire paragraph. Then tap Copy.
TIP: Selecting a single word puts it in Word Selection mode where you can drag to increase or decrease the number of words selected. If you go past a single paragraph, it will typically switch to Element Selection mode where instead of corners you get edges that you can drag out to select multiple paragraphs, images, etc.
To Save or Copy a graphic, touch and hold the picture or image until you see the pop-up asking if you would like to Save or Copy the image.
Using Browsing History to Save Time and Find Sites
The advantage of keeping your frequently visited sites in history is that you can load them from the History tab when you go into the browser menu (see Figure 11-12). Also, sometimes you want to go back to a certain site, but you can't remember the name; checking your history will show you the exact site you wish to visit.

Figure 11-12. Using Browser History