
Chapter 3
Sync Your iPad with iTunes
In this chapter we will show you the steps to get set up to synchronize information between your iPad and your Windows or Mac computer. Besides syncing, iTunes can do so much more, like organize your music, create playlists, buy songs, videos; it also has Home Sharing and Genius features. To learn about these features, please check out Chapter 29.
NOTE: If you do not maintain a calendar or contact list on your computer or elsewhere, nor have any photos, videos, music, audiobooks or pictures on your computer, you still need to connect your iPad to iTunes on your computer to at minimum backup your iPad as well as perform software updates when they become available.
We will also show you what to consider before you sync, how to set up the automatic sync of your personal information, and how to manually transfer information. With iTunes, you can sync or transfer contacts, calendar, notes, apps, music, videos, documents, and picture libraries. iTunes also has the added benefit that it automatically will backup your iPad whenever you connect it to your computer. We even show you a few simple troubleshooting tips if things are not working quite right. Finally, we show you how to check for updates and install updated operating system software for your iPad.
TIP: If you are new to iTunes, we strongly recommend you check out Chapter 29, “Your iTunes User Guide,” to help you get the most out of iTunes.
Before You Set Up Your iTunes Sync
There are a few things you need before you can start syncing using iTunes. We cover the prerequisites and answer a few common questions about the reasons to use iTunes. We also help you understand what happens if you own another Apple device, such as an iPhone or iPod, and start syncing with your iPad.
Prerequisites Before You Sync
There are just a few things you need before you start syncing your iPad with iTunes.
- Make sure you have the latest version of iTunes installed on your computer. For how to install or update iTunes, see Chapter 29: “Your iTunes User Guide.”
- Create an iTunes account (Apple ID); see the “Create iTunes Account” section in Chapter 29.
- Get the white sync cable that came with your iPad. One end plugs into the dock port in the bottom of your iPad near the Home button and the other plugs into the USB port on your computer.
Can I Sync iTunes with Another iPhone, iPod touch, or iPod and My iPad?
Yes! As long as you are syncing to the same computer, you can sync many Apple devices (Apple says up to five, but we have heard of people syncing more) to the same iTunes account on a single computer.
CAUTION: You can't sync the same iPad, iPhone, or iPod to two different computers. When you attempt to do this, you will see a message similar to this: “Would you like to wipe this device (iPad, iPhone, iPod) and re-sync the new library?” If you select Yes, then all the music and videos on the device will be erased.
Other Sync Options: MobileMe and Exchange/Google
There are other ways to synchronize your personal information and email, such as Exchange/Google and MobileMe, which we cover in Chapter 4: “Other Sync Methods.” Keep in mind, however, that even if you choose to go with these other ways to sync, you will still need to use iTunes to
- Backup and restore your iPad.
- Update the iPad operating system software.
- Sync and manage your applications, also known as “apps.”
- Sync your music library and playlists.
- Sync movies, TV shows, podcasts, and iTunes U content.
- Sync books.
- Sync photos.
Considering Other Sync Options
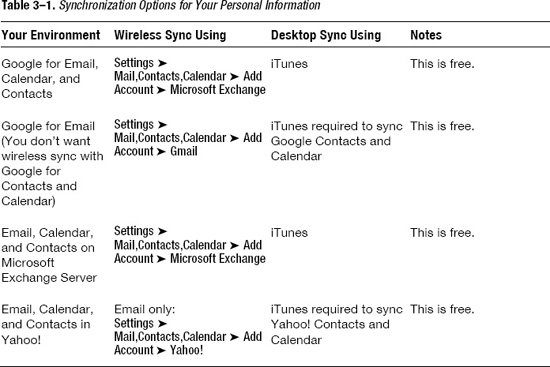
Table 3–1 summarizes your other synchronization options. What you choose to use for synchronization should be driven by where you currently store your email, contacts, and calendar—your environment.
NOTE: As you can see in Table 3–1, with some environments you can wirelessly sync your contacts and calendars to your iPad.
Setup Your iTunes Sync
We show you all the steps to perform both automated syncs and manual transfers of information to your iPad using iTunes.
The iPad Summary Screen
Once you connect your iPad to your computer, you can see important information, like your iPad's memory capacity in GB, installed software version, and serial number. You can also check for updates to the software version or restore data to your iPad. There are several other options that are available on this screen.
Get a feel for the left nav bar. Click on various items in this left nav bar and notice that the main display window changes (see Figure 3–1).
The top nav bar inside the main window also changes based on what you have selected in the left nav bar.
For example, when you click on your iPad in the left nav bar, you will see tabs across the top of the main window that show information related to your device.
When you click on the iTunes store in the left nav bar, you see tabs related to the store in the main window.
To see the iPadSummary screen:
- Start up iTunes software on your computer.
- Connect your iPad to your computer with the white USB cable supplied with the device. Plug one end into the bottom of the iPad near the Home button and plug the other end into a USB port on your computer.
- If you have successfully connected your iPad, you should see your iPad listed under DEVICES in the left nav bar.
- Click on your iPad in the left nav bar, then click on the Summary tab on the left edge of the main window (see Figure 3–1).
- If you want to be able to drag and drop music and videos onto your iPad, you need to check the box next to Manually manage music and videos.
- If you want to have iTunes open and sync your iPad automatically whenever you connect it to your computer, check the Open iTunes when this iPad is connected box.
NOTE: You may see the text and checkbox next to Open iTunes when this iPad is connected in the Options area on this Summary screen grayed out (not-clickable). This is because of a setting in the iTunes Edit Preferences ![]() Device tab screen, the checkbox next to Prevent iPods, iPhones and iPads from syncing automatically has been checked. If you uncheck this box in the Preferences
Device tab screen, the checkbox next to Prevent iPods, iPhones and iPads from syncing automatically has been checked. If you uncheck this box in the Preferences ![]() Device tab, then you can make the Open iTunes when this iPad is connected a clickable item again.
Device tab, then you can make the Open iTunes when this iPad is connected a clickable item again.
![]()
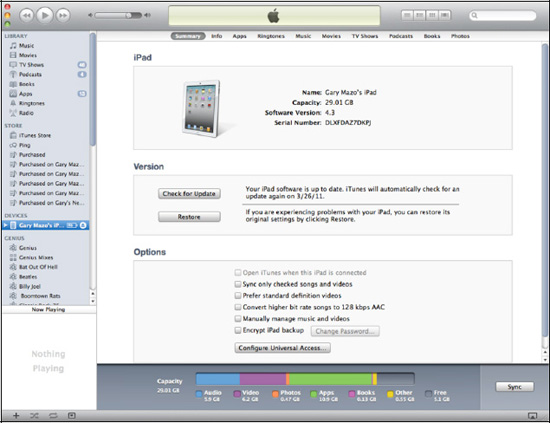
Figure 3–1. The iPad summary screen in iTunes
iTunes Navigation Basics
Get a feel for the left nav bar. Click various items in this left nav bar and note that the main display window changes.
The top nav bar inside the main window also changes based on what you have selected in the left nav bar. For example, when you click your iPad in the left nav bar, you'll see tabs across the top of the main window that show information related to your device. When you click the iTunes store in the left nav bar, you see tabs related to the store in the main window.
Getting to the Sync Setup Screen (Info Tab)
Your first step is to get to the setup screen for syncing your contacts, calendar, email, and so forth. You follow the same steps described previously for getting to the Summary screen, except now you click the Info tab at the top to see the Contacts (and other sync settings) in the main iTunes window.
Sync Your Contacts and Calendars
Let's start by setting up syncing of your contacts and calendars.
- Check the Sync Contacts with boxand adjust the pull-down menu to the software or service where your contacts are stored. At publication time, on a Windows computer these are Outlook, Google Contacts, Windows Contacts, and Yahoo! Address Book. See Figure 3–2. You can also select All contacts or Selected groups.
- To sync Calendars, check the Sync Calendars with box and adjust the drop-down list to match the software where you store your calendar on your computer, as shown in Figure 3–2. You may also select All calendars or Selected calendars.

Figure 3–2. Selecting software for syncing contacts (Windows)
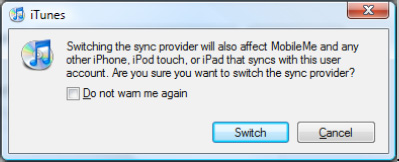
CAUTION: Whenever you switch between software and services in these Sync Settings screens (called the sync provider), it affects every one of the mobile devices connected to your iTunes account. For example, if you sync contacts to your iPhone or iPod touch (in addition to your iPad), these changes will also affect MobileMe. You will be changing the way contacts sync for any other devices connected to your iTunes account.
Google and Yahoo! Sync
If you select Google or Yahoo! sync, you'll be prompted to enter your Google ID or Yahoo! ID and password.
NOTE: The options you see in this and other drop-down boxes on the Info tab will vary slightly depending on the software installed on your computer. For example, on a Mac, the contacts sync does not have a drop-down list; instead the other services, such as Google Contacts and Yahoo!, are shown as separate check boxes.
To continue setting up your email accounts, bookmarks, and more, scroll down the page. If you don't want to set anything else up for syncing, click the Apply button in the lower-right corner of the iTunes screen to start the sync.
TIP: If you're a Mac user who uses Microsoft Entourage, you'll need to enable Entourage to sync with iCal. To do this, go into the Preferences settings in Entourage, then go to Sync Services and check the boxes for synchronizing with iCal and Address book, as shown in Figure 3–3. If you are a user of Office for Mac 2011, you will need to install SP1 (Service Pack 1) to allow syncing to your iPad through iTunes. As of writing this book, the SP1 update had not yet been released. Based on Microsoft's Office for Mac website, you should be able to use Apple Sync Services to sync Outlook calendar, contacts, notes and tasks.
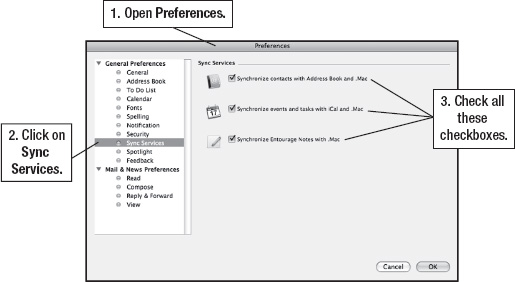
Figure 3–3. Microsoft Entourage and Outlook settings (Apple Mac)
Syncing Email Accounts, Browser Bookmarks, and Notes
Scroll down the page to sync email account settings, browser bookmarks, and notes.
NOTE: After syncing the email account settings to your iPad, you'll still have to enter your password for each email account in the Settings ![]() Mail, Contacts, Calendars for each email account. You have to do this only once on your iPad for each account.
Mail, Contacts, Calendars for each email account. You have to do this only once on your iPad for each account.
- Scroll down below the Calendar settings on the same Info tab in iTunes to see the Mail account settings.
- Check the Sync Mail Accounts from box and adjust the pull-down menu to the software or service that stores your email (Figure 3–4). This might be Outlook on a Windows computer or Entourage or Mail on a Mac.
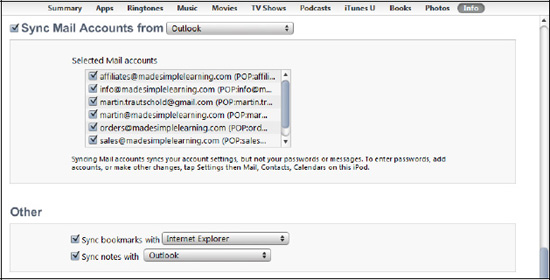
Figure 3–4. Settingupemail accounts, browser bookmarks, and notes to sync
NOTE:As of publication time, iTunes supports only two web browsers for sync: Microsoft Internet Explorer and Apple Safari. If you use Mozilla Firefox or Google Chrome, you can still sync your bookmarks, but you'll have to install free bookmark sync software (such as xmarks from
www.xmarks.com) to sync from Firefox or Chrome to Safari or Explorer. Then you can sync your browser bookmarks in a two-step process. The Firefox Homeapp is a nice option to sync bookmarks for Firefox users (visithttp://itunes.apple.com/ca/app/firefox-home/id380366933?mt=8) - To sync your browser bookmarks, check the Sync bookmarks with box and adjust the pull-down menu to the web browser you use (see Figure 3–4). At this time, you can select only Internet Explorer or Safari.
- To sync your notes, check the Sync notes with box and select the software or service where your notes are stored.
- Click the Apply button in the lower-right corner of the iTunes screen to start the sync.
NOTE: Depending on how much information (especially contacts and calendar information) you have, the initial sync could take 15 minutes or more.
Syncing Your iPad with iTunes
The syncing is normally automatic when you plug in your iPad to your computer's USB port. The only exception is if you have disabled the automatic sync.
Keeping Track of the Sync
At the top of iTunes, inside the Status window, you can see what is happening with the sync. You may see Syncing contacts with [your name here]'s iPad or Syncing calendars with [your name here]'s iPad, which lets you see what is currently being synced.
Handling Sync Conflicts
Sometimes, the iTunes sync will detect conflicts between the data in your computer and on your iPad, such as the same contact entry with two different company names, or the same calendar entry with two different notes. Handling these conflicts is fairly straightforward.
- In the Conflict Resolver window, click the information that is correct. This turns the background a light blue, while the side not selected is white. See Figure 3–5.
- If there are any more conflicts, click the Next button until you finish resolving all conflicts.
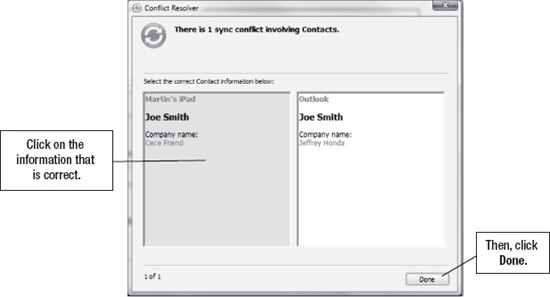
Figure 3–5. iTunes sync Conflict Resolver
- Click Done to close the window.
- All your selections will be applied to the next sync with your iPad. You are given the choice to Sync Now or Sync Later.
NOTE: Conflicts can cause the sync to stop in mid-process. Contacts are synced first, then the Calendar. So if a Contacts sync conflict is found, the Calendar will not sync until the Contacts conflict is resolved. Make sure to resync your iPad after you resolve conflicts to complete the sync.
Cancelling a Sync in Progress
You can cancel a sync from iTunes or from your iPad.
To cancel the sync from iTunes on your computer:
Click the X inside the sync status window, as shown in Figure 3–6.
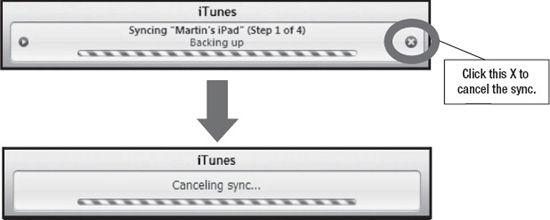
Figure 3–6. Clicking the X in the status window in iTunes to cancel the sync
To cancel the sync from the iPad:
Slide the slider bar at the bottom of the screen that says Slideto Cancel. This is in the same place as the normal Slide to Unlock message.
Why Would YouNot Want iTunes to Automatically Sync?
There could be a few reasons to syncmanually instead of automatically:
- You don't want to fill up your iPad with too many music and video files.
- The sync and backup process takes a long time, so you don't want it to happen every time you connect your iPad to your computer.
- You plug your iPad into various computers to charge it up, but don't want to be asked if you want to erase and resync your music every time.
NOTE: If you want to drag and drop music and videos, you need to make sure to check the Manually manage music and videos box in the Summary tab in iTunes.
Manually Stopping the Auto Sync Before It Starts
There may be times you want to connect your iPad to your computer without the auto sync starting up. This could be because you don't have much time and want to quickly drag and drop a few new songs to your iPad without syncing everything else.
To stop the normal auto sync of your iPad, you can press certain keys on your computer keyboard while connecting your iPad to your computer.
On a Windows PC:
Press and hold Shift + Ctrl while connecting your iPad to your computer.
On a Mac:
Press and holdCommand + Option while connecting your iPad.
Turning Off the Auto Sync Permanently
You can turn off the auto sync permanently in iTunes. You might want to do this if you prefer to have manual control over all the sync processes.
CAUTION: Turning off the auto sync also disables the automatic backup of your iPad every time you connect it to your computer. This setting is best for a secondary computer, which you might use to charge your iPad but would never want to sync.
To turn off the auto sync in iTunes, follow these steps:
- From the iTunes menu, select Edit and then Preferences.
- Click the Devices tab at the top.
- Check the Prevent iPods, iPhones, and iPads from syncing automatically box (see Figure 3–7).
- Click the OK button to save your settings.
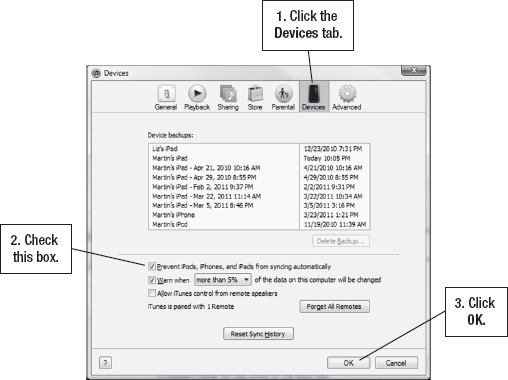
Figure 3–7. Disabling auto sync in iTunes
Getting a Clean Start with the Sync
Sometimes you'll have issues with the sync and just need to get a fresh start. There are a few things you can do in this regard with iTunes: you can erase or reset the sync history so iTunes thinks it is syncing for the first time with your iPad, and you can force all information on the iPad to be replaced with information from your computer.
Resetting Sync History (Make iTunes Think It Is Syncing for the First Time)
To reset your sync history in iTunes, follow these steps:
- Select the Edit menu and then click Preferences.
- Click the Devices tab at the top of the iTunes Preferences window.
- Click the Reset Sync History button at the bottom, as shown in Figure 3–8.
- Confirm your selection by clicking Reset Sync History in the pop-up window.
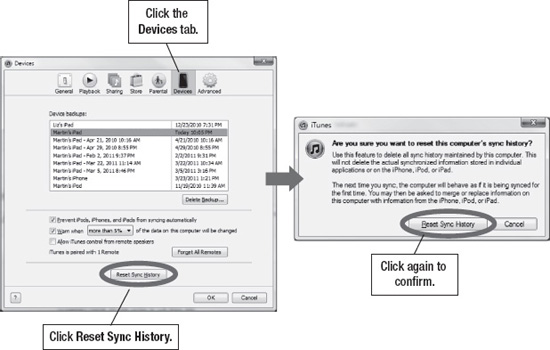
Figure 3–8. Resetting sync history in iTunes
Replacing All Information on the iPad (Next Sync Only)
Sometimes you may need to get a fresh start with your iPad information. For whatever reason, you want to get rid of all the information on your iPad in one or all the synced apps and just start over. Follow these steps:
- As you did to set up the sync previously, connect your iPad to your computer, start iTunes, click your iPad in the left nav bar, and click the Info tab at the top of the main window.
- Scroll all the way down to the Advanced section (see Figure 3–9).
- Check one, some, or all of the boxes as you desire.
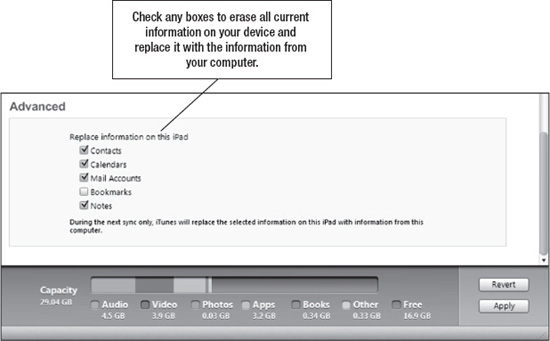
Figure 3–9. IntheAdvanced area, select the information you want to replace.
- When you are ready, click the Apply button in the lower-right corner. The sync should happen immediately. All of the information for the apps you have checked will be erased from the iPad and replaced with the information from your computer.
Apps: Syncing and Managing Them
With iTunes, you can sync and manage your apps on your iPad. It's easy to drag and drop your app icons around on a particular Home screen page or even between pages on your iPad.
Syncing Apps in iTunes
Follow these steps to sync and manage apps:
- As you did to set up the sync previously, connect your iPad to your computer, start iTunes, and click your iPad in the left nav bar.
- Click the Apps tab on the top of the main window.
- Check the Sync Apps box to see all apps stored on your iPad and your Home screens, as shown in Figure 3–10.
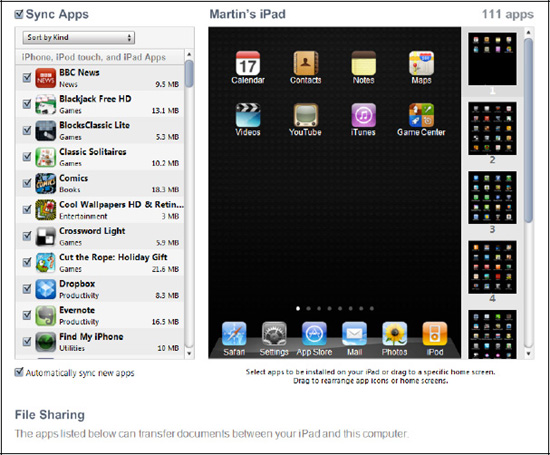
Figure 3–10. Sync Apps screen in iTunes
Moving Apps, Working with Folders, or Deleting App Icons
It is easy to move around and organize your application icons in this screen in iTunes.
To move an app within a screen: Click it and drag it around the screen.
To move an app between Home screen pages: Click and drag it to the new page in the right column. The new page expands; drop it on the new page.
To dock an app on the bottom dock : Remove one icon if there are already six icons. Then click and drag the icon to the dock.
Removing and Reinstalling Apps
To remove an app from your iPad, simply uncheck the box next to it and confirm your selection, as shown in Figure 3–11. Don't worry—since you are syncing apps to your computer in iTunes, you still have a copy of the app inside iTunes.
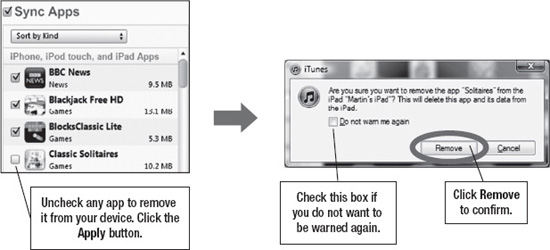
Figure 3–11. Unchecking an app to delete it from your iPad
TIP: Even if you delete an app from your iPad, if you have chosen to sync apps as shown, you can still reinstall that app by rechecking the box next to it. The app will be reloaded onto your iPad during the next sync.
Getting Downloaded Items into iTunes to Sync Them
If you buy or download content from the iBookstore, iTunes store, or App Store within iTunes, it automatically appears in your own iTunes library. But how do you get content that you have downloaded from the Web into iTunes? (It does not automatically appear in iTunes.) What happens if something you downloaded is compressed in a .zip file, like an audiobooks? In this section, we help you understand the basic steps of downloading content from the Web to your computer and then getting it into iTunes so you can sync it to your iPad.
TIP: You can also find great audiobooks (both free and paid) from Audible.com.
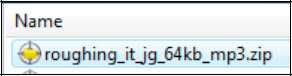
Step 1: Download the content to your computer
Go to the web site where you want to download content. In this case, we want a free audiobook from Click the link Zip file of the entire book in the left column of links. (This 488 MB file will take you between 15 minutes and 4 hours to download depending on the speed of your Internet connection.) |
 |
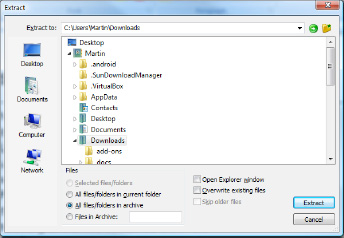
Step 2: Unzip the file, if necessary
| Next, locate the file you just downloaded. It will usually be in your Downloads folder. Unzip or uncompress all the files. |  |
|
This unzipping process will vary depending on what software you have installed on your PC or Mac. However, it usually involves double-clicking to open the zip file. Then select Unzip, Unzip All, Extract, or Extract All. Most often, all these files will be unzipped either directly into the Downloads folder, or a folder within the Downloads folder with the name of the zip file. |
 |
Step 3: Drag and drop the content into iTunes
Next, locate the files you extracted and highlight them all. You can select all files in a list by holding the Shift key on your computer keyboard and clicking the top file and then the bottom file in the list. Then, drag the entire highlighted list over to iTunes and drop it on your library in the top of the left column. You can also use the File |
 |
Step 4: Select content to sync to your device
Use the steps shown in the sections later in this chapter to sync the downloaded content to your iPad.
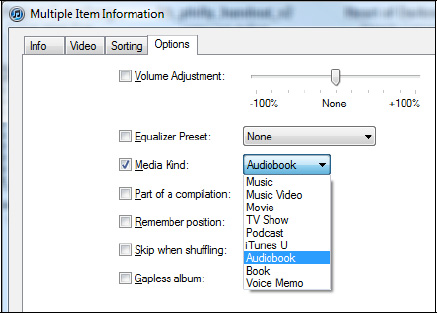
How to make sure an Audiobook shows up as an Audiobook (not music)
TIP: some audiobook files appear in your Music Library. Here's how to correct this. If you downloaded a free audiobook from Librivox.org, then the audiobook will probably appear in your Music library, but you can change this. In order to put the files into the correct Audiobook library, perform the steps listed below.
|
 |
File Sharing (File Transfer) Between Your iPad and Your Computer
As long as you have an app installed that works with files, such as GoodReader or Stanza, you can use iTunes to transfer files between your computer and your iPad. You perform this file transfer using the bottom of the Apps tab in iTunes—below all the application icon screens.
TIP: Some apps, such as GoodReader, come with wireless methods for transferring and sharing files. Check out the GoodReader section in Chapter 27: “New Media: Reading Newspapers, Magazines, and More” for more information.
Copying Files from Your Computer to Your iPad
To copy files from your computer to your iPad, follow these steps:
- As you did to set up the previous sync, connect your iPad to your computer, start iTunes, and click your iPad in the left nav bar.
- Click the Apps tab on the top of the main window.
- Scroll down to the File Sharing section below the apps, as shown in Figure 3–12.
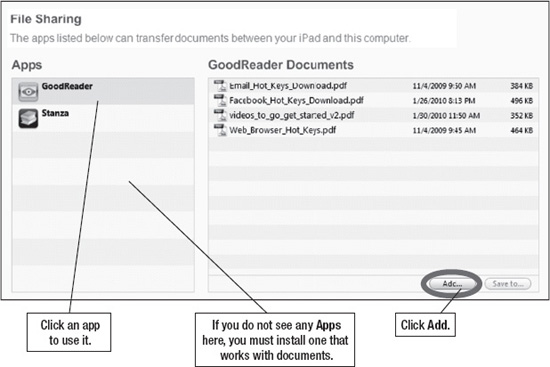
Figure 3–12. Transferring files to your iPad
- Click any app in the left column, and then click the Add button in the lower-right corner.
- A window will pop up. Select a file to transfer and click the Open button. The file will be transferred immediately to your iPad.
Copying Files from Your iPad to Your Computer
To copy files from your iPad to your computer, follow these steps:
- Connect your iPad to your computer, start iTunes, and click your iPad in the left nav bar.
- Click the Apps tab at the top of the main window.
- Scroll down to the File Sharing section below the apps (see Figure 3–13).
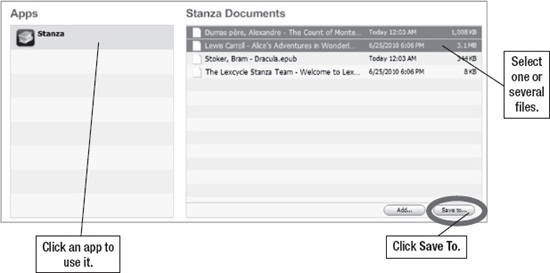
Figure 3–13. Transferring files from your iPad
- Click any app from which you want to transfer the files in the left column.
- Select one or several files using any of these methods:
- Click a single file.
- Hold the Control key (Windows) or Option key (Mac) and click any number of files.
- Hold the Shift key and click the top and bottom file in a list to select all files in that list.
- After the file(s) are selected, click the Save To button in the lower-right corner.
- A window will pop up asking you to select a folder on your computer to receive the files from your iPad. Locate and click the folder, and then click the Select Folder button. The file(s) will be transferred immediately to your computer.
Syncing Media and More
Now let's look at how to set up an automatic sync for music, movies, iBooks, iTunes U content, and more.
CAUTION: Make sure you're logged into iTunes with the same iTunes account you want to use on your iPad, as Digital Rights Management (DRM)–protected content (music, videos, and more) won't sync unless both accounts match. You can logout and log in to iTunes on both your desktop and your iPad to make sure you are logged into the right accounts.
Keeping an Eye on Capacity (Available Space)
As you begin to select ringtones, music, videos, books, podcasts, and more to sync, you will want to keep an eye on the capacity bar at the bottom of each of the iTunes sync screens. If you see that you are nearing or exceeding capacity with any of your selections, you know you need to make a few adjustments. Sometimes you just can't take it all with you! Figure 3–14 shows that we currently have 15.6 GB (gigabytes) free on our iPad for more content—so we have plenty of free space.

Figure 3–14. Watch the free space available as you make sync selections in iTunes
Syncing Ringtones
When you click the Ringtones tab, you can choose to sync your entire ringtone library or selected items. Ringtones are used for FaceTime calls on the iPad.
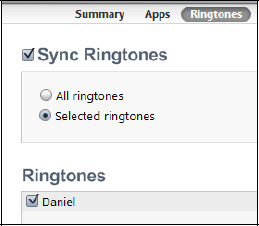
TIP: Learn how to assign ringtones to your contacts, purchase custom ringtones, and create your own ringtones from your music in Chapter 18: “FaceTime Video Messaging and Skype.”
Syncing Music
When you click the Music tab, you can choose to sync your entire music library or selected items.
CAUTION: If you have manually transferred some music, music videos, or voice memos to your iPad already, you'll receive a warning message that all existing content on your iPad will be removed and replaced with the selected music library from your computer.
To sync music from your computer to your iPad, follow these steps:
- Connect your iPad to your computer, start iTunes, and click your iPad in the left nav bar.
- Click the Music tab on the top of the main window.
- Check the Sync Music box (see Figure 3–15).
- Click next to Entire music library only if you are sure your music library will not be too large for your iPad.
- Click next to Selected playlists, artists, and genres if you are unsure whether your music library is too large, or if you want to sync only specific playlists or artists.
- You can choose whether to include music videos and voice memos by checking those boxes.
- You can also automatically fill free space with songs.
CAUTION: We don't recommend checking this option because it will take up all the space in your iPad and leave no room for all those cool apps!
- Now check off any of the playlists or artists in the two columns on the bottom of the screen. You can even use the search box at the top of the Artists column to search for particular artists.
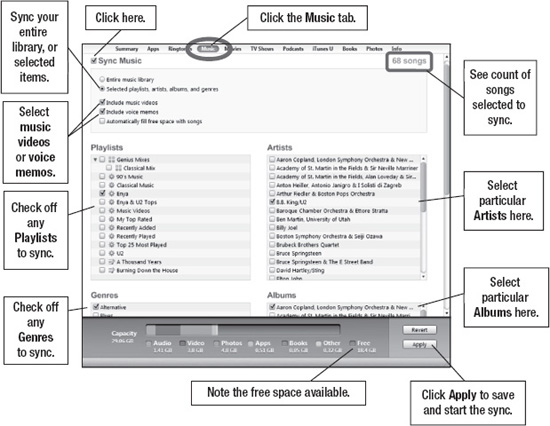
Figure 3–15. Syncing music with your iPad
Syncing Movies
When you click the Movies tab, you can choose to sync specific, recent, or unwatched movies, or all of them.
To sync movies from your computer to your iPad, follow these steps:
- Connect your iPad to your computer, start iTunes, and click your iPad in the left nav bar.
- Click the Movies tab on the top of the main window.
- Check the Sync Movies box (see Figure 3–16).
- If you'd like to sync recent or unwatched movies, check the Automatically include box and use the pull-down to select All, 1 most recent, All unwatched, 5 most recent unwatched, etc.
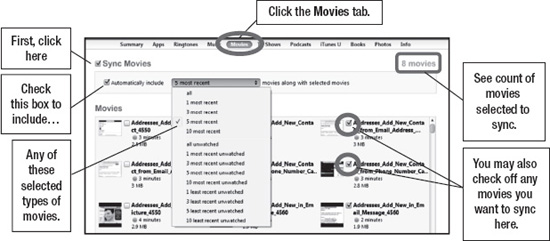
Figure 3–16. Configuring movie sync to automatically include selections
- If you selected any item besides All, you have the choice to sync specific movies or videos to your iPad. Simply check the boxes next to the movies you want to include in the sync.
Syncing TV Shows
When you click the TV Shows tab, you can choose to sync specific, recent, or unwatched TV shows, or all of them.
To sync TV shows from your computer to your iPad, follow these steps:
- Connect your iPad to your computer, start iTunes, and click your iPad in the left nav bar.
- Click the TV Shows tab on the top of the main window.
- Check the Sync TV Shows box (see Figure 3–17).
- If you'd like to sync recent or unwatched TV shows, check the Automatically include box and use the pull-down to select All, 1 newest, All unwatched, 5 oldest unwatched, 10 newest unwatched, etc.

Figure 3–17. Configuring TV showsync to automatically include selections
- Choose all Shows or selected Shows next to episodes of.
- If you choose SelectedShows, you can choose individual shows and even individual episodes in the two sections in the middle of the screen.
- If you have playlists of TV shows, you can select those for inclusion by checking the boxes in the bottom section of the screen.
Syncing Podcasts
When you click the Podcasts tab, you can choose to sync specific, recent, or unplayed podcasts, or all of them.
TIP: Podcasts are audio or video shows that are usually regularly scheduled (e.g., daily, weekly, or monthly). Most are free to subscribe to in the iTunes store. When you subscribe and set up the auto sync as shown in this section, you'll receive all your favorite podcasts on your iPad.
Many of your favorite radio shows are recorded and broadcast as podcasts. We encourage you to check out the Podcast section of the iTunes store to see what might interest you. You'll find podcasts of movie reviews, news shows, law school test reviews, game shows, old radio shows, educational content, and much more.
To sync podcasts from your computer to your iPad, follow these steps.
- Connect your iPad to your computer, start iTunes, and click your iPad in the left nav bar.
- Click the Podcasts tab on the top of the main window.
- Check the Sync Podcasts box (see Figure 3–18).
- If you'd like to sync recent or unplayed podcasts, check the Automatically include box and use the pull-down to select All, 1 newest, All unplayed, 5 newest, 10 most recent unplayed, etc.
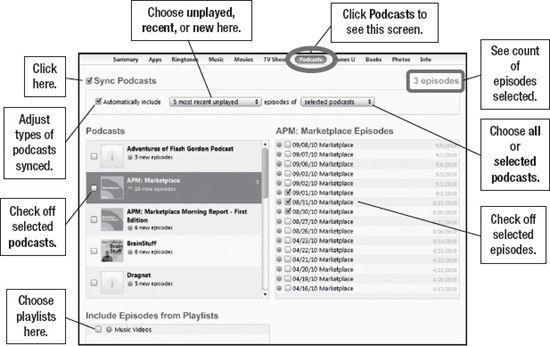
Figure 3–18. Configuring podcast sync to automatically include selections
- Choose All Podcasts or Selected Podcasts next to episodes of.
- If you choose SelectedPodcasts, you can choose individual podcasts and even individual episodes in the two sections in the middle of the screen.
- If you have playlists of podcasts, you can select those for inclusion by checking the boxes in the bottom section of the screen.
TIP: After you sync these podcasts, you can enjoy them in the Podcasts section of the Music app on your device.
Syncing iTunes U
When you click the iTunes U tab, you can choose to sync specific, recent, or unplayed iTunes U content, or all content.
TIP: iTunes U podcasts are similar to other audio or video podcasts, except that they focus on educational content and are mostly produced by colleges and universities. Most are free to subscribe to in the iTunes store. When you subscribe and set up the auto sync as shown in this section, you'll receive all your favorite iTunes U podcasts on your iPad.
Be sure to check out the iTunes U section in the iTunes store. You may find your favorite college or university has shows to teach you biology, astronomy, or a whole lot more. There's even a Stanford University course on how to develop iPad apps! Many of the top universities broadcast class lectures from famous professors in iTunes U. Go ahead and check it out—what you'll find is amazing!
To sync iTunes U content from your computer to your iPad, follow these steps.
- Connect your iPad to your computer, start iTunes, and click your iPad in the left nav bar.
- Click the iTunes U tab on the top of the main window.
- Check the SynciTunes U box (see Figure 3–19).
- If you'd like to sync recent or unplayed items, check the Automatically include box and use the pull-down to select All, 1 newest, All unplayed, 5 newest, 10 most recent unplayed, etc.

Figure 3–19. Configuring iTunes Usync to automatically include selections
- Choose All Collections or Selected Collections next to items of.
- If you choose SelectedCollections, you can choose individual collections and even individual items in the two sections in the middle of the screen.
- If you have playlists of iTunes U podcasts, you can select those for inclusion by checking the boxes in the bottom section of the screen under Include Items from Playlists.
Syncing iBooks, PDF files, and Audiobooks
When you click the Books tab, you can choose to sync all or selected books and audiobooks.
TIP: Books on the iPad are electronic versions of their paper cousins. They are in a specific electronic format called ePub. You can buy them in the iBookstore on the iPad or acquire them from other locations and sync them to your iPad using the steps described here. Books you acquire elsewhere must be unprotected or “DRM-free” in order to sync them to your iPad. You read these books in the iBooks app or in other book reader apps on your iPad. See Chapter 12: “iBooks and E-Books” to learn more.
To sync books, PDF files, or audiobooks between your computer and your iPad, follow these steps:
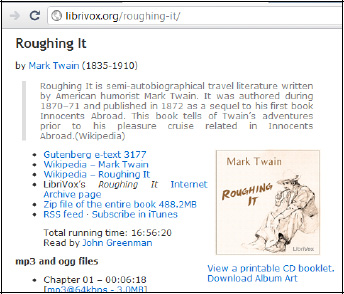
TIP: You can find free iBooks to download by doing a search for “project gutenberg” in the iBookstore. You can find free audiobooks to download by going to http://librivox.org from your computer web browser and downloading public domain audiobooks. (These free audiobooks are typically not read by professional actors but by volunteers, so the quality may vary.) See the section “Getting Downloaded Items into iTunes to Sync Them” in this chapter to see exactly how to download and sync free audiobooks.
- Connect your iPad to your computer, start iTunes, and click your iPad in the left nav bar.
- Click the Books tab on the top of the main window.
- Check the Sync Books and Sync Audiobooks boxes (see Figure 3–20).
- If you'd like to sync all books, leave the default All books selection.
- Otherwise, choose Selected books and make your choices by checking specific books in the window.
TIP: In order to sync iBooks, PDF files, and other similar documents to your iPad, you need to first drag and drop your file from your computer into your iTunes library. Grab the file from any folder on your computer, and drag and drop it right on your library in the upper left column in iTunes.
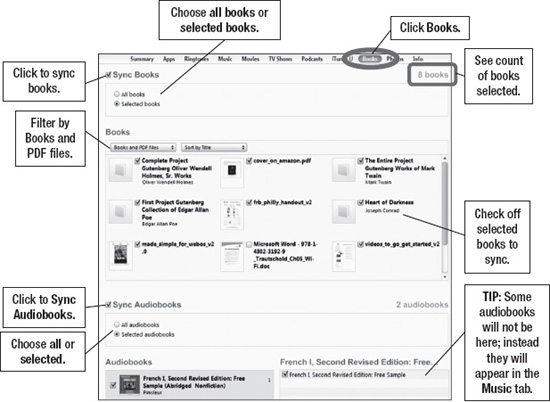
Figure 3–20. Configuring books and audiobooks sync to automatically include selections
- If you would like to sync all audiobooks, leave the default All audiobooks selection.
- Otherwise, choose Selected audiobooks and make your choices by checking off specific audiobooks in the window below this selection item.
TIP: After you sync these books, you can enjoy them in the iBooks app on your device. You can listen to audiobooks in the iPod app, where the Audiobooks tab is on the left side.
NOTE: Audiobooks from Audible require that you first authorize your computer with your Audible account before you can sync them to your iPad from your computer.
Syncing Photos
When you click the Photos tab, you can choose to sync photos from all folders or selected folders and you can even include videos.
TIP: You can create a beautiful electronic picture frame and share your photos on the stunning iPad screen (see Chapter: 16 “iPad Photography”). You can even use your photos to set the background wallpaper and screen-lock wallpaper (see Chapter 7: “Personalize and Secure Your iPad” for more information).
To sync photos from your computer to your iPad, follow these steps:
- Connect your iPad to your computer, start iTunes, and click your iPad in the left nav bar.
TIP: Mac users can also sync photos using iPhoto orAperture, including Events (time-based sync), Faces (person-based sync), and Places (location-based sync).
- Click the Photos tab on the top of the main window.
- Check the Sync Photos from box (see Figure 3–21).
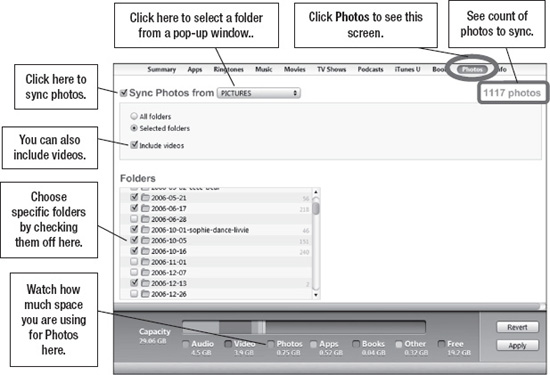
Figure 3–21. Configuring photo sync to automatically include selections
- Click the pull-down menu next to Sync Photos from and select a folder where your photos are stored. If you want to grab all your photos, go to the highest folder level possible (e.g., C: on your Windows computer or “/ ” on your Apple Mac).
- If you'd like to sync all photos from the selected folder on your computer, select All folders, shown inFigure 3–21.
CAUTION: Because your photo library on your computer may be too large to fit on your iPad, be careful about checking All folders.
- Otherwise, choose Selected folders and make your choices by checking specific folders in the window below, as shown in Figure 3–21.
- You can also include any videos in the folders by checking the Include videos box, as shown in Figure 3–21.
- When you are done choosing your photos to sync, click the Apply button to save your settings and start the sync.
- When the sync starts, you'll see the status in the middle-top status window in iTunes.
How to Know What Is New or Unplayed in iTunes
You may notice little numbers next to items in the left nav bar of iTunes (see Figure 3–22). There are similar little blue numbers in the upper-right corner of items in the main window. These numbers show how many items are unplayed, unwatched, or, in the case of apps, require updates.
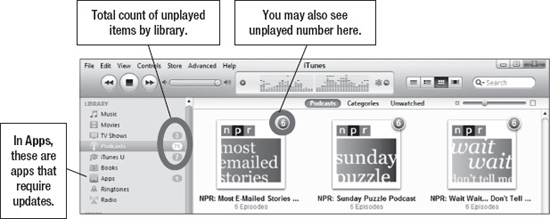
Figure 3–22. Quickly seeing the number of unplayed items
Manually Transferring Music, Movies, Podcasts, and More on Your iPad (Drag-and-Drop Method)
The Auto Sync sections showed you how to automatically sync content to your iPad. Here you'll learn how to manually transfer songs, videos, books, audiobooks, and more. The process is the same for all types of content, so we'll show you how to do it for just one type.
TIP: Use these same drag-and-drop techniques to add items to a playlist.
To manually transfer content from your computer to your iPad, follow these steps:
NOTE: Be sure to check Manually manage music and videos on the Summary tab in iTunes before you try to drag and drop music or videos. If you've chosen to automatically sync content (e.g., music, movies, podcasts, etc.), you won't be able to use this drag-and-drop method to copy items to your iPad.
- Connect your iPad to your computer, and start iTunes.
- In the left nav bar, click your iPad. Then click the Summary tab at the top. Near the bottom of the screen, make sure the Manually manage music and videos box is checked. You may see a warning message if you have previously synced music or videos to your iPad, saying that all previously synced music and videos will be replaced with your iTunes library. This is OK.

- In the left nav bar, under the LIBRARY heading, click the type of content (Music, Movies, TV Shows, Podcasts, iTunes U, etc.) you'd like to transfer.
- In the main window, you'll see your library of content. It's usually easiest to select List View from the top of iTunes, as shown in Figure 3–23. This allows you to see all the content in a list and easily select a single item or group of items.
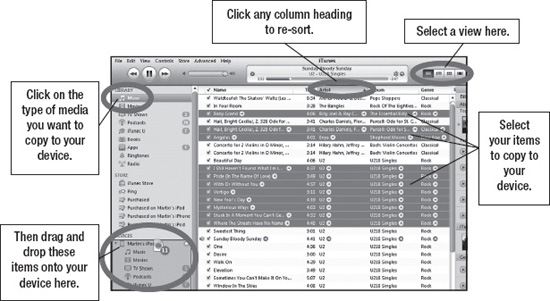
Figure 3–23. Selecting media to drag and drop onto your device
- Here is how to select content individually, in a list or separated:
- To select an individual item, simply click it to highlight it.

- To select items that are not in a continuous list, Windows users press and hold the Control key while clicking items, and Mac users press and hold the Command key while clicking items.

- To select items in a continuous list, press and hold the Shift key while clicking first the top item and then the bottom item in the list. All the items in between will be selected.
- To select an individual item, simply click it to highlight it.
- Then, to copy these items to your iPad, simply click and drag the selected item(s) over to your iPad and let go of the mouse button. All selected items will then be copied to your iPad in the left column under DEVICES.
Troubleshooting iTunes and the Sync
Sometimes iTunes does not behave exactly as you'd expect it to, so here are a few simple troubleshooting tips.
Check Out the Apple Knowledgebase for Helpful Articles
The first step when you're having a problem is to check out Apple's support pages, where you'll find lots of helpful information. On your iPad or computer's web browser, go to this web page and click a topic or device for help:
http://www.apple.com/support/ipad/
iTunes Locked Up and Will Not Respond (Windows Computer)
- Bring up the WindowsTask Manager by simultaneously pressing the Ctrl + Alt + Del keys on your keyboard. The Task Manager should look something like Figure 3–24.
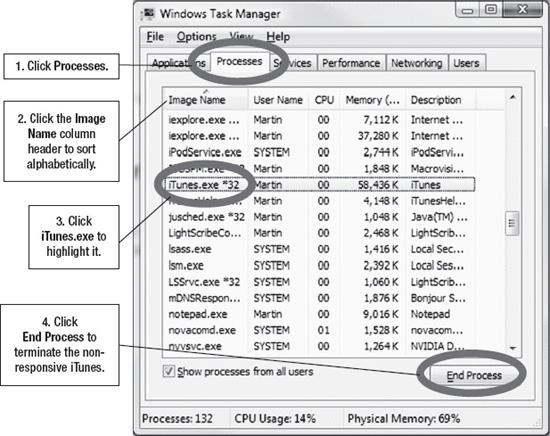
Figure 3–24. Locating
iTunes.exein Windows Task Manager to terminate it - Then, to end the process, click End process from the pop-up window.
- Now, iTunes should be forced to close.
- Try restarting iTunes.
- If iTunes will not start or it locks up again, reboot your computer and try again.
iTunes Locked Up and Will Not Respond (Mac Computer)
TIP: Pressing Command + Option + Escape is the shortcut to bring up the Force Quit Applications window shown in Figure 3–25.
- Go up to the iTunes Menu at the top and click.
- Click Quit iTunes.
- If that doesn't work, go to any other program and click the small Apple in the upper left-hand corner.
- Click Force Quit and the list of running programs will be displayed.
- Highlight iTunes and click the Force Quit button.
- If this does not help, try restarting your Mac.
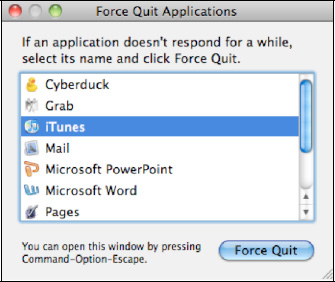
Figure 3–25. Force Quit Applications window on Mac computers
Updating Your iPad Operating System
You can check for updated software and install updated operating system (called “iOS”) software using iTunes.
NOTE: Do this update when you won't mind being without your iPad for 30 minutes or more, depending on the amount of information on your iPad and the speed of your computer and Internet connection.
Normally, iTunes will automatically check for updates on a set schedule, about every two weeks. If no update is found, iTunes will tell you when it will check for another update.
To manually check for updated iOS software in iTunes and install it, perform the following steps: and see Figure 3–26:
- Start iTunes.
- Connect your iPad to your computer.
- Click your iPad, listed under DEVICES in the left nav bar.
- Click the Summary tab in the top nav bar.
- Click the Check for Update button in the center of the screen in the Version section.
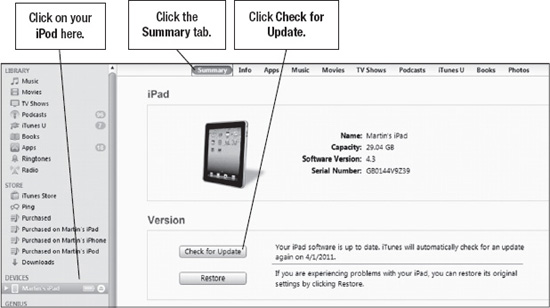
Figure 3–26. Checking for updated software
- If you have the latest version, you'll see a pop-up window saying something like “This version of the iPad software (4.x.x) is the current version.” Click OK to close the window. You are done with the update process.
- If you don't have the latest version, a window similar to the one shown to the right will tell you a new version is available and ask if you would like to update. Click Download and Update.
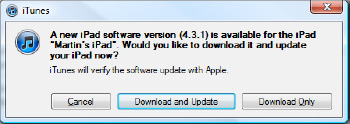
- iTunes will take you through a few screens that describe the update and ask you to agree to the software license. If you agree, click Next and Agree to download the latest iOS software from Apple. This will take about 5–10 minutes.
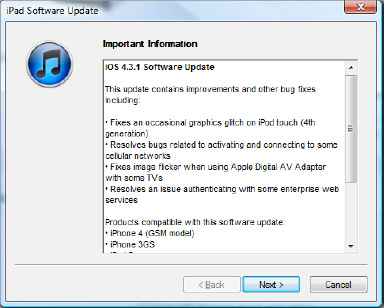
TIP: We show you all the screens you might see in this update process in the “Reinstalling the iPad Operating System” section of Chapter 29: “Troubleshooting.”
- Next, iTunes will back up your iPad, which might take 10 minutes or more if your iPad is filled with data.
- Now the new iOS will be installed and your iPad erased.
- Finally, you'll be presented with the screen allowing you to set your iPad up as a new one or restore it from a backup.
- Choose Set up as a new iPad if you want to erase all your data after the update process
- Choose Restore from the backup of, and make sure you select the correct backup file (usually the most recent one).
Now your iPad will be restored or set up as you selected and your iPad OS update is complete.