
PART I
Becoming an iPhone Setup Pro
- Chapter 1 Selecting and Setting Up Your iPhone
- Chapter 2 Icon Placement and Organization
- Chapter 3 Managing Your E-Mail Accounts with iPhone
- Chapter 4 Wrangling iTunes (While Maintaining Your Sanity)
Chapter 1
Selecting and Setting Up Your iPhone
In This Chapter
- Deciding which iPhone is right for you
- Going the refurbished route
- Selecting a carrier
- Dealing with non-expandable storage
- Utilizing Find My iPhone
- Working with wireless networks
- Updating your iTunes build
- Organizing your iLife
One of the beautiful things about Apple in general, and about the iPhone in particular, is the complete simplicity of the buying process. Apple’s never been one to offer limitless customization options, which just so happens to be a blessing and a curse. This chapter breaks down the options that do exist in the blossoming iPhone universe, explains the pros and cons of each, and discusses whether your hard-earned greenbacks should be used for an upscale model. I also dive into the process of managing the storage you’re dealt, untangle the mystery of wireless connectivity, and ensure that your PC or Mac is ready to work in concert with your freshly birthed phone. I’ve also found that iPhone ownership—much like home, car, and pet ownership—is far more gratifying when things are kept tidy. Hence, a deep dive into the organization of your looming iLife awaits.
Choosing Which iPhone to Buy
In the introduction, I made it sound like the process of buying an iPhone was as easy as choosing between chocolate and cheesecake for breakfast. And it is. Sort of. But just because there aren’t many options, doesn’t mean that you have no options whatsoever. Apple currently sells three models of the iPhone. There’s the iPhone 4, the iPhone 4S, and the iPhone 5. The former two options can connect to 3G mobile data networks, whereas the iPhone 5 can connect to LTE networks. All three models can be found on Verizon Wireless, AT&T, and Sprint in the United States, while a host of prepaid carriers and global carriers offer them as well. Compared to the original iPhone, which shipped exclusively on AT&T in 2007, the iPhone is tremendously more accessible now than it ever has been.
If you’re new to the smartphone world, you might wonder what the real difference is between 3G and LTE. There’s a huge difference. LTE, which is available on a growing amount of carriers, is oftentimes five to ten times faster than 3G. It makes browsing the web, checking your e-mail, and taking care of other business on your phone so much faster. Yes, you can feel the speed difference. And if you plan on ever using your iPhone as a mobile hotspot to tether your laptop and access the Internet that way, I strongly encourage you to opt for the iPhone 5 if only to have access to those LTE waves.
The iPhone 4 and 4S offer a 3.5-inch retina display, while the iPhone 5 offers a 4-inch, 1136×640 resolution panel. What’s that taller screen get you? Room for an extra row of icons or folders on the home screen (and those folders can hold 16 apps each versus 12 on the iPhone 4 and 4S), and as developers build new apps to meet the new specifications, you’ll also find programs that enable you to see just a bit more than users can see on the iPhone 4 or 4S. The “take it or leave it” style has always been a polarizing trademark for Apple, but I believe that fewer buying options enables a tighter seal between the hardware and software. Apple’s unique in its insistence on handcrafting both the physical device and the operating system (iOS) that runs beneath it, and the only logical way to guarantee a stellar—or at the very least, uniform—experience across the entire iPhone portfolio is to quell deviation with regard to specifications. Supply chain aficionados refer to this as “vertical integration.”
Let’s dig in to find out which combination is idyllic for those still situated outside of the iPhone Owners Club.
Saving Money the Refurbished Way
It’s a common theme, really. Apple introduces a new product. Apple sees massive demand. Apple sees people lined up for hours in order to get their hands on Apple’s new product. But eventually, supply catches up with demand, and if you wait even longer, you’ll even find yesterday’s hottest commodity in refurbished form.
If you’ve ever tried to find an Apple product on “sale,” you’ve probably realized that it’s a Herculean task. Apple has notoriously tight controls on pricing, and unlike the PC universe, you won’t find typical discount stores selling Apple wares for less. Even Walmart is permitted to shave only a few precious cents from their iPhone and iPod touch offerings. So, is there any hope whatsoever to get in on the iPhone cheaply? You bet.
Apple advertises only the MSRP (manufacturer’s standard retail price), but I have a tried-and-trusted alternative to paying top dollar. That is Apple’s astonishingly well-stocked refurbished store (http://store.apple.com/us/browse/home/specialdeals), which is continually updated as new batches of refurb iPhones flow in. I know, you’ve done “the refurb thing” elsewhere, only to get a cracked device with miscellaneous crumbs scattered about and a questionable warranty that expired before the postal service could even deliver it. But here’s the thing: Apple’s refurbished products are better than any other refurbished product I’ve come across.
You should also look for refurbished iPhones from carrier stores; AT&T will even sell them online.
When I say they’re “as good as new,” I’m thoroughly downplaying reality. In fact, I rarely recommend that people buy an Apple product new. (The iPhone 5 is a notable exception, simply due to the inclusion of an LTE cellular radio.) Refurbished iPhones, just like the company’s refurbished Macs and iPods, arrive in fresh plastic wrap with polished accessories, a user guide, and the same one-year warranty that’s affixed to new Apple products. The only difference? A drab cardboard exterior compared to the flashily designed boxes you see in the store. Outside of that, you’ll be remarkably hard-pressed to tell an Apple refurb apart from a new piece.
Choosing Between Carriers
Choosing an iPhone carrier used to be easy: it was AT&T or nothing. These days, competition is fierce, and a host of other operators are offering the iPhone. AT&T, Sprint, and Verizon Wireless are the major postpaid operators to carry the iPhone line in the United States (shown in Figure 1-1), whereas Cricket and a smattering of other prepaid carriers are also now offering the iPhone 4, 4S, and 5.
Figure 1-1: Choose carefully! Carrier-locked iPhones won’t work on other networks (except the Verizon one)
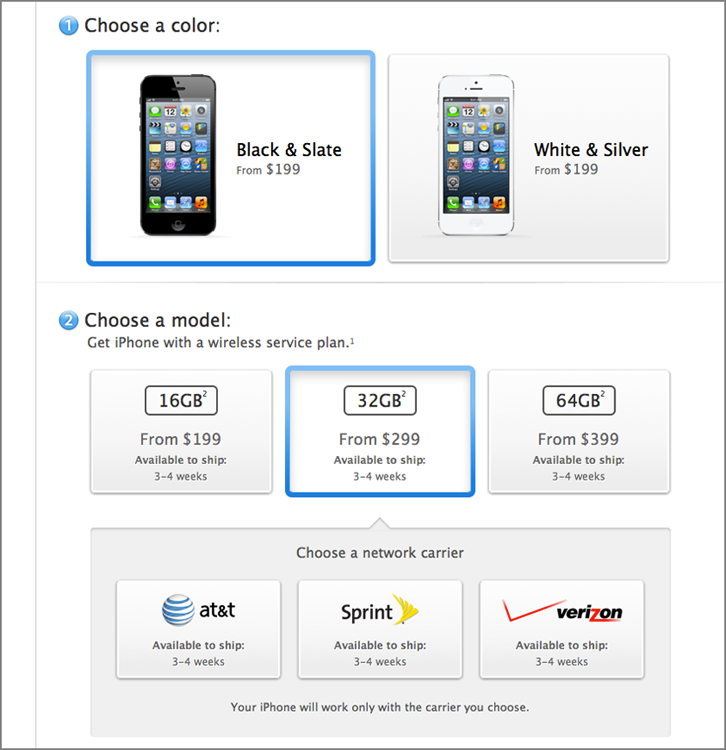
Globally, the list runs longer than I have the space to list. In general, however, almost every major carrier in the world carries or supports the iPhone. Even T-Mobile USA, the “fourth” major carrier in the United States, supports the iPhone. It doesn’t sell them, mind you, but it will happily sell you a T-Mobile SIM card to place in an iPhone that you’ve purchased elsewhere.
Generally speaking, Verizon Wireless offers the best, most reliable, and widest coverage in the United States. Its LTE umbrella hits far more cities than that of AT&T and Sprint, and if you happen to hit a rural area, you’ll stand a better chance of having any connectivity at all on Verizon. Naturally, Verizon also tends to be the most expensive option, but you get what you pay for. Sprint’s service is historically the weakest among these three, but it’s also the lone remaining postpaid carrier in America to offer the iPhone with an unlimited data plan, so heavy users may be swayed.
As if you needed one more reason to select Verizon as your iPhone 5 carrier, it’s also the only iPhone 5 sold in the United States from a carrier that is unlocked from day one. Even if you ink a new two-year agreement with Verizon to get an iPhone 5, the phone they ship you will support Nano SIM cards from AT&T, T-Mobile, and any other GSM carrier in the world. You might not receive LTE on all of those carriers, but basic data and voice services will work. And there’s no unlock fee to pay, either.
Why does this all matter? Your iPhone’s speed and reliability on a network is only as good as the provider it’s linked to, and there’s absolutely no way to turn an AT&T iPhone into a Verizon iPhone. Even if you currently reside in an area with historically solid AT&T voice and data coverage, I recommend picking up the Verizon iPhone if price isn’t a factor. I’ve traversed all 50 U.S. states, and I can say with authority that AT&T’s high-speed reach is markedly less than Verizon’s.
Understanding the Non-Expandable Storage Situation
What’s in a megabyte? Oh, 1024KB, which is comprised of… never mind. I could dig deep into the technobabble surrounding storage and be here for hours, so I’ll just cut to the chase: Apple provides three options for storing files locally on the iPhone. You can buy a 16GB model, a 32GB model, or a 64GB model. That’s it. Despite the pleading of pundits, there’s still no SD (Secure Digital) card slot on the iPhone, which means that the quantity of storage you get can never been expanded via any means whatsoever.
Choosing an iPhone with adequate storage for your needs is of utmost importance. What you probably don’t realize now is that you’ll need far more storage than you suspect. Much like with our homes, we tend to fill the iPhones in our lives with as much “stuff” as it gives us room for. What, exactly, takes up space on an iPhone?
- E-mails
- Music
- Photos
- Videos
- Apps
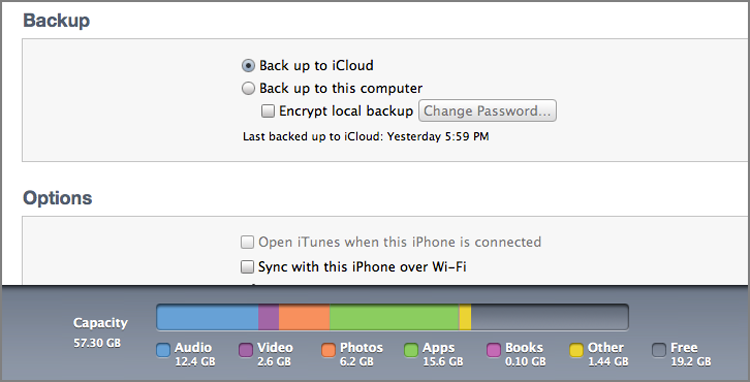
Those are the heavy hitters, seen in Figure 1-2. Things like Contacts, Calendar entries, and miscellaneous To-Do lists also take up space, but they’re so insignificant that it’s not worth harping on. The long and short of it is this: if you plan on using your iPhone as a serious content consumption machine—loading it down with iTunes TV rentals and every album you’ve had since the second grade—buy the one with as much storage as you can afford. If you’re willing to “clean house” every so often in order to only have the latest and most germane content onboard, the cheaper 16GB edition will do.
Figure 1-2: This capacity gauge within iTunes lets you know what’s taking up space on your iPhone.
The good news is that Apple’s taking the focus off of internal storage in many ways with the introduction of iCloud, enabling users to simply stream in content that’s hosted elsewhere, as opposed to on the device. Granted, this magic seems magical only when you have a solid connection to the Internet, but it’s certainly worth considering. Thanks to iCloud—a feature that I devote significant time to in Chapter 16, “iCloud, the Cloud, and iTunes Match”—there’s at least a secondary option for storing TV shows, music, and movies, but you’ll still need to keep local versions of your most favorite material right on your iPhone. Wireless Internet isn’t quite ubiquitous, in a literal sense.
Thinking About Data Tiers
Defining 3G could take up a book’s worth of pages on its own, but I’ll try to keep it brief. If you own a smartphone, you’re all too familiar with mobile data. It’s a constant wireless data connection that enables you to sync up with the Internet, pull down e-mails, send tweets, and remain constantly dialed into your digital life. These days, it’s hardly a foreign concept.
You’re probably wondering how much data is consumed by doing these various tasks. Just two years ago, this wasn’t even an issue at all. All four of the major U.S. carriers offered unlimited data plans with their smartphones, so pondering the strain placed on the network by any given task wasn’t something consumers were apt to do. Today, it’s different. The networks are being burdened by gaining new users faster than carriers can build new towers, so what we’re left with is a world of tiered data plans.
As mentioned earlier, you have a handful of tier choices for iPhone data. But it’s nearly impossible to make an informed decision as to which tier suits you best without knowing how much data is consumed by the tasks you do on a regular basis. The sidebar entitled “What’s in a Download?” is a rough-and-dirty guide to give you some basic perspective.
- Sending an e-mail: around 0.1MB without attachments
- Loading a typical website: around 0.2MB to 1MB
- Downloading a single song from iTunes: around 3MB to 6MB
- Downloading the Engadget Distro app: around 2MB
- Video chatting over FaceTime: around 3MB per minute
- Streaming an SD TV show: around 400MB for a 30-minute program
- Streaming an HD TV show: around 1500MB for a 30-minute program
- Loading an Adobe Flash-based website (on iPhone): 0MB
Got all that? Good. Most of the major carriers, outside of Sprint in the United States, are pushing a generic 2GB-per-month plan. If you’re careful to download apps and app updates at home on a Wi-Fi connection, you probably won’t have any issue staying under that barrier. Downloading apps and streaming video are the two easiest ways to destroy a data plan, and although it might be tempting to tether an LTE-equipped iPhone 5 as your home broadband connection, don’t. Any carrier will pick up on the heavy usage within a month and will probably disconnect your account.
Keeping Tabs on Data Usage
So, loading a few web pages should take only a few megabytes of your monthly allotment, but wouldn’t it be grand if you could see specifically how much data you’ve used at any given time? It would. And it’s possible. Apple doesn’t go out of its way to make it clear, but there’s a slightly hidden data meter that’s always running in the background, calculating how much cellular data you’ve sent and received right down to the byte. It operates in real-time, and it doesn’t miss anything.
In fact, it’s a fantastic tool for sniffing out “data leaks.” If you’re using the 3G or 4G connection and you have too many push notifications enabled, you might be consuming data that you never intended to. I strongly recommend disabling push e-mail, Twitter, Facebook, and other social networking apps while using 3G if you’re dangerously close to exceeding your monthly allotment. And, of course, you should really stop streaming Netflix for 10 hours per day. That’s just embarrassing.
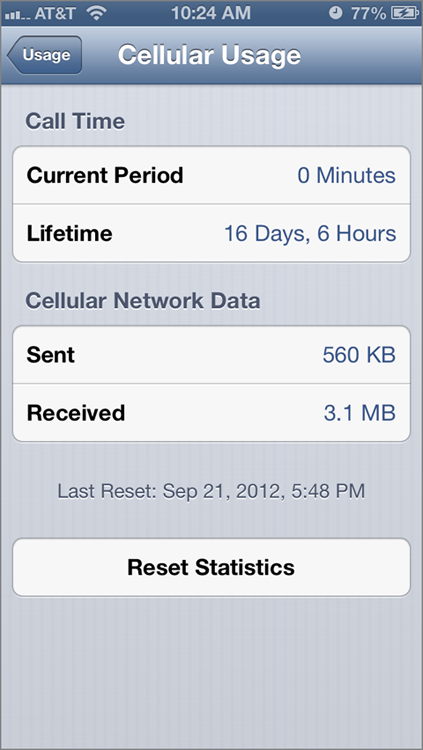
To access the meter, visit Settings General Usage Cellular Usage, as shown in Figure 1-3. You should also set up a recurring reminder on your iPhone that encourages you to reset that meter every 30 days. If you don’t, it’s practically impossible to keep tabs on how much data has been consumed on a new month’s worth of data.
Figure 1-3: Ah, a fresh cellular data counter. Careful not to run this up too fast!
- Opera Mini—It’s a free, fast, and compact web browser for the iPhone. When you request a page, the request is sent to the Opera Mini server, which downloads the page from the Internet. The server then packages your page in a compressed format—dubbed OBML—which requires less data to download.
- Skyfire—If you’re a YouTube addict, get the Skyfire browser and accompanying VideoQ app ($3.99), which has a multimedia compression feature that lets users spend less time loading videos and less data accessing them.
- Onavo—This is a free app that acts as a proxy server for your iPhone. Once installed, the app streams data sent to you from Safari, Mail, Facebook, Google Maps, Twitter, and others through Onavo's servers, and then compresses it before sending it to your iPhone. Users also receive access to compression reports and metrics on data savings. The app doesn't shrink or compress information that you send, though, so your image and video uploads will still look as good as possible.
- DataMan Pro for iPhone—If you’re constantly fretting your usage, and can’t remember to check Apple’s built-in usage meter, this $0.99 app provides elaborate notification and monitoring services, enabling you to stay informed and curb usage as your monthly limit approaches. You’ll get unmistakable alerts as you’re approaching your monthly limit, helping you to dodge those pesky overage fees.
Setting Up (and Understanding) Find My iPhone
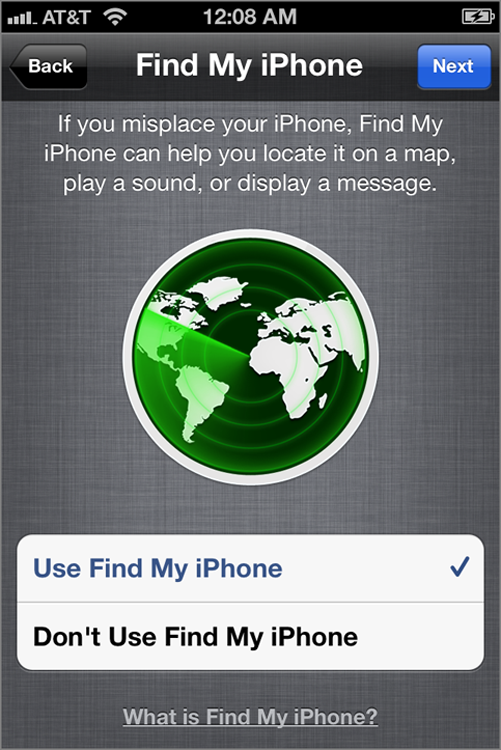
Find My iPhone is a brilliant service that ships with every iOS 5- and iOS 6-equipped iPhone (see Figure 1-4). If you update your existing iPhone to Apple’s latest mobile OS, you will have it. Swell, eh? Put simply, it’s a software/hardware solution that allows your Apple ID to keep tabs on the movement of your iPhone, and if it’s ever lost or stolen, you can rather easily track it down. Think of it as OnStar tracking, but for your iPhone.
Figure 1-4: Make sure you tick the top option here during your initial setup. Failing to do so will result in endless tears from yours truly.
Setting up this service didn’t used to be so simple. In a prior life, this service required a MobileMe account, a paid service that only the hardest of hardcore Apple loyalists were apt to spring for. Sensibly, Apple figured it prudent to bring this highly valuable service to all iPhone owners, completely free of charge.
Enabling the service is as simple as accepting the opt-in notification for location-based services upon iOS install, choosing to turn Find My iPhone on, and creating an iCloud account. If you skipped this process while rushing through the startup screens in iOS, simply visit Settings iCloud Find My iPhone, and flip the toggle to On. I can’t emphasize this enough: please, take five seconds and enable this feature. It’s never been easier to proactively protect your investment in anything.
Once active, it’s downright staggering what you can do should your iPhone become lost or stolen. For starters, you can sign into www.icloud.com on any web browser in order to see precisely where it’s at based on its GPS coordinates. If you’re near a pal with an iOS device of their own, there’s a Find My iPhone app that allows you to use their device to locate and interact with your lost device.
And when I say, “interact,” I mean interact. You can force a pop-up message onto the screen of your misplaced device, encouraging anyone who finds it to drop it off at a given location or phone you at whatever number you please. The message you write is completely customizable. Moreover, you can force the alert to make an audible sound—even if you had the Mute function on when you lost it!
If you’re concerned about ill-willed thieves prying into your personal information, you can remotely set a lock-screen password requirement, and if you know that it has somehow fallen into the wrong hands, you can remotely delete all of its contents (see Figure 1-5), but you won’t be able to track it if you do. Clearly, this is a last resort recommendation. If (and when) you do retrieve it, a simple restore from iCloud will bring it back to the state you left it in. Did I mention all of this was free?
Figure 1-5: Wipe away. You can restore it in a few clicks with iCloud.

Working with Networks
Despite being a highly useful offline product, the iPhone is truly at its best when connected to a live wire. And by that, I mean no wire at all. Ensuring that your iPhone is connected to the Internet—be it over Wi-Fi or 3G—ensures the best possible experience, and allows you to take full advantage of iCloud, Game Center, e-mail, and a litany of other incredible features that simply aren’t available offline.
Right from the get-go, iOS’s startup process asks you to connect to a Wi-Fi network in order to fully set up your device. That’s how integral the Internet is to the overall experience. So, it goes without saying that you should be near the web before you venture too far into iPhone setup. I recommend venturing to Settings Wi-Fi each time you situate yourself in a new place. As soon as you’re in, the iPhone begins an automatic perusal of the surroundings in search of nearby Wi-Fi networks. Connecting to one is as simple as tapping the one you’re after and entering the security password (if applicable).
I encourage you to use Wi-Fi whenever you can, particularly when you’re home. If you’re on a tiered data plan, there’s no need in relying on a cellular network when Wi-Fi is around.
If your home router is located a great distance away from where you typically use your iPhone, and you’re pulling your hair out from dropped connections, it’s probably worth investing in a Wi-Fi repeater or extender. My personal favorite is the AirPort Express. For one, it’s an Apple product, which practically guarantees smooth sailing within the ecosystem. Two, it’s widely available for less than $100—far less if you buy it from Apple’s refurbished store. Three, it’s wildly compact, and a new AirPort Utility app (free in the App Store) enables you to have complete control of the AirPort Express’ settings and security right from your iPhone—no Mac or PC required.
Updating and Readying iTunes
Make no mistake: iTunes is still a very real, and very necessary part of the iPhone experience. Apple has gone to great lengths in order to convince the world otherwise, but unless you’ve grown up entirely enveloped in Apple’s ecosystem, you’ll still find the occasional talk with iTunes a necessity. To Apple’s credit, iOS, iTunes Match, and iCloud have made iTunes interactions far less necessary than in years past, but keeping the primary middleman between your stored files and your iPhone in tip-top shape should be considered a mandate.
The truth of the matter is that iTunes is updated on a far more regular basis than iOS. Apple tends to make only major, deliberate changes to the latter, whereas the former seems to be in a perpetual state of improvement. Or perhaps “repair” is a better term, depending on your perspective. At any rate, it’s extremely wise to ensure you have the very latest copy of iTunes installed on your PC or Mac before attempting to set up your iPhone for the first time, or upgrade your existing iPhone for its initial encounter with iOS 6.
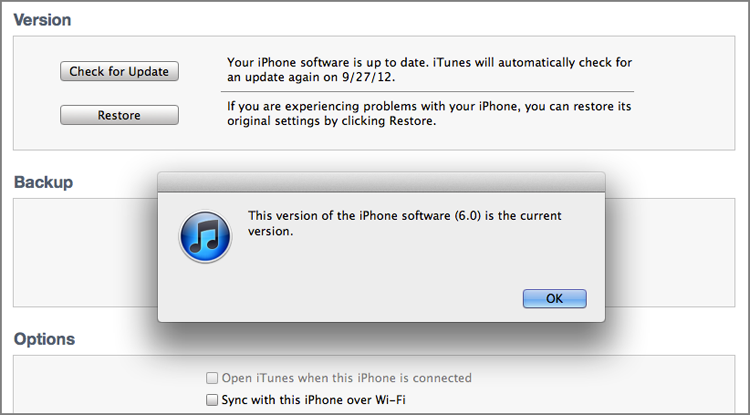
You have two options when it comes time to update. Either use Check For Updates within iTunes itself, or cruise over to www.itunes.com and download the new installer from Apple. Once the latest iTunes is fired up, and your iPhone is plugged into your computer via USB, a quick tap of the Check For Update button should get things underway on your device. Have a look at Figure 1-6 for a clearer understanding.
Figure 1-6: Fingers crossed for an update!
Organizing Your iLife First
“Sheesh, another step in the process before I even dive into my iPhone?” A fair question. But yes, that’s exactly the case. I’ve set up a number of iPhones in my time, and I’ve consistently found that those who put in the proper efforts ahead of time are more greatly rewarded afterward. The entire iPhone experience is enriched by being organized, and a few key portions of Apple’s iLife suite tie directly into the fabric of iPhone.
How iPhoto Ties into iPhone, and Vice Versa
The first program worth mentioning is iPhoto. Granted, this won’t apply to those who aren’t using a Mac (or, OS X, given that Apple’s desktop OS can technically be hacked onto machines designed for Windows), but it’s a surprisingly robust piece of software that’s worth dabbling in if you’re a self-proclaimed shutterbug. One of the real joys of using iPhone comes in the form of sharing photos. The built-in slideshow feature enables owners to quickly and beautifully share vacation and family pictures without having to lug a full laptop and external hard drive worth of photos to a relative’s abode. Unless you organize your images ahead of time, they’ll show up as a scattered mess on your iPhone. “Garbage in, garbage out” has never been so accurate.
I dive deeper into Photo Stream in Chapter 16—one focusing solely on the merits of iCloud—but suffice it to say, this is yet another method for pulling down captured shots and displaying what’s been happening most recently in your life according to the cameras on your various iOS devices.
How Movies and Content Share Homes
Let’s go ahead and get this idea engrained in your head: don’t let content live solely on your iPhone. Thinking of it in the following terms is guaranteed to save you grief should something go wrong on your device—your movies, photos, music, and other miscellaneous content should live either on your computer or in the cloud, and in an ideal world, in both.
It’s absolutely worth creating a robust, well-cataloged file folder system for your local videos. And then, sort them in iTunes. Anything that’s prearranged in iTunes tends to sync beautifully with the iPhone. If you choose to sync it from some random filesystem on your computer, your mileage will obviously vary.
As you’ll learn in the chapters to come, syncing is a huge part of iPhone life. I’ve an inkling that Apple’s doing all that it can to change that, but we aren’t there yet. Apple would love nothing more if everything you could ever want were available on demand from the cloud. As it stands, you’ll be reaching back to your computer for a great many files, and things aren’t going to become magically organized on your iPhone if they’re strewn about on your home computer.
Realizing that content will be living in two places is a bit tough for some to wrap their head around. But as an ardent supporter of backing up everything on your computer, it’s something that’s worth managing. If you acquire something fresh on your computer, make sure it’s placed in the same filesystem or program that you initially sync your iPhone to. That way, updates are shared with no fuss to speak of. If you happen to download a new app or iTunes record on your iPhone, I discuss how to transfer those to your PC in the pages to come. The key is making sure the data continues to flow both ways, even after the initial setup. Computing families that talk together, stay together.
Summary
It’s important to carefully consider which iPhone is right for you. Perhaps saving a bit on the iPhone 4 or 4S is worth giving up the LTE that’s only included on the iPhone 5. If saving money is a priority, opting for less storage capacity or even a refurbished iPhone might be the way to go. The same careful consideration should be applied to choosing your carrier.
You can set up your iPhone in the blink of an eye. But that’s not the path you should take. Putting a proper amount of effort into cataloging and organizing your content before setting your iPhone up will ensure that subsequent syncs are smooth and predictable, and that no data is haphazardly left out or lost.
The proactive iPhone owner is the happiest, and I’ve provided a number of methods for keeping an eye on your cellular data usage, as well as managing your network situation. Utilizing the Mobile Hotspot function on the iPhone 5 enables lightning fast tethering access for nearby laptops—a huge deal for business travelers. AirPort Express is not only a highly recommended iPhone accessory, it’s a travel companion that I never leave home without. Just like my iPhone.