
Chapter 3
Managing Your E-Mail Accounts with iPhone
In This Chapter
- Mastering the Gmail app
- Perfecting the Mail app
- Managing multiple accounts
- Tweaking the settings
Have you looked at how most folks use their iPhone? More often than not, it’s being used with a finger. As voice calls fade to history and text-based communications grow, more and more individuals are using their iPhones predominantly as e-mail machines. The iPhone is actually quite great at doing just that, but understanding the intricacies of how the iPhone handles e-mail is vital to avoiding inefficiencies and frustrations. In this chapter, I do a bit of composing of my own, digging through the App Store’s vibrant third-party library in order to overcome some of the limitations and stumbling blocks related to e-mail. I also show you a few alternatives to the factory Mail app, including Gmail’s own app. Finally, I touch on e-mail syncing and the smattering of options available to keep your iPhone, iPad, and desktop web browser on the same page.
Mastering Gmail’s iOS Application
If you aren’t an avid Gmailer, perhaps this section won’t be near and dear to your heart. But if you are, it’s probably worth a look-see. Most iPhone owners dig right into the conventional Mail app settings—the e-mail app that Apple loads into each and every iPhone Dock it sells—and proceeds with the built-in Gmail registration and setup tool. And that works. It’s quick and painless, and for most, that’s that.
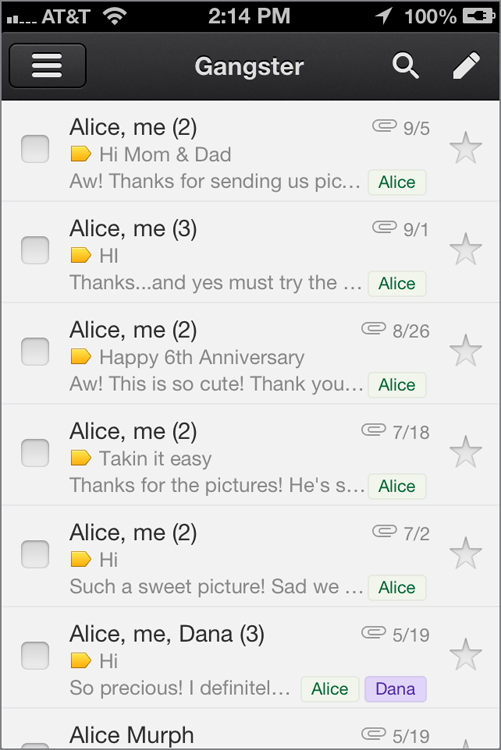
But there’s actually an alternative—an alternative that I’m convinced is far better in almost every way. After months of radio silence, Google was finally able to launch a Gmail iOS app into the App Store (see Figure 3-1). The upside is that this replaces the old method of using Safari to browse the Gmail web app; the downside is that it’s mostly an HTML5 web app wrapped into a standalone program. That said, it still manages to support the lion’s share of Gmail features that most users simply can’t live without (Archive, Labels, and so on).
Figure 3-1: It may look like a web app, but it’s the Gmail iOS app.
Why Gmail’s iOS App Trumps Mail
The Gmail iOS app works mostly like the company’s web app, but in a far friendlier form. There are also a few new tricks up the program’s sleeve that make it even easier to use the native app over the watered-down version through Apple’s own Mail app. For starters, the Gmail iOS app supports notifications within iOS 5 and iOS 6. That’s a huge improvement over using the web app, because users can now get notified of new e-mails immediately (using a built-in “push” service). You can then hop into Settings Notifications to change which kinds of notifications you see, and how you want to be alerted to new messages. You can even have those notifications show up in your lock screen and the drop-down menu; or, for those who receive far too much e-mail, turn any of the notification options off.
Another perk of using the Gmail iOS app is the ability to “Send-As.” Basically, those using their single Gmail account as a repository for multiple other accounts (from work, school, etc.) will be able to reply to business-or education-related messages using their business-or education-related e-mail address. No more switching e-mail addresses or accounts in order to reply from a specific address; you can select which identity to send from right in the composition window.
Perhaps most importantly, Google’s Gmail iOS app knows how to handle e-mail threads and archives. iOS 5/6 has improved its handling of threads, but I’ve still seen many occasions where the built-in Mail app rendered a 20+ message thread incorrectly, whereas this app always displays things just as I’ve come to expect from within Gmail. Archives are also a major part of daily life for Gmailers, and if assigning a label to a message before archiving it is vital to keeping your inbox organized, you’ll be happy to know that this portal nails it every single time. Colored stars, too, can only be fully executed within Gmail’s iOS app.
Inputting Text via Keyboard and Voice Dictation
Unlike the iPad, there’s no pull-apart split keyboard when using the iPhone in a horizontal orientation. Like the iPad, however, Apple still won’t allow you to load a custom keyboard into iOS. Even with iOS 6, there’s still a single factory keyboard option; there’s no Swype or SwiftKey here. It’s a crying shame, too.
Apple’s stock keyboard was easily the best onscreen option when the iPhone launched in 2007, but these days, many superior alternatives exist for the Android. Instead of giving those same opportunities to iPhone users, Apple has implemented something else—voice dictation.
When composing a message in the Gmail iOS app, simply move your cursor (via touch, of course) to the body of the e-mail. Once there, you’ll notice the virtual keyboard change ever-so-subtly. To the left of the spacebar, there’s now a microphone icon (assuming you’re using an iPhone 4S or iPhone 5). Tap that, and you’ll soon be composing your e-mail with your vocal cords (shown in Figure 3-2).
Figure 3-2: Speaking your emails can be much faster than typing them.
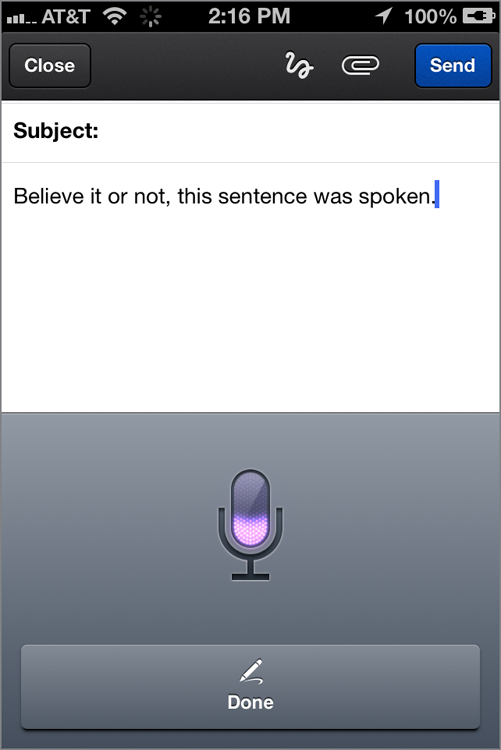
Dictating e-mails (or any document, really) can be a huge time saver, but it’s also a point of frustration for many. To get the best results from the voice dictation feature, I first recommend being on Wi-Fi or a 3G/4G data connection. If you’re in a remote locale where only GPRS or EDGE (2G or older) data services are available, the service will struggle to return results. Secondly, try to speak clearly and boldly in a room with minimal background noise, and aim your mouth directly at the microphones on the bottom of your iPhone. Pausing and stuttering will almost certainly introduce errors in the text that are eventually returned to your display.
Finally, try to only speak three to four sentences at a time. If you speak for much longer, the voice dictation app will simply cut you off mid-sentence, forcing you to remember where you left your train of thought. It’s also worth mentioning that dictating generally means “talking like a robot.” You have to think ahead for the best results—you literally need to say the word “comma” if you want a comma to be inserted. Same goes for “new paragraph” and “question mark.” If you speak like you’re writing—instead of like you’re talking to a best bud face-to-face—you’ll face far fewer frustrations.
Perfecting the Mail App
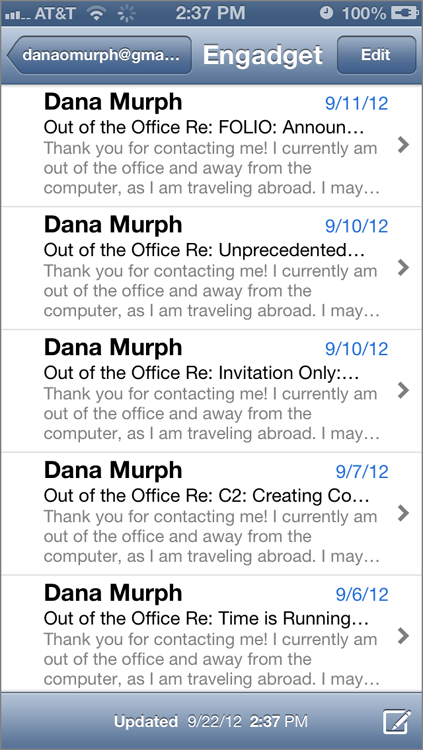
Even if you’re dead-set on using the Gmail app to check your e-mail, there’s plenty of reason to also establish your addresses within Apple’s Mail app. I generally discourage duplicity with things like this, but as I alluded to earlier, there are certain benefits to having an e-mail account registered with an app that’s so finely woven into the core of iOS. Universal Searches won’t pull up findings within your e-mail accounts unless they’re established in Apple’s own Mail app (shown in Figure 3-3), and push notifications cannot be sent down through Safari if you’re trying to use an e-mail system’s web app.
Figure 3-3: Simple and clean is Apple’s iPhone Mail app.
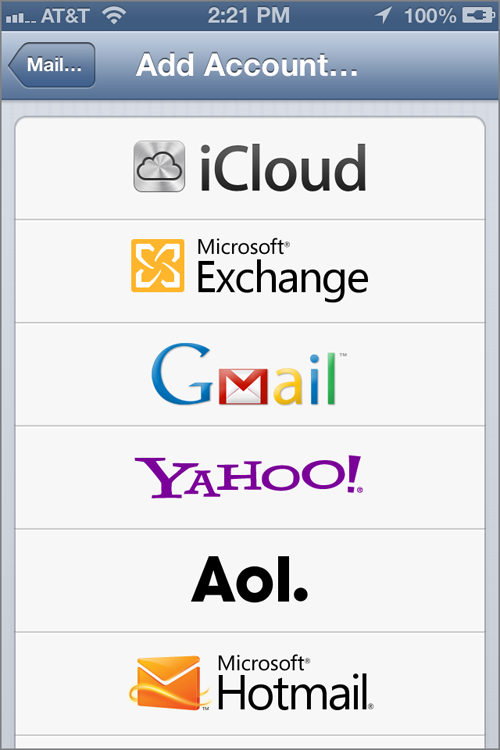
Beyond all that, though, Mail is a fantastic app on its own, but there are an abundance of settings and options to tweak—things that most folks don’t ever take the time to investigate. Good thing you aren’t lumped into that crowd. Apple makes it stunningly easy to get an e-mail account registered in Mail… provided you’re using a Gmail, Yahoo!, Microsoft Exchange, iCloud, Aol, or Hotmail account. Those are shown in Figure 3-4.
Figure 3-4: Take your pick. Plenty of automated e-mail setup awaits.
Here’s a stunner: Mail setup leads you to all sorts of other non-mail related things. I’ll give you a moment to let that sink in. Apple has intelligently realized that you may not want to suck down associated contacts, notes, and calendars for every single e-mail account you load into Mail. To that end, each new account you create gives you the option to toggle the aforementioned extras off or on. If you’re looking to add your work e-mail address to Mail just for the sake of having it there in case of an emergency, but you’ve no desire whatsoever to see any weekly conference calls on your personal calendar, just venture to Settings Mail, Contacts, Calendars and select each account individually. See for yourself in Figure 3-5.
Figure 3-5: Syncing everything? Nothing? You’ve got options.

You’ve probably heard a thing or two about “push” and “pull” systems related to e-mail. The iPhone handles both. Push accounts—such as a Gmail account—automatically alert your iPhone that a new message has arrived, even if it’s asleep or idling. It requires no action whatsoever on your end. Naturally, this “always alert” state has a slightly negative impact on battery life (think of it as your iPhone sleeping with one eye cracked open), but more detrimental is the data required. If you’re using cellular data, or you’re counting kilobytes with more intensity than calories, you may want to disable push altogether.
To do this, surf over to Settings Mail, Contacts, Calendars Fetch New Data. Right up top (shown in Figure 3-6) is a toggle to disable or enable push wholesale. “Fetch” is another term for “pull,” where you give the iPhone a time interval in which to reach out to your connected accounts and pull in anything new since the last polling time. My suggestion is 15 minutes for those addicted to their digital lives, and hourly for everyone else. Manually is fine, but why force yourself to remember what to refresh when the iPhone will do it for you? Push forces updates to your phone as soon as they happen; pull (or fetch) retrieves information on a schedule that you dictate. iCloud information is set to Push, but other third-party accounts give you additional control.
Figure 3-6: Pushing or fetching options can be applied separately to various accounts.

Another tip is to dig one level deeper. If, while in that same window, you tap Advanced, you’ll be able to tell each and every mail/calendar account how you want it to push or pull. Perhaps pushing your personal account while only pulling your work account hourly is an ideal situation, as it saves precious battery life and data where you can most afford to. Just don’t tell your boss.
- Show 500 recent messages: It doesn’t demand that much extra space, and it’s awesome to have a huge history when sifting for something offline.
- Preview 5 lines: The more glanceable information you can get your hands on, the less time you waste diving deeper into something that’s not important.
- Minimum Font Size Medium: Unless your eyes are troubling you. The Giant setting is highly useful for some, and highly hilarious for everyone else.
- Show To/Cc Label On: In most cases, the more information you have to glance at when communicating, the better off you are.
- Ask Before Deleting Off: You can always resurrect things from the Trash if you need to.
- Load Remote Images Off: Selecting On is a great way to accidentally buy into a phishing scam.
- Organize By Thread On: Attempting to read e-mails sans threads could cause your iPhone to burst into tears.
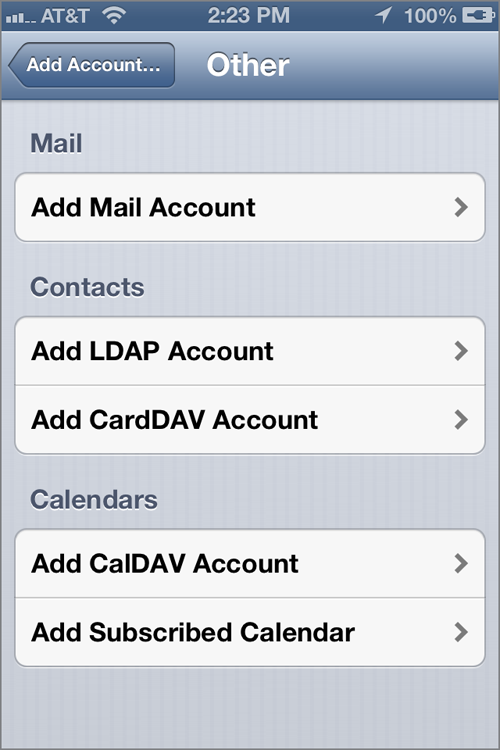
There’s another hidden gem here that more advanced users may very well appreciate. While in Settings Mail, Contacts, Calendar Add Account…, there’s a nondescript Other option beneath all the branded, pre-configured solutions. Mysterious! I’ll dig into the specifics of popping an unorthodox e-mail account in here in the section “Password and Multiple Account Management,” but for now, I’d like to draw attention to a foursome of obscure (to the simpleton, anyway) options below Contacts and Calendars. If you were hoping to connect an LDAP or CardDAV account for pulling in the former, or a CalDAV/Subscribed Calendar for the latter, here’s your opportunity (as shown in Figure 3-7). Make sure you bring your server address, username, password, and a crafty description, though.
Figure 3-7: Got your own mail settings? Punch ‘em in here!
If you’re one of those folks (like me—no shame in confessing it) who have a multitude of shared Google Calendars, getting them to populate in the iPhone’s Calendar app is far more difficult than it should be. Although you may assume that simply flipping the Calendar toggle to On in your added Gmail account would be enough, that only adds the sole Google Calendar that directly links to said account. If you’ve access to shared Gcals from your significant other, colleagues, bosses, sports teams, and so on, they won’t just “show up.” Defies logic, but it’s true.
Tweaks for Productivity
Although the iPhone’s Mail app is fully capable of handling as many e-mail accounts as you can throw at it (within reason, naturally), there can only be one default. This is actually more important in relation to third-party apps that allow shortcuts to “mail” things from within. For example, if you select to e-mail an article from a news magazine, it’ll send from your default account. If your work is fairly strict about what passes through its mail servers, make sure your personal account is the default at Settings Mail, Contacts, Calendars Default Account.
Also, leaving “Sent from my iPhone” as your signature may seem a bit pretentious and played out—and let’s be honest, it sort of is—but it definitely gives recipients a heads-up to expect curt replies, stranger than usual formatting, and a glut of typos. Better safe than sorry, right?
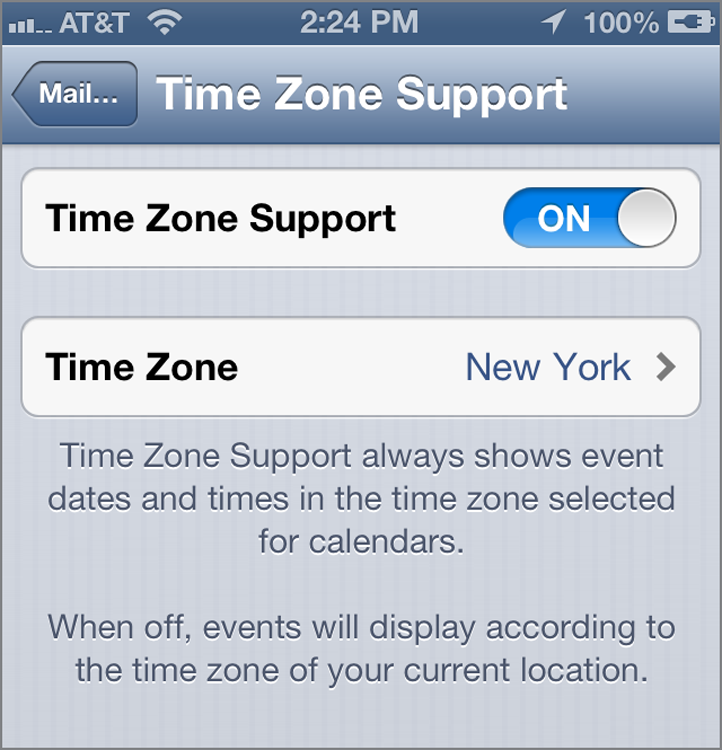
If you’re planning on traveling with your iPhone (you should!), pay close attention to how your calendars are displayed. Over in the familiar Settings Mail, Contacts, Calendars Calendars section, make sure you deliberately choose to turn Time Zone Support on or off. Off will please those who want to see what times their events are with respect to whatever time zone they’re currently in. On will please those who may change position in the world, but never mentally leave the time zone where their work takes place. In my world, Engadget revolves around Eastern Time, so my iPhone is flipped to On. Even if it’s 3AM on a Thursday in Sydney, I want to be reminded that it’s noon on Wednesday so far as my work is concerned (see Figure 3-8). There’s hardly a productivity (and reputation) killer more ruthless than a confused time zone.
Figure 3-8: In a New York state of mind, regardless of location.
Avid archivists should also know about another swipe trick: sweeping left or right across a message in the list of messages will bring up a red Archive button, which does exactly what you think it does upon pressing.
Mark As Unread is another beast entirely. It feels like Apple changes the location of this feature on every iOS release, and it’s located in a somewhat hidden spot in iOS 5/6. I use this function all the time for e-mails I want to peek momentarily, but to which I don’t have time to fully reply at the moment.
Within an opened message, you’ll need to take the following steps:
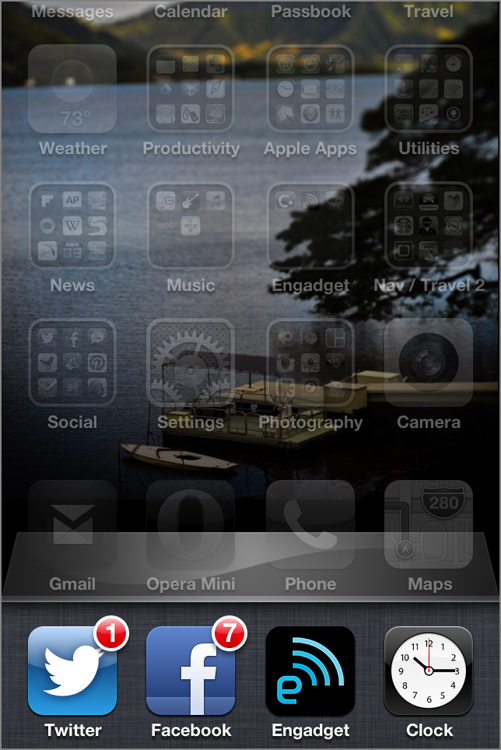
I mentioned earlier that multi-tasking is more like backgrounding on the iPhone. That doesn’t mean that you should avoid keeping mental tabs on what’s lurking behind your Mail pane. When composing an e-mail that requires you to reference something stored on Dropbox, in Numbers, on a web page, an address in Maps, or practically any other application, a simple double-tap of the Home button will pull up apps that are currently running in the background (as shown in Figure 3-9). It’ll only show the four most recently used at first, but a swipe from right to left will reveal more (and more… and more).
Figure 3-9: Background apps are shown in the bottom bar.
Just tap whatever app you need to reference in order to hop into it, and then do the same bottom-bar emergence trick as before in order to find Mail sitting there in the lower-left corner. Your message will remain just as you left it, ready to accept a new thought or even a paste of text that you copied from a different app.
Choosing Your VIPs
It’s distasteful to talk about in public, but let’s be honest: there are e-mails that can wait, and there are e-mails that can’t. What determines the split? The sender, of course. With the introduction of iOS 6, Apple has added a new VIP system that enables you to select and label certain people in your Contacts list to be more important than the rest. People like significant others, bosses, children, and so on. From a mail perspective, this is hugely important when it comes to seeing important messages first.
Much like the arrival of a text message, you can allow any VIP that sends an e-mail to an account established in your Mail app to have their message show up on your lock screen. Think of it as a “high priority” alert. While in the Mail app, you’ll also get a new VIP inbox, where you can sift through messages sent only from folks who you’ve deemed highly important (see Figure 3-10).
Figure 3-10: The worst part about VIP labeling? Choosing who to omit.

Password and Multiple Account Management
Look, you’re a popular person. There’s no need to feel ashamed about having eight e-mail accounts. (At least, you can keep telling yourself that.) All jesting aside, there are a few snippets you should know about having a cadre of accounts within Mail. For one, the notification bubble on the Mail icon—which represents a view of how many unread messages you have—shows the sum of all unread e-mails across accounts. There’s unfortunately no way to force the icon to only show unread message counts for a specific list of accounts, which might not bother those who go to great lengths to maintain a “zero inbox” in their most used account.
I’ve already touched on the importance of carefully selecting which account is your default, but changing from one to the next is fairly simple. While in the Mail app, just tap Inbox Mailboxes in order to pull up a list of your accounts. I recommend naming them with care. If you have more than a couple, using just your name, “personal,” or “work” may not be descriptive enough.
For now, Apple has no feature that allows you to lock specific apps or e-mail accounts. Once you’re through the optional lock screen password—which you established in Settings General Passcode Lock—you’ve access to everything. This is particularly troubling when you need to hand your iPhone off for a work presentation, but would rather your nosey colleagues not “accidentally” read your e-mail or spot any personal push notifications.
To date, there’s no app in the App Store to remedy this, but jailbreakers have an option. A few, actually. FolderLock, Lockdown Pro, and Locktopus can be found in Cydia or BigBoss repositories, and all are priced at under $5. These apps allow you to enable very specific locks for apps and content, and again, my suspicion is that Apple sees the light here and integrates similar functionality into a future iOS build.
S/MIME (Secure/Multipurpose Internet Mail Extensions) is one of the more advanced security features that most common folk will just gloss right over, but for those obsessed with keeping track of signed messages (or those that have this requirement due to the sensitive nature of their work), it’s a great feature to tap into. Apple has enabled support of this by default within iOS, and you’ll need to dig into Settings Account Advanced for each e-mail account in order to enable it on each account. From here, you can opt to receive signed messages and sign them yourself, but you'll need to procure a certificate elsewhere, first. Once in possession of that (VeriSign's a good place to head for that), just e-mail it to yourself and have iOS install it.
Summary
Although the iPhone has “phone” in its name, it’s clearly more than that. It’s an e-mailing machine, and iOS 6 has added plenty of new features (VIP lists, for example) to highlight this aspect. Simply managing the influx of information and notifications is a job in and of itself, but Apple’s notification options allow you to surface e-mails from the people most important to you.
Google finally succeeded in bringing a native Gmail app to iOS, and while it’s far from perfect, it does give avid Gmailers access to the subtle extras that make it so compelling. A native Gmail app has kept many on Android; the addition of this app into the iOS ecosystem could be a great reason to switch. Managing multiple accounts—and perhaps even multiple tools for sending messages—is tricky but worth the effort.