
Chapter 4
Wrangling iTunes (While Maintaining Your Sanity)
In This Chapter
- Understanding how to use iTunes effectively
- Working iTunes activations across multiple systems
- Configuring activations and deactivations
- Managing iTunes syncs
- Circumventing time-consuming processes
- Using one iPhone with multiple machines
Apple has gone to great lengths in order to remove the PC (or Mac, for that matter) from the list of necessary items when first setting up an iPhone. With the introduction of iOS 5 (and continued in iOS 6), the idea of “PC-free” was not only introduced, but also forced to the forefront. Think of it less as an option, and more like the new regime. Not that I’m complaining—making the iPhone more of a standalone device can mean only good things for mobile professionals, not to mention those who just aren’t interested in learning the intricacies of a computer operating system in order to properly set up their iOS-based device. Despite the remarkable efforts, though, an iPhone’s potential is still only fully realized with the help of a partner, and as with most right-hand men, iTunes is both a blessing and a curse at times. This chapter will help you tame a necessary evil, and show you how to make iTunes work with you (as opposed to the obvious alternative).
Mastering the Initial iTunes Setup
When Apple initially launched iTunes on Windows, it aptly proclaimed that “Hell Had Frozen Over.” By bringing the liaison used with every modern iPod and iPhone to the archrival operating system, the company took a huge step in opening itself up and finally playing toward the demands of the masses. Not surprisingly, it has been consumer electronics—not Macintosh computers—that have forced the company’s shares northward and placed them on a nearly unbelievable path of record-breaking quarters. But the irony in Apple’s clearly tongue-in-cheek statement is that there’s more “hell” in iTunes than any other piece of software designed in Cupertino.
Year after year, and release after release, iTunes remains the most griped about piece of Apple software. Granted, it’s about the only piece that works on 95+ percent of personal computers, but there is much to learn about an application that’s both a requisite to maximum iPhone enjoyment and an absolute thorn in the side of computer users the world over. As with most frustrating things, iTunes doesn’t have to be the boss of you, but you’ll need a bit of underground knowledge in order to gain the upper hand.
Creating Your Initial iPhone Profile
One point that Apple doesn’t make nearly clear enough is just how important the initial iTunes/iPhone marriage is. As with any bona fide matrimony, getting these two off on the wrong foot will unquestionably lead to heartache, if not outright disaster. Being that prenuptial agreements are null and void in the computing space, it’s better if you don’t have to resort to a night of reformatting every other week. The trick? Thinking about how you want your media arranged before pressing every “Okay, Move Along!” confirmation button you see.
Intro to iTunes
It’s helpful to know what iTunes is going to ask of you before actually approaching the point of no return. Although owners of the original iPhone can sync most of their applications, music, and preferences to a newer iPhone sans a PC, iPhone owners who are new to the entire ecosystem will inevitably end up touching iTunes sooner rather than later. I suggest plugging your iPhone into your Mac or PC and ensuring that the latest release of iTunes is installed, and the latest version of iOS is running on your phone.
One of the more vexing quirks of Apple is its insistence that you keep your software and hardware up-to-date. I generally recommend holding off on updates for at least a week or two after their release in order to see whether issues crop up (surprise incompatibilities with automotive iOS systems, for instance), but it’s smart to have everything up to date at the point of first contact. Like I said, getting off on the right foot gives you more control over where to take the relationship from there.
Updating both is as simple as navigating to iTunes in the top menu bar and activating the Check For Updates option. If you’re connected to the Internet, your iTunes should search for any available iOS updates when you initially plug it in.
Post-updates, I strongly recommend registering the device when iTunes prompts you. Chapter 1, “Selecting and Setting Up Your iPhone” covered the Find My iPhone feature, but suffice it to say here—this is the first step in ensuring that you can track down your lost or stolen iPhone. Trust me, although it’s easy to just click Never Register, it’s absolutely worthwhile to go ahead and hand over some information.
The next step is undoubtedly important: you’re aiming to either restore your iPhone from a backup (applicable to perfectly happy owners of older iPhones) or create a new profile. For the sake of iOS newcomers (and those who just need a fresh start), the following sections assume that you’re checking the latter.
The Whys, Whats, and Wheres of iTunes
Before going any further, you’ll be best served by having a few other ducks in a row in advance:
- Are you using Google Calendar, an Exchange calendar, iCal, or something else for your date-tracking needs?
- Have you migrated all of your contacts into Gmail or into the Mac Address Book?
- Are all of the photos you want on your iPhone sitting in organized folders within iPhoto?
- Have you compiled an assortment of music for your iPhone, and thrown it all into a dedicated playlist within iTunes?
- Have you converted your favorite video clips into formats optimized for iPhone?
- Are your downloaded apps all up-to-date, and are they arranged in folders and on the home panes that you want them to be?
Choosing to Sync Your Calendar
Believe it or not, Apple’s iPhone actually syncs amazingly well with Google services. Rivals they may be, but they both understand that they need one another. I’m an avid Gmail and Google Suite user, and if you’re like me, your entire world would crumble around you if Google Calendar failed to send reminders for a 24-hour period. The trick when setting up your calendar is to know ahead of time whether or not you’ll be using Apple’s built-in Calendar.
If you use Google’s Calendar, make absolutely sure that you tell iTunes not to sync your calendar. It’s a complete nightmare to have two conflicting (or worse, overlapping) calendars running on your iPhone. It goes without saying that the same is true for any other calendar service other than Apple’s Calendar; if you use Exchange or any other Cloud-based calendar service, don’t let the initial calendar sync happen. (If you happen to dabble in both Calendar and something else, feel free to have two calendars installed—just make sure you don’t end up with duplicate entries.)
Choosing to Sync Your Contacts
Overseas travelers stuck in a hotel room with no native cell service will certainly appreciate having a few pals from back home on speed dial, even if that means dialing a username instead of nine consecutive numbers. The rules you read with calendars apply here; iTunes will give you the option to sync Contacts from the OS X Address Book application should you choose. Pick wisely, because having duplicate (or triplicate!) contacts is confusing to wade through and frustrating to eradicate.
Organizing Your Photos
The iPhone is an ideal tool for displaying photo slideshows to colleagues or coeds, and the built-in Photos application nicely sorts images into folders. But if you want to save yourself tons of time, you need it all nicely sorted on your computer before you sync. On the Mac, the easiest way to do this is to toss the images you want on your iPhone into iPhoto.
iTunes is smart enough to automatically resize gargantuan JPEGs into more sensibly sized files for use on the iPhone, but it’s not smart enough to guess which image should go in which gallery. For those who’ve never sorted their heaps of vacation photos (raise your hands—I won’t judge), this task is downright daunting, but organizing things in iPhoto prior to that initial iTunes sync is time well spent.
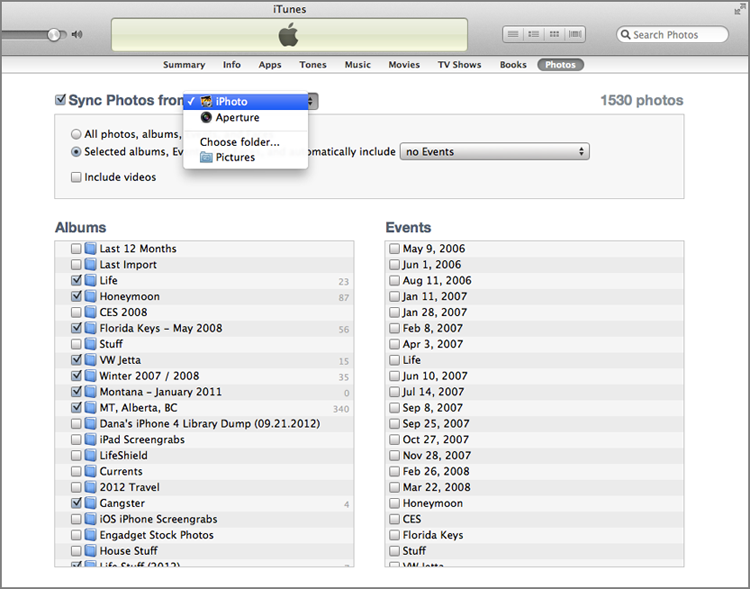
If, for some reason, you’d rather avoid those programs altogether, you can choose the Sync Photos From option in the Photos pane of iTunes (shown in Figure 4-1) and then select a file folder with your desired photos in it. It’s a bit messier, but doesn’t require as much legwork on the organization front.
Figure 4-1: The Choose Folder option is for those who’d rather avoid using a dedicated photo-management program.
Readying Your Music for the iPhone
When it comes to music, I’m happy to report that no third-party program is needed. iTunes, the same program used for syncing purposes, is also the program I recommend using to manage your music. It’s not the most streamlined tool for playback, and older machines tend to have a tough time dealing with how many resources it ties up, but it’s far and away the most sensible for use with iOS products. Syncing music to the iPhone using any program other than iTunes is a hassle that’s simply not worth dealing with, and if you happen to get an iTunes gift card, you’ll find that it’s even more logical to keep grandfathered and digitally purchased music in one central location.
You need to think about storage before syncing music over; I have amassed well over 80GB of music, and if you’re in a similar boat, you’ll be in the unfortunate position of not being able to sync 100 percent of your tunes to your new phone. Time to pick and choose! The easiest way to do this is to create a new playlist within iTunes, as shown in Figure 4-2.
Figure 4-2: Creating a new playlist is as simple as a single click… or pressing Cmd+N (Control+N for PC users).

Go ahead and decide how much room you’re willing to sacrifice for music. Roughly 50 percent of your storage is a safe bet, leaving the rest for e-mails, Dropbox attachments, apps, and photos, but feel free to adjust based on your particular needs.
From there, create a playlist that’s easy to recognize (“iPhone Music” works magically), and then sift through your gigantic library, dragging and dropping your absolute favorites into the list. Those willing to put in the extra time and effort could actually create a number of playlists and simply add up how much storage they each require. Have a look at Figure 4-3 to see where the fun begins. iTunes handily tells you exactly how much space a given playlist takes up on a small line at the bottom of the software—keep an eye on that to make sure you aren’t overloading things.
Figure 4-3: Total songs, total playtime, and total storage requirements. Pay close attention to that last one.

Once you’re satisfied with your selections, it’s important to tell iTunes very specifically what music you want synced. By default, it’ll attempt to sync your entire library until it runs out of room, but that’ll leave no extra space for apps, photos, and whatever else. You need to simply click the Selected Playlists, Artists, Albums, and Genres selection and then check off the individual playlist choice(s). iTunes will bring over only the tunes in those lists, not your entire library.
Preparing Your Video Content for the iPhone
When it comes to putting films, TV shows, or home movies on your iPhone, you have two main options. The first is the one that Apple hopes you choose frequently. There’s a movie and TV rental store right within iTunes, and as you’d expect, anything purchased or rented from there will land pre-formatted to fit on your phone. That’s notable for two reasons: First, it’s optimized for size, so it won’t take up unnecessary space. Second, it’s optimized to fit the screen resolution of the iPhone, so it’s guaranteed to look crisp and not distorted. In other words, renting or buying content from the iTunes Store removes gobs of hassle, and anything downloaded from there immediately files itself nicely into an iTunes subsection on the left rail.
But what if you’re dealing with footage you’ve already captured? Home videos or Digital Copy films acquired as part of a DVD or Blu-ray combo pack might not always be optimized for viewing on the iPhone, and unlike with photos, iTunes isn’t built to convert them without your intervention. The good news is that iTunes is capable of doing it, but you need to put in a little elbow grease. Just visit the Advanced menu to create versions for iPod, iPhone, iPad, or Apple TV. If you want more control over how videos are re-encoded, you can also use iMovie HD or Final Cut Pro, or any other video-conversion software that can downsize to the resolution of your phone.
Updating Your Apps
If you’re new to the iOS/iTunes ecosystem, you won’t have any apps to worry about updating, but if you already have a few kicking around, it’s worth updating them all before throwing them on the iPhone. Within the Apps section of iTunes, you can simply click Check For Updates below your cadre of apps to get the process started, but as with most everything else related to iTunes, you’ll need a live Internet connection to accomplish anything.
If you’re an organization junkie, which you likely are if you’re poring over these words, you’ll want to put extra effort into arranging your apps in a sensible fashion within iTunes. I discuss specific patterns and recommendations in the pages to come, but it’s worth knowing up-front that you don’t want to sync your apps haphazardly, only to then manually arrange them on the device. If you do the arranging within iTunes, that layout “sticks” to your profile.
Understanding Account Limits
You might assume that content purchased in the iTunes Store can be played back only on the machine that you originally used to complete the transaction. Or, if you’re in the other school of thought, you might assume that a single purchase in one place should be readily available anywhere else. With the introduction of iTunes Match and iTunes in the Cloud, Apple has vastly extended the usability of iTunes purchases, but when it comes to actually playing things back and syncing via hardwire, there are still a few limitations that you need to know about.
Authorized Computers
In the iTunes world, your system is either authorized or deauthorized—there’s no in between. In order to access purchased content, play it back, and—perhaps most importantly—sync it to your iPhone, you need to have access to a live Internet connection as well as your iTunes credentials. In essence, iTunes requires you to log in before doing any of these tasks as a means to double-checking your purchase history before allowing you to copy that content onto other devices (such as your iPhone).
The good news is that five computers can be simultaneously authorized. For the vast majority of consumers, that’s plenty. A home desktop, a laptop, perhaps a work machine, and a Netbook shared by the family. But if you’re one of those people (much like myself, I might shamelessly add) and have more than five machines within reach, you’ll need to figure out which of the five you want to authorize.
How to Deauthorize and Authorize
This proves particularly tricky when visiting a friend, and wanting to play back content that you purchased on a foreign machine. If you’re already at your five-machine limit, their copy of iTunes will inform you when you attempt to authorize a sixth. Stuck? Not quite. There’s a fairly simple workaround, but Apple curiously buries the option in a place most folks don’t think to look.
You need to first log in to your iTunes account on the guest machine, and then click your username in the top-right corner. Once you reenter your password, a full profile page is shown. The typical fields are there (name, address, and billing information), but if you scroll all the way to the bottom, you can see how many computers you currently have authorized. From there, you click Deauthorize All (shown in Figure 4-4) in order to remotely deauthorize all five machines and start back at one on the guest computer you’re in front of. Yes, this means you’ll need to reauthorize the systems that you just canned at a later date, but that’s as simple as signing in again.
Figure 4-4: Click the Deauthorize All button to start fresh.

What Can Be Synced, and Where?
Syncing files between a computer and an iPhone can be a magical, if not a mysterious, experience for the uninitiated. With a few choice clicks, content housed on a PC becomes content housed on a phone, all neatly organized and ready for mobile consumption. Apple purposefully leaves many of the particulars vague for the sake of simplicity—a company value that oftentimes annoys power users who would rather have access to the minutiae going on behind the scenes.
Where Files Go in a Sync
Unlike Android 2.x, which allows users to simply mount their devices and drag content over as they would on an external hard drive, iOS takes a vastly different approach. For instance, the MP3 files stored on your computer are renamed and reorganized when synced onto an iPhone, and then shuffled into an esoteric file pattern that only iOS can accurately digest. Why mention this? Because getting files off of your iPhone isn’t nearly as easy as getting them on it.
Let’s say your hard drive fails, and the only place your music remains is on your iPhone. You might assume that a simple “reverse sync” to the new PC would be all that’s required to shift those files back from the iPhone and onto a new system. Sadly, it’s not that easy. The reason likely has nothing to do with Apple, but with the RIAA and MPAA—America’s two largest content overlords. They look out for the rights of content creators, which means that they usually end up frustrating end users in one fell swoop.
If iOS were allowed to reverse sync content unchecked, you could theoretically purchase thousands of songs and movies, and then place that purchased content onto an unlimited amount of guest computers, thereby distributing “stolen” content at will. In reality, this makes it impossible to use your iPhone to restore any lost files. Bummer.
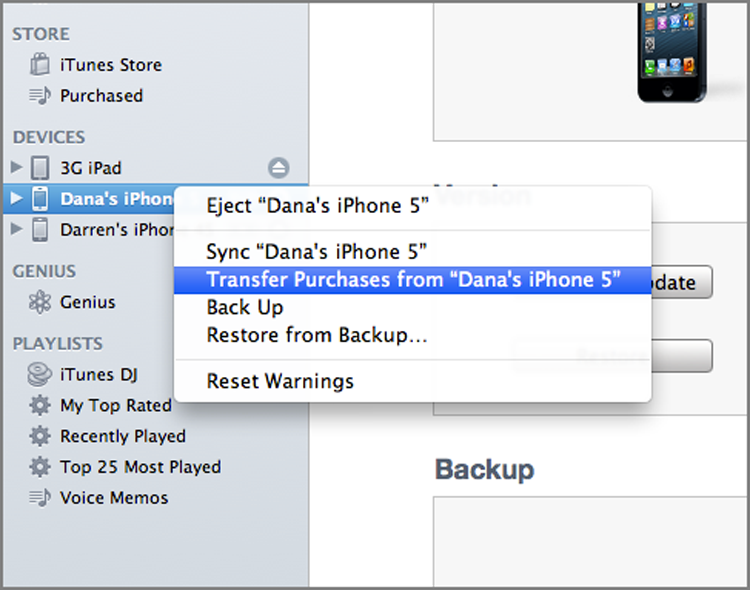
If you plug your iPhone in to a new machine, you can right-click on the mounted device and choose to Transfer Purchases back to the connected machine (as shown in Figure 4-5). It works like a charm for content that you’ve procured via the iTunes Store, but that’s the extent of the functionality. Any content you purchased elsewhere—be it a physical record store or Amazon’s rivaling MP3 service—is not eligible for a reverse sync.
Figure 4-5: While in the Apps or Music section in iTunes, right-clicking your device’s name brings up a Transfer Purchases option.
How to Revert Your iPhone to a Prior State
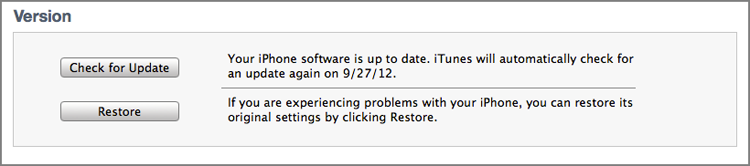
If you manage to create problems for yourself while using your iPhone—perhaps while downloading a problematic app or otherwise—Apple makes it fairly painless to restore your device to a prior state. If you allow it, Apple backs up every single morsel of your iPhone before every new sync, so if something goes wonky, you can plug it back in and select the Restore button (shown in Figure 4-6) to revert the entire system to a place of peace—before trouble struck.
Figure 4-6: Don’t worry if you tap Restore by accident—Apple gives you one final chance to confirm.
Opting Out of a Backup
As mentioned, there’s tremendous value in allowing iTunes to back up your device while it’s still in a recent, useful state. Should anything go wrong, it’s extraordinarily comforting to know that a backup is available to get your iPhone back on its feet. But the harsh reality is that we’re all busy, and sometimes, too busy to sit around and wait for a system backup to complete.
It’s a situation that occurs quite often in my world. You purchase a new album from iTunes, you drag those new tunes into your iPhone Music playlist, and you plug in your iPhone to add those songs. It sounds like it ought to be a simple two- to three-minute process, but if it’s been a month or so since your last sync, the initial backup process could take in excess of 20 minutes. In other words, you have 20+ minutes of waiting ahead of you before the new tracks even think about migrating over.
When you’re rushing out of the door, this scenario is a buzz kill of epic proportions. Thankfully, Apple makes it possible to opt out of backups, but unsurprisingly, it doesn’t go out of its way to advertise that.
Figure 4-7: No time for backups? It’s as easy as clicking that tiny little X on the right.

How to Manage Multiple Computers
It won’t take you long to realize that Apple intends for you to use one computer to manage your iPhone. Have a couple of machines at home, plus one at work? Brace for frustration. The good news is that most of the multi-machine mayhem can be calmed with a few sly workarounds, discussed in this section.
Secrets on Partial Syncs
Believe it or not, you don’t have to sync everything from one machine to your iPhone. But it’s not as easy as being able to pick and choose what comes from where. Users can sync music and contacts from one host machine, while another is used only to sync photos and apps.
The trick is to be exceedingly careful about what you check to sync. If you carelessly leave the Sync Music box checked on a machine with no music on it, your iPhone will soon be devoid of Devo (and whatever else you had on there). From there, the only way to get the tunes back is to resync with the machine from which the tunes originally came—there’s no “Undo button” for syncs.
Cautions on Using Secondary Machines to Add Content
One common misconception is that you can use Machine A to sync your music, and then use Machine B to simply add a newly downloaded album, while keeping your existing playlist in-place. Unfortunately, this is absolutely not the case. The reasoning, as best I can tell, relates back to the same piracy concerns as explained earlier. In an ideal, honest world, Machine B would be able to suck down your existing music structure, back it all up, and then add the newly downloaded tunes atop that. The concern here is that you end up giving Machine B a wealth of content that perhaps the owner didn’t actually purchase. So, Apple makes it impossible, except for music purchased in the iTunes Store. In theory, if every single song on your iPhone were acquired via the iTunes Store, this scenario would be possible. Food for thought, anyway.
But the secret here is that the same is true for apps. The difference, notably, is that most consumers will have acquired every single app on the iPhone via the App Store. Only developers who have side-loaded test programs would run into issues with an app not being eligible for transfer in a reverse sync. So, this situation would work with apps, but there’s a catch. A new iTunes master wouldn’t recall the exact app structure that you painstakingly organized on Machine A, so if you pull over your apps, add a few newcomers, and then resync with Machine B, all of your created folders are eliminated, and you’re left to manually reorganize the location of every single app.
Summary
iTunes is a powerful tool, and it’s one that will almost certainly become a necessity in your continued iPhone use. It’s of paramount importance to organize your photos, music, movies, and apps before making the initial iPhone sync, and it’s vital that you deselect contact and calendar syncing if you’re planning to pull those tidbits from the Cloud on another service (Google, Microsoft Exchange, and so on).
Planning ahead and staying organized within iTunes is the best way to guarantee a seamless and satisfactory experience when syncing with iPhone, and it’s important to always let the program back up your phone whenever you have ample time. If you’re in a pinch, opting out of a backup is as simple as clicking a single X, but remember to plug your device back in when time is more plentiful in order to keep your restore file current in case of disaster.
Finally, I recommend against having multiple iTunes masters on a single device. Although it’s possible to pick and choose which machine syncs which sections, this method makes it impossible to have a whole restoration file, leaving your iPhone susceptible to vast downtime if problems ever arise.