
PART II
Acing the Advanced Features
- Chapter 5 Multi-Tasking Magic
- Chapter 6 Taking FaceTime (and Those Other Video Calling Solutions) to the Next Level
- Chapter 7 Streaming Your Multimedia Without Wires: Airplay
- Chapter 8 Cutting the Cord: Utilizing Wireless Functionality
Chapter 5
Multi-Tasking Magic
In This Chapter
- Learning the shortcuts
- Discovering what’s hidden
- Managing your background apps
- Universally searching
- Gesturing your way around iOS
I’ve alluded to this before, but Apple’s definition of multi-tasking on the iPhone doesn’t jibe with the definition that was (and still is) used within the desktop operating system realm. iOS 5 and iOS 6 can most certainly have multiple applications running at once, but you’ll be forced to look at ‘em one at a time. In my estimation, that’s more like “backgrounding,” but this chapter doesn’t spend any more time arguing semantics. Instead, I explain how to make the very most out of what Apple has to offer in terms of multi-tasking (or whatever you prefer to call it), and how to think about your workflow in a way that follows logic in the iOS world. You learn about shortcuts, dig deep to figure out what’s hidden, and learn to manage the apps that are running in the background. You even learn about reducing resource load by killing apps that you aren’t actively using, and I show you why Apple’s Spotlight is the unsung hero of iPhone productivity. Finally, I touch (ahem) on the expanding world of multitouch gestures, which Apple has placed at the forefront of iOS discovery. Your iPhone is nothing without your touch, and having the full gamut of gestures in the forefront of your mind will undoubtedly improve your overall experience.
Shortcuts Galore
Half of the fun in owning an iPhone is “discovering” new ways to use it. At first, it’s little more than a mystery. Pop a couple of productivity apps on it, and soon it’s an essential part of your workday artillery. But there’s another part of the equation, and that part is usability.
The iPhone, without even understanding the concept of multitouch, is immediately and infinitely usable. There’s just something intrinsically natural about control via touch, and few companies have implemented it as well as Apple has on the iPhone. But smooth scrolling on web pages and seamless shuffling of photos is just the tip of the proverbial iceberg.
Mashing Buttons
Go on, admit it: you always were one of those kids who couldn’t resist pressing the big, red button, despite obvious warnings to avoid doing so. Apple’s minimalistic approach means that there aren’t too many buttons and switches on the iPhone, but that also means that each and every one of them is highly important to understand.
I’ll start at the top. Up there, you’ll find what rocket scientists affectionately call the power button. I’ll give you a moment to ponder its possibilities. In all seriousness, the power button itself does have a few undercover features, some of which are only revealed when used in conjunction with other buttons. Aside from turning an iPhone on from a powered-off state, a single press will also turn on and off the display. Moreover, holding it down for a few short seconds will bring up an otherwise impossible-to-find option to turn the unit off entirely. It’s also not a bad idea to do this every week or so. Even the iPhone can get caught up in its own mire sometimes, and giving it a fresh start every six or seven days helps to ensure that it doesn’t become too bogged down. If your iPhone ever becomes completely unresponsive and unusable—yes, this can and has happened—holding down the power button as well as the Home button for approximately 10 seconds will initiate a “hard reboot.”
While I’m on the topic of using your power and Home buttons in conjunction, I’ll speak about one other function this tandem can pull off. Mashing the Home and power buttons simultaneously will cause a white flash and a camera shutter sound. That song and dance is to let you know a capture of your iPhone display was just taken and stored for safe keeping in your Photos app. It’s the same place that photos taken from the iPhone camera are housed, and they can be easily pulled over to your Mac by firing up iPhoto and initiating an import. Each captured image is saved natively as a .PNG file, with a resolution matching that of the device you’re on.
Screenshots and Hidden Bars
The two-button screen capture feature is a real godsend for those working in the media industry, but it’s also equally beneficial for consumers. Troubleshooting remotely becomes a lot easier when you can capture onscreen errors in order to show others, and those who need to permanently capture something onscreen for offline viewing later will also be thrilled to have this in their back pocket. Curiously, screenshots aren’t saved in their own folder. They’re just saved in the Camera Roll as images taken with your onboard camera. You can, however, easily e-mail, iMessage, or tweet screenshots by searching in the Photos app.
Pressing the Home button twice in quick succession will bring up—for lack of better terminology—the multi-tasking menu. It’s a Secondary Dock bar that contains each and every app that you have currently running in the background, even if they’re idle. They are arranged from most recently used (left) to least recently used (right). Have a gander yourself in Figure 5-1.
Figure 5-1: The Secondary Dock, sitting pretty beneath Engadget’s iOS app.

Swipe from left to right on that multi-tasking menu, and you’ll spot a new layout with a few vital buttons and sliders. While you’re in this Secondary Dock bar, I’ll explain the other shortcuts here. The left most icon controls the orientation lock (preventing the screen from shifting when the phone tilts), whereas the trio of buttons in the middle control music playback (skip backwards, play/pause, skip forward). The right most icon (Music) will pop you directly into your music application. If you’ve most recently used Videos, you’ll see that shortcut in place of Music. I’ve found that double-tapping the Home button and using that Secondary Dock bar to get into my Music app is far more convenient than exiting to the home screen and then hunting for the icon. Furthermore, knowing that this shortcut is always available may encourage you to stash your Music app on a less important home pane, saving more room for other apps on that all-important first pane.
Although the iPhone’s native lock screen still isn’t as useful as some lock screens that are available to jailbroken devices, there is one highly appreciated extra tossed into iOS 5 and iOS 6. If you double-tap the Home button while the screen’s locked, you’ll get a top bar that allows you to play/pause a track, move forward or back within the last accessed playlist or album, and even adjust the volume—all without ever sliding to unlock the device. Have a peek in Figure 5-2.
Figure 5-2: Trigger your Music controls, right from the lock screen.
Furthermore, just bringing up the lock screen will present a small “slider” icon in the lower-right corner. Slide that upwards, and you’ll be taken immediately into your Camera app. This was implemented in order to give users quicker access to their cameras in order to not miss so many crucial moments. Once the Camera app loads, you can flip the phone horizontally and use the Volume Up button as the shutter button. You can, of course, use the virtual onscreen shutter button if you prefer, but the physical button along the top just feels more like a conventional camera motion.
Mastering Your Inner Keyboarder
Not surprisingly, the iPhone relies on touch for just about every interaction. But there’s one antediluvian aspect that’s oft overlooked, though just as important: the keyboard. Although you can admittedly get quite a bit accomplished on the iPhone sans any input on a QWERTY layout, its uses become significantly limited. In fact, Apple itself has shown extra care of late when it comes to the device’s onscreen virtual keyboard.
From day one, critics extolled Apple’s slate for having a remarkable keyboard and input system, and despite having to type on a flat, hard screen, composing e-mails and the like on it is actually quite enjoyable. And quick, to boot. But as I’ve witnessed on the Android platform, one keyboard really doesn’t fit all. I’ve known many people to jailbreak their iPhone solely for the opportunity to install a modified keyboard. Unfortunately, even iOS 6 doesn’t allow for custom keyboard installations, but I touch on using voice dictation in place of keystrokes in Chapter 14, “Utilizing Your Personal Assistant: Siri.”
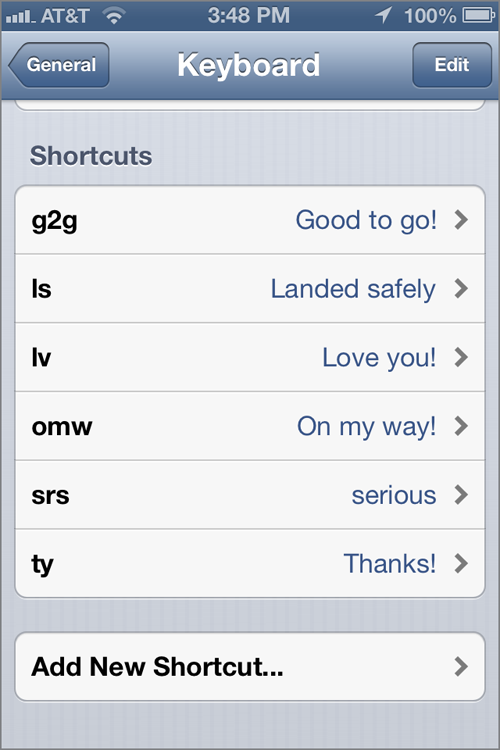
Kbrd Shrcts
Kids these days. Who has time to actually type out full sentences? All jesting aside, there’s more to keyboard shortcuts within iOS 5 and iOS 6 than LOL and JK, and Apple has intelligently pulled in functionality from things like TextExpander in order to make the overall typing experience faster, without reverting to commonly known acronyms to do so.
There’s no third-party app required here. Just surf over to Settings General Keyboard Shortcuts in order to get started. The idea is pretty simple, as evidenced by Apple’s one inclusion from the factory: omw. When typing omw on the iPhone, it’ll automatically expand to “On my way!” By pressing Add New Shortcut, you’ll be able to add any number of similar shortcuts. Perhaps g2g for “good to go,” or iirc for “if I recall correctly”. Figure 5-3 provides another idea. These shortcuts make it easier for legitimate typers to quickly type out actual words and phrases, but on the other hand, quick messagers may actually prefer the shortened version out of respect for space. At least Apple’s giving you the option.
Figure 5-3: Finally, a customizable option. Go crazy!
While you’re in this Settings pane, I’ll discuss the five shortcut sliders that Apple flips on by default. Auto-capitalization, auto-correction, check spelling, enable Caps Lock and “.” shortcuts are all useful to keep on in my estimation, but it’s worth making special mention of two of ‘em. Auto-correction can be a serious pain for those who use iMessage frequently. Yo is almost universally corrected to something other than yo, and you’ll need to get used to tapping the X in the bubble that pops up a suggested word if you prefer to skip it. The “.” shortcut is actually one of the more useful ones in the keyboard; just press the spacebar twice after a standard sentence is complete, and it’ll automatically add a period, space out once and prime your next letter to be capitalized as you begin a new sentence. Handy!
Long-pressing and Hidden Commands
Speaking specifically for the U.S. English keyboard—which is the only one this feeble brain can understand—there’s a bit of extra value in trying out the oh-so-popular long-press. Long-pressing select keys will bring up menus containing extra characters, and if you press the .?123 key in order to switch over to the numeric pad, the trick works on a few keys there, too. Finally, a double-tap of the Caps Lock key (it’s the up arrow just below the A and Return keys) activates caps lock, and another single-tap deactivates it. (A single tap capitalizes just the next letter.)
Although the onscreen keyboard is certainly capable of handling its fair share of e-mails, those who are drop-dead serious about input into the iPhone may opt for a docking or Bluetooth keyboard. When using an external keyboard, the world of shortcuts opens up even further. If you’re familiar with shortcuts within OS X, many of those work on iPhone as well. Here’s a list of surefire keyboard shortcuts that external typists should do their best to commit to memory.
- CMD+C (copy)
- CMD+X (cut)
- CMD+V (paste)
- CMD+Z (undo)
- CMD+Shift+Z (redo)
- CMD+Delete (deletes current line to the left of cursor)
- CMD+Up (top of document)
- CMD+Down (bottom of document)
- CMD+Left (start of line)
- CMD+Right (end of line)
- Option+Delete (nixes the word to the left of the cursor and its preceding space)
- F1 (dims the display)
- F2 (brightens the display)
- F7 (prior track)
- F8 (plays or pauses music)
- F9 (forward track)
- F10 (mutes volume)
- F11 (volume decrease)
- F12 (volume increase)
- Eject key (displays or conceals onscreen keyboard)
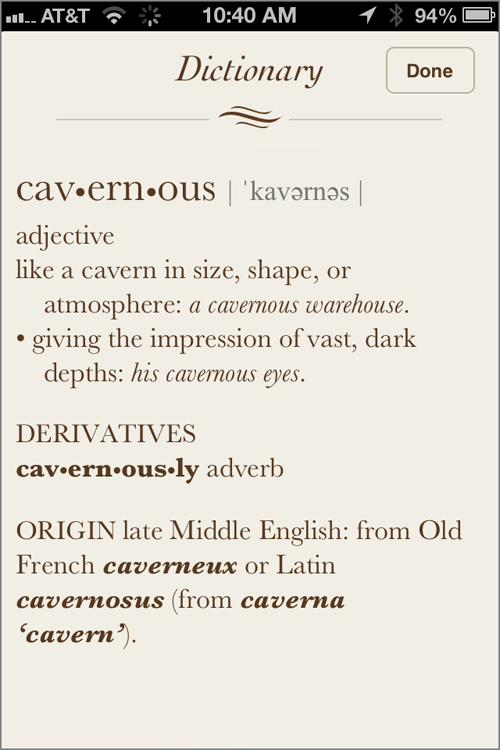
On the off chance that you’re typing a word without actually knowing the definition (or, perhaps more likely, you spot a curious word that your mate typed), you can simply long-press the befuddling word in order to bring up a Define option. As a bonus, the pop-up definition box is just gorgeous (see just how gorgeous in Figure 5-4), proving once again that few details were overlooked.
Figure 5-4: Definitions never looked so beautiful.
Screening Your Phone Calls
It may not be smiled upon, but keeping an overly close eye on who exactly is calling may be useful at times. Apple has really stepped things up in this department with iOS 6. At long last, iPhone users are given options other than Accept or Reject when it comes to dealing with an incoming call. By default, iOS 6 users can select Reply With Message or Remind Me Later by swiping up on the icon to the right of the Slide To Answer window. The former is remarkably useful. If you see a call come in, but you just can’t take it at the moment, a couple of quick taps will shoot a text or iMessage to the caller with a pre-configured message (“I’ll call you later,” for example), or you can input a custom message.
If you’re going into an important meeting, just toggle on Do Not Disturb mode within the phone’s Settings menu. From there, calls will be silenced and sent to voicemail if you so choose. Within Settings Notifications, you can further customize how your phone reacts to Do Not Disturb. For example, you can allow Favorites and VIP callers to still ring through, while all other calls are silenced.
Another beautiful aspect of this new feature is Quiet Hours. Essentially, you can schedule a daily time when Do Not Disturb should be active. If you aren’t keen on receiving notifications, text messages, or calls from the hours of 10PM to 7AM, you can set that up while in this same menu. Experts have long since argued that we’re growing dangerously connected—this simple tweak will ensure that you at least get a decent night’s rest without your iPhone waking you.
Making the Most of Maps
As an avid traveler, having the world in my pocket has been one of the biggest boons to smartphone ownership. There’s a big, bold world out there in the built-in Maps application, but to best experience it, there are a few tips you should know.
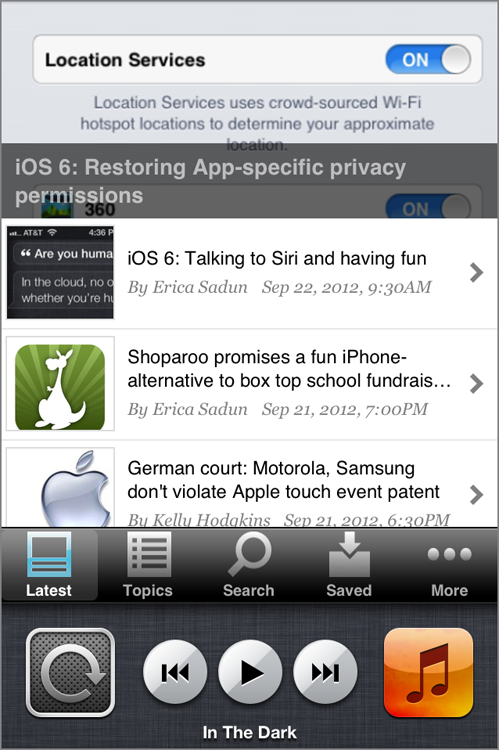
For starters, you’ll need to activate Location Services, at least for Maps. Get going by heading to Settings Location Services, and flipping that top option to On. You should already have this active if you have Find My iPhone active, and while you can switch some apps off if you’re uncomfortable with everything having access to your current coordinates, keep it on for Maps. Without it, well… you won’t do much navigating.
While you’re on this pane, hop on down to System Services. The top six options, all of which should be on by default, are just fine to leave that way. But I strongly recommend switching the Status Bar Icon to On. Why? With that active, you’ll get a location services icon in the top menu bar (beside the battery life indicator) whenever an application is using your location. Think of it as a heads-up to when your coordinates are being shared, and if you object to some unknown app doing so, you’ll be able to quickly shut things down and uninstall it, or adjust the preferences to disable location sharing on that particular piece of software.
Now that your sharing preferences are squared away, let’s focus on a few hidden features of Maps. You won’t go far without getting your bearings, so you’ll need to dial up a Wi-Fi or 3G/4G connection and tap that northeasterly arrow in the lower left. That’s the shortcut for pinpointing your current location—a useful thing to tap before starting any guidance.
Once you’ve searched for a locale you’d like to head to, tapping the pin that drops enables you to seek directions (shown in Figure 5-5), and once that pop-up emerges, you can typically get walking, driving, and public transportation directions—provided that you’re in a proper city for the third option, of course.
Figure 5-5: Tap that title for directions and bring your appetite!

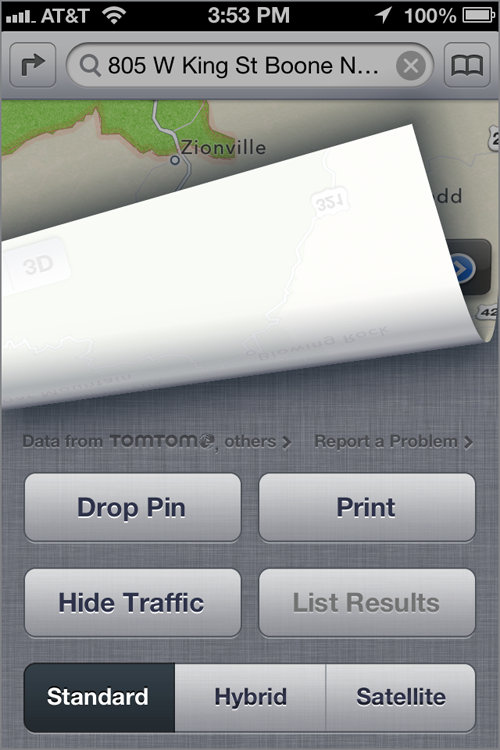
That’s all pretty straightforward, but it may be easy to overlook that turned page corner in the lower right. Pull that page toward the center, and you’ll uncover a few options—mostly visual tweaks—that may prove pleasing. Underneath, you’ll find four Map options (Standard, Satellite, Hybrid, and List), and if you’re in a dense population center, that Traffic overlay will give you a real-time view to congestion on the roads surrounding you. Perhaps the most useful nugget is the Drop Pin function (shown in Figure 5-6), which allows you to place a visual marker on an area that you’d like to remember—perhaps your hotel in a foreign city—to act as a central point of reference. I dive into the Print function in Chapter 8, “Cutting the Cord: Utilizing Wireless Functionality,” but suffice it to say, those zany enough to actually think about printing a virtual map can do so (wirelessly, to boot) from this options pane.
Figure 5-6: Peeling back the options pane in Maps
Managing Your Background Apps
Apple’s iPhone is chock full of surprises, including one that involves apps running in the background. The art of multi-tasking is truthfully still being mastered by iOS, but we’re a lot closer to true multi-tasking today than we were even a few generations prior. iOS won’t allow you to have two separate apps open and onscreen at the same time—the closest you’ll come to that is the use of multiple tabs within Safari—but thanks to an expertly constructed backgrounding scenario, flipping back and forth among programs is just about effortless.
But, as with all computers, the iPhone has its limits. There’s but a specific amount of memory in the device, and while it’d take a hardcore poweruser to truly see a performance dip from using too many programs at once, those who fail to do a bit of housekeeping may unintentionally end up seeing the same.
The first step to managing is figuring out what wheels are in motion. By initiating a double tap of the Home button, you’ll spot the Secondary Dock at the bottom. It’s a sight you should be familiar with by now, but here’s something you may not have known. Each app in that tray is active, albeit idle, in the background. Each app is also claiming its own share of resources—however small—which may eventually impact performance and battery life if the build-up becomes too great over time.
Since the app you used longest ago will be all the way at the end of line, I suggest swiping towards the right until you reach the last app there. Then, long-press on any infrequently used app that you aren’t planning to use soon. A small minus sign will appear in the corner of the app icon (shown in Figure 5-7); give that a tap to close the app, freeing up whatever resources were assigned to it.
Figure 5-7: Minus means gone!

Spotlight: Universally Searching
Without qualification, one of the most useful aspects of OS X is Spotlight. It’s simple, well integrated, and eerily accurate. In short, Spotlight is a baked-in search apparatus that peeks into whatever folders and filesystems you deem fit in order to find programs, documents, and even snippets of code hidden within documents. And while this functionality has been on the iPhone in the past, it’s even better in iOS 6.
As described earlier, accessing Spotlight is as easy as swiping toward the right from the home screen. From there, you can simply start typing, and the iPhone will begin to shoot out tailored results with each additional letter or character.
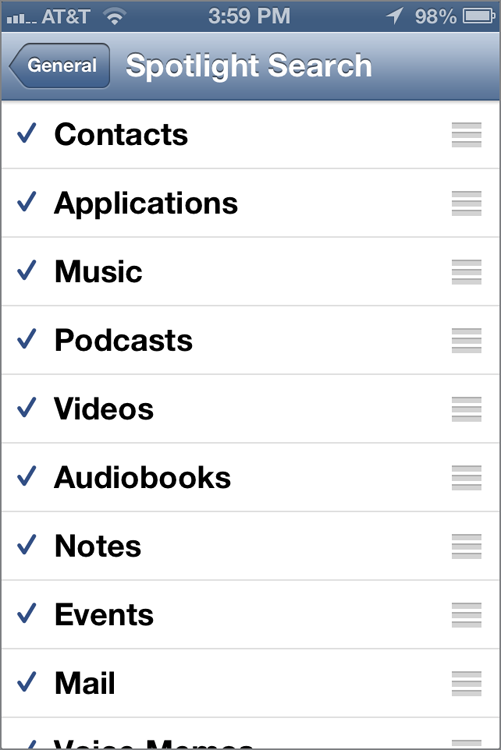
But here’s a tip: Apple lets you customize (to some extent) what Spotlight will index and search. In order to see what’s being included (or, perhaps more importantly, excluded), you’ll need to head to Settings General Spotlight Search and have a gander at the options (shown in Figure 5-8). Unfortunately, you can’t include web apps here, so avid users of the Gmail HTML5 app won’t be able to use Spotlight to dig through archived messages.
Figure 5-8: Don’t want your contacts cluttering Spotlight results? Uncheck ‘em!
While I’m on the topic of searching, I should also point out that Apple is now giving Safari users the ability to change which engine it uses for searches initiated in the top-right Search bar within the browser. A look at Settings Safari Search Engine provides a trifecta of choices: Google (default), Yahoo!, and Bing. My personal preference remains Google, but those who tend to prefer either of the alternatives can change it here.
Gestures to Live By
Gestures have always been a crucial part of the iOS experience, and Apple is keeping that trend alive with the touch input experience in iOS 5 and iOS 6. Everything from gesturing back to the home panel to pinching in order to zoom within the Camera app is included, both of which I highlight in detail in this section.
Shutterbug Swipes
Within the Camera app itself, you may not expect too many extras with regard to touch. Turns out, that’s absolutely not the case. For starters, you can pinch-to-zoom in order to get tighter or farther away from a shot, but remember—you’re dealing with digital zoom here, which introduces a plethora of noise in order to get closer to your subject. Optical zoom, which isn’t available on the iPhone, is the type of zoom that’s preferred, as it doesn’t inject pixilation into your resulting images after zooming.
Remember, it’s also possible to hop directly into the Camera app by swiping up on the icon in the lower right from the lock screen.
Pinching and Zooming
It’s as universal as it gets on the iPhone: pinching and zooming. One technique provides a smorgasbord of effects throughout iOS, and it’s something that I recommend you learn, STAT. In the Photos app, this simple act of taking two fingers onscreen and pulling them closer together allows one to zoom in on a shot; reversing the movement zooms out. While in Safari, pinching in brings a full page in view, while pinching out allows you to focus in on a specific area of images or text.
In Maps, as mentioned, pinching and zooming helps you to get a broader or tighter view on the area that immediately concerns you. This technique is popularized in a litany of third-party apps, making it nigh impossible to list out what it’ll accomplish in every scenario. One thing’s for sure, though: it’ll almost certainly do something in every app, so be sure to give it a go before fussing with a less intuitive way to navigate.
Summary
I’ll never discourage you from discovering the iPhone in a way that suits you. Part of the magic is the ability for the iPhone to become whatever it is you want it to be. But we’re all in a hurry, and this chapter was designed to give you a look at shortcuts and navigation tips that’ll make your time with iPhone both productive and efficient.
Half the battle is knowing where to start, and shortcuts are as important as ever with iOS 5 and iOS 6. From keyboard shortcuts to gesture-based navigational tricks, there’s an easier way to get around. Long-pressing buttons and apps enables you to get where you’re going with fewer steps, and searching for content, apps, and text clippings via Spotlight is bound to keep your wild-goose-chasing to a minimum.
Finally, it’s important to fully realize the power of gestures. Don’t stop with just single-finger swipes to the side. Multi-finger gestures are more powerful and prevalent than ever within iOS 5 and iOS 6, and more often than not, their uses aren’t entirely obvious. Simply initiating these swipes (along with the pinch-to-zoom technique) could help you fall in love with any given program all over again.