17 Single person operation: mic placement overview and static operation
(In the following sections under Single person operation, for ‘reporter’ read reporter/interviewer/presenter/talent/contributor, whichever applies.)
I realize it's an obvious statement, but operating by yourself, you're limited by only having one pair of hands, although an experienced operator will know when the time has come to ask for assistance. However, in this day and age I also realize that, although you may require assistance, the likelihood of getting any is next to impossible, due to ‘budget constraints’ (you'll recognize the terminology if you've been on a management course).
Thus, as well as being responsible for the sound, you're also responsible for the pictures: lighting, exposure, colour balance and composition. You also have to bear in mind the requirements of the edit, keeping an eye on continuity and subject position, plus you'll probably be expected to remember who said what and when. Again, experience is the only guide as to how much one person can achieve without compromising the intelligibility/fidelity of the recorded sound.
Moreover, working alone with your ‘one pair of hands’ limits the amount of equipment you can carry. So in this section, I'm assuming that you carry a fairly basic kit, which for the purposes of simplicity, will consist of mics that are plugged straight into the camcorder. More sophisticated techniques, for example, pole operation together with using the mixer, are covered in differing parts of Sections 22–28, Sound recordist operation.
Mic choice and placement
More often than not, time is your enemy, and although the professional within you would prefer to use a gun mic on a stand to acquire the best quality sound, the practicalities involved in carrying it around, setting it up and running the cable safely around the location (ensuring it is firmly secured, using gaffer tape where necessary) may not endear you to everyone, especially not a first-time client!
Hence, many single operators simply clip a radio mic on the person in shot. It's relatively quick and easy, slips neatly into your pocket for carrying between locations, and there aren't any cables trailing around your feet. But please refer to Section 9, Mics: cables and radio, which outlines possible pitfalls and limitations inherent in RF transmission, and Section 11, Mics: use of clip mic for seated interview, for a consideration of the pros and cons of clip mics.
Remain stationary
As often as not, location sound recording involves contributors in static positions, seated or standing in frame. As a single person operator, this is bound to be in your best interests, as the less you have to move around from pillar to post with equipment, the better. Hence, if you are asked for advice by production on the issue, I suggest you point out to them that a static position invariably proves to be the quickest in terms of set-up (and de-rig) and the most reliable and efficient in respect of sound (and picture) acquisition for single person operation.
Unfortunately, many producers/directors become entranced by the notion of ‘moving pictures’ and frequently endeavour to construct shots featuring the reporter and/or the camera moving as well. Whilst there are undoubtedly occasions when shot development can prove effective, simply moving for the sake of it should be discouraged wherever possible. All too often the problems thrown up by a move can prove detrimental to mic placement, and/or involve extra time spent co-ordinating walking, talking, panning, tilting and zooming, etc. and in the long run only lead to sub-standard results. If you can, suggest a compromise whereby you shoot at least one take of the ‘stodgy’ static shot, and then, if time allows, go for the all-singing, all-dancing, bells and whistles alternative.
Piece to camera
The most straightforward situation you are likely to encounter is one person speaking to camera (or in other words, the reporter talking directly to the viewer), the PTC. However, although you only have one person in vision whose speech is being covered by one mic, you should always use both sound tracks, plugging the main mic into channel one, and selecting your camera mic to channel two. Whilst not totally failsafe, this method of operation does provide a certain amount of back-up in case of unforeseen problems.
If the reporter is sufficiently experienced in mic handling technique, you could ask him/her to hold the gun mic at waist level (preferably out of shot). In most instances, this should provide you with intelligible dialogue against the aural background, unless you're in a noisy environment. In these circumstances, you may find a clip mic positioned closer to the mouth (than the gun mic) produces a satisfactory balance between dialogue and background, unless the surrounding noise is particularly severe.
In which case, you are going to have to position a mic capsule much closer to the reporter's mouth, which almost certainly means a mic appearing in shot. And, whilst I, as a cameraman find this intrusive, I should point out that there are occasions when being unobtrusive is not necessarily what's required, regardless of the background noise level. Certain television stations insist on their reporters using a stick mic complete with channel logo (Figure 17.1). Woe betide those of you who don't get it in shot!
However, if you don't have the logo foist upon you, your choice may simply be aesthetic, which mic looks best? We've already suggested that the stereotypical reporter has a stick mic in one hand and a clipboard in the other, and this could well be the time you put it to the test. Or you may prefer to use the gun mic, although since it's prone to popping especially at close quarters, I would only suggest it as more or less the last resort. Moreover, since gun mics are prone to handling noise, you are now relying on the reporter having the necessary mic handling experience, and you must always remember that once the mic is in somebody else's hands, so is your reputation for sound acquisition!
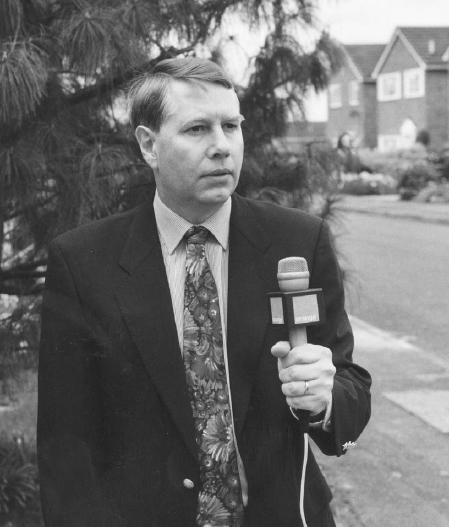
Figure 17.1 Stick mic with logo (make sure it's in shot!)
Should the background noise level be varying constantly, reduce the gain of the camera mic on channel two, especially if you're using a DV camcorder, in order to accommodate any overload and peak distortion, should events become extremely loud. Although, if this does prove to be the case, in all likelihood the reporter's words will be lost/unintelligible on either channel, occasioning a retake.
One plus one
When faced with two people, you would normally use one mic apiece, feeding one to channel one and the other to channel two. Depending on what you have in your kit, you may use:
![]() one clip and a gun or stick mic
one clip and a gun or stick mic
![]() a gun and a stick mic.
a gun and a stick mic.
In conventional interview situations, single person operation almost always dictates the first option, unless you only have one radio mic, in which case use a cabled clip mic for the reporter beside the camera, or a cabled stick mic, if you don't have two clips. If their questions aren't vital, you may pick up sufficient guide sound from the on-camera mic, which should be selected to channel two if you are only using one radio/clip mic on the interviewee.
If the questions are vital, and you only have one clip mic, use a gun mic, which is best on a stand (see Stand mic, below) for the interviewee and place the clip mic on the reporter. If the stand/gun mic option is too unwieldy/time-consuming, use the clip mic for the interviewee and have the reporter hold the other mic (gun or stick), but do ensure that they have sufficient experience to hold it correctly. Fortunately, the majority of aspiring professionals will welcome guidance in this matter (but will probably forget everything you've said once you start recording.).
If both contributors are together in vision, the most unobtrusive solution is almost certainly to use a radio/clip mic for each. But if you only have one in your kit, place the radio/clip mic on your interviewee (selected to channel one) and give the stick mic to the reporter to hold (channel two). Otherwise let the reporter use the stick mic in the time honoured fashion of moving it between themselves and the interviewee (on channel one), and select the camera mic to channel two, but be especially vigilant monitoring the channel one input for suitable level and intelligibility. Visually, you may need to offer advice and guidance to your reporter in order to avoid too distracting an arm movement as he/she moves the mic backwards and forwards, as inexperience can be clearly visible as well as audible (not forgetting that you may also have to consider that all-important logo).
And the rest …
Covering more than two people becomes problematic without assistance, unless you're happy with the reporter and stick mic scenario. Your choice then lies between the stick mic on one channel and the camera mic on the other, or a radio/clip mic on the reporter and the stick mic to cover all other contributors. Circumstances and experience are your only guide to the best solution.
This, of course, assumes that the people are speaking. If they are undertaking some other form of noise generating activity, working with machinery, playing musical instruments and/or singing, then luck plays as great a part as judgement. If you can rehearse their activity, you can judge where best to place your mic, as well as how likely they are to faithfully repeat their performance. But if you have no control over events, you're almost certainly going to have to use the camera mic, and possibly position your reporter with another mic, and guide him/her into a suitable position for optimum sound pick-up (but see Section 2, Sound measurement; Phase, and Moving mics).
‘I haven't got a mic stand in my kit!’ I hear you cry. Well, I always carry a folding lightweight table stand (Figure 17.2(a),(b)) for its versatility in an emergency. As well as putting it on a flat surface, it can be gaffered to all sorts of other stands (Figure 17.3), equipment, bits of furniture, etc. To help with acoustic isolation, place a piece of thick foam/sponge rubber under its base, as they're particularly prone to picking up noise transmitted via the table/desk top. You'll probably need to gaffer stand to rubber and rubber to table to secure it in position (but beware marking/damaging polished surfaces!), unless it is also going to appear in shot, in which case you must strive to make it as neat and unobtrusive as possible.
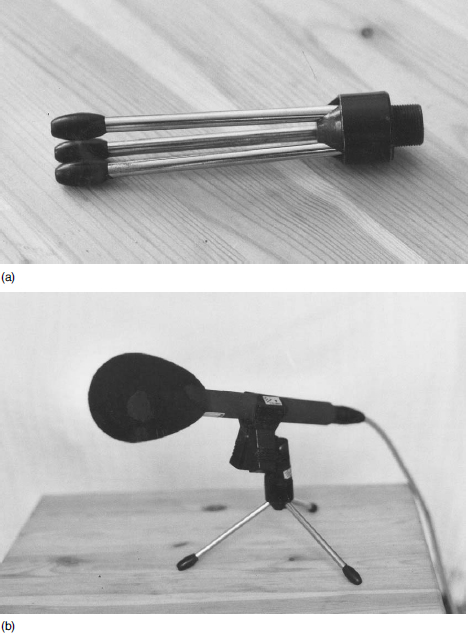
Figure 17.2 (a) Folding table stand; (b) easily opens out to hold mic
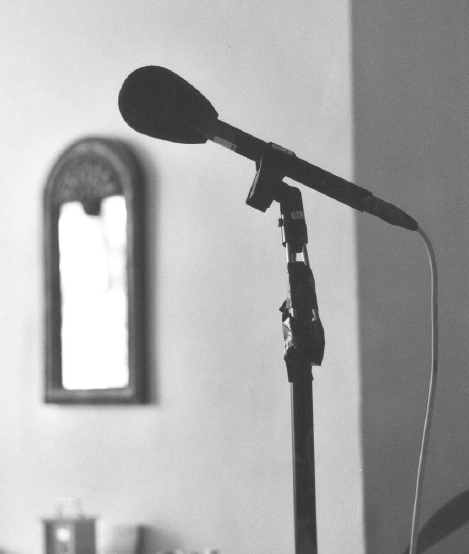
Figure 17.3 Table stand gaffered to lighting stand
If you carry lighting stands, you should use the ones that have a screw thread (Figure 17.4(a),(b)) on the spigot in order that they can double as a mic stand in an emergency. But, although this may get you out of the odd tight spot, they don't have acoustically isolated bases and can all too easily pick up sound transmitted through the floor. Do not rely on them for anything other than desperation, although foam rubber placed under the feet will help, but if you do this, ensure that the stand remains stable.
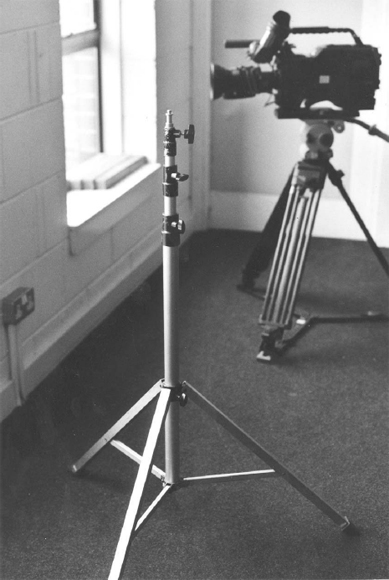
Figure 17.4 (a) Lighting stand with screw thread on spigot
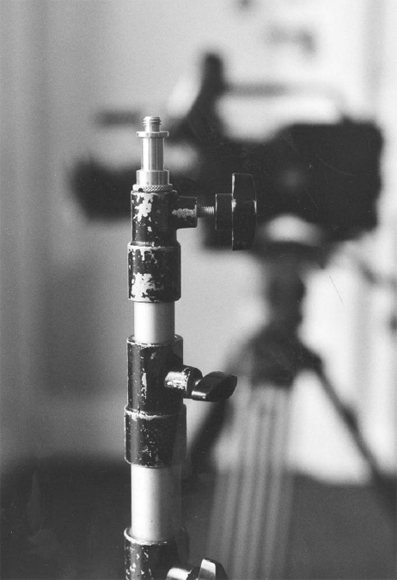
Figure 17.4 (b) Screw thread on spigot in detail
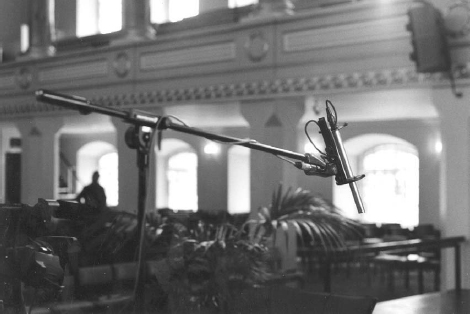
Professional microphone stands come in all shapes and sizes, and are sturdy, thus relatively heavy, to ensure stability and improve acoustic isolation, together with rubber feet (Figure 17.5). My first choice is a gallows stand, with an arm to hold the microphone, an extremely flexible stand, which normally enables you to have both stand and microphone out of shot (Figure 17.6).
Whatever you use, it takes up space, and cramped conditions pose a problem. You need to place the mic in the correct position, but out of shot! A table stand is sometimes acceptable in shot (without the rubber, etc. underneath), which may prove one way of overcoming the problem. If you have pressed a lighting stand into use, you also have to position it such that it doesn't get knocked by being placed too close to your contributors (which is no doubt exactly where you need it for acceptable sound pick-up).
Care: whatever stand/mounting you use, always ensure that the cable is safely routed back to the camcorder, and gaffer it in place if necessary. Please also refer to Section 28, Sound recordist operation: multiple contributors; Mic stands, which has a more comprehensive overview of mounting mics and using stands at height.
Figure 17.5 Rubber feet on mic stand