
Stereo acquisition should not to be undertaken without forethought and planning. There has been much discussion/argument/disagreement amongst professionals over the best way to handle stereo acquisition on location. It mainly centres on the relationship of the sound to the picture. Shooting a sequence, the viewpoint/camera angle changes between each shot; the burning question is – should the sound perspective change to match the visual perspective of each frame? A simple example (as transmitted on one Australian soap) illustrates what happens if we go down this road (Figure 29.1).
Shooting singles of the characters with the mic positioned as for a monaural recording, the fountain switches sides on each cut. This will both draw the viewer's attention to the mechanics of the edit, and prove extremely disconcerting.
Sound stage
At present, custom and practice favours establishing a ‘sound stage’ for each scene, usually as if viewed square on to the action. Before shooting, you must agree with the cameraman and production where this ‘front of stage’ line is going to be drawn. If the camera crosses this line, the left and right of the sound stage will appear incorrect, even though the camera has not technically crossed the visual line (which can all too easily shift angle/position with artist movement).
On location, dialogue is recorded in mono, and in post-production is placed into an ambient stereo atmosphere corresponding to your sound stage. Using a pan pot, the dialogue may be shifted left or right as desired within the overall image. It cannot be over-emphasized that you must know how your results are to be used in order to provide both sufficient and effective material to ‘build’ a believable stereo image. This obviously means that you must record sufficient ambient sound track (without any over-obvious aural intrusion/s, i.e. ‘noises off’) at your location into which the mono dialogue can be placed (see Wildtrack, below).
Sound bite
If, for example, you can be certain that only a sound bite (that is a single unedited clip) is being used from an interview, you could use a stereo mic over the camera to cover the interviewee, and place them in the middle of the sound stage. A similar situation may pertain for a PTC or vox pops (but do not consider giving a stereo mic to a reporter to handle – see Don't move! below). Once recorded in this fashion, using a pan pot will essentially only be able to shift the whole image left or right.
Wildtrack
The problem with using ‘true’ stereo on location is being able to ensure sound continuity over any edits, especially if portions of the sound image (people, vehicles, etc.) are on the move – imagine the amount of wildtrack you'll need to successfully cover all the joins. On a stereo shoot, you need to cover every eventuality from every angle (staying the same side of your ‘front of stage line’), and easily record three or four times more wildtrack than you would on a mono shoot, from each position. A separate sound recorder is virtually mandatory, e.g. DAT.
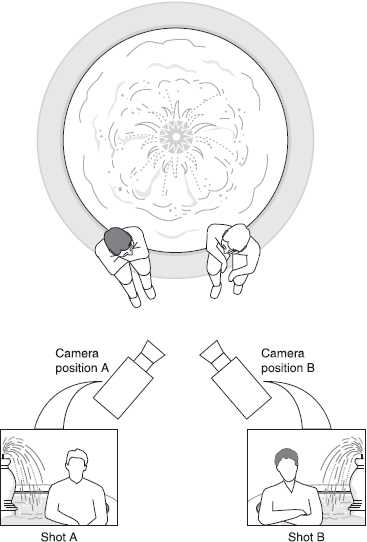
Figure 29.1 The two actors are seated in front of the fountain; but when the cut is made from one camera to the other, the fountain switches from one side of frame to the other in the background and its sound ‘ping-pongs’ from left to right
Don't move!
The first time an experienced recordist uses a stereo mic on a pole, and obeys his/her instinctive reaction to quickly move the mic to follow dialogue, you'll see their face turn green, as their world literally revolves around their ears! Whatever you do with stereo, you must keep the mic static, or the listener will notice the aural image moving. Stereo sets out to replicate the binaural experience of human hearing, and the ear/brain processing happily adjusts to head turns, but sitting watching television, you tend not to turn your head, so the sound stage must remain static throughout each scene.
On camera mic
From the foregoing you can deduce that mounting a stereo mic on the camera is impractical for acceptable sound coverage should the camera move or pan/tilt in any direction.
Mics
Since we have two ears, the most common set-ups utilize two mics to achieve the desired result. Mics may be individually mounted and possibly spaced/angled to represent the spatial separation of the human ears, or they may be mounted piggy-back fashion on top of each other, or both capsules may be contained within one housing (Figure 29.2).
For simple location use, the first set-up would be considered impractical, and one of the other two methods is likely to be the preferred option. Although the obvious way of recording stereo is to record left and right information (A/B) on two tracks, it's more common on location to record M/S, especially for dialogue, as with the mic correctly placed this has the added advantage of providing a strong mono signal for later use.
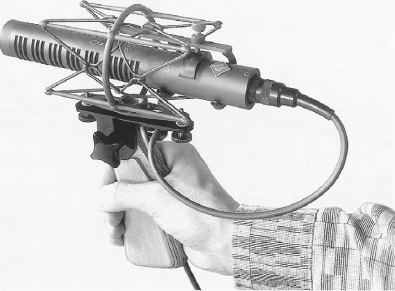
Figure 29.2 A hand-held M/S stereo mic (Courtesy of Neumann/USA)
Middle (or main) and side: a directional mic capsule points forward and a figure of eight mic capsule collects sideways information. The combination of these mics provides Sum and Difference signals, which are the two recorded soundtracks. Thus the ‘Sum’ signal is a ready-to-use mono signal, and the stereo information is in the ‘Difference’ signal, which needs to be decoded along with the ‘Sum’ for stereo sound. A/B stereo signals, left and right tracks, can be obtained from the M/S signals with the correct equipment and conversely, M/S is readily obtained from A/B signals.
The two modes are directly related (simplistically A+B=M and A-B=S), but if the image is wrong in one, it will be wrong in the other, there's no magic ‘fix-it’ in post-production. However, when using M/S you can widen your image by increasing the S signal relative to the M. However, the S signal must not be greater than the M signal, and you run the risk that if your image is too wide, information that is clearly heard in stereo is lost in mono (it's a bit like viewing an original 16×9 picture transmitted as 14×9 protected, you can't see the edges of frame!). A centrally placed source should give a zero S signal, whilst a source panned fully to one side should give equal M and S signals.
Pole operation
On location, mic handling techniques for stereo are radically different from mono. Although you will certainly be using a mic on a pole for some, if not all of the time, due to the mic's construction/sensitivity this will almost certainly be more prone to handling noise from the pole than the equivalent mono operation. Check the mic on the pole for unwanted/unexpected noise before you venture into the field, you may find you need to obtain a different pole.
Of course, you'll want to maintain a steady, not to say as static a mic position as possible, but there may be circumstances that force a repositioning of the mic whilst recording. If you set the acceptance angle of the mic to wide (in visual terms, using your lens, it's the equivalent of zooming out) then any slight movement will hopefully be imperceptible to the listener – but do be aware of the compatibility of the mono signal! If the visual analogy helps, shot development on a wide angle lens is less wobbly and distracting than shooting on a narrow angle.
Having set your sound stage, do give a thought as to whether you're working the pole over or under the action. In mono, recordists often swap the ‘above or below’ mic position between shots with gay abandon, but if you do so working in stereo you will obviously laterally reverse the image, unless you change left for right. In A/B you can do this by swapping the inputs to the mixer, or in M/S, you can phase reverse the S signal.