
22 Sound recordist operation: mixer
In this section, you wear the mantle of the Sound Recordist, a member of a professional team, with a wider range of equipment and responsibilities than the single operator. You're solely responsible for sound recording, working closely with a cameraman, and on larger productions you may also be responsible for supervising other members of a sound crew. As you become more experienced, you will be expected to work together with staff from several different backgrounds and disciplines. You should always respect the experience and knowledge that your colleagues in other departments bring to the production (make-up, costume, props, sparks, etc.) as they will respect you and your views. Before you reach this stage in your career, make sure that you take the time to understand every person's role in the programme making chain, and how all of you interact with each other in order to work together as a team, no one discipline is more important than another.
Operationally, you're now using mics fed via a mixer to the camcorder, monitoring on headphones, and feeding both tracks of the recorder. Nevertheless, at this juncture we'll only consider mono recording, and tackle stereo separately (see Sections 29 and 30). This section builds on the information from previous sections, rather than repeat everything about camcorder audio facilities, mic placement, shooting for the edit, etc. In order to avoid confusion, in the sections which are prefixed as ‘Sound Recordist Operation’, ‘channel’ refers to mixer facilities and ‘track’ refers to recorder facilities.
Portable location mixer
The vast majority in use today are four channel capable, enabling you to mix up to four separate sources (Figure 22.1). For the majority of location work, they are operated whilst slung around the recordist's neck via a strap, and experience is needed to adjust them to find a comfortable position in which to ‘wear’ one all day (Figure 22.2). They are often contained within a weatherproof pouch, which can hold extra items of equipment, for example, spare batteries, screwdriver, radio mic with transmitter/receiver, etc. This being so, ensure that your mixer/pouch combination has a reasonably wide and padded strap to spread the load on your shoulder/s. The mixer itself provides a range of facilities, but you must refer to the handbook in order to confirm whether the one you are using has all the features listed below.
(a) Channel inputs
Each channel is switchable between mic and line level inputs, and normally has additional switched attenuation, most commonly 10 dB and 20 dB, and/or a coarse gain control in order to give each fader precision control within a wide range. There is also switched provision for phantom or T-powered mics. Switchable bass cut is available usually in two steps, commonly 4 dB and 10 dB, at 50 Hz and/or 100 Hz, or at 75 Hz and 150 Hz (Figure 22.3).
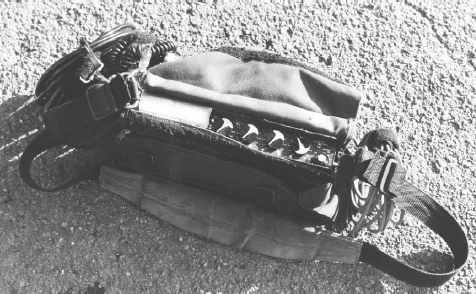
Figure 22.1 SQN4 portable location mixer in pouch
On location, plug the inputs in a logical fashion. For instance, from your operating position you could have the contributors, as seen from left to right, plugged from channels one to four. Or you may prefer to stick to a personal working set-up, for example: channels one and two – clip and/or radio mics; channel three – stick mic; and channel four – gun mic; or for press conferences, gun on three and PA on four. Your working preferences will probably be dictated by the layout and ‘feel’ of the faders on whichever mixer you're using.
On a stereo capable mixer there will be pan pots for each channel, and a channel gang switch for at least channels one and two, if not three and four as well, and the facility to gang limiters (see Section 30, Stereo: mixer).
(b) Outputs
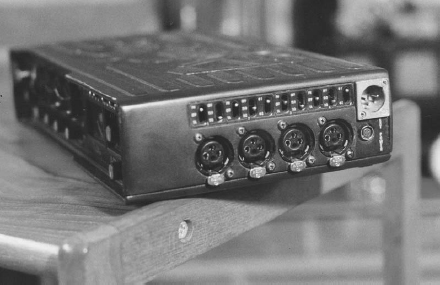
There are at least two pairs of balanced outputs, main (multi-pin) and auxiliary (3-pin XLRs), each may also have a gain control sited at the side of the mixer, although the outputs are fed primarily via the main gain control. There is also an unbalanced output, suitable for feeding a separate recorder, e.g. DAT or transcription (Figure 22.4).
The overall amount of compression and limiting may be variable/switchable. A compressor circuit acts in a similar fashion to a knee circuit in the video signal, and proportionally reduces the level when it rises above a pre-determined point (the onset or threshold). This onset may be variable/switchable as may the proportion of compression applied to the signal (2:1, 3:1, etc.). A limiter is a compressor with a high ratio, at least 18:1, with the onset close to peak. Thus, any momentary high-level signal, a gunshot for example, which would distort when passed without limiting, is held when its level reaches the pre-determined threshold. The limiter decay time may also be variable, and for optimum use is set to around 0.1 to 0.2 second.

Figure 22.2 Sound recordist using a mixer harness over both shoulders – good load-spreading
(c) Powering
Most models run on a nominal 12 V supply, often 8 AA dry cells loaded internally, but the operational voltage range may be approximately 9–14 V. There is a power switch which either offers internal or external powering in addition to ‘off’, or the mixer may detect when power is available on its external feed, and switch from the dry cells to external automatically. The external power socket will accept 12 V from a rechargeable battery via a suitable lead, the slim NP1 being a popular choice with recordists. (If the mixer runs on AA cells, you'll probably find that rechargeable AA cells do not provide sufficient voltage to run it for any length of time, if at all, as their nominal maximum is 1.2 V per cell as opposed to the 1.5 V per dry cell.)
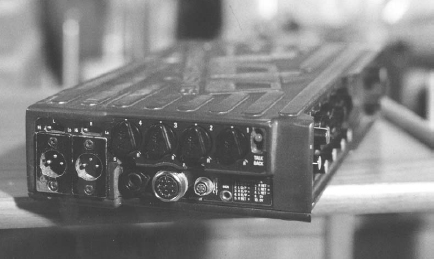
Figure 22.4 Mixer output panel
The mixer dies when power drops below approximately 9 V, and most mixers have a battery check facility (often via one of the meters). A safety feature of most mixers is that the audio monitoring facility loses signal (in other words, your headphones begin to ‘die’) before the mixer output, so you can tell if and when batteries need replacing during a lengthy recording prior to any deleterious effect to the main sound output.
(d) Metering and monitoring
Most stereo capable mixers intended for broadcast use have two PPMs for metering. They may follow mixer signal output only, or switch metering to follow the headphone monitoring selection. The headphone monitoring will normally be via either a standard quarter inch (6 mm) jack or mini 3.5 mm jack socket, with an associated volume control. You must set your headphone monitoring level before you start any other work, and note the position of the volume control. Since the mixer is unlikely to leave your hands, it is extremely unlikely that this control will be accidentally altered, but it always pays to be careful.
Headphone monitoring includes most, if not all, of the following: mixer output, return feed from camcorder, A/B stereo, A or B in both ears, M/S stereo, M or S, each channel independently, PFL – pre-fade listen, which allows you to monitor the input to a channel before opening the fader. (See also Section 24, Sound recordist operation: mixing mics; PFL.)
(e) Tone
The mixer may provide a selection of ‘standard’ tones for test/line-up purposes (see also Section 6, Camcorder: sound metering; Meter summary), and certainly mono and stereo tone. Stereo tone idents at least one channel (usually the left).
Mixer/recorder
There are currently mixers available incorporating an onboard hard disc recorder. This facility is slowly making inroads into productions which previously used separate Nagra and DAT recorders. They do, however, use more power than a stand-alone mixer, and are heavier. If you use 12 V rechargeable batteries for power, and have a couple of radio mics and transmitters/receivers in the mixer pouch, alongside spare dry cells, XLR sex-change barrels, phase reverse lead, and a tweaker or two, then slinging the whole lot round your neck for a day's work may not be entirely practical. (I never cease to be amazed at the detritus carried in the average sound recordist's mixer pouch, kangaroos have nothing on them!)
The other advantage to using this facility is that you no longer need the umbilical cable between your mixer and the camcorder, although do ensure you select the camera mic (preferably to both recorder tracks) to at least provide a guide track, in the event you decide to dispense with a cable feed altogether. You almost certainly do need a feed of timecode from the camcorder to your recorder. (A word of caution with respect to timecode – to date, the majority of camcorders do not possess sufficiently accurate onboard timecode generators to ensure they run in sync with other equipment unless a locking feed is provided, or they themselves are the master, see also Section 33, Timecode.) The feed can be cabled, but that defeats one of the advantages of this set-up. There are radio timecode systems available, but problems in the signal path can render gaps in the timecode, and thus throw up horrendous problems in post production. The best solution is to use accurately set timecode generators, such as Lockit boxes (Figure 22.5), feeding each item of equipment.
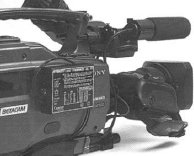
Figure 22.5 Lockit box mounted on the side of a camcorder (courtesy Ambient Recording GmbH)