
23 Sound recordist operation: track selection
Camcorder plugging
There are many differing cables and connectors available to couple the mixer to the camcorder. Broadcast camcorders have XLR inputs, and the simplest method of connecting the two is to run two XLR cables from the mixer, to feed tracks one and two. More often than not, though, in the field of broadcasting most sound recordists will use one of the more specialist cables and connectors which consists of a single outer housing with several cables contained therein. As well as sending sound to the camcorder these ‘multi-core’ cables provide the facility to receive a combination of return information including audio monitoring, cueing, video, timecode, and even power from the camera battery.
On the other hand, should your work involve smaller DV equipment, you may find that you have an option to purchase specialized interface boxes/connectors which can either be off-the-shelf, or even made to order, in the event that you are not yet fully confident to wield a smouldering soldering iron. In this field, though, there are too many variations (and continuing developments) to present any form of comprehensive list herein.
Whilst having all the information provided by a multi-cable connection is often useful, in the broadcast arena these cables are heavier, and more expensive than a simple pair of XLRs. Your cameraman may not thank you for adding to his/her load! If a fault occurs, unless you carry a spare (expense!) it's a good idea to have several XLRs to fall back on.
However, since speed is so often of the essence, the majority of recordists opt for the single multi-core cable between the camcorder and themselves, in spite of the extra expense and slight additional weight. Always beware: the problem with using more than one lead/cable is that two or more can all too easily tangle together, and cause problems when fast coupling/uncoupling is required. Should you opt for the two XLRs route to feed the camcorder, I suggest that you ensure that they're both the same length, and that you tape them together at regular intervals along their length to avoid the mad spaghetti heap that can all-too-easily materialize under your nose, when least expected.
To further minimize the risk of this unseemly happenstance, whatever cable/s you use, do not leave more than is necessary between the camcorder and yourself. Coil any excess at your own end and attach it to the mixer in such a way that it can easily be loosened if the cameraman suddenly hares off after that vital shot (Figure 23.1). At the start of the working day, many recordists attach ‘tails’ to the camcorder (or some form of ‘breakout box’) allowing for that all important swift coupling/uncoupling (Figure 23.2).
Without re-hashing information from previous sections, with the mixer connected to the camcorder, make sure that you have selected line level input for each of the tracks. Moreover, unless you are feeding the same sound to each track, check that you've correctly fed tracks one and two. For peace of mind, different coloured glands or cables are a boon, since a swift glance at the plugged ends is all the reassurance you need to establish that everything is connected as it should be. When you do a line-up, check the last few seconds of recording to ascertain that all is working as expected, and that your track selection and levels are correct.
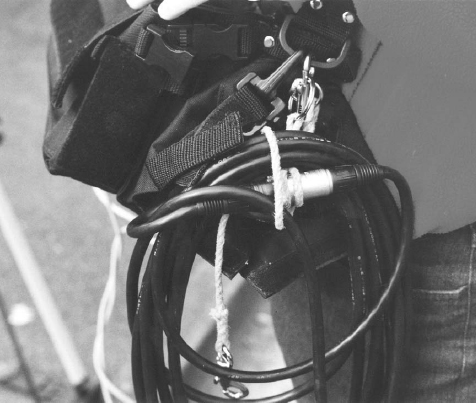
Figure 23.1 Cable coiled on mixer
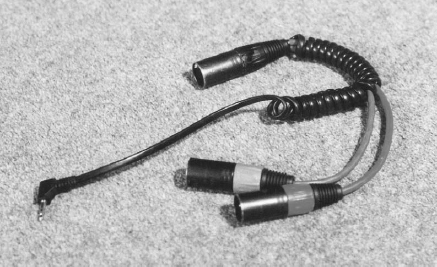
Figure 23.2 ‘Tails’ used to attach mixer lead to camcorder, allowing for quick disconnection
There will be times when the cameraman you're working with will go off and shoot by him/herself, using the camera mic to provide a guide track. When the two of you ‘re-connect’ it is vital to check that you've re-selected ‘line’ input to both recorder tracks, and that your mixer is correctly re-plugged. Do not rely on the cameraman doing this (and I speak as a cameraman myself!).
The cameraman may also rely on you selecting the camera mic in the first place, before he/she goes off in search of his/her illustrative shots. And it's usually best if you do so, since, as sound recordist, you're nominally in charge of all the audio recorded on location, even though you may not actually be plugged into the camcorder and monitoring the results at all times! In this event, for safety's sake you may opt to select manual level to track one, and auto level to track two, since this should cover just about any conceivable shooting scenario.
However, some cameramen/productions prefer to have the camera mic selected to track two at all times, regardless of whether your mixer is connected or not, which is more an ENG style of operation. They may even dictate whether they want it in auto or manual mode (meaning they will probably insist on ‘auto’ in spite of your protests). As a sound recordist, you may have to accept this, even though you would prefer to use both tracks for your mixer output when connected. If you do work like this though, ensure that track one is always switched to line level on the rear input, and that you write up the cassette box/label to this effect.
Radio link
An alternative to having a cable between the camcorder and the mixer is to radio link the sound feed between them. Some productions/cameramen may insist on this set-up, and whilst it can provide great flexibility of working and freedom of movement for both the camera and mic positioning, it has its share of pitfalls.
You will have to mount a radio receiver on the camcorder, which not only adds to its weight, but almost certainly also affects/alters the balance. This may prove problematic either when operating on the shoulder/hand-held or tripod mounted camcorder (depending on the range and flexibility of the panning head). The receiver needs to be powered, and this is best done via the camcorder battery if the facility exists, since in this configuration, any battery failure precludes the possibility of further shooting. I hope this is an obvious statement, but you must always be aware of when the camcorder is turning over, so that you're sending correctly balanced sound at this point in time.
Plus, just to keep you on your toes, there are several reasons why the mixer output may not be recorded, among them:
![]() Your transmitter develops a fault/battery dies.
Your transmitter develops a fault/battery dies.
![]() The receiver develops a fault/battery dies.
The receiver develops a fault/battery dies.
![]() RF problems/interference, as outlined in Section 9, Mics: cables and radio, Radio mic rules.
RF problems/interference, as outlined in Section 9, Mics: cables and radio, Radio mic rules.
![]() The cameraman doesn't notice the lack of sound.
The cameraman doesn't notice the lack of sound.
As with using radio mics, the only safe way to ensure that you have a complete sound track is to replay all of it at the end of a take. Should this prove impractical, or if you're covering an unrepeatable event, then, for peace of mind, and to allay heart failure, make a back-up recording. At minimum this should be on MiniDisk, if not DAT (or Nagra). Hopefully, as mixer/recorder combinations become more commonplace, these problems will be alleviated.