
28 Sound recordist operation: multiple contributors
How many people can you cover on a single camera shoot? Unfortunately that's the sound equivalent of the ‘How long's a piece of string?’ question. You often find that, in spite of having advised a production concerning the limitations of a four channel mixer, on the day, several extra guests materialize, ‘We just couldn't say no, and their views are vital, darling!’ Yes, I forgot to mention that you must carry a large hat from which you pull rabbits several times a day!
Depending on the content of the shoot and the positions of the contributors (and the size of the shot/s and the acoustic, etc.) you may be able to cover everything and everyone with the gun mic on the pole. If there's a main presenter/reporter, you could put a (radio) clip mic on them, and use the pole for the rest of the contributors. Or if two or three of the guests are the major contributors, you could mic them individually, and again use the pole for the rest. You need to be sure that your results will be sufficiently flexible for post-production.
Therefore, before you start shooting, advise production that the limitations imposed by four channels may mean having to retake parts of the item to ensure intelligible sound throughout. During recording, if you do miss the beginning of someone's speech, it's normally better to wait until the end of the take before you ask if that particular answer is important (without the contributors overhearing your conversation) to give production the option of going for a re-take.
Multi-channel desk
Of course, providing you have advance information you may opt to use a larger mixer (Figure 28.1) and extra mics. If you do, (a) it could well require mains power, and (b) of necessity you'll be seated (recordists always get to the chairs first) in your own working area (check that there's sufficient space available at the location).
Should mains power (or lack thereof) be a problem, you could cascade the output from your portable mixer into one channel of another. Two four channel mixers then provide you with seven mic inputs. This is probably simpler than using two portable mixers and feeding the output of one to track one and the other to track two of the camcorder, although that would provide you with eight mic inputs. However, it's not an operationally portable option, if you see what I mean, and you still need an area to call your own in which to set up. Moreover, this tends to be a solution of last resort, as two portable mixers are difficult to control with a lively seven way (or more) discussion. With the left hand (and fingers!) on one mixer, and the right on the other, you'll find that split brain becomes more likely than split track!
The sound trolley
Rather than having to search for a desk or table (or other flat surface), working from a trolley affords much greater flexibility for your operation, especially when moving between locations. There are many available for this purpose, allowing you several options as to how you may best configure it to suit any given circumstances. For instance, you can choose the number of shelves, and where you place several other facilities on board. There's a wide selection of these which may be vital to your shoot, including mini-monitor, mics, DAT recorder, handsets, cables, dry cells, etc.
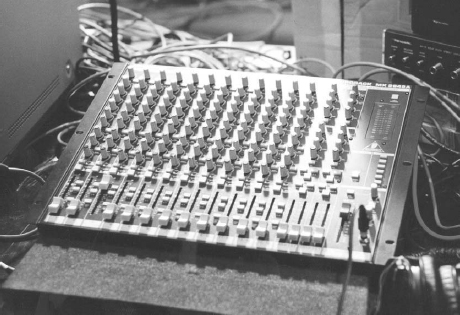
Figure 28.1 Multi channel mixer
The base can be an ideal place to house large batteries to provide power (very often a car battery or two, depending on the length of your shooting day and estimated power drain), and many recordists utilize the trolley structure to clip the pole to the side, together with radio mic receivers (strapped/gaffered/clamped on to an elevated spare pole or stand, firmly attached to the side). Add to this all those other items from the mixer pouch I've already mentioned, together with a folding chair and thermos, and you'll never go back to working without one!
Mic stands
Years ago, it was a customary wheeze to send new recruits on a quest to technical stores for a long stand. But like screwdrivers, there's no single one (long or short!) that suits all occasions (Figure 28.2). When choosing a stand, you must ensure that it holds the mic stable and securely in the position you require. If it has a boom arm and/or telescopic sections, you must check that the arm/sections can be securely tightened to support the weight of the mic (plus windshield?) that you intend to use, and that they aren't prone to droop or collapse under the strain.
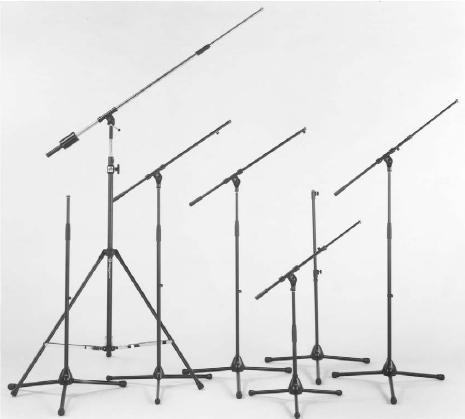
Figure 28.2 Mic stands (Courtesy of AKG Acoustics)
In use, they should be sited as safely as possible, and acoustically isolated from the surface on which they're placed. Do not use them on rough ground, or other unstable surfaces, unless you have a secure means of anchoring them in position. A heavy base is an asset, as are sandbags placed on the base, but these alone should not necessarily be relied upon as the sole means of anchorage. On exterior locations, I have seen stands roped down to tent pegs, and I recommend you use a minimum of three, which are best sited equidistant between each leg, if the stand has a tripod base. (But beware the possibility of noise being transmitted via the taut ropes to the stand, and thus to the mic output, especially if they get knocked by passers-by or buffeted by the wind, unfortunately, there's no perfect answer in atrocious conditions.)
Beware, the higher you raise a stand, the less stable, as a structure, it becomes overall. So even indoors, with no howling gale surrounding you, as well as weighting and/or securing the base, you may also have to put some form of ‘protection’ around it in order to prevent the possibility of someone getting too close to it and knocking it over. This protection should take the form of good solid structures, most locations should have suitable furniture such as desks or tables you can use for this purpose (you definitely don't want to carry these around with you). Note: avoid using chairs. I've often seen chairs placed round equipment to keep it clear of people, but I'm afraid that people more often than not remove those same chairs to sit on, leaving a potential accident exposed.
For cables, use the clips on the stand if they are provided, and double check the safety of the cable runs back to your operating position. Should the public have access to the location at any time during your operation, all cable runs should be secured using gaffer tape or rubber matting on the floor surfaces, or by correctly supporting and slinging them above the working area to avoid a hazard. When there are only members of the production on site, it is often assumed that they are sufficiently experienced to avoid the trip hazard presented by cables. Nevertheless, the safest course is always to secure them whenever possible.
Equalization
Multi-channel mixers generally have several other facilities available on their control panel apart from a fader per channel. Depending on the make and model, they can allow you to perform all sorts of sound manipulation or ‘enhancement’, the most common being EQ, equalization. Using this, the frequency spectrum is divided into bands, each one with controls to increase or decrease (amplify or attenuate) that particular portion of the spectrum. In this way you have more precise control over, say, the bass cut of a hand-held mic, or enhancing the bass response of a clip mic.
Should you be recording a musical item, for example, you might decide to use EQ to ‘improve’ one or more of the performers or their instruments. I would caution you against too much signal manipulation ‘in the field’ where listening conditions may not be ideal. Any signal processing of this sort is best left to post-production, especially if the signal is digitally encoded prior to recording.
Face the music
Whilst on the subject of musical items, you should confirm with your cameraman that he/she will not stop recording, even whilst changing shot and/or moving from one position to another, especially if he/she is shooting with the camera hand-held/shoulder mounted. This is most important as in these instances you must always ensure that the sound track is continuous. I promise you it's blood on the cutting room floor otherwise, as discontinuous music tracks are an editor's nightmare.
I haven't said anything about how best to place your mics for musical items, it's even more of the ‘How long's a piece of string?’ question, but one with knots in! In a handbook of this nature, nominally about single camera acquisition, I can but offer guidelines. First of all, are you only using the two camcorder tracks or do you also have other tracks separately available? The answer to this question obviously affects which decisions you can leave for the dubbing mixer/editor.
One mic
In the main, it's simplest to use only one mic, the gun mic for preference. Most musical groups/performers are used to public appearances, and should be self-balancing, especially if they are acoustic/unamplified. If they have a conductor, a good starting place is to position the mic over (and possibly slightly behind) his/her head, allowing sufficient room for enthusiastic arm movement, three metres clearance should be about right. Hopefully, you'll have time to rehearse, and adjust the position of the mic to bring about the desired result. If you've time, record the rehearsal and replay it to the performers, they may wish to adjust their performance/balance to improve the overall sound.
If the group uses amplification, you'll probably need to position the mic as far from their loudspeakers as possible, and hope that the overall mix sounds correct. Again, record a rehearsal, and replay it. With an enthusiastic (over-amplified) group, it will be almost impossible to assess their performance in situ, so replaying it in a quieter environment afterwards is vital. They may, or may not, be able to adjust their overall mix to the loudspeakers, and you may be able to convince them that for your purposes, it's best if they adjust the mix to … and this is where your diplomacy may be stretched to its limit, or beyond, but suggestions are – bring the vocal forward, lessen the bass, back off the drums, shoot the pianist – no sorry, wrong script … and hope that they comply.
With a multi-channel mixer, you may be tempted to use a mic for each instrument and/or performer, and even utilize separate recorders to provide extra tracks. This is only for the experienced recordist. The major problem you face is getting sufficient separation between the outputs of individual mics/tracks. If you don't succeed, there will be too much ‘colouration’ on some or all of the tracks from adjacent performers/instruments to enable the dubbing mixer to perform a satisfactory balance.
Shooting from several camera positions
Whilst on the subject of performance, should you be involved in coverage of onstage activities, such as drama and/or musical items, you may very well find that the method of coverage from a visual point of view requires shooting the scene from several camera positions. In this way, there will be a reasonable variety of shots of different sizes from several angles, which will ensure flexibility of choice in the edit suite.
From a sound point of view of course each time you run the sequence, you'll have a different sound track (although this naturally doesn't apply if you're working to a backing track). And you must ask yourself, ‘Which track is likely to be considered the main one?’ before you actually run to record. I'm sure you'll soon realize that the shot which is critical to having the sound absolutely in sync with the vision is the close up, either of a character speaking, or of an instrument being played.
Therefore, make sure that any tracks shot in close up are continuous from a sound point of view, especially if the cameraman decides to move the camera at some stage during the performance, and even if he/she chooses a different shot size from a fresh angle. In other words, under these circumstances, the camcorder must always be running to provide a continuous track, regardless of the pictorial content (unless of course you're also running a separate sound recording on DAT, or similar, which you must keep running irrespective of what the cameraman is up to!). It may be that a sound edit can take place later, between two or more of your ‘close-up’ tracks, but do take care to ensure the consistency of your balance between takes for close-ups.
If time is available, you may also wish to re-run one or more of the close-up takes with a slightly different balance, bringing that performer/character a little more to the fore in your mix (see also Perspective below). Again, the more choice you can give the editor in post production, the better, but do ensure that each take is labelled or identified accordingly, as to any change you make to the mix or balance.
Perspective
Whilst it's unlikely you'll find yourself working on a full scale drama at the start of your career, dramatic reconstructions are often included in documentaries, and you must become familiar with working to a script. Whilst intelligibility is paramount, you must also match the sound perspective to the shot. For this it's vital that you have the camera's output on a monitor in front of you, together with a copy of the script, marked up in such a way that it provides you with a guide to the shot sizes applicable to different sections of the dialogue.
Obviously, if you have a CU of a performer, you want the sound to be ‘close’. If on the other hand you're recording a WS, you'll want a more distant sound with a reasonable amount of surrounding atmosphere. If you're uncertain as to how the resulting recording is to be edited, you might decide to split track, and use close mic technique for dialogue on one track, and feed ‘loose’ sound to the other. This enables the dubbing editor to control the amount of background atmosphere in the final mix. But always check with the director/producer (or dubbing editor) beforehand as to what form of post-production may be applied to your results.
Communications
The sound recordist is usually tasked with providing communications, if required, on location. Whilst it's something else to bring with you, and check beforehand that it is fully functional, by providing it you remain in control of all the sound on location. You will almost certainly find it to your advantage that, however many handsets production request you to supply, it always pays to have at least two or more spare. In this way, you have one for yourself, and at least one spare for when one of the others gets lost or broken, or is required by the executive producer who's decided to drop in to ‘see how things are going’.
Ensure you have plenty of charged batteries, and a reliable system of identifying which are charged and which are flat. Handsets which work with pluggable headsets (Figure 28.3) should help to cut down some of the extraneous noise generated by voluble production staff, and you should always endeavour to provide these in addition for each handset. One point to beware of though, the output from these handsets is easily swamped in a noisy environment, and tends to distort if the volume is turned up too far in an attempt to overcome the surrounding noise (even when used with a headset).
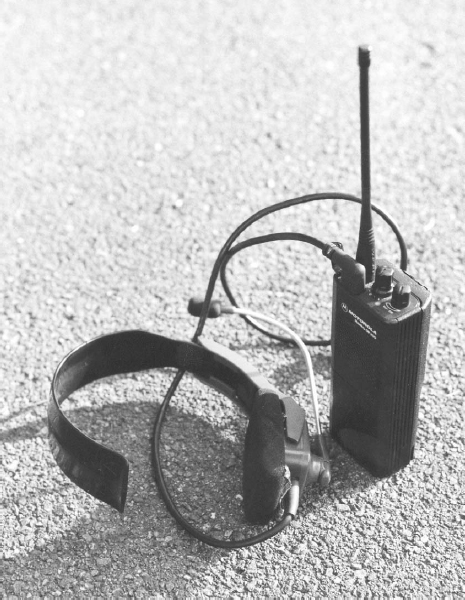
Figure 28.3 Radio communication handset (walkie-talkie) with headset
Working with assistants
A trained, experienced assistant is worth their weight in gold. Not only do you have someone to help with the overall operation, plus rigging and de-rigging, but you also have someone with whom you can discuss the minutiae of the sound coverage, and thus solve potential problems in half the time.
Communication is all-important, and you must keep them informed of all relevant information with respect to imminent changes, e.g. any deviation from previous plans/script. If they're operating a pole, and wearing headphones, they can all too easily miss production conversations leading to these changes, which may involve contributor or camera movement, differing emphasis in delivery of the dialogue, etc. Similarly, they are your eyes and ears if your operational position is out of sight of the action. They can pass messages via the mic to keep you informed of ongoing discussions concerning the shots amongst the camera crew, for example.
PA
Again, whilst you're in charge of all sound on location, you may be asked to provide an audio feed for PA. Depending on the complexity of the event you're covering, you may simply wish to select some feeds to an auxiliary output from your mixer. This assumes you don't have to adjust their level once set, or that the level you're using for your recording is also satisfactory for the PA.
However, more often than not you'll find that your programme mix is unsuitable for an audience feed. There are many reasons for this, an obvious example being if you only intend to record part/s of an event, and maybe record interviews whilst other aspects of the event continue. This being the case, you should supply a dedicated mixer and operator/assistant to take care of the PA separately, whilst you concentrate on your own recording. This probably also means that they will need separate access to your audio feeds, which may result in you having to supply DAs to provide these extra facilities. You'll need to liaise closely with them to ensure that the sound from the PA loudspeakers is not going to adversely affect/colour your own output.
On the other hand, if you need to obtain a feed from on-site PA facilities (over which you have had no planning or control), you may need to route it via a DI box (see Section 9, Mics: cables and radio; Direct inject box) in order to ensure you have a balanced feed.