
More often than not, part of the recordist's job is to set timecode. There are certain conventions to be observed when doing so, and you should always check with your production team (or the editor in post production) to find out which option/s they prefer. At present, most NLE systems need to ‘see’ continuous timecode, and can become upset if it is discontinuous, i.e. if it suffers from interruptions, which can more often than not interrupt any digitization of the rushes at that point. So care must be taken if and when you (or the cameraman) rewinds/reviews/replaces tapes and/or changes battery to ensure that you reset exactly to the end of the previously recorded material before recommencing recording (see also Timecode on location, below).
With broadcast camcorders, there is a choice of information you can lay on to the tracks associated with timecode (Figure 33.1).
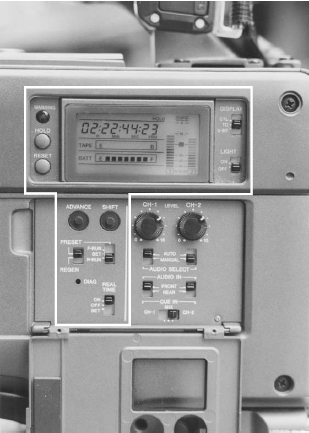
Figure 33.1 Various timecode and data options can be set via the switches on the panel under the LCD display
This track is the electronic equivalent of sprocket holes, and assists the replay machine to synchronize correctly with the recording. It is essentially a counter, utilizing hours, minutes and seconds (and on broadcast camcorders it often also registers frames, thus HMSF in total), but merely registers control pulses. Should you reset it in mid cassette and rewind your tape, it will return a negative value. (Care should be exercised if you have this function selected during recording, as pressing Reset – also see below – will instantly zero the display.)
Caution
It is erroneously referred to as timecode in basic DV systems, which only have this facility to indicate elapsed time, thus it is unlikely to be frame accurate on a replay machine, once removed from its original recorder.
Data or U-bit
Data, or user bits as they are labelled on some camcorders, is the equivalent of an identification stamp. Being a hexadecimal display, it can be set to any value from zero to nine and A to F. It remains permanent/static throughout a recording, and tape review, eject or insertion, until manually reset. If you wish to use this facility, always set it before setting timecode, since its ‘set’ position freezes both functions.
Timecode
It's probably easiest to think of this as a digital stopwatch (displaying HMSF), which you can either start and stop with your recording (R-run), or continually run showing time of day (F-run), the LCD display value of which is then laid down whilst recording. Upon replay, whatever has been recorded on this track will be displayed on the replay machine's timecode reader, and will be frame accurate.
Many non-linear editing systems require that this track be numerically continuous, thus R-run is chosen. In any event, you must ensure that any discontinuities in timecode or the process of recording material over several days/tapes does not result in the same code being recorded on more than one cassette. To avoid problems with a discontinuity, run for a minimum of ten seconds before allowing action to commence, and note this timecode on the cassette label and box.
Hold and reset
There are two buttons associated with timecode. Hold simply freezes whichever display is selected, although the data continues to be updated in the background and is once again displayed when Hold is released. Reset is used to zero the display (whilst in the Set mode), for example when you change a cassette.
For precise setting information refer to the camcorder handbook. Broadcast camcorders also have a function to allow time of day to be recorded in Vertical Interval Timecode (VITC).
Timecode feed to ancillary equipment
You will need a cable to connect with the Timecode out BNC socket on the side of the camcorder to the relevant input (refer to handbook) on the ancillary equipment. To ensure precise locking, the lead needs to remain in place throughout recording (see Radio timecode below).
Feeding timecode in the opposite direction, from ancillary equipment to the camcorder, is not recommended. For example, you may have a backing track of a performance on tape (e.g. DAT) with timecode reference. By feeding that to your camcorder you match the timecode to the pre-recorded track. But, each take will generate exactly the same timecode, a post-production nightmare unless this has been agreed beforehand, and the takes are digitized separately. It may then prove beneficial to have the same timecode for ease of synchronous shot editing, but do ensure that this is indeed the requirement before you undertake the assignment.
Radio timecode
There are several systems available, but any problem in signal path or battery failure will result in gaps/errors in timecode, providing post production exasperation. A more secure cable-less system is the use of Lockit Boxes, see also Section 22, Sound recordist operation: mixer; Mixer/recorder.
Timecode on location
If you rewind your cassette to review earlier shots, you must be careful when resetting the tape that you don't over-record previous material, unless this is intentional. This is because, having rewound the tape, when you next run to record, irrespective of tape position, TC resets itself to the number recorded at the end of the previous final take, and runs from there.
Let's take an example, with a new cassette loaded, zero the timecode, and start recording. Having reached 00.12.08.04, the director wishes to check a previous shot for continuity. You rewind and replay the master shot which ends at 00.05.59.22. The director is satisfied with continuity, and yells, ‘Run to record,’ as time is tight. However, having finished replaying the tape, you'll notice that the timecode once again reads 00.12.08.04 with the tape stationary, even though you haven't played or spooled forward to this point. Do not make the mistake of thinking that the tape has magically jumped forward, and for goodness’ sake don't start recording immediately! Press Return (Ret) on the lens (or zoom demand) to review the last few seconds of the tape, and the timecode will once again run up to 00.05.59.22, but when the tape stops, it resets to 00.12.08.04. Your choice is to spool to the end of the recorded shots and reset at the end of the recording, or to alter the TC setting if you really intend to over-record from 00.05.59.22.
By the same token, should you wish to record on a partially used cassette, having found the end of the previously recorded pictures, you may wish to reset TC and CTL. Replaying the end of the last shot will display the previously recorded TC. When the tape stops, however, the TC display will revert to the value it displayed prior to the insertion of the cassette. To avoid confusion, I would always leave some seconds difference if I entered fresh TC information. For example, assume the end of the previous recorded pictures is 00.12.08.04. I would not set TC to 00.12.08.05; rather I'd add a few seconds, or more likely round up to the next minute, and start recording from 00.13.00.00 (but make a note on the cassette label and box!).
However, most of today's digital camcorders have a timecode Regen function, which regenerates the correct timecode from the inserted tape. Switch to the Regen position and replay the last few seconds of recorded material, and the timecode will be reset from off-tape information. Using the Ret button on the lens to replay and reset on the last few seconds of the previous recording, you can also ensure that timecode continuity is retained for editing purposes. This also applies to the previous example of over-recording material. Set to Regen, and the timecode will reset to the value it picks up from running a few seconds of pre-recorded material. You can then begin to record from that point onwards, and the timecode will be continuous. However, the dangers of misusing this facility cannot be over-emphasized!
As already indicated, you cannot reset CTL to follow on from previously recorded information, nor does the LCD display a previously recorded value. You either leave the information as it's displayed – i.e. whatever it was prior to inserting the cassette – or simply zero it. But you must run-up for at least ten seconds to provide a safety margin for post production requirements. If switched to CTL position, selecting Set will re-select TC, and TC values will then be displayed and altered by the use of Advance and Shift, or by pressing Reset. The CTL value will remain unaffected, and the display will revert to CTL when Set is deselected.
Head cleaning
The ‘quality’ of LTC (longitudinal timecode) and Control Track can be affected by the state of the heads in the audio stack, which records their data. Should the head become clogged, or worn, the strength of the recorded signal may be insufficient to correctly register on a playback machine. Regular maintenance should ensure you don't encounter this problem.
More information
A detailed article by the author on timecode use and setting, including synchronizing several cameras, is to be found in Zerb 50, Summer 1999, also reprinted in Image Technology July/August 2001, Volume 83, No.6.