
24 Sound recordist operation: mixing mics
Mics
It is impossible to provide a definitive list of mics that constitute a ‘working’ kit for a recordist. Much depends on the type of work you're engaged on, and/or the equipment provided by your employer. Nevertheless, as a bare minimum, I would expect a recordist to have one gun mic, one dynamic reporter's (stick) mic, two clip mics, and a radio clip mic (which may be provided instead of one of the line-fed clip mics).
Mic placement has been dealt with in previous sections (see Sections 10 and 11, Mics: placement with regard to speech, and Use of clip mic for seated interview; and Sections 17 and 18, Single person operation: mic placement overview and static operation, and Specific location scenarios), but a word to the wise, do remain open-minded when others offer suggestions. Experienced artists often have advice on how best to mic their performance, for example, I've known bassists and guitarists suggest how and where to put mics in/on their instruments, producing exactly the desired result. In the case of musicians, many have spent a lifetime striving to achieve a certain sound from their instruments, so do respect their comments.
Mixing
With four channels ‘at your fingertips’, it may seem that the best way to cover that number of contributors is to put a mic on each person and fade them all up at once. By all means try it and see, but each mic is essentially a source of noise, and for every fader you open you raise the ‘base’ level of ambient sound. The further each one is opened, the more ‘noise’ you add – definitely not to be recommended.
However, assuming that the circumstances you find at your location dictate that you have to mic each of your contributors individually, as outlined above, then before you start recording you need to establish a voice level for each person in turn (it's the ‘What did you have for breakfast?’ scenario all over again!). To do this, ask each person to speak one at a time, and open their channel fader to what you judge to be the correct level and make a note of its position (how it feels under your fingertips). Having established four fader positions, once you start recording, you have to keep all faders at as low a level as possible, apart from opening to your pre-determined level, the one for who-ever's speaking. Depending on their conversational level, you may have to slightly alter the amount to which you fade up each individual contributor.
Whilst listening to your output is therefore of the utmost importance, you also have to watch your contributors, and anticipate who's likely to speak (so you won't have much time to look at your meters or the faders themselves). Only open the channel fader of the person who's speaking, to around your predetermined full voice level. You'll probably find that the ideal working position for the other three faders will be somewhere around less than half of their predetermined speech level position. However, if one contributor is fidgeting, or making distracting noises, you may have to reduce their level even more. Ideally, none of the faders will be fully closed, but there are no hard and fast rules. If more than one person starts talking at once you instantly have an editorial decision to make, whose speech do you let dominate?
Well that depends on whether you (meaning the production) have control of the discussion, and can repeat any sections that prove unclear. That's certainly the safest option, a retake of any interrupted speech, so that you get each contributor to separate their comments. If the conversation is a ‘once only’ opportunity, then the safest option is almost certainly to let the camera be your guide. The viewer/listener can only see whoever is in shot, so you need to be in a position to see the direction in which the camera is pointing. You must be able to judge the size of the shot it's taking, and thus how many of the speakers are in vision.
Judging shot size
You'll probably find it helpful if you can see a video monitor, too, but do take the time to think about how the camera positions itself for each shot. On a single, the camera's lens will be pointing directly at the person (Figure 24.1), but on a wide shot, the camera lens will almost certainly be pointed at the middle of the group, and tilted down (Figure 24.2). Use any rehearsal time to study the shots and the camera positions so that you're aware of how the cameraman will react to unexpected comments. It may be that the director will already have arranged that, in the event of a free-for-all, he/she would like the shot to stay with one particular person. If this is so, although you may need to ensure that their sound remains predominant, you'll still need to be able to hear questions and comments directed at them.
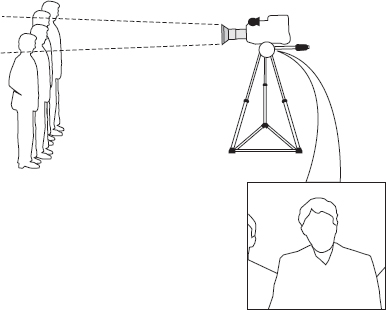
Figure 24.1 Camera framed for a single

Figure 24.2 Camera framed for a WS
From the foregoing you can see that smoothly mixing between contributors takes experience, and can only be done by listening to your output, especially when voices become raised (and intermingled), as you will almost certainly have to judge most of the output level by ear alone, and adjust faders accordingly (see Section 25, Sound recordist operation: practical exercises (d) and (e)).
PFL – pre-fade listen
Pre-fade listen (which may be labelled ‘pre-hear’ on some sound desks) can be very reassuring to enable you to check an incoming sound feed, prior to actually fading it up. The more channels you have at your fingertips, the more important you'll find this facility, and certainly any large multi-channel mixer/sound desk (see Section 28, Sound recordist operation: multiple contributors) almost certainly has an easily accessible button associated/beside/below each fader which you can press to monitor the incoming feed related to that channel. On these desks, you will probably also have the option of monitoring via your main loudspeakers, or via a smaller pre-hear unit, which may also handle talkback (see Section 31, Live broadcasting, for further details concerning talkback facilities).
On portable mixers, PFL is more likely to be part of the headphone monitoring circuit, and in all likelihood switched via a rotary selector on the side of the mixer. This may make it less easy to access in a hurry, especially when the mixer is in a protective carrying case slung over your shoulder, but there are some instances when it can bail you out of an impending disaster.
You may remember that the advice given in Section 22, Sound recordist operation: mixer, was to plug your contributors to the input channels in a logical order. Herewith a cautionary tale! All goes smoothly until a break in recording (often to change a tape or battery), at which stage some or all of the participants also take a break, removing their mics themselves, and casually discarding them on their chairs. Once the tape/battery has been changed, the director is chivvying said participants to hurry back to their places, and insists that the cameraman runs to record immediately the ‘bums are on the seats’. Although you were distracted when said participants sat down, and put their mics back on, looking up as the cameraman says ‘At speed’, you realize that in the rush to resume recording, the mics have been swapped around (and of course, all your clip mics look the same!). Fortunately PFL allows you to check who's wearing which one without necessarily stopping everything again (and upsetting the overwrought director).
A similar situation might arise if you are unable to see your participants (and although the sound recordist may get his/her own mixing area – with a chair! – due to the ‘exigencies of the location’ it may well be around a corner or behind a pillar) and again PFL comes to your rescue. In more straightforward operations, you may need it to monitor a radio mic, especially if you've been having trouble with that particular channel/frequency combination (see Section 9, Mics: cable and radio for more information on radio mics and their problems). In one instance, I can even recall two sports broadcasters who managed to swap their radio mics (complete with transmitters) during a break in the recording of an event we were covering, and the sound recordist only spotted the mistake (well, they claimed it was) when checking PFL.
However, you must bear in mind that when you are using PFL, you are monitoring the source before the relevant fader. Therefore the level of incoming sound is determined by the coarse gain setting for that channel, and does not correspond to the level as heard in your overall balance via the fader; in fact, you will almost certainly perceive it to be at a lower level. Hence, you must not make any balance or level decisions solely using PFL as a reference.
So, as a reminder:
![]() PFL should only be used to determine the presence of and identitfy a source.
PFL should only be used to determine the presence of and identitfy a source.
![]() The level you hear does not relate to your overall balance.
The level you hear does not relate to your overall balance.
![]() The use of PFL does not alter or affect your overall balance.
The use of PFL does not alter or affect your overall balance.