
The recorder normally has a couple of meters, one for each track, which indicate levels and/or numbers, and wiggle in time with your sound input/s. But can you rely on them to provide you with useful information? Certainly not, unless you're also listening on headphones. A wiggling meter simply indicates a varying level of noise being recorded on that track. Whether it's the sound you want, or spurious noise being generated by your timecode circuitry, mobile phone or RF interference, can only be determined by listening.
Unfortunately, the quality of meters on camcorders often leaves a lot to be desired. Historically, they were volume unit (VU) meters, and invariably one of the cheaper components. However, since they were sited in such a way that they were unreadable whilst the cameraman was operating, they were rarely used as the primary source of level indication. And when a recordist was in charge of the sound, he/she almost always used a broadcast standard mixer, with quality onboard monitoring, usually a PPM.
Nevertheless, a professionally specified meter does provide an indication of the level of sound being recorded, and can help you judge whether it's sufficient or excessive, providing you understand the nature of the display.
(a) Volume units (VU), measuring power as opposed to voltage, tend to be frequency dependent, prone to over-reading low frequencies (Figure 6.1). They track the average sound level, but do not accurately register the peaks, and are prone to overshoot. The cynical sound recordist will tell you that VU stands for ‘virtually useless’. The zero of the scale is approximately equivalent to halfway between five and six on a PPM, and you'll see that the portion of the scale above zero is marked in red. Do not let your recording level go beyond the mid-point of the red portion of the scale (and this is assuming some degree of overshoot). Normal conversation should be reading from below −5 to no more than −2 or −1 (minus is the black part of the scale below zero. And −2 and −1 are not marked as such, you simply estimate their position).
(b) Bar graph meters (Figure 6.2) tend to be similar to the VU meter, some with the same numerical scale. But others (Figure 6.3), usually on the newer DV camcorders, have a different numbering system (in decibels). When using this scale you must keep your sound level from approaching 0 (zero) too closely (imagine it as the ‘lid’ on a box, once you reach it, you cannot put any more signal – i.e. record a higher level – into it), especially if you are using a DV camcorder, which almost certainly doesn't have a limiter in circuit on manual operation. Although they still operate in a similar fashion to the VU meter, their response to peaks, notably on broadcast models, has been improved.
(c) Peak programme meter (PPM) (Figure 6.4). For many years, the de facto standard used in British broadcasting. I have yet to find one on a camcorder, but most broadcast mixers have this type of meter. As the sound level increases, the needle swiftly moves up the scale, but has a slow ‘decay’ time (damping), thus helping you register the peak sound level. Your highest level should not go beyond 6 on the scale. Normal conversation (interviews, etc.) should reasonably register between 3 and 4, and definitely not peak above 5 (unless the shouting starts!).

Figure 6.1 VU meter
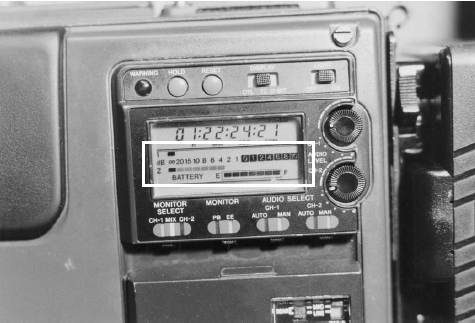
Figure 6.2 Bar graph meter with VU-style dB scaling (running horizontally)
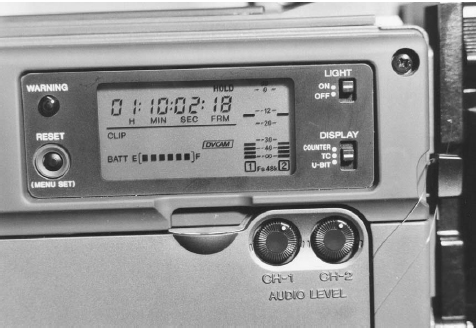
Figure 6.3 Bar graph meter on more recent camcorders with dB scaling (running vertically)
There are no obvious similarities between the metering systems, but for those of you with a technical background, in the UK, zero level tone is set to level four on a PPM, and to minus four on a VU meter. Thus, these levels can be taken as equivalent, and are close to the visual mid-point of each meter's scale.

Figure 6.4 PPM. There is a 4 dB change in level between the markings on a PPM scale. Just to be difficult, some models may have a 6 dB range between 0 and 1, and between 1 and 2, you'll need to check the specifications. It is generally agreed that programme material should be kept to within a range of 20 dB, and not exceed 26 dB.
In the case of the bar graph mentioned above, there are differing opinions as to the ‘correct’ level. (Since the top of the scale is 0 (zero), numerals below this value should have a minus sign in front of them, as they indicate relatively lower degrees of level (in decibels), although the minus sign is not normally indicated on the bar graph LCD display on the camcorder.) Many recordists opt to set tone to register −20 on the scale, in order to leave sufficient ‘headroom’ for unexpected peaks, and some set it even lower at −22 or −24. It should certainly not be set higher than −18 (see also Section 22, Sound recordist operation: mixer; Limiter).
So, before we start recording, we can utilize the meter to indicate if what we're hearing is of a reasonable level. Hence those well-worn questions such as, ‘Tell us what you had for breakfast.’ In fact, you simply need to keep people talking until you've established a sound level that sounds right, and doesn't distort. I'd advise you to experiment with levels before you arrive on location, especially if you're unfamiliar with equipment (see Section 20, Single person operation: tracks, levels and practical exercise (c)).
Viewfinder indication
All camcorders I've seen can display a rough indication of sound level in the viewfinder. It usually takes the form of a series of ‘blocks’, or a line of varying length, at the bottom of frame. Although it's likely to be fed from the metering circuitry, do not rely on it for accuracy, and always monitor on headphones.
Auto tone
Many modern camcorders provide a line-up tone when switched to bars with the camera mic position selected (this facility may be turned on/off from the menu). Whilst this provides a high pitched noise at the beginning of the tape, it doesn't help you record the correct level from your mics on location, nor does it give the VT editor any reliable guide to the subsequent level of your recorded sound, since you're unlikely to be using a mixer if you've used the camcorder's tone.
Line-up
It is standard practice to record at least 30 seconds of bars and tone at the beginning of each cassette. These test signals indicate video and audio levels for the subsequent editing process, and have the added advantage of ‘getting past’ the first section of the cassette which may have tensioning instability (not a problem with disc based recording systems), which would adversely affect the first few seconds of sound and pictures.
Technical: in the UK, the standard line-up check signal uses a fixed frequency tone, generated by an oscillator to give 1 kHz at 1 mW, fed into 600 ohms, and this is referred to as ‘zero level’. The equivalent meter settings for this signal are: four on a PPM, minus four on a VU and −18 or −20, or sometimes −24 (depending on mono or stereo deployment, see Section 30, Stereo: mixer; Levels, and also on programme content, e.g. speech or music) on a bar graph meter.