
A sound cable needs to be as ‘transparent’ as possible to the signal it's carrying. Hopefully, you won't be required to undertake very long cable runs, but as you can imagine, the output from a microphone is pretty small, and if you have losses or interference brought about by your cable and/or its connectors, it spells extremely bad news.
Balanced line
Put simply, a balanced signal path is one which has the two signal legs (live and return) separated from the earth (screen). A properly screened cable will greatly assist in the reduction of interference (induction) from other sources (Figure 9.1).
To further assist the integrity of the circuit, many professional cables have two wires for each of the legs, and are constructed in such a way that induced phase differences in the signal path along the cable tend to cancel out. This type of cable is termed star-quad, and will normally have an XLR connector at either end (Figure 9.2(a),(b)). Care should be taken not to accidentally connect a balanced line to an unbalanced one (see Direct inject box below).
Unbalanced line
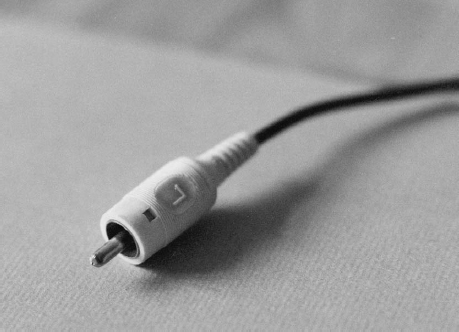
Uses the screen/earth as the return signal path, and cable ends will only have one inner and one outer connection. An example in common use is the phono plug (Figure 9.3).
Direct inject box
For those occasions when you do need to connect an unbalanced line to your mixer, you need one of the many useful little boxes that are prone to gather in a sound kit called a direct inject box. This is a balance transformer, and has several inputs, often in the nature of jacks and mini-jacks, as well as phono; although you should ensure that whatever one you obtain for yourself has all the requisite types of input socket that you're likely to need in your part of the world. It normally only has one output, an XLR socket, and it may be battery powered. Examples of its use are to connect feeds from semi-pro PA, musical instrument amps, and various domestic audio sources to your equipment.
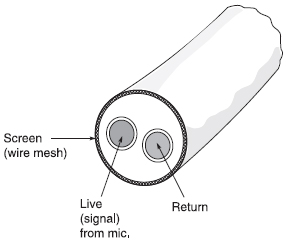
Figure 9.1 Cross-section of balanced mic cable
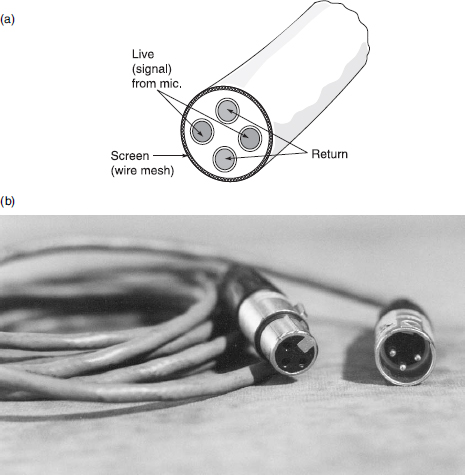
Figure 9.2 (a) Cross-section of star quad mic cable; (b) star quad cable with XLR plugs
Straight or curly?
Certain cables are available in curly versions (Figure 9.4), similar to those found on some phone handsets. Whilst at first sight this may seem to be the answer for keeping your cables tidy and flexible, and you might immediately think of it as the solution to working at a variable distance between the camcorder and your mixer, for example, it can in fact pose operational problems:
![]() As the cable extends, it becomes taut, and pulls at either end, which may place undue strain on the connections.
As the cable extends, it becomes taut, and pulls at either end, which may place undue strain on the connections.
![]() When one end is attached to the camcorder, the weight of the cable pulls down at the connection, making it heavier to hold and carry.
When one end is attached to the camcorder, the weight of the cable pulls down at the connection, making it heavier to hold and carry.
![]() Moreover, should it become taut, it could also misalign the camera on its mounting, adversely affecting the framing (Figure 9.5).
Moreover, should it become taut, it could also misalign the camera on its mounting, adversely affecting the framing (Figure 9.5).
![]() The loops of the cable's curls can snag on objects with which it comes into contact, a tripod leg, for example. In some instances, when the recordist moves around the tripod, the force which the cable's loop is capable of exerting on the tripod locking mechanism has been known to be sufficient to loosen and collapse the leg if it has not been properly locked to begin with.
The loops of the cable's curls can snag on objects with which it comes into contact, a tripod leg, for example. In some instances, when the recordist moves around the tripod, the force which the cable's loop is capable of exerting on the tripod locking mechanism has been known to be sufficient to loosen and collapse the leg if it has not been properly locked to begin with.
Plugging
Rather than plug cables directly to sockets, it is good practice to tie them off, fairly loosely, beforehand, thus helping to relieve any stress or strain on the connector. If plugging to the camcorder, tie off on the panning handle, or the carrying handle, using a clove hitch (Figure 9.6).
Colours
On complex rigs, it's useful to have a variety of cable colours so that you can distinguish which feed is which at a glance. You can also have coloured glands on the XLR connectors, which may be a preferred option for simply identifying cable ends. Either facility simplifies fault identification and re-cabling due to production changes.

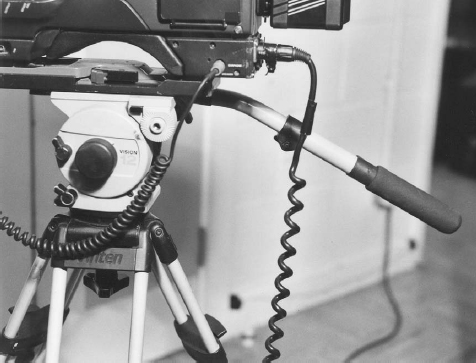
Figure 9.5 Taut curly lead, which can all too easily cause unwanted movement to panning head resulting in misframed shots
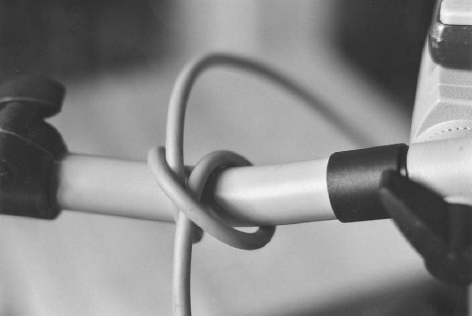
Figure 9.6 Cable tied off on pan bar, using a clove hitch
Radio mics
Any mic can be a radio mic. You feed its output into a transmitter, and receive the resultant RF signal at a convenient spot to record it (beside the camera for all intents and purposes) (Figure 9.7).
The most common mic used as a radio mic is the clip/personal, and so it's often mistakenly referred to as a radio mic. To confuse you more, should you order/hire a radio mic, you expect to get a clip mic with a transmitter/receiver combination. Another option available is a hand-held radio mic, which looks similar to a stick mic and has the transmitter built into the handle (Figure 9.8).
Radio mic rules
The rules governing the use of radio mics dictate that for best results you should:
![]() Ensure that the transmitter does not come into contact with other metal (remove coins, keys, etc. from the pocket, if that's where you put the transmitter).
Ensure that the transmitter does not come into contact with other metal (remove coins, keys, etc. from the pocket, if that's where you put the transmitter).
![]() TURN OFF ALL MOBILE PHONES. Do not switch them to vibrate/silent instead. They should always be turned off whilst you are recording anyway, but they are especially problematic if used in the vicinity of radio transmitters/receivers.
TURN OFF ALL MOBILE PHONES. Do not switch them to vibrate/silent instead. They should always be turned off whilst you are recording anyway, but they are especially problematic if used in the vicinity of radio transmitters/receivers.
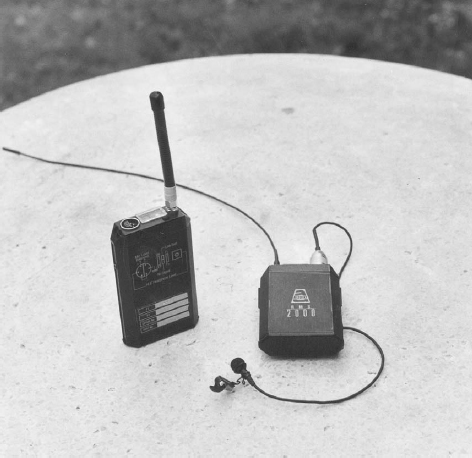
Figure 9.7 Radio mic transmitter and receiver
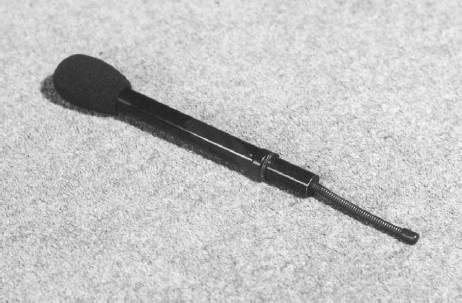
Figure 9.8 Radio hand-held stick mic, with transmitter aerial at base
![]() Ensure that the transmitter doesn't come into contact with wet surfaces. Wet and damp often hamper RF propagation, and contact with damp skin, a contributor sweating or your hands being wet (with rain!) for example, will almost certainly reduce its range/efficiency.
Ensure that the transmitter doesn't come into contact with wet surfaces. Wet and damp often hamper RF propagation, and contact with damp skin, a contributor sweating or your hands being wet (with rain!) for example, will almost certainly reduce its range/efficiency.
![]() Ensure that the transmitter aerial lead is straight. If it's coiled, or otherwise shortened, that too can drastically reduce its range. It must also be kept dry!
Ensure that the transmitter aerial lead is straight. If it's coiled, or otherwise shortened, that too can drastically reduce its range. It must also be kept dry!
![]() Ensure its ‘line-of-sight’ to the receiver is unimpaired, especially by metal.
Ensure its ‘line-of-sight’ to the receiver is unimpaired, especially by metal.
![]() The receiver aerial often works best when vertical (better still, use a dual aerial – diversity – kit), and should always retain its line-of-sight with the transmitter. Positioning the receiver as high as possible – gaffered to the top of a lighting stand (although ensure the stand is firmly sited, i.e. won't fall or blow over) is the usual quick fix – should help improve the signal path.
The receiver aerial often works best when vertical (better still, use a dual aerial – diversity – kit), and should always retain its line-of-sight with the transmitter. Positioning the receiver as high as possible – gaffered to the top of a lighting stand (although ensure the stand is firmly sited, i.e. won't fall or blow over) is the usual quick fix – should help improve the signal path.
![]() Before recording, check the condition of the batteries in both transmitter and receiver, and change them if in doubt.
Before recording, check the condition of the batteries in both transmitter and receiver, and change them if in doubt.
![]() Carefully monitor the recording to ensure no stray clicks, pops, or splats are produced. If there are any, you will have to move the position of one or more of the variables (transmitter, receiver, frequency, batteries, etc. see also Section 35, Fault finding; Intermittent noise). Unwanted noises such as these may be caused by multi-path interference from reflections, so look around for plate glass windows, or water. Large bodies of water can be especially problematic as they can both reflect and absorb RF, depending on your relative positions. Some radio mics have switchable frequencies, enabling you to avoid RF interference, if you're lucky. Even though you have correctly licensed your frequency, that does not stop others illegally using it, and causing you problems.
Carefully monitor the recording to ensure no stray clicks, pops, or splats are produced. If there are any, you will have to move the position of one or more of the variables (transmitter, receiver, frequency, batteries, etc. see also Section 35, Fault finding; Intermittent noise). Unwanted noises such as these may be caused by multi-path interference from reflections, so look around for plate glass windows, or water. Large bodies of water can be especially problematic as they can both reflect and absorb RF, depending on your relative positions. Some radio mics have switchable frequencies, enabling you to avoid RF interference, if you're lucky. Even though you have correctly licensed your frequency, that does not stop others illegally using it, and causing you problems.
![]() At large events, press conferences, etc. there may be other crews legally using the same frequency. If you are working alongside other crews, check with each other as to which frequencies are in use. Always turn your receiver on first, and monitor for activity on the frequency. Switching your transmitter on will cause an initial pulse on the frequency, disturbing any ongoing transmissions. If two channels operate on the same frequency (or even close frequencies), the RF signals interfere with each other.
At large events, press conferences, etc. there may be other crews legally using the same frequency. If you are working alongside other crews, check with each other as to which frequencies are in use. Always turn your receiver on first, and monitor for activity on the frequency. Switching your transmitter on will cause an initial pulse on the frequency, disturbing any ongoing transmissions. If two channels operate on the same frequency (or even close frequencies), the RF signals interfere with each other.
Warnings:
(a) Two transmitters placed side-by-side, even on different frequencies, can interfere with each other.
(b) Using the same channel as another crew does not guarantee that you can utilize their output if their transmitter/receiver is of a different model/manufacturer, due to differences in signal processing between designs.
(c) Legally licensed frequencies in one country may not be legal in another.
![]() Always replay as much (preferably ALL) of your recording on site to ensure you have no unheard problems.
Always replay as much (preferably ALL) of your recording on site to ensure you have no unheard problems.
![]() There are NO guarantees that it will work 100% of the time.
There are NO guarantees that it will work 100% of the time.
Were all that not enough to curb your enthusiasm for them, be aware that you'll almost certainly need licences for the frequencies you're using (as mentioned above). If you hire the kit, this should be taken care of, although you must check with the hire company as it's the user's responsibility to ensure the kit is licensed. Thus, it's your responsibility to obtain a licence if you own the kit (via JFMG in the UK).