
CHAPTER 44
Animating Hair and Cloth
The specialized hair and cloth systems can create believable, realistic hair, but the real benefit to making hair and cloth come alive is found in the dynamic abilities of both.
In this chapter, you'll look at the dynamic abilities of both the hair and cloth systems. Using these systems, you can simulate hair blown by the wind and cloth that drapes over and around underlying objects.
Cross-Reference
Creating and defining both the Hair and Cloth systems is covered in Chapter 29, “Adding and Styling Hair and Fur, and Using Cloth.”
Using Hair Dynamics
Being able to style hair is great, but have you ever left the barbershop and had the wind do its own styling job on your hair? The Dynamics rollout for Hair and Fur lets you define specific forces and let the hair fall where it may.
Tip
Be conservative with the forces that are applied to a hair system. Too many forces or too extreme forces can easily destroy any styling that you've created.
Making hair live
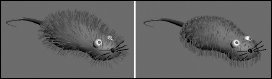
The Dynamics rollout is available only if the Hair and Fur (WSM) modifier has been applied to an object. At the top of the Dynamics rollout are three modes: None, Live, and Precomputed. If you select the Live mode, then the hair around the growth object immediately becomes subject to gravity and other forces in real time, causing the hair to droop about the growth object. Moreover, if you move the object within the viewport, the hair flows about the object as if you were moving a real object with hair attached. Figure 44.1 shows a simple mouse with hair attached. The image on the left shows the hair particles with the None mode enabled, and the image on the right shows the hair after the Live mode is enabled. Notice how the hair particles fall around the mouse object.
FIGURE 44.1 The Live dynamic mode makes the hair react in real time to the scene forces.
If you press the Escape key while in Live mode, a dialog box appears, giving you the option to Freeze, Stop, or Continue. If you click the Freeze button, then the hair stays in its current position.
The Precomputed mode is available only after you've specified a Stat File name. This mode lets you save the hair motions into a separate stat file.
Setting properties
Only a few properties need to be defined to enable hair dynamics. In the Dynamics rollout, you find values for Gravity, Stiffness, Root Hold, and Dampen. These properties control how the hair behaves in response to the environment forces. The Gravity value can be negative if you want the hair to rise instead of fall. You can simulate space environments by setting the gravity to 0. The Stiffness value eliminates all dynamic movement if set to 1.0. If you want the hair to move only slightly as the object moves, then a Stiffness value close to 1.0 should work. The Root Hold value is like stiffness but applies only to the root. The Dampen value causes motions to die out quickly.
All dynamic properties except Gravity can be controlled using a grayscale map, using the small button to the right of the value field.
Enabling collisions
The first type of dynamic force to address is to enable collisions between the hair and the other scene objects. To enable collisions between the growth object and its hair, simply enable the Use Growth Object option. This option is only enabled when Sphere or Polygon Collisions are enabled first. In addition to the growth object, other scene objects can be added to the list with which the hair will collide. To add other objects, click the Add button and pick the object to add in the viewport. Each collision object can use either a boundary Sphere to define its collision volume or a Polygon, which bases collisions on the actual surface geometry. The latter takes longer to compute, but it's more accurate.
Enabling forces
In addition to the ubiquitous gravity, you can enable collisions between the hairs and the growth object and any other scene objects. To add another scene object to the collision calculations, click the Add button and select the new collision object. The External Forces list lets you add Space Warps for additional forces such as Wind.
Running a simulation
The Precomputed mode lets you save the hair dynamics to a separate stat file. If you want to capture the dynamic simulation, you first must specify a stat file by clicking the button to the right of the Stat File section. With a stat file specified, click the Run button in the Simulation section to calculate the dynamic solution. The Start and End fields let you enter the range for the simulation. A separate stat file is generated for every frame of the animation.
If you enable the Precomputed mode option before you render, then the stat file is read and used during the rendering process. You can delete all stat files quickly with the scarily named Delete all files button.
Tutorial: Simulating hair dynamics
Dynamic hair moves and flows around the other objects in the scene that are animated. As an example of this, you'll move a female character's head back and forth and simulate how the hair moves. I selected the Mohawk hairstyle because I'm hip and cool, a real rebel. Actually, the Mohawk is a simple style and gives you a chance to play with the Stiffness property.
To simulate the dynamics of a hair system, follow these steps:
- Open the Female head with mohawk.max file from the Chap 44 directory on the CD.
This file includes the head from a female character model created by Zygote Media. The hair modifier already has been added to this character and styled.
- Click the Auto Key button, drag the Time Slider to frame 5, and move the character to the right in the Top viewport. Then drag the Time Slider to frame 10, and move the character back to the left. This simple motion should be enough to bend the hair over. Then disable the Auto Key mode.
- With the head selected, open the Dynamics rollout and set the Stiffness value to 0.8. This should keep the hair standing straight up. To check this, enable the Live mode and watch how the hair reacts.
- Set the Simulation to run from 0 to 10 frames, and then open and specify a stat file location. The path of the stat file location is displayed. Then click the Run button to start the simulation. The precomputed values are saved to stat files.
- Select the Precomputed mode option and drag through the animation frames to see how the hair reacts.
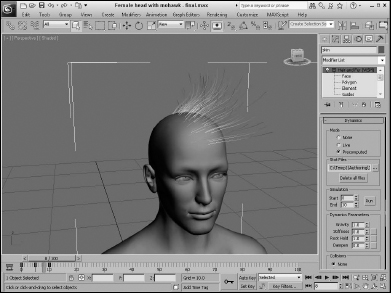
Figure 44.2 shows the hair bending to one side as the female head moves.
FIGURE 44.2 Using precomputed hair can save you a bundle of time when rendering.
Simulating Cloth Dynamics
Hair isn't the only system that has the benefit of dynamic motion. Cloth also can benefit from dynamic simulations. The steps for setting up a dynamic cloth simulation are similar to those for hair. First, apply the cloth modifier and define the cloth properties and the environmental forces acting on the cloth. Then run the simulation.
Defining cloth properties and forces
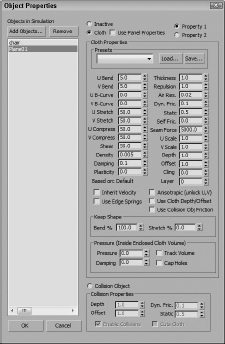
To add objects (both cloth and collision objects) to the simulation, click the Object Properties button in the Object rollout. This opens the Object Properties dialog box, shown in Figure 44.3. Clicking the Add Objects button lets you select scene objects to add to the simulation. Only objects added to the scene are included in the simulation. If an object isn't added, it's ignored. All objects added to the simulation are added to the list at the left. Selected objects in the list can be specified as Inactive, Cloth, or Collision Object. For Cloth and Collision Objects, you can set properties. You also can load and save cloth presets. Cloth presets are saved using the .sti extension.
Tip
If the cloth tends to pass through objects, then you can increase the Offset value for the collision object.
FIGURE 44.3 The Object Properties dialog box lets you define the properties of cloth and collision objects.
After all the objects involved in the simulation are included and defined, you can set the simulation range in the Simulation Parameters rollout. The initial state for the object to be draped may be set using the Set Initial State button, which is located in the Object rollout. The Cloth Forces button, in the Object rollout, opens a simple dialog box where you can select to add additional forces to the simulation. Gravity is added by default, but you can change its value in the Simulation Parameters rollout.
Creating a cloth simulation
After completing the initial setup, clicking the Simulate button starts the simulation process. The objects are updated in the viewport as each frame is calculated. After every frame is calculated, you can see the entire dynamic simulation by dragging the Time Slider or clicking the Play Animation button. If you want to drape the cloth without running it over several frames, you can use the Simulate Local button. The Simulate Local (damped) button causes the simulation to run local with a large amount of damping, which is useful if the cloth tends to drape too fast. If you want to remove the current simulation because some properties have changed, click the Erase Simulation button, or you can remove all frames after the current simulation frame with the Truncate Simulation button.
If the simulation is taking too long to compute, you can cancel the simulation by pressing the Escape button.
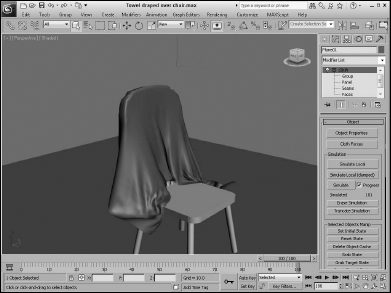
If you need to change a cloth or force property, click Erase Simulation, make the change, and run the simulation again. Simulation motions can be saved as keys with the Create Keys button. Figure 44.4 shows a simple plane object that has been draped over a chair over the course of 100 frames.
FIGURE 44.4 After you've defined cloth and force properties, an executed simulation drapes the cloth over a chair.
Viewing cloth tension
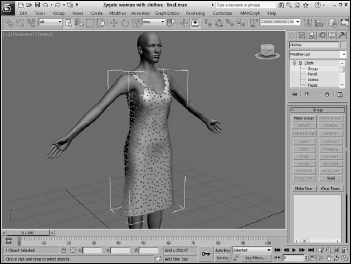
For cloth objects created using the Garment Maker modifier, you can view the tension in the cloth using the Tension option in the Simulation Parameters rollout. This option shows the areas of greatest tension in shaded colors. Figure 44.5 shows the tension in the dress draped over the female model from Chapter 29, “Adding and Styling Hair and Fur, and Using Cloth.” You can also select a seam to tear when enough force is applied to it.
FIGURE 44.5 You can view the tension for cloth created with the Garment Maker modifier.
Tutorial: Draping cloth over a jet
For a larger example of a cloth system, you'll drape a drop cloth over a jet.
To simulate the dynamics of a cloth object, follow these steps:
- Open the Sheet over Mig jet.max file from the Chap 44 directory on the CD.
This file includes a Mig-29 jet model created by Viewpoint Datalabs.
- Choose the Create
 Standard Primitives Plane menu command, and drag in the Top viewport to create a plane object that covers the jet. Set the Length and Width values to 150 and the Length and Width Segment values to 100 to make the sufficient resolution for the cloth, and drag the plane object upward in the Front viewport, so it sits above the jet.
Note
You also can create the cloth from a rectangular spline that has the Garment Maker modifier applied to it. This approach uses the Delaunay tessellation, which is better for simulating cloth than the rectangular sections in the Plane object.
- With the plane object selected, choose the Modifiers Cloth Cloth menu command to apply the Cloth modifier to the object.
- Open the Modifier panel, and click the Object Properties button in the Object rollout to open the Object Properties dialog box. Select the Plane01 object in the left list, and choose the Cloth option. Then select the Silk option from the Presets drop-down list, and set the Thickness to 0.5.
- With the Object Properties dialog box still open, click the Add Objects button, click the Select All button, and click the Add button. With all added properties in the left list selected, choose the Collision Object option and click OK to close the dialog box.
- In the Simulation Parameters rollout, enable the End Frame option and set the end frame to 100. Then click the Simulate button in the Object rollout. The plane object descends and covers the jet being draped as it falls.
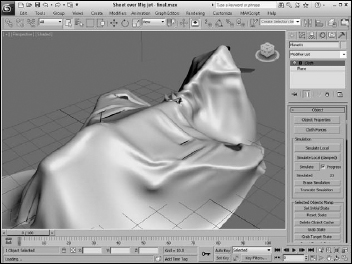
Figure 44.6 shows the sheet draped over the jet.
FIGURE 44.6 Computing the dynamics of a cloth object is possible with a cloth system.
Summary
Using dynamic simulations, you can control and compute the motions of hair, fur, and cloth. These motions take into account the various forces and collision objects included in the scene.
Specifically, this chapter covered the following topics:
- Enabling hair dynamics
- Simulating cloth dynamic motion by initiating a simulation process
Part XI, “Advanced Lighting and Rendering,” is up next. It includes coverage of several advanced topics beginning with the advanced lighting options.