
CHAPTER 29
Adding and Styling Hair and Fur, and Using Cloth
Understanding hair
Growing hair and setting hair parameters
Styling hair
Understanding cloth systems
Creating cloth panels using Garment Maker
Using the Cloth modifier
Iwant to start this chapter with a bold statement, “Bald Is Beautiful.” I make this statement because I have a brother who, upon discovering his hair had started thinning, decided that bald was the way to go. But, after seeing far too many 3D models that were bald because of the unavailability of a decent hair plug-in in Max, I can also declare that “Bald Is Boring.”
Now that Max has hair and fur, I expect to see the level of realism for a number of Max artists, including myself, take a quantum leap forward.
Creating cloth isn't that difficult. In fact, with a plane primitive, you can easily create a perfectly straight blanket, towel, or flag. However, animating cloth that drapes realistically over a character is very difficult and best left to dynamic engines like reactor.
Although you can still animate cloth collections using reactor, Max also has a separate stand-alone cloth simulation system aptly named Cloth that you can use to create deformable cloth and to animate it as well.
Cross-Reference
The hair and cloth systems in Max are dynamic, meaning that they are affected by forces in the scene such as wind and gravity. The dynamic nature of hair and cloth is covered in Chapter 44, “Animating Hair and Cloth.”
Understanding Hair
Although a section titled “Understanding Hair” sounds like it would be taken from a beauty salon guide, the way Max deals with hair is unique and needs some explanation. Hair, like particle systems, deals with thousands of small items that can bring even the most powerful computer screeching to a halt if not managed.
In Max, hair doesn't exist as geometry but is applied to scene objects as a separate modifier. This level of separation keeps the hair solution independent of the geometry and makes removing or turning off the hair solution as needed easy. It also keeps the viewport display from bogging down. The Hair and Fur modifier is a World Space Modifier (WSM), meaning that it is applied using the World Space coordinates instead of local ones.
The other half of the Hair and Fur solution is a render effect that allows the hair to be rendered. This render effect is applied and configured automatically when the Hair and Fur modifier is applied to an object. This causes the scene with hair to be rendered in two passes. The geometry is rendered first, followed by the hair.
Note
Hair can be rendered only when a Perspective or Camera view is selected. Hair cannot be rendered in any of the orthogonal views.
Another similarity to particle systems is that the hair follicles can be replaced by instanced geometry, so you can create a matchstick head character by replacing hairs with an instance of a matchstick.
Tip
Using instanced geometry with a fur system is a great way to create and position plants and ground cover.
The materials that are used on hair are defined in the Material Parameters rollout in the Modify panel instead of in the Material Editor. Many of the hair parameters have a square button to their right that lets you apply a map to the parameter.
When the Hair and Fur modifier is added to an object in the scene, a Hair and Fur render element becomes available that you can use to render out just the hair for compositing.
Working with Hair
Applying hair to an object is as easy as selecting an object and choosing the Hair and Fur WSM modifier, which is found in the Modifiers ![]() Hair and Fur
Hair and Fur ![]() Hair and Fur WSM. After hair is applied to an object, you can use the parameters in the Modify panel to change the hair's properties.
Hair and Fur WSM. After hair is applied to an object, you can use the parameters in the Modify panel to change the hair's properties.
Growing hair
Hair can be grown on any geometry surface, including splines, by simply applying the Hair and Fur WSM to the selected object. When the Hair and Fur modifier is first applied to an object, it is applied to the entire surface of the selected object, and when it is applied to a set of splines, the hair appears between the first and last spline.
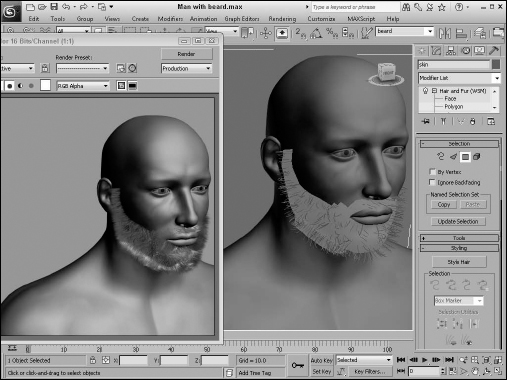
If you want to localize the hair growth to a specific area of the object, you can make a subobject selection using the controls in the Selection rollout. The available subobjects include Face, Polygon, Element, and Guides. After making a subobject selection, click the Update Selection to display the guide hairs only in the selected area in the viewports. Figure 29.1 shows hair grown on a man's face to create a beard.
After taking the time to make a subobject selection, create a selection set for the hair area for quick recall.
FIGURE 29.1 By making a subobject selection, you can control precisely where hair is grown.
Applying hair to a single spline doesn't create any hair, but if multiple splines are included as part of the same Editable Spline object, then the hair is interpolated between the various splines in the order they are attached following the spline's curvature. This provides a great way to add special features like a ringlet to an existing set of hair.
Setting hair properties
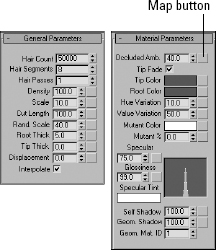
Several rollouts of properties can be used to change the look of the hair. The General Parameters rollout, shown in Figure 29.2, includes settings for the overall Hair Count, the number of Hair Segments between adjacent splines, the number of Hair Passes, Density, Scale, Cut Length, Random Scale, Root and Tip Thickness, and Displacement. The Hair Count value sets the total number of hairs for the given geometry. Higher values take longer to render but produce more realistic hair. The Hair Passes sets the number of render passes to use for determining hair transparency. The higher the Hair Passes value, the wispier the hair looks. The Rand Scale value provides a random amount of scaling for a percentage of hairs to look more natural. The Displacement value sets how far from the source object the hairs grow and can be a negative value.
Although the Hair Count value can accept huge numbers, adding a large number of hairs takes a long time to render and can really slow your system.
FIGURE 29.2 Hair properties can be altered using the General and Material Parameters rollouts.
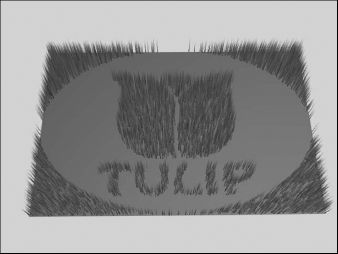
The buttons to the right of most of the parameters in the General Parameters rollout let you add a map to control the property with a grayscale bitmap. Figure 29.3 shows a simple plane object mapped with a bitmap used to control the hair density. The black areas of the bitmap have no hair growth, but the white areas have maximum growth. This provides a way to create patchy hair on a character or creature.
The Material Parameters rollout, also shown in Figure 29.2, includes settings for the Occluded Ambient value, controlling the tip and root colors, Hue and Value Variations, the addition of mutant hairs, percentage to include, and specular and glossiness settings. The Occluded Ambient value sets the contrast for the hair lighting. Smaller values have a stronger contrast, and higher values appear more washed out. The Hue and Value Variation values define a percentage that the hair color can deviate from the specified color to give the hair a more natural coloring. The Mutant percentage defines the percentage and color of hairs that are discolored, such as white hairs.
Note
The Occluded Ambient property is applied as an effect, so it is actually a fake global illumination pass.
The Tip Fade option causes the hair to be more transparent toward the tip. The Specular Tint color changes the color of specular highlights. The Tip Fade and Specular Tint options apply only to hairs rendered with mental ray. The Self Shadow value sets how much the individual hairs cast shadows on other hairs, and the Geometry Shadow settings determine how much shadow is contributed by other geometry objects. The Geometry Material ID is used to assign a material to geometry-rendered hair.
Many of the properties in the Material Parameters rollout also can be controlled using map buttons located to the right.
FIGURE 29.3 Many of the hair properties can be defined using maps.
Caution
Map colors are multiplied with the base color value, so set the base color to white before using a map.
In addition to the general and material parameters, rollouts also are available for controlling the amount of Frizz and Kink, and for the Multi-Strand nature of hair. Frizz causes the hair to curl at its tip or root. Kink parameters cause the hair to be zigzagged in shape; the Multi-Strand parameters cause hair to separate into groups like grass does. Figure 29.4 shows four areas with different hair properties applied, including normal straight hair with no frizz or kink, a section with Frizz, one with Kink, and Multi-Strand.
FIGURE 29.4 Changing hair properties can drastically alter the hair's look from normal to frizz, kink, and multi-strand.

Tutorial: Adding a spline fringe to a quilt
Quilts are designed to make you feel all warm and fuzzy, and what could be fuzzier than some soft fringe surrounding a quilt? Fringe makes grabbing the quilt easy.
To add hairy fringe to a quilt using splines, follow these steps:
- Open the Patch quilt.max file from the Chap 29 directory on the CD.
- Select the Create
 Shapes Line menu command, and draw a couple of simple splines that extend at right angles from every corner of the quilt in the Top view. These splines will be used to designate the start and end splines for the quilt fringe. Hair strands will be placed between these two simple splines. Start at one corner, and proceed in turn clockwise around each of the corners. Add a second line on top of the first line to complete the set of splines.
 - Select the first spline, and convert it to an Editable Spline object using the right-click quadmenu. Then click the Attach button, and select the splines in the order they were created.
- With all the splines selected, choose the Modifiers Hair and Fur Hair and Fur WSM menu command to apply the Hair and Fur modifier to the splines.
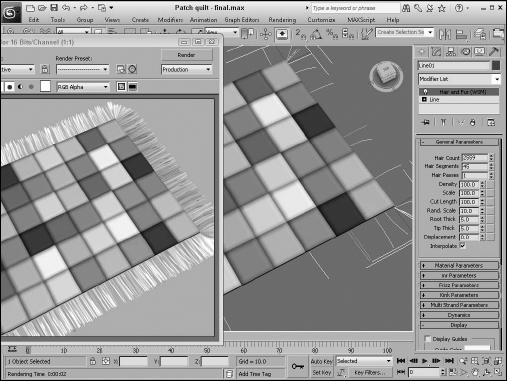
- Open the Modify panel, and in the General Parameters rollout, set the Hair Count to 2500, the Random Scale value to 10, and the Tip and Root Thickness to 5.0. Then open the Material Parameters rollout, and change the Tip and Root colors to white.
Figure 29.5 shows the resulting quilt with its fringe, all warm and fuzzy.
FIGURE 29.5 Hair or fringe can be added to a subobject selection or to the entire object.
Styling Hair
The Display rollout (located way at the bottom of the rollouts) includes settings for controlling how many hairs are displayed in the viewports. To see all the hairs, you need to render the scene. You can select to display Guide Hairs and actual hairs and set a color for each. The Override option causes the color specified in the color swatch to be used instead of the render color. You also can select a Percentage value of the total hairs to display in the viewport up to the number in the Max Hairs value. Enabling the As Geometry option causes the hairs to appear as geometry objects instead of lines.
Guide hairs control the position of all adjacent hairs. Guide hairs extend from each vertex in the attached object. Guide hairs are yellow by default, and viewport hairs are red, but you can change the color for each in the Display rollout.
Guide hairs provide a simple way to style, comb, and brush hair. By positioning the guide hairs, you can control what the rest of the hair looks like.
Note
No guide hairs are available when the Hair and Fur modifier is applied to a selection of splines because the splines act as guides.
Using the Style interface
In addition to the hair properties, you can change the look of hair by using the various hair styling features. These features are found in the Styling rollout. The Style Hair button activates an interactive styling mode in the viewport where you can brush, comb, and manipulate the individual hairs. The Style Hair button is activated automatically when the Guides subobject mode is selected.
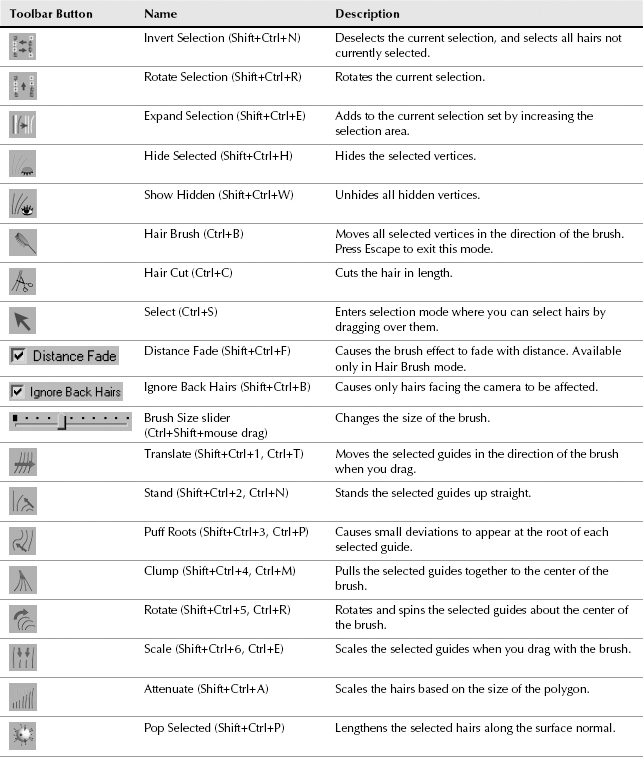
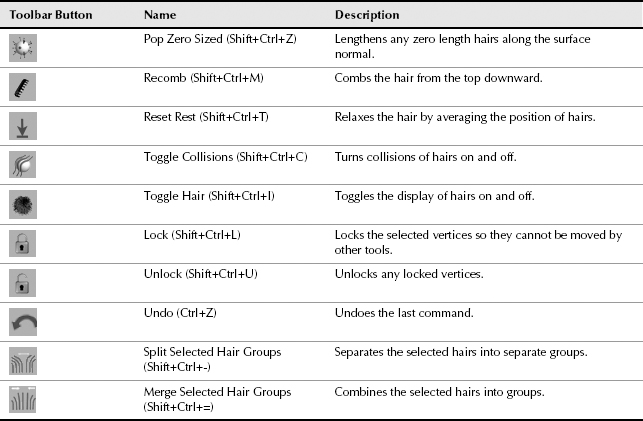
Within the Styling rollouts are several icon buttons. These buttons are described in Table 29.1. The brush size can be interactively set by holding down the Ctrl and Shift keys while dragging the mouse when in Brush mode, or you can change the brush size using the slider located under the Ignore Back Hairs option. The Distance Fade option causes the brushing effect to fade as it gets closer to the edge, resulting in a softer effect at the hair tips.
TABLE 29.1 Hair Styling Buttons
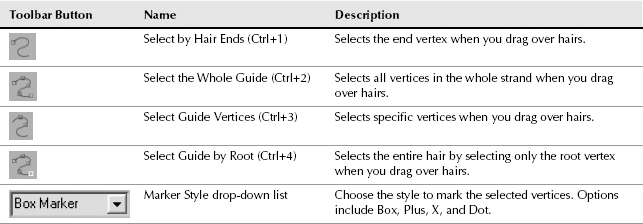
When you're finished styling, click the Finish Styling button in the Styling rollout to exit styling mode.
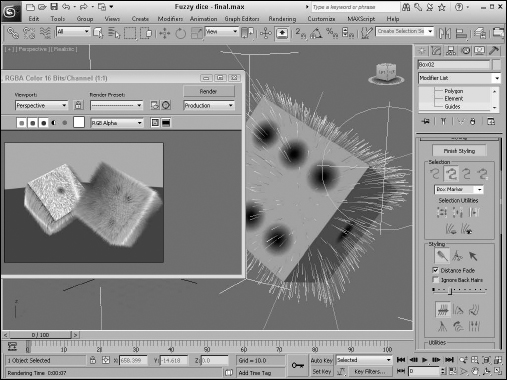
Tutorial: Creating a set of fuzzy dice
Fuzzy dice. What could be cooler?
To style the fur applied to a set of fuzzy dice, follow these steps:
- Open the Fuzzy dice.max file from the Chap 29 directory on the CD.
- Select one of the dice, and choose the Modifiers Hair and Fur Hair and Fur (WSM) menu command to apply hair to the selected die.
- Open the General Parameters rollout, and set the Hair Count to 20000 and the Scale value to 50. Then open the Material Parameters rollout, and change the Tip Color to white and the Root Color to Red. Then open the Frizz Parameters rollout, and set the Frizz Root and Frizz Tip values to 0. This makes the hair strands straight and red.
- Open the Styling rollout, and click the Style Hair button. In the Utilities section, click the Pop Selected button to make all the hair stand out. Then select the Hair Brush icon, and drag downward in the viewport near the guides at each of the top corners. Click the Finish Styling button when completed.
- Drag the Hair and Fur (WSM) modifier from the Modifier Stack, and drop it on the unselected die.
Figure 29.6 shows the resulting pair of dice.
FIGURE 29.6 Hair can be styled by changing the position and orientation of the guide hairs.
Using hair presets
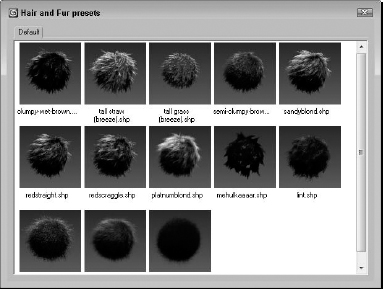
If you have a specific set of parameters that create a unique hair look that you're happy with, you can save it using the Save presets button in the Tools rollout. Hair preset files are rendered on the spot and added to the Hair and Fur Presets dialog box, shown in Figure 29.7. To add a preset configuration to the current object, simply double-click it.
FIGURE 29.7 The Hair and Fur presets dialog box shows rendered thumbnails of the available presets.
In addition to presets, hairdos—created by styling the hair—also can be copied and pasted onto other hair selections.
Tip
If you ever get into trouble styling hair, you can click the Regrow Hair button in the Tools rollout to reset all the styling to its original state.
Using hair instances
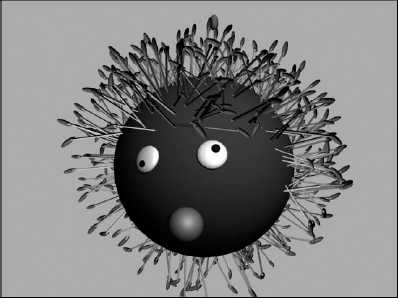
Although the default hair looks great, if you ever wanted to replace the hair splines with an instanced geometry, you can do so by using the Pick Instance Node in the Tools rollout. The X button to the right of the Instance Node Pick button is used to remove the instance. Figure 29.8 shows a funny head created using a matchstick for a hair instance.
Tip
Be sure to adjust the Hair Count value before selecting an instanced object. Complex instanced objects should be used only with manageable numbers.
FIGURE 29.8 Mr. Matchstick head has all his hair replaced with matchsticks, an instance.
Rendering Hair
You can change the hair render settings by opening the Effects panel using the Rendering ![]() Effects menu. The Render Settings button in the Tools rollout provides quick access to the Effects panel. The Hair and Fur rollout includes settings for the Hairs and Lighting rendering methods.
Effects menu. The Render Settings button in the Tools rollout provides quick access to the Effects panel. The Hair and Fur rollout includes settings for the Hairs and Lighting rendering methods.
Hairs can be rendered using three options. The Buffer method renders each hair individually and combines the effect. It uses minimal memory requirements. When the buffer method is selected, you can choose the Raytrace Reflections/Refractions option for better quality. The Geometry method converts each hair into a geometry object that is rendered. The mr Prim method renders hair using the mental ray renderer. For this option, you can set the Voxel Resolution used to render hairs.
Cross-Reference
More on mental ray is covered in Chapter 47, “Rendering with mental ray and iray.”
Motion Blur can be enabled to make hairs that are moving fast appear blurred. The Oversampling setting adds an anti-aliasing pass to the rendering. The options include Draft, Low, Medium, High, and Maximum. The Composite Method option depends on the rendering method that is selected. A list of occlusion objects and a setting for Shadow Density also are available.
By default, all lights (except for direct lights and daylight systems) are used to light hair, but if a spotlight is added to the scene, you can select the spotlight and click the Add Hair Properties button at the bottom of the Hair and Fur rollout. This adds a Hair Light Attributes rollout to the Modify panel for the selected spotlight where you can set the Resolution and Fuzz of the shadow map for the hair object cast by the light.
Understanding Cloth
If you drop a shirt over a chair, how does it land? It folds and bunches as it drapes over the solid object. Also notice how different types of cloth drape differently. Compare how silk reacts versus a terry cloth towel. Being able to accurately simulate how cloth reacts to scene objects and forces is yet another critical element that can really make a difference in your final scenes.
Cloth in Max is created using a modifier. This modifier can be applied to any object to make it a cloth object, or you can specifically create a set of clothes using the Garment Maker modifier. During the process of making an object into a cloth object, the object is divided into multiple faces using one of several subdivision methods. This provides the mesh with enough resolution to be deformed accurately.
Cloth objects are endowed with characteristics that let them respond to external forces within the scene including gravity, wind, and collisions with other scene objects. After all the scene objects, forces, and cloth objects are added to the scene, you can start a simulation that defines how the cloth moves within the scene under the effect of the other scene objects and forces.
Cross-Reference
This chapter focuses on creating and defining cloth objects. The dynamic nature of cloth is covered in Chapter 44, “Animating Hair and Cloth.”
Creating Cloth
When you start to model a cloth object, keep in mind that the model must have enough resolution so that it can accurately fold over itself several times. If the resolution isn't defined enough, then the bending of the cloth is not believable.
Note
Although dynamic cloth can be deformed under the effect of forces applied to it, cloth cannot apply a force back against the deforming object. This is a scenario that reactor can handle because it deals with all objects in the scene. A trampoline, for example, is a good example of a deformable cloth surface that can apply a force back on the deforming object using reactor.
You can increase the resolution of a model in several ways. The Garment Maker modifier includes parameters that can increase the resolution of a mesh, or you can use the HSDS (for Hierarchical SubDivision Surfaces) modifier to increase an object's resolution.
Tip
When making cloth objects, use a single-sided Plane object instead of a Box object. Using a Box object needlessly doubles the number of polygons to be included in the simulation.
Using Garment Maker to define cloth
Clothes can be added to models using a method that is similar to the way real clothes are made. Each section of cloth, called a panel, is outlined using lines and splines in the Top viewport. Clothes patterns also can be imported and used. Include a break at each corner of the panel, or the modifier will round the corner. After you have all the various panels created, convert one of the panels to an Editable Spline object and attach all the panels into a single object. You can apply the Modifiers ![]() Cloth
Cloth ![]() Garment Maker to the set of panels.
Garment Maker to the set of panels.
Tip
The easiest way to create cloth panels is to draw the entire cloth panel and then use the Break Vertex command in Vertex subobject mode to break each corner.
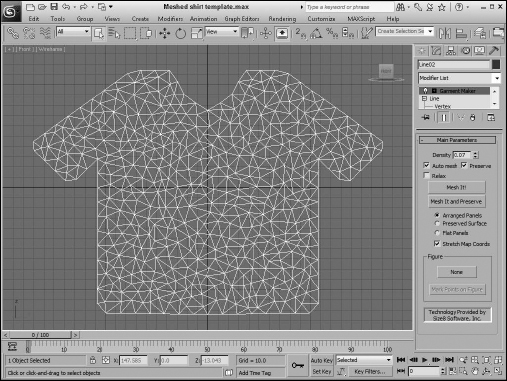
When the Garment Maker modifier is first applied, the panel outlines are made into mesh objects and subdivided using the Delaunay algorithm, as shown in Figure 29.9. This algorithm uses random triangulation and divides the triangles into roughly equal shapes. This helps keep the cloth from folding along common lines caused by regular patterns. You can alter the number of polygons in the subdivided mesh using the Density value. If the Auto Mesh option is disabled, then you can update the density change using the Mesh It button. The Preserve option maintains the 3D shape of the object. If Preserve is disabled, then the panel is made flat.
FIGURE 29.9 The Garment Maker modifier uses the Delaunay algorithm for subdividing cloth meshes.
The next step is to position the panels so they surround the model that they will be draped over. The subject that is to receive the clothes can be selected by clicking the Figure button in the Main Parameters rollout. After an object is selected, clicking the Mark Points on Figure button makes a small figure outline appear in the upper-left corner of the viewport. This figure outline has markers corresponding to the chest, neck, pelvis, shoulder, and wrists. Dragging over the body of the character lets you mark corresponding locations on the character.
After body parts are marked, you can select a cloth panel and use the Panel Position buttons in the Panel rollout to position the various cloth panels around the body. The Panel Position buttons include Front Center, Front Right, Back Center, Right Arm, and so on. You also can position the panels manually.
The Garment Maker modifier has three subobjects: Curves, Panels, and Seams. With the panels in place, you can stitch seams between the panels using the Curves subobject mode for flat drawn panels or with the Seams subobject mode for panels that are positioned about a model. Each seam edge should be relatively the same length. The Seam Tolerance value sets how far apart the two edges can deviate. For each seam, you can set a Crease Angle and Strength. The Sewing Stiffness value determines the strength that the seams are pulled together.
After the seams are defined, you can apply the Modifiers ![]() Cloth
Cloth ![]() Cloth modifier to pull the panels together and simulate the cloth's motion.
Cloth modifier to pull the panels together and simulate the cloth's motion.
Creating cloth from geometry objects
Any geometry object can be made into a cloth object using the Cloth modifier available by selecting the Modifiers ![]() Cloth
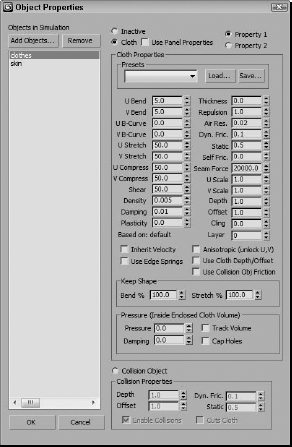
Cloth ![]() Cloth menu command. Although the modifier is added to the object, it is set to Inactive by default. To activate the cloth, you need to open the Object Properties dialog box, shown in Figure 29.10.
Cloth menu command. Although the modifier is added to the object, it is set to Inactive by default. To activate the cloth, you need to open the Object Properties dialog box, shown in Figure 29.10.
The list at the left holds all the objects that are involved in the cloth simulation. New objects can be added to the list using the Add Objects button. Each object can be set to Inactive, Cloth, or Collision Object, and properties can be set for each type. For cloth, the properties include Bend, Stretch, Shear, Density, Thickness, Friction, and Scale values. Defined cloth settings can be saved and recalled. Cloth property files are saved using the .sti file extension. Max also includes a sizable list of presets in a drop-down list, including Burlap, Cashmere, Cotton, Flannel, Rubber, Satin, Silk, Terrycloth, and Wool, among others.
In addition to objects added to the scene, a cloth simulation also can include forces. The Cloth Forces button opens a dialog box where you can select which forces in the scene can be added to the cloth simulation. Gravity is added by default automatically to the simulation. You can set the Gravity value in the Simulation Parameters rollout along with several other parameters, including the Start and End Frames.
With all the objects and forces added, click the Simulate Local button to set the initial state of the cloth simulation. This drapes the cloth over the scene objects and pulls all defined seams from the Garment Maker modifier together. Sometimes the Simulate Local button moves the cloth panels together too fast, so you can use the Simulate Local (damped) button to add lots of damping to the scene to prevent problems from panels moving too fast.
FIGURE 29.10 The Object Properties dialog box includes all the parameters for the cloth and collision objects.
Tutorial: Clothing a 3D model
If you've ever wanted to design and outfit a set of models with a custom-made line of clothing, here's your chance. Using Garment Maker and the Cloth modifiers, you outfit the 3D model with a set of clothes. Watch for this new line next spring at your local retailers. This excellent female character was supplied by Zygote Media.
To create and apply a set of clothes to a 3D character, follow these steps:
- Open the Zygote woman with clothes.max file from the Chap 29 directory on the CD.
- Select the Create Shapes Line menu command, and draw in the Top viewport the front outline of a simple tank top and a simple skirt. Make sure the panels are closed splines. Then right-click in the viewport to exit Line mode.
- Select the Tools Mirror menu command, and create mirrored copies of the clothes for the back side. Then convert one of the panels to an Editable Spline, and attach all the other panels together into a single object. In Vertex subobject mode, select all the corner vertices in all panels and click the Break button.
- With the clothes selected, choose the Modifiers Cloth Garment Maker modifier. This automatically subdivides all the cloth panels into multiple polygons.
- In the Main Parameters rollout, click the Figure button and select the female character. Then click the Mark Points on Figure button. A small figure appears in the upper-left corner of each viewport with the upper chest area marked in red. Drag the cursor over the character until the matching upper chest area is located, and click. Repeat for all the marked positions. When all points are marked, click the Mark Points on Figure button again to exit marking mode.
- In the Modify panel, select the Panels subobject mode and choose the tank top's front panel. Select the Top at Neck level, and click the Front Center button. This places the tank top's front in front of the character. Repeat the placement for the other panels. If the placement isn't correct, manually move the panels until they are in front of and behind the character, as shown in Figure 29.11.
FIGURE 29.11 Using figure markers, you can approximate where the clothes are positioned on a character.
- In the Modify panel, select the Seams subobject mode. In the Front viewport, select two edges that should be connected and click the Create Seam button. Repeat this for all seams including the sides of the skirt and shirt and the top of the shirt. Connecting lines are drawn between both sides of the seam. If the seam boundaries are crossed, then click the Reverse Seam button.
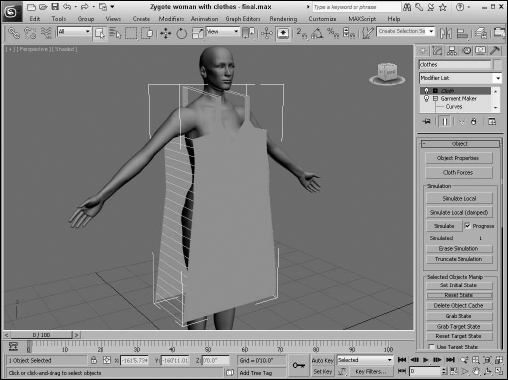
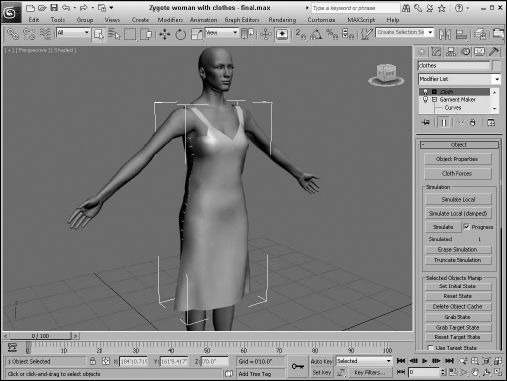
- With the seams defined, select Modifiers Cloth Cloth to apply the Cloth modifier. In the Object rollout, click the Object Properties button. In the Object Properties dialog box, select the clothes object and enable the Cloth option. Then click the Add Objects button, select the character mesh, and mark it as a Collision Object. Set the Offset value for the clothes to 0.3, and click Ok in the Object Properties dialog box.
- Click the Simulate Local button. The cloth seams are pulled together, and the clothes are draped over the character.
Figure 29.12 shows the female character in a simple gown.
FIGURE 29.12 The Simulate Local button causes the clothes to be draped over the body.
Summary
The Hair and Fur modifier allows you to add hair to scene objects. Using the parameters found in the various rollouts, you can define the type of hair that is created. The Cloth modifier enables a cloth dynamic system that can simulate the complex motion of cloth as it interacts with objects and forces in the scene.
Specifically, this chapter covered the following topics:
- Growing hair and setting hair parameters
- Styling hair and using the hair presets
- Understanding how cloth systems work
- Using the Garment Maker modifier
- Creating cloth objects from geometry objects using the Cloth modifier
Part VII, “Advanced Materials,” is next. The first chapter in this part shows off all the cool specialized material types.