4 Managing Your Photo Library
Lesson overview
As your photo library grows, it is increasingly important to organize your files so that they can be found easily. Lightroom Classic CC offers options for organizing your images before you even click the Import button, and even more once they’re in your catalog. You will manage folders and files without leaving the Library module, apply keywords, flags, ratings, and labels, and then group photos in convenient collections, regardless of where they’re stored. In this lesson, you’ll learn how to:
Work with a folder structure and understand and use collections.
Work with keywords, flags, ratings, and labels.
Tag faces in the People view and organize images by location in the Map module.
Edit metadata and use the Painter tool to speed up your workflow.
Find and filter files.

This lesson will take 1 to 2 hours to complete. Please log in to your account on peachpit.com to download the files for this lesson, or go to the “Getting Started” section at the beginning of this book and follow the instructions under “Accessing the lesson files and Web Edition.” Store the files on your computer in a convenient location. Your Account page is also where you’ll find any updates to the lessons or to the lesson files. Look on the Lesson & Update Files tab to access the most current content.

Lightroom Classic CC delivers powerful, versatile tools to help you organize your image library. Use people tags, keywords, flags, labels, ratings, and even GPS location data to sort your images, and group them into virtual collections by any association you choose. Make fast, sophisticated searches, based on practically limitless combinations of criteria, that will put the photos you want at your fingertips.
Getting started
Before you begin, make sure you’ve set up the LRClassicCIB folder for your lesson files and created the LRClassicCIB Catalog file to manage them, as described in “Accessing the lesson files and Web Edition” and “Creating a catalog file for working with this book” in the “Getting Started” section at the start of this book.
![]() Note
Note
This lesson assumes that you already have a basic working familiarity with the Lightroom Classic CC workspace. If you need more background information, refer to Lightroom Classic CC Help, or review the previous lessons.
If you haven’t already done so, download the lesson04 and lesson04_GPS folders from your Account page at www.peachpit.com to the LRClassicCIBLessons folder (see “Accessing the lesson files and Web Edition” in the “Getting Started” section).
Start Lightroom Classic CC.
In the Adobe Photoshop Lightroom Classic CC - Select Catalog dialog box, make sure the file LRClassicCIB Catalog.lrcat is selected under Select A Recent Catalog To Open, and then click Open.
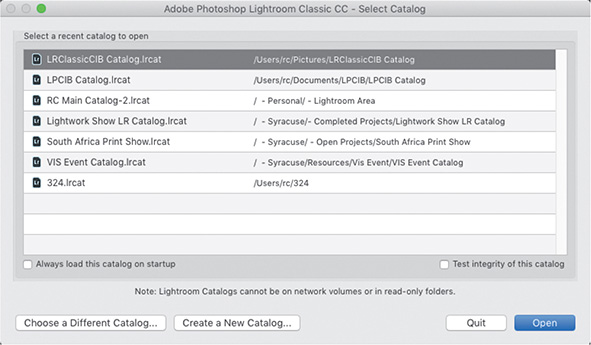
Lightroom Classic CC will open in the screen mode and workspace module that were active when you last quit. If necessary, switch to the Library module by clicking Library in the Module Picker at the top of the workspace.
![]() Tip
Tip
The first time you enter any of the Lightroom Classic CC modules, you’ll see module tips that will help you get started by identifying the components of the workspace and stepping you through the workflow. Dismiss the tips by clicking the Close button. To reactivate the tips for any module, choose [Module name] Tips from the Help menu.

Importing images into the library
The first step is to import the images for this lesson into the Lightroom library.
In the Library module, click the Import button below the left panel group.

If the Import dialog box appears in compact mode, click the Show More Options button at the lower left of the dialog box to see all the options in the expanded Import dialog box.

Under Source at the left of the expanded Import dialog box, locate and select your LRClassicCIBLessonslesson04 folder. Ensure that all 31 images from the lesson04 folder are selected for import.
In the import options above the thumbnail previews, select Add so that the imported photos will be added to your catalog without being moved or copied. In the File Handling panel at the right, choose Minimal from the Build Previews menu and ensure that the Don’t Import Suspected Duplicates option is selected. In the Apply During Import panel, choose None from both the Develop Settings menu and the Metadata menu, and type Lesson 04, Collections in the Keywords text box. Make sure that your import is set up as shown in the illustration below, and then click Import.
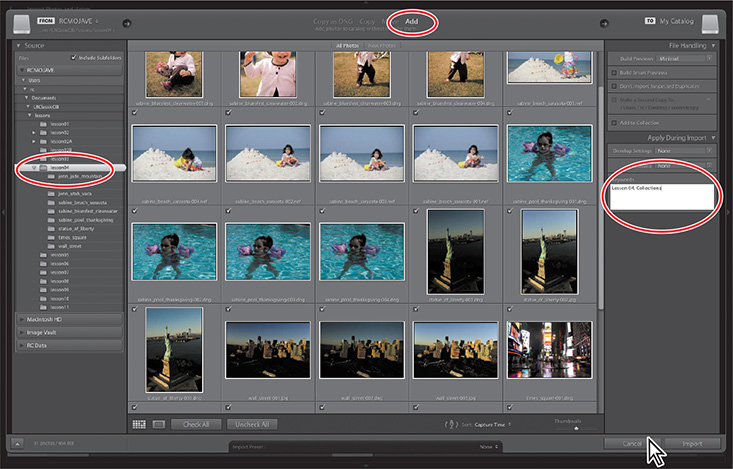
The 31 images are imported from the lesson04 folder and now appear in both the Grid view of the Library module and in the Filmstrip across the bottom of the Lightroom Classic CC workspace.
Folders vs. collections
Each time you import an image, Lightroom creates a new catalog entry to record the file’s address on your drive—the folder in which it is stored and the volume that contains that folder—in the Folders panel in the left panel group.
To keep a handle on your growing library, you need to store your pictures in folders, and you need those folders to keep some sort of structure. However, folders are an inefficient way of organizing your information, especially when it comes to photography, where you may want access to individual images in a whole bunch of places. To do that, you need collections.
Folders store; they do not organize
Let me give you a quick example. Let’s imagine that this is a picture I think is so amazing, I want to use it for a variety of things. I think this image is a good example of my child photography, that it captured one of the best moments in our family life, that it is a great picture of my daughter, Sabine. I may want to show it to different people at different times and in different circumstances. My solution? I create an album for each of these moments, and place the picture of Sabine in each of the folders.

While that might seem like a good solution, we now have one file living in five different places. If this picture is 10 MB in size, I would be taking up 50 MB of storage—five times the amount I need—simply to have it easily accessible in every possible photo group I might need it in. From a disk usage standpoint, that’s inefficient.

Then, what happens if I need to make a change to the file? I would have to remember all of the locations where that file lives, and make sure that every change I make is added to the image in each location. That’s even more inefficient. Thankfully, Lightroom solves a lot of this with collections.
Using collections to organize images
A collection is a virtual folder that allows you to organize your pictures from any number of separate physical folders, whether on your hard disk, removable drive, or network-attached storage device. A single master image can be included in any number of collections without adding space, and gives you the flexibility to create organization from all of your images. If we followed the previous example, I can have five different collections in Lightroom—one for each situation—and each collection can have the image inside of it, but all of those “images” are simply references in the catalog to the same physical file.
![]() Tip
Tip
If you are a user of the Apple service iTunes, think of collections as playlists for your pictures. You have one picture, but it can go to multiple playlists.
This concept is the literal cornerstone of everything you do in Lightroom, and your ability to master this method of organization makes using it so much easier.
There are several types of collections in Lightroom: Quick Collections, collections, collection sets, and smart collections, listed in the order I feel they are important to your workflow.
![]() Note
Note
You can learn more about publish collections in the bonus lesson in the download files. For how to access those files, see the “Getting Started” section at the beginning of the book.
Any collection can also be part of an output collection—a collection that is created automatically when you save a print layout or a creative project such as a photo book or web gallery, linking a set of images to a particular project template, together with all of your customized settings.
Any collection can also become a publish collection, which automatically keeps track of images that you’ve shared via an online service, or that is synced to Lightroom CC on your mobile device via Adobe Creative Cloud.
Let’s walk through the first four, step by step, as it is vital that you get these under your belt.
![]() Tip
Tip
If the Thumb-nail Badges option is selected in the Library View Options, a photo that is included in a collection of any kind displays the collection badge in the lower right of its thumbnail.
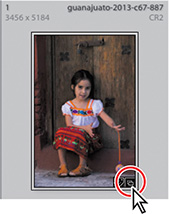
Click the badge to see a menu listing the collections in which the image is included. Select a collection from the list to designate that collection as the image source folder.
The Quick Collection
The Quick Collection is a temporary holding collection, a convenient place to assemble a group of images from different folders. You can access the Quick Collection from the Catalog panel so that you can easily return to work with the same selection of images at any time. Your images will stay in the Quick Collection until you are ready to convert your selection to a permanent collection that will then be listed in the Collections panel.
You can create as many collections and smart collections as you wish, but there is only one Quick Collection; if there is already a selection of images in the Quick Collection, you’ll need to clear the Quick Collection or convert it to a standard collection and then clear it before you can use it to assemble a new grouping.
We already created a Quick Collection in Lesson 3, so let’s move on to the two that you will use the most in Lightroom: the collection and the collection set.
Creating collections
In the lesson04 folder, there are a series of images that are placed inside of subfolders. The idea here was that this would simulate how you would normally import your images. We’re going to start there and give these pictures some order.
Navigate to the jenn_jade_mountain folder in lesson04. Once the images appear in the Grid view, select all of them by pressing Command+A/Ctrl+A.
Click the plus sign (+) button at the upper right of the Collections panel, and choose Create Collection. In the Create Collection dialog, give it the same name as the folder, so type jenn_jade_mountain, and in the Options area, make sure Include Selected Photos is selected, and click Create.

![]() Note
Note
Once you’ve grouped a selection of photos as a collection you can rearrange them in the Grid view or the Filmstrip, changing the order in which they will appear in a presentation or a print layout. Your customized sorting order is saved with the collection.
A new collection has been made in the Collections panel with three images in it. The pictures in this collection are digital references to the physical copies on your hard drive.
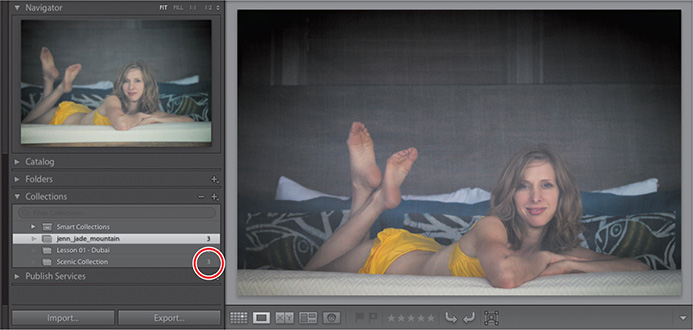
Let’s experiment with the power of collections even further.
Create two additional Collections called Summer Portfolio and Happy Jenn. Make sure that you place the middle file of the previously selected ones—jenn_jade_mountain-002.nef—in both of the collections you just created.
![]() Tip
Tip
The Import New Photos option in the Synchronize Folders
dialog box automatically imports any files that have been added to a folder without yet having been added to your image library. Optionally, activate Show Import Dialog Before Importing to choose which of those files you wish to import. Activate the Scan For Metadata Updates option to check for files with metadata modified in another application.
As a result, we now have three different collections: Summer Portfolio, Happy Jenn, and jenn_jade_mountain. Each collection has the same file of my wife, Jenn, but they still only reference one physical file. But wait, it gets better.

Select the Happy Jenn collection, and be sure the above picture is selected,
In the Quick Develop panel, click the Exposure double-arrow on the left two times to make this image two stops underexposed.

Click each of the collections in the Collections panel, and you’ll see that this photo is automatically updated in all three collections the moment you make a change in one of the collections, since they all reference that same, single physical image file.
Smarter file management, smaller file sizes, immediate version control—this is why collections are so important.
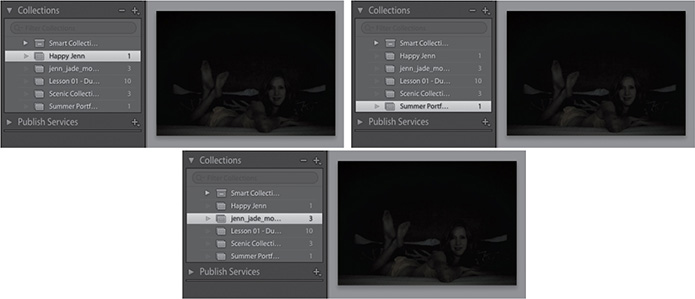
Pro tip: Automatic collections from folders
While I hope that this has inspired you to make collections out of everything you import, it can be a little daunting to make collections when you have been using folders for some time. So since you’ll need them for the next exercise, I’ll share a pro tip with you.
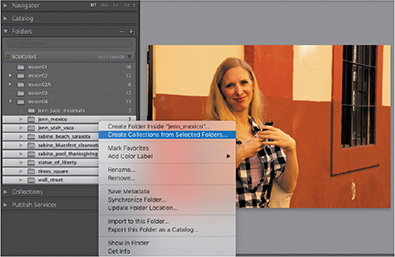
You can make collections from the remaining folders for this lesson by clicking the first one and Shift-clicking the last one in the series. Once they are selected, right-click and select Create Collections From Selected Folders.
In the Collections panel, you’ll see that there is now a series of collections, one for each of the folders that you imported from the lesson04 folder.

Your turn: Make a new collection
Let’s make another new collection, this time one that includes images from multiple folders.
Click the Collections panel’s plus sign (+) button again, and create a new collection called Lightroom Book Highlights. Make sure Include Selected Photos is unselected.
Click All Photographs in the Catalog panel to see all of the images you’ve imported. If necessary, make the thumbnails smaller so you can see all of them at the same time.
Command-click (Ctrl-click) seven of the images (choose your favorites) and drag them into the new collection. The goal here is to make sure that you are selecting images from each of the lesson folders you have imported so far, from Lessons 1 to 4.
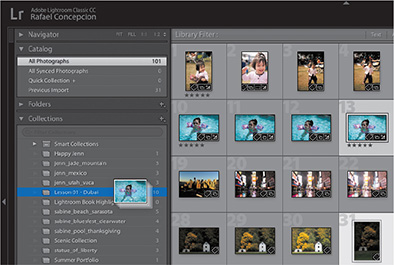
Your new collection now houses images from different folders, yet each one still only reflects a single physical copy on your computer. As your photographic needs grow, you’ll find that you need to organize collections like digital albums, to share the best of a series of images in short order.
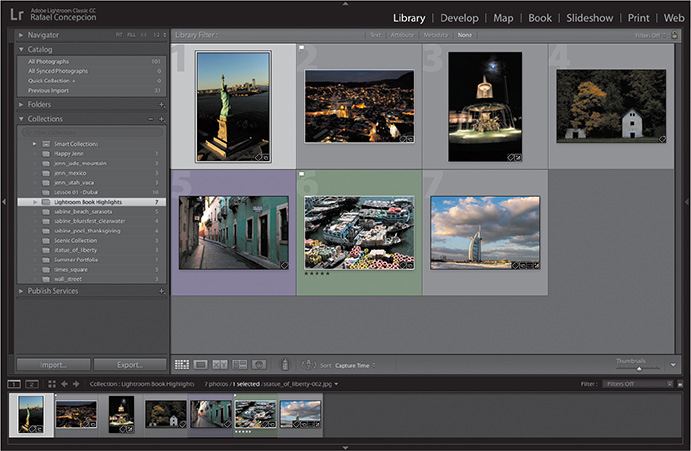
Working with collection sets
It’s easy to see that, as you add more collections, your list in the Collections panel could get a little unwieldy. If you use Lightroom for professional and personal work and have a lot of different collections for each, it will be hard to scroll through them all and and see where your work images are versus your family images.
We need to better group and organize our collections. This is where collection sets come in. Collection sets are virtual folders that can hold both collections and other collection sets.
Let’s go through some examples with the collections that we have so far. Take a look at the collections we’ve made so far; we can find some elements that each of them share.
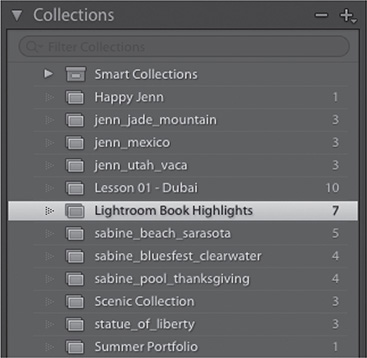
There is a series of collections with images of my wife, Jenn. There also is a series of collections with images of my daughter, Sabine. Let’s start with Jenn.
Click the plus sign (+) button at the upper right of the Collections panel and choose Create Collection Set.

In the Create Collection Set dialog box, for Name, type Jenn Vacation Images, and make sure Inside A Collection Set is unselected.
Click Create, and then drag the four Jenn collections into the Jenn Vacation Images collection set.
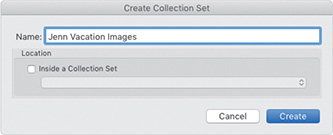
You now have all four collections organized in one spot.
Create another collection set, and this time, for Name, type Sabine Vacation Pictures. Place all of the Sabine collections inside of it. When done, your collections should look like the illustration to the right.

Looking at the Jenn and Sabine collection sets, what do these two sets have in common? They are family vacation pictures! Let’s create one more collection set. In the Create Collection Set dialog box, for Name, type Family Vacation Pictures. Instead of placing collections in it, drag the two collection sets—Jenn Vacation Images and Sabine Vacation Pictures—inside of it.

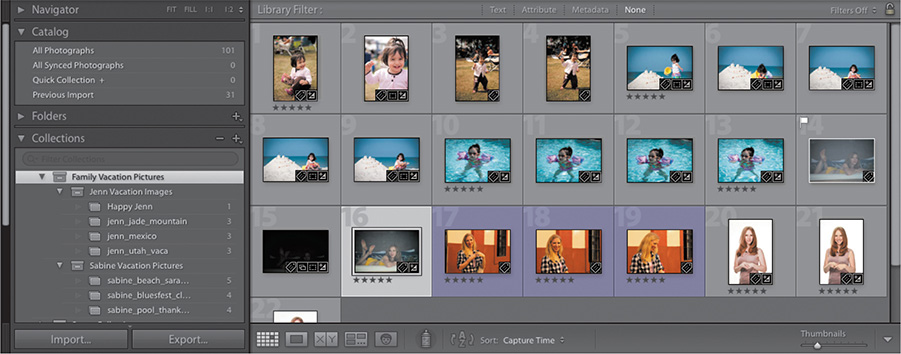
This is the start of Lightroom organizational nirvana. If I want to see all of the family vacation pictures, I can click the Family Vacation Pictures collection set and see all of them. If I want to see just the Jenn Vacation Images collection set, I can click it and see only images of my wife. If I want to see images of my daughter at Bluesfest, I can click that individual collection and see only those photos.
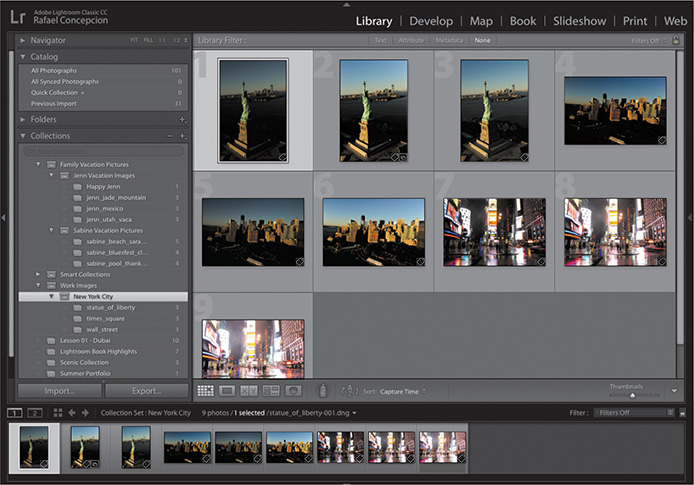
In the illustration below, I created a collection set called New York City and placed the remaining collections we made from the lesson04 folder images into it. Then, I made one final collection set called Work Images, and placed the New York City collection set in it. Try this on your own and see how well you do!
Smart collections
A smart collection searches the metadata attached to your photos and gathers together all those images in your library that meet a specified set of criteria. Any newly imported photo that matches the criteria you’ve set up for a smart collection will be added to that collection automatically.
You can create a smart collection by choosing Library > New Smart Collection and choosing a descriptive name based on the criteria you add. Then specify the search criteria for your smart collection by choosing options from the menus in the Create Smart Collection dialog box.

You can add more search criteria by clicking the plus sign (+) button to the right of any of the rules. Hold down the Option/Alt key and click the plus sign (+) button to refine a rule. In the illustration below, a second rule has been added to search for images containing the words New York in any searchable text, and then a third and a fourth rule have been added to search for images that are flagged and were edited this year. I also changed the name of the smart collection to reflect the new criteria.

Taking your collections on the road
Lightroom Classic CC enables you to sync photo collections between your desktop computer and your mobile devices so that you can access, organize, edit, and share your photos anywhere, anytime. Whether you’re working in Lightroom on your desktop or on your iPad, iPhone, or Android device, any changes you make to photos in a synced collection will be updated automatically on the other device.
Syncing photos from Lightroom Classic CC
Lightroom CC lets you sync from only one catalog. Since we are working on a sample catalog, I won’t recommend that you switch to your personal catalog and sync images now. Instead, I’ll switch to my personal catalog and demonstrate the process of syncing—it’s easy enough to do—so you’ll be prepared to share and sync online when you are finished with the book and have switched back to your own catalog.
![]() Note
Note
This exercise assumes that you have already signed in to Lightroom Classic CC with your Adobe ID. If you have not yet signed in, you’ll need to do so before you begin; choose Help > Sign In.
Move the pointer over your name in the identity plate at the upper left of the workspace. Click the small white triangle to open the activity center, and then choose Sync With Lightroom CC.

In the Collections panel, click the empty checkbox at the left of the name of one of your collections to sync it to Lightroom CC. If the Share Your Synced Collections tip appears, dismiss it for now.
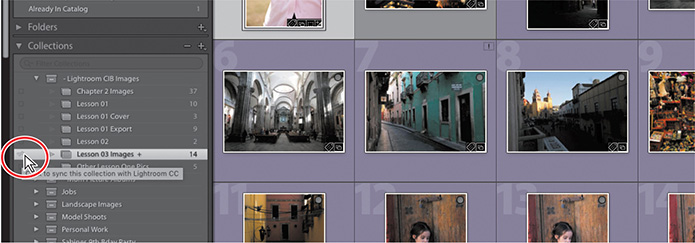
You’ll know that your collection is online when you see a Make Public button at the top right of the work area.
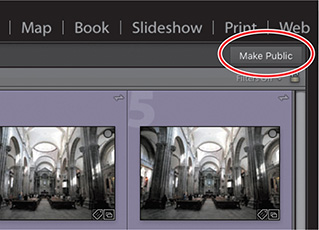
By default, when you share it online, your collection is private. If you click the Make Public button, it switches to Make Private and a URL is generated that you can copy to give to others or click to go to the collection online.

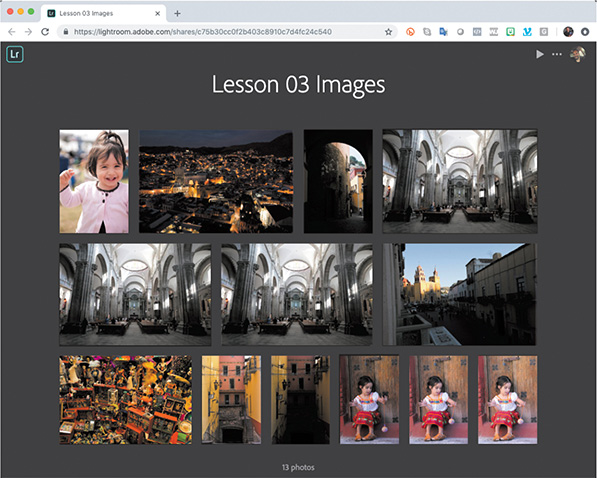
The link that you get from Lightroom Classic CC is designed to allow recipients to view, like, and comment on your collection. Lightroom also gives you a few options for managing your online collections, both in the mobile app and in a browser.
Viewing synced photos on your mobile device
On your mobile device, tap the Lightroom CC app icon, then sign in to Lightroom CC for mobile with your Adobe ID, Facebook, or Google.
The first screen you’ll see is the Albums view, which lists the collections you’ve synced from your desktop, as well as any you create in Lightroom CC mobile, and also offers some built-in views. First is the All Photos view, where you can browse all your synced images and all photos taken by your device camera and imported into Lightroom CC. There is a view that shows you only the images taken in Lightroom CC, one that shows you the most recently added images, and one that shows only photos with faces.

Scroll down to find the album that has been synced online and tap it to see it.
One of my favorite features about the mobile apps is that you can perform edits on images in collections that you have synced online. Tap an image in the synced collection to see the editing tools in groups along the bottom (with the device vertical) or right side (with the device horizontal) of the screen.

All of the editing tools that you will learn how to use in the Develop module, in the next lesson, are available to you on a mobile device. You can import, sync, and then work on the go in a matter of seconds. Tap a tool group to open it.
Any changes that you make online will automatically sync (if you have an internet connection) with Lightroom Classic CC. This makes for a powerful editing combination.
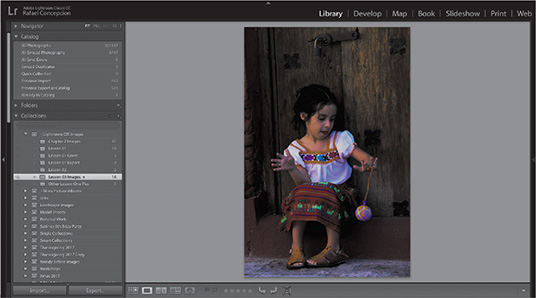
Editing on the Lightroom.adobe.com site
If you don’t have access to the mobile app but do have access to a browser, simply go to lightroom.adobe.com and sign in. On this site, you will have access to all of the collections that you have shared online, and you can do even more than just view the images.

As with the mobile app, the website offers you a suite of controls, similar to what you would use in Lightroom Classic CC. With all of this flexibility, you are never too far from an edit or a share.
As soon as you complete this book, I encourage you to sign into the lightroom.adobe.com website and share a couple of your own collections. You’ll be surprised at how much you can do.

Using keyword tags
Perhaps the most direct way to mark your photos so that they’re easier to find later is by tagging them with keywords—text metadata attached to the image files to categorize them by subject or association.
For example, the image in the illustration at the right could be tagged with the keywords Statue of Liberty, New York City, and Monument, and could therefore be located by searching for any one or combination of those tags. If the Thumbnail Badges option is selected in the Library View Options dialog box, photos with keyword tags are identified by a keywords badge at the lower right of the thumbnail.
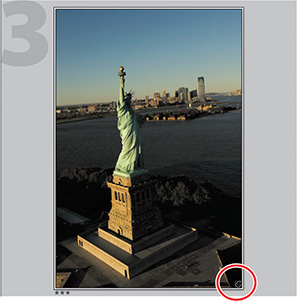
You can apply keywords to your photos individually or tag an entire series of images with shared metadata in one operation, thereby linking them by association and making them easier to access among all the photos that make up your library. Keywords added to images in Lightroom can be read by Adobe applications such as Bridge, Photoshop, and Photoshop Elements, and by other applications that support XMP metadata.
Viewing keyword tags
Because you applied keyword tags to the images for this lesson during the import process, the thumbnails in the Grid view and the Filmstrip are all marked with the keywords badge. Let’s review the keywords you already attached to these photos.
![]() Tip
Tip
Clicking the keyword badge of an image in Grid view will automatically expand the Keywording panel.
Make sure that you are still in the Grid view, and then select the lesson04 folder in the Folders panel.
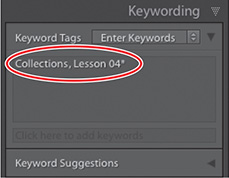
Show the right panel group, if necessary, and then expand the Keywording panel. Expand the Keyword Tags text box at the top of the panel. By selecting each thumbnail in the Grid view in turn, you can confirm that all of the images in the lesson04 folder share the keywords “Collections” and “Lesson 04.”
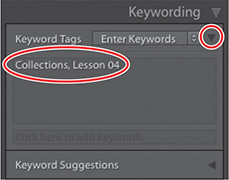
Select any one of the photos in the lesson04 folder. In the Keyword Tags text box at the top of the Keywording panel, select the text “Lesson 04” and press the Delete/Backspace key on your keyboard to delete it.
Click anywhere in the Grid view, and then choose Edit > Select All or press Command+A/Ctrl+A to select all the photos in the lesson04 folder. In the Keyword Tags text box, the keyword “Lesson 04” is now marked with an asterisk to indicate that this tag is not shared by every image in the selection.
Expand the Keyword List panel.
![]() Tip
Tip
You can apply an existing keyword tag to selected images by clicking the tag in the Keyword Suggestions area in the Keywording panel. To remove a tag from a selected photo or photos, either delete the word from the Keyword Tags text box in the Keywording panel, or click the checkbox to disable that keyword in the Keyword List panel.
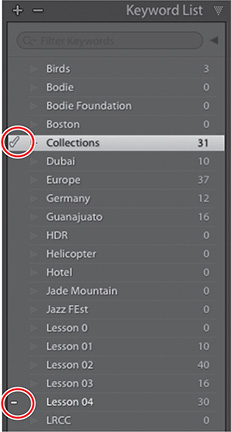
In the Keyword List, a check mark to the left of the keyword “Collections” indicates that this tag is shared by every image in the selection, while the tag “Lesson 04” is marked with a dash, indicating that it is attached to some, but not all, of the selected images. The image count to the right of the Collections tag shows that it is shared by all 31 of the images for this lesson, while the Lesson 04 tag shows that it is shared by only 30 of the 31 images.
With all 31 images still selected, click the dash mark in front of the Lesson 04 tag to reinstate the deleted tag; a check mark replaces the dash and the image count for the Lesson 04 keyword increases to 31.
Adding keyword tags
You already added keywords to your images during the process of importing them into your Lightroom library. Once the images have been added to your Lightroom library, you can add more keywords by using the Keywording panel.
![]() Note
Note
Always use a comma to separate keywords; words separated by a space (Copenhagen Denmark) or by a period (Copenhagen. Denmark) will be treated as a single keyword.
In the Folders panel, click the jenn_mexico subfolder inside the lesson04 folder, and then choose Edit > Select All or press Command+A/Ctrl+A.
In the Keywording panel, at the bottom of the Keyword Tags area, click where it says “Click Here To Add Keywords,” and type Guanajuato, Mexico. Make sure to separate the new keywords with a comma.

Press Return/Enter when done. The new keywords are listed in alphabetical order in the Keywording panel and in the Keyword List panel.

In the Folders panel, select the lesson04 folder, and then choose Edit > Invert Selection to select all the images other than the three in the jenn_mexico folder.
In the Keywording panel, click in the text box at the bottom of the Keyword Tags area and type Holiday. Press Return/Enter.
Choose Edit > Select None or press Command+D/Ctrl+D on your keyboard.
Working with keyword sets and nesting keywords
You can use the Keyword Set area in the Keywording panel to work with keyword sets—groups of keywords compiled for a particular purpose. You could create a set of keywords for a specific project, another set for a special occasion, and one for your friends and family. Lightroom Classic CC provides three basic keyword set presets. You can use these sets as they are or as starting points for creating sets of your own.
![]() Tip
Tip
Keyword sets are a convenient way to have the keywords you need at hand as you work on different collections in your library. A single keyword tag may be included in any number of keyword sets. If you don’t see the Lightroom presets in the Keyword Set menu, open the Lightroom Preferences and click the Presets tab. In the Lightroom Defaults options, click Restore Keyword Set Presets.
Expand the Keyword Set area in the Keywording panel, if necessary, and then choose Wedding Photography from the Keyword Set menu. You can see that the keywords in the set would indeed be helpful in organizing the shots from a big event. Look at the categories covered by the other Lightroom keyword sets. You can use these as templates for your own keyword sets by editing them to suit your needs and saving your changes as a new preset.
Grouping your keywords in keyword sets is one way to keep your keywords organized. Another handy technique is to nest related tags in a keywords hierarchy.
Click the Germany keyword in the Keyword List panel, then drag it onto the Europe keyword. The Europe keyword (the “parent” keyword) expands automatically to show the Germany tag (the “child” keyword tag) nested inside. Do the same with the Prague keyword.

In the keyword list, drag the Times Square keyword onto the New York City keyword. The New York City tag expands to show the nested Times Square tag.
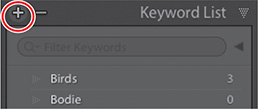
I want to create a UAE keyword inside of the Dubai keyword. Click the plus sign (+) button at the upper left of the Keyword List panel to create a new keyword tag.
In the Keyword Name text box in the Create Keyword Tag dialog box, type UAE. Make sure the first three options under Keyword Tag Options are selected as shown in the illustration at right, and then click Create.
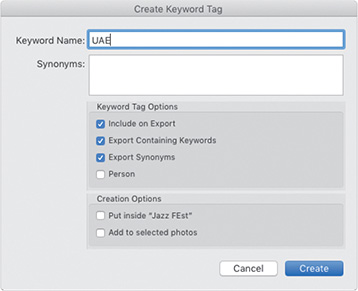
Include On Export Includes the keyword tag when your photos are exported.
Export Containing Keywords Includes the parent tag when your photos are exported.
Export Synonyms Includes any synonyms associated with the keyword tag when your photos are exported.
In the Folders panel, select the lesson01 folder, and then choose Edit > Select All or press Command+A/Ctrl+A to select all of the images in the folder. Drag the Dubai and UAE tags from the Keyword List onto any of the selected images in the Grid view.
In the Keyword List, check marks in front of the new Dubai and UAE keyword tags, and the image count to the right of each entry, indicate that both keyword tags have been applied to all selected photos.

Searching by keyword
Once you’ve taken the time to organize your images by adding keywords and other metadata, such as ratings, flags, and labels, it is easy to set up sophisticated and detailed filters to find exactly the photo you’re looking for.
For now, we’ll look at some techniques for finding the photos in your library by searching (or filtering) for keywords alone.
![]() Tip
Tip
If you find that you cannot have two panels open at the same time in either of the side panel groups, right-click the header of any panel in the group and disable Solo mode in the menu.
Choose Library > Show Photos In Subfolders, if it’s not aleady selected. In the left panel group, collapse other panels, if necessary, so that you can clearly see the contents of the Catalog and Folders panels. In the Folders panel, click the lesson04 folder, and then choose Edit > Select None or press Command+D/Ctrl+D.
Use the Thumbnails slider in the Toolbar to reduce the size of the thumbnails to the minimum, so that you’ll be able to see as many images as possible in the Grid view. If the Filter bar is not already visible above the Grid view, choose View > Show Filter Bar or press the Backslash key ().
In the right panel group, collapse other panels, if necessary, so that you can see the contents of the expanded Keyword List panel.
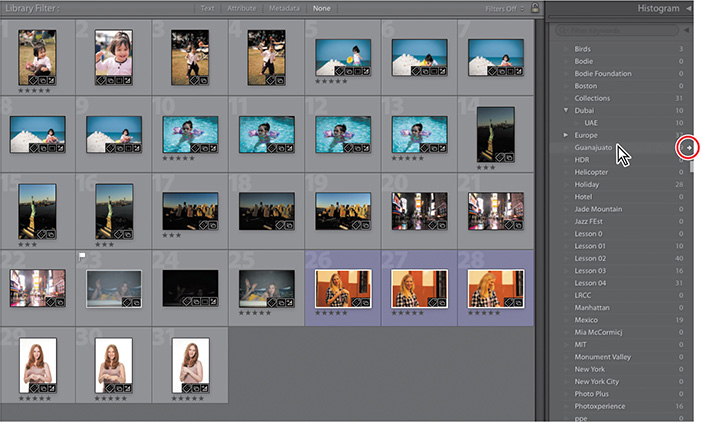
In the Keyword List panel, move your pointer over the entry for the keyword Guanajuato, and then click the white arrow that appears to the right of the image count. Press Command+D/Ctrl+D or choose Edit > Select None.
![]() Tip
Tip
To transfer lists of keywords between computers or share them with colleagues who are also working in Lightroom, use the Export Keywords and Import Keywords commands, which you’ll find in the Metadata menu.
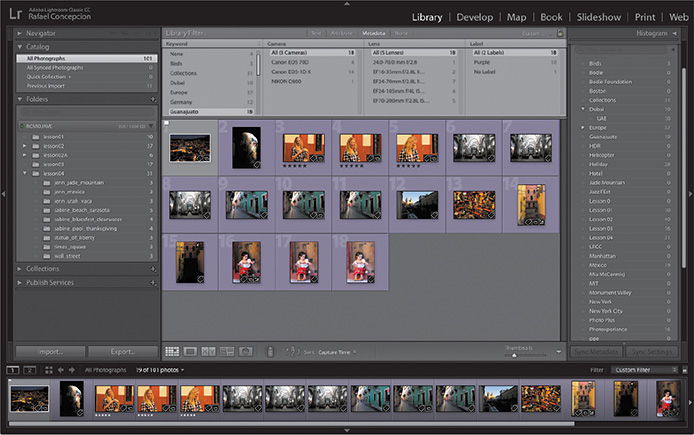
In the left panel group, All Photographs is now selected in the Catalog panel, indicating that your entire catalog was searched for photos with the Guanajuato tag.
The Metadata filter was activated in the Filter bar at the top of the work area, and the Grid view now displays only those images in your library that are tagged with the Guanajuato keyword tag.

The images in the Grid view are filtered so that only the 18 photos with the tag are still visible. Now you’ll use a different technique to search.
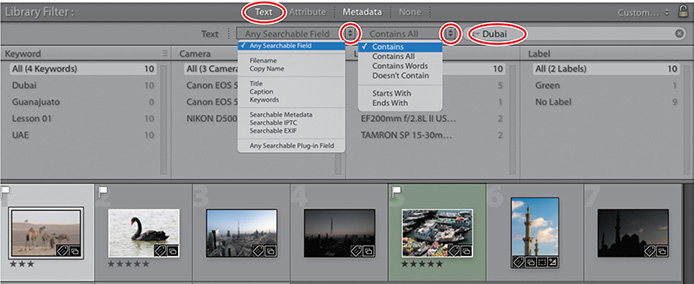
Click All at the top of the Keywords column, then click Text at the top of the Filter bar. In the Text filter options, choose Any Searchable Field from the first menu and Contains from the second menu, noting the options available in each menu. Then type Dubai in the text box at the right and press Return/Enter.
![]() Tip
Tip
You can use the lock button at the right end of the Filter bar to keep your current filter settings active when you choose a different image source from the Catalog, Folders, or Collections panels.
Only 10 photos are still visible in the Grid view—the ones you created in Lesson 1. Of course, the true power of the Library filters only comes into play when you set up more complex filters based on a combination of criteria, but this exercise should have given you at least a glimpse of the possibilities.
At the top of the Filter bar, click None to deactivate the filters. In the Folders panel, select the lesson04 folder, and then choose Edit > Select None or press Command+D/Ctrl+D.
Using flags and ratings
The Attribute filters in the Filter bar allow you to search and sort your images according to attributes such as flags and ratings. When you click Attribute in the Library Filter bar, the Filter bar expands to display controls for sorting your images by flag status, edit status, star rating, color label, copy status, or any combination of these attributes.

Flagging images
Assigning flags to sort the good images from the rejects (and from the unflagged so-so images) can be a good way to begin organizing a group of photos. You can flag an image as a pick or a reject, or you can leave it unflagged.
Select Attribute at the top of the Filter bar. The Filter bar expands to show the Attribute filter controls.
If the Toolbar is not already visible below the Grid view, press the T key. Click the triangle at the right side of the Toolbar and choose Flagging from the menu to show the Flag As Pick and Set As Rejected buttons in the Toolbar.

![]() Tip
Tip
In the Grid and Loupe views, you’ll find tools for adding ratings, flags, and color labels in the Toolbar. In the Compare and Survey views, you can change any of these attributes using the controls beneath the images. You can also flag, rate, or color label a selected image by using the Set Flag, Set Rating, or Set Color Label commands in the Photo menu.
In the Folders panel, select the wall_street subfolder inside the lesson04 folder.
In the Grid view, click your favorite from this group of photos captured in New York City. If the Flags option is selected under Cell Icons in the Library View Options dialog box, you’ll see a gray (unfilled) flag icon in the upper-left corner of the image cell, indicating that this photo is not flagged. If necessary, hold the pointer over the image cell to see the flag, or disable the Show Clickable Items On Mouse Over Only option in the Library View Options dialog box.
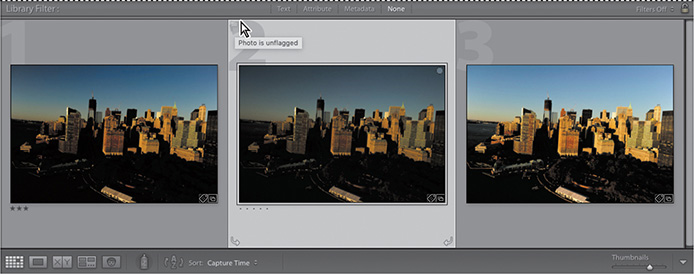
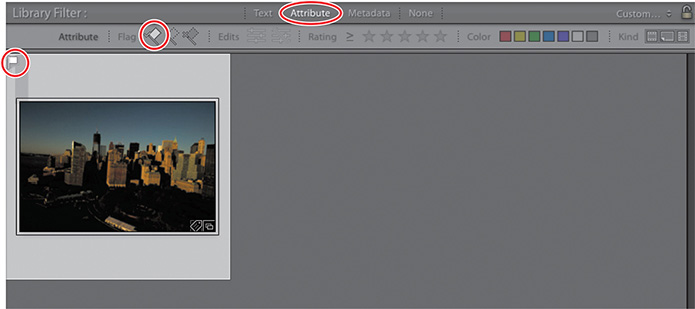
To change the flag status to Flagged, you can click either the flag badge in the image cell or the Flag As Pick button in the Toolbar. Note that the photo is now marked with a white flag icon in the upper-left corner of the image cell.
Click the white flag button in the Attribute Filter bar. The Grid view displays only the image that you just flagged. The view is now filtered to display only flagged images from the wall_street folder.
![]() Tip
Tip
You can use the Library > Refine Photos command to sort your photos quickly on the basis of their flagging status. Choose Library > Refine Photos, and then click Refine in the Refine Photos dialog box; any unflagged photos are flagged as rejects and the picks are reset to unflagged status.
Lightroom Classic CC offers a variety of ways to flag a photo. To flag a photo as a pick, choose Photo > Set Flag > Flagged or press the P key on your keyboard. Click the flag icon at the upper-left corner of the image cell to toggle between Unflagged and Pick status. To flag an image as a reject, choose Photo > Set Flag > Rejected, press the X key, or Option-click/Alt-click the flag icon in the upper-left corner of the image cell. To remove a flag from an image, choose Photo > Set Flag > Unflagged or press the U key. To set any flag status for an image, right-click the flag icon in the upper-left corner of the image cell and choose Flagged, Unflagged, or Rejected from the menu.
With the white flag still selected in the Attribute Filter bar, click the gray flag button (the flag in the center). The Grid view now displays any photos flagged as picks and all unflagged photos, so once again we see all of the images in the wall_street folder.
In the Filter bar, click None to disable the Attribute filters.
Assigning ratings
A quick and easy way to sort your images as you review and evaluate them is to assign each photo a rating on a scale from one to five stars.
In the Folders panel, click the jenn_utah_vaca folder, and in the Grid view, click the third photo to select it.
Press the 3 key on your keyboard and the words “Set Rating To 3” will appear onscreen briefly. The photo is now marked with three stars at the lower left of its image cell.

![]() Tip
Tip
If you don’t see the star rating in the image cell, choose View > View Options and make sure Rating And Label is activated in the Compact Cell Extras display options.
Click the triangle at the right of the Toolbar and choose Rating in the menu, if necessary. The stars in the Toolbar reflect the rating you just applied to the selected image. If you have multiple images selected with different ratings, the Toolbar will reflect the rating of the first image selected.
![]() Tip
Tip
You can also assign ratings in the Metadata panel by choosing from the Photo > Set Rating menu or by choosing from the Set Rating submenu when you right-click a photo’s thumbnail.
It’s easy to change the rating for a selected image: simply press another key between 1 and 5 to apply a new rating or press the 0 key to remove the rating altogether.
Adding metadata
You can leverage the metadata information attached to the image files to help you organize and manage your photo library. Much of the metadata, such as capture date, exposure time, focal length, and other camera settings, is generated by your camera, but you can also add your own metadata to make it easier to search and sort your catalog. In fact, you did just that when you applied keywords, ratings, and color labels to your images. In addition, Lightroom supports the information standards evolved by the International Press Telecommunications Council (IPTC), which includes entries for descriptions, keywords, categories, credits, and origins.
You can use the Metadata panel in the right panel group to inspect or edit the metadata attached to a selected image.
In the Folders panel, click the times_square folder. In the Grid view, select the first image.
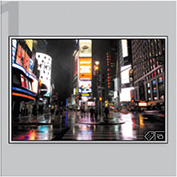
Expand the Metadata panel. If necessary, collapse the other panels in the right panel group or hide the Filmstrip so that you can see as much of the Metadata panel as possible. Choose Default from the Metadata Set menu in the header of the Metadata panel.
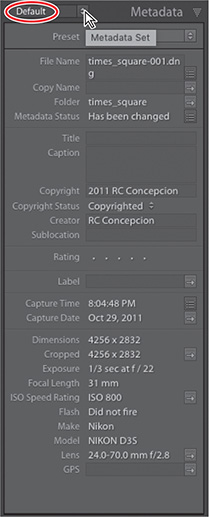
Even the default metadata set exposes a great deal of information about the image. Although most of this metadata was generated by the camera, some of it can be very useful in sorting your photos—you could filter images by capture date, search for shots taken with a particular lens, or easily separate photos taken on different cameras. However, the default set displays only a subset of an image’s metadata.
Choose EXIF And IPTC from the Metadata Set menu. Scroll down in the Metadata panel to get an idea of the kinds of information that can be applied to an image.
For the purposes of this exercise, choose Quick Describe from the Metadata Set menu.
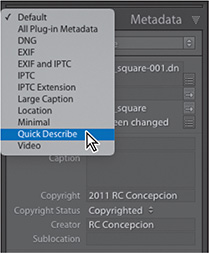
In the Quick Describe metadata set, the Metadata panel shows the filename, copy name (for a virtual copy), folder, rating, and some EXIF and IPTC metadata. You can use the panel to add a title and caption to a photo, attach a copyright notice, provide details about the photographer and the location where the photo was shot, and change the star rating.
In the Metadata panel, click the third dot to the right of Rating to assign the image a rating of three stars, and then type Times Square Nights in the Title text box and press Return/Enter.


Command-click/Ctrl-click either of the other two photos to add it to the selection. In the Metadata panel you can see that the folder name, dimensions, and camera model are shared by both files, but items not shared by both images now show the entry <mixed>. Changes made to any of the items in the Metadata panel, even those with mixed values, will affect both of the selected images. This is a convenient way to edit items such as copyright details for a whole batch of selected images at the same time.

Tagging faces in the People view
Undoubtedly, your growing photo library will include many photos of your family, friends, and colleagues. Lightroom Classic CC makes it quick and easy to tag the people that mean the most to you, taking much of the work out of sorting and organizing what probably amounts to a large portion of your catalog, and making it even easier to retrieve exactly the photos you’re looking for.
Face recognition automatically finds the people in your photos and makes it simple for you to tag them. And the more faces you tag, the more Lightroom Classic CC learns to recognize the people you’ve named, automatically tagging their faces whenever they appear in new photos.
There are no lesson images provided for this exercise, so the first thing you need to do is import some of your own photos.
![]() Tip
Tip
If any of the photos you import have embedded GPS information, the Enable Address Lookup dialog will open. Click Enable.
Use either the Import button or the drag-and-drop method you learned in Lesson 2 to import a selection of photos featuring the faces of people you know. Make sure you have a mix of single-person images and groups of various sizes, with plenty of overlap—and at least a few strangers’ faces.
By default, face recognition is disabled, so we need to have Lightroom analyze our photos and build an index of those images that include faces.
In the Catalog panel, change the image source from Previous Import to All Photographs, so that Lightroom Classic CC will index the entire catalog. Press Command+D/Ctrl+D or choose Edit > Select None.
Press T to show the toolbar, if necessary, and click the People button.

Lightroom displays a message screen welcoming you to the People view. Click Start Finding Faces In Entire Catalog. A progress bar appears at the upper left of the workspace and the Activity Center menu opens with a tip showing you where you can turn face recognition off and on. Wait for the indexing process to complete before moving on.
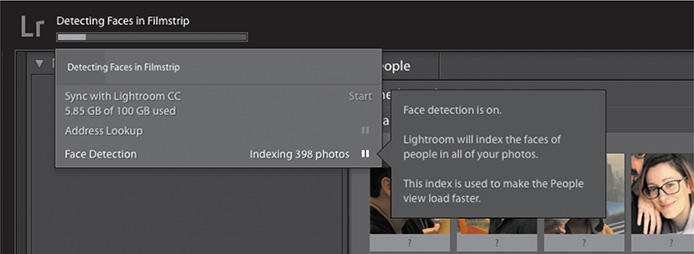
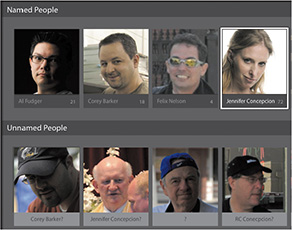
The work area is now in People view mode. Lightroom Classic CC stacks similar faces for tagging, with an image count for each stack. The default sorting order is alphabetical, but as none of the faces are yet tagged, they are arranged by stack size. At this point, all the faces are listed in the Unnamed People category.

Click the stack badge on a people stack to expand it. Command-click/Ctrl-click all of the photos in the stack that belong together, then click the question mark below a selected thumbnail, type the person’s name, and press Return/Enter.
Lightroom moves the selected photos into the Named People category, and the image counts in both category headers are updated.
![]() Tip
Tip
You can also add photos to the Named People groups by simply dragging them directly from the Unnamed People area.
Repeat the process for two or more unnamed stacks. Already, Lightroom is learning, suggesting more photos that may belong with those you’ve named. Move the pointer over a suggested name to confirm or dismiss the suggestion.
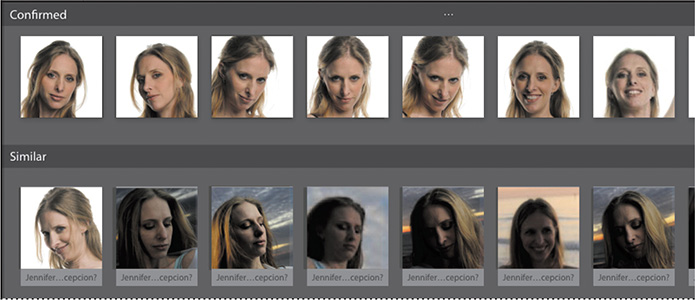
Continue until you’ve named at least five or six people and tagged several photos for each, then double-click one of the faces in the Named People stack to enter the Single Person view, where the upper division is now labeled as the Confirmed category, showing all the photos tagged with the selected name. Below, the Similar category displays only the suggested matches for this face.
Add as many photos as you can to the group in the Single Person view, then when you’re done, click “< People” at the left of the Confirmed header to return to the People view.
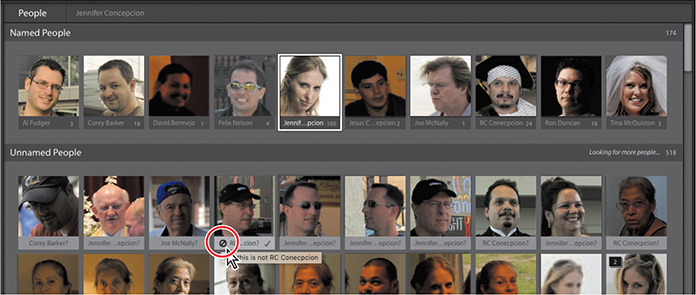
Repeat the process for all named people, alternating between the People and Single Person views, until the only untagged photos are people you don’t know or image fragments incorrectly identified as faces. Dismiss any incorrect suggestions on the leftover photos, then remove them from the Unnamed People list by clicking the X icon that appears with the question mark in the label.

![]() Tip
Tip
You can quickly isolate your People tags in the Keyword List panel by expanding the filter options at the top of the list of keywords and clicking People.
Click the Grid view button in the toolbar, then double-click a photo with multiple people to see it enlarged in the Loupe view. Click the Draw Face Region button in the toolbar to see the People tags attached to the image. When you find a face that has not been identified by face recognition, you can use the Draw Face Region tool to drag a box around it, and then enter a name.
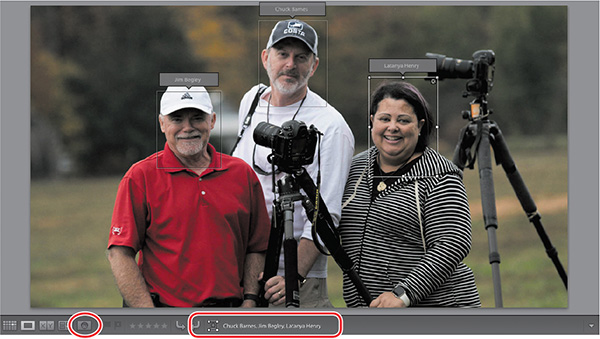
Inspect the Keyword List panel to see your new People tags listed with your other keywords. You can use the Keyword List panel or the Text and Metadata filters to search for People tags, just as you would for any other keyword.
Organizing photos by location
In the Map module, Lightroom Classic CC enables you to leverage geotagging technology so that you can see exactly where your photos were captured on a Google map, and search and filter the images in your library by location.
![]() Note
Note
You need to be online to make use of the Map module.
Photos that were captured with a camera or phone that records GPS coordinates will appear on the map automatically. You can easily add location metadata to images captured without GPS information by dragging them directly onto the map from the Filmstrip, or by having Lightroom match their capture times to a tracklog exported from a mobile device.
In the Library module, click the Import button below the left panel group.
Under Source at the left of the Import dialog box, navigate to the folder LRClassicCIBLessonslesson04_GPS. Make sure that all of the images in the folder are selecteded for import. Set the import options above the thumbnails to Add, type Lesson 04, GPS in the Keywords text box, and then click Import.
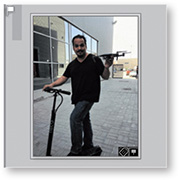
In the Grid view or the Filmstrip, select the first, third, seventh, and last images, as seen in the illustration below. The first is of me on a scooter.
Click Map in the module picker.
![]() Tip
Tip
If GPS address lookup has not yet been enabled for your catalog, you may see a dialog box asking you to authorize Lightroom Classic CC to exchange GPS location information with Google Maps. Click Enable, then click away from the pop-up notification to dismiss it.
Working in the Map module
Lightroom has automatically plotted the selected photo’s location by reading the GPS metadata embedded in the image file; the location is marked by a yellow pin. Depending on your zoom depth, you may see the number of images at that location on the pin. Click the pin to see thumbnails of the images taken at that location.

![]() Note
Note
What you see onscreen may differ from this illustration, depending on the map style and zoom depth set when you last used the Map module.
![]() Tip
Tip
If you don’t see the Map Info overlay at the upper right, and the Map Key explaining the color-coding of location pins, choose Show Map Info and Show Map Key from the View Menu.
Dismiss the Map Key by clicking the Close button (x) at the upper right or by deselecting Show Map Key in the View menu. Double-click the map next to the pin to zoom in on that location.
The Navigator panel at the left shows an overview map, with a white rectangle indicating the area visible in the main map view. The Toolbar below the map view offers a Map Style menu, a Zoom slider, and buttons for locking pins and loading GPS tracklogs. The Metadata panel at the right displays embedded location information.
Click repeatedly on the Zoom In (+) button at the right of the slider in the Toolbar, until you can see the Bounce Trampoline Park. In the Map Style menu, select each of the six styles in turn, then set your preference.
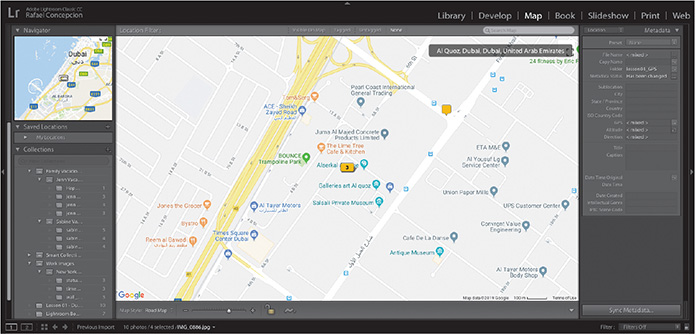
You can drag the map in the main view to reposition it, or move the map’s focus by dragging the white-bordered box in the Navigator. Hold down the Option/Alt key and drag a rectangle in the main map view to zoom in to that area.
The Location Filter bar above the map lets you highlight just those photos captured at locations currently visible on the map or filter for tagged or untagged shots.
Click each of the four filters in the Location Filter bar in turn, noting the effect on which images are displayed in the Filmstrip.

![]() Tip
Tip
Click the location marker badge on a thumbnail in the Library module’s Grid view or the Filmstrip to be taken to the image’s location in Map view.
In the Filmstrip and the Library module’s Grid view, images that are tagged with a GPS location are marked with a location marker badge.
Geotagging images captured without GPS data
Even if your camera does not record GPS data, the Map module makes it easy to tag your photos with map locations.
![]() Tip
Tip
To check if a photo selected in the Library has GPS metadata, choose the Location metadata set in the Metadata panel, then look for coordinates in the GPS field.
In the header of the Filmstrip, click the white arrow to the right of the name of the currently selected image and choose Folder: lesson01 from the Recent Sources list in the menu. Command-click/Ctrl-click to select the two images of the Burj Al Arab (the last two images).
In the search box in the Location Filter bar, type Burj Al Arab, then press Return/Enter.
The map is redrawn and the new location is marked with a Search Result marker.
Clear the Search Result marker by clicking the X button at the right of the text search box in the Location Filter bar.
Right-click the found location on the map and choose Add GPS Coordinates To Selected Photos.
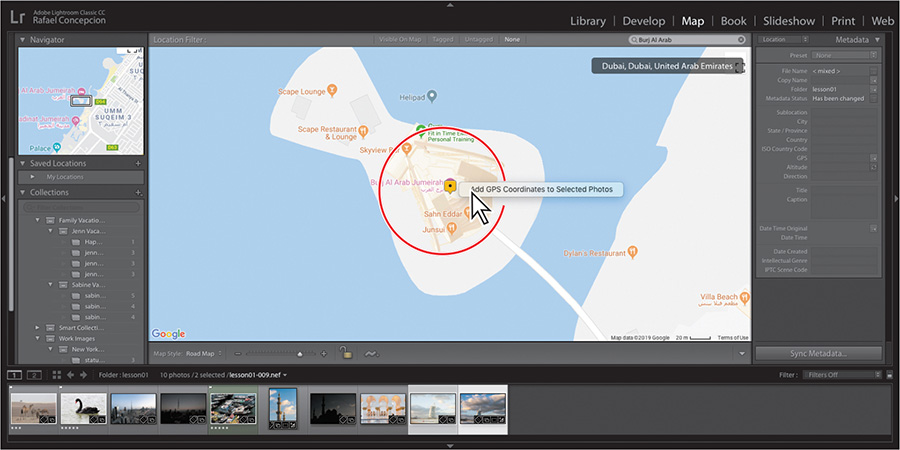
Choose Edit > Select None. Move the pointer over the marker pin on the map to see a preview of the photos captured at that location. Click the marker pin to select the photos attached to that location. Click the white arrows at the sides of the preview thumbnail to cycle through the other images mapped to this location, and then click away from the preview to close it.
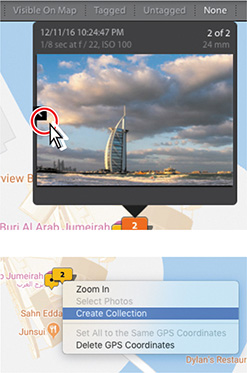
Right-click the map pin and choose Create Collection. Type Landmarks as the name for the new collection, then deselect all options and click Create.
The new collection appears in the Collections panel, and you can drag the images into it.
Saving map locations
In the Saved Locations panel, you can save a list of your favorite places, making it easy to locate and organize a selection of related images. You could create a saved map location to encompass a cluster of places that you visited during a particular vacation, or to mark a single location that you used for a photo shoot for a client.
Click the Recent Sources menu in the Filmstrip header again, and choose All Photographs. Zoom out in the map view until you can see the image as below.
Expand the Saved Locations panel on the left, if necessary, and then click the Create New Preset button at the right of the header.
In the New Location dialog box, type The Palm as the location name. Under Options, set the Radius value to 4.8 Miles, then click Create.

Your new listing appears in the Saved Locations panel; the image count shows that there are nine tagged images that fall within the specified radius. On the map, the saved location has a gray center pin that can be repositioned, and a second pin on the border for increasing or decreasing the radius of the target area.

Selecting or deselecting a location in the Saved Locations panel shows and hides the circular location overlay, and makes the location active for editing. To add photos to a saved location, you can either drag them directly from the Filmstrip onto the location’s entry in the Saved Locations panel or select the images in the Filmstrip and click the checkbox to the left of the location name in the panel.
Click the white arrow that appears to the right of the location name when you move your pointer over the location in the Saved Locations panel to move to that saved location on the map. To edit a location, right-click its entry in the Saved Locations panel and choose Location Options.

Once your photos are tagged with locations, you can search your library using the filter picker and search box in the Location Filter bar above the map, the Saved Locations panel, and the Library Metadata filters set to GPS Data or Map Location.
Click Library in the module picker to return to the Library module.
Using the Painter tool
Of all the tools Lightroom Classic CC provides to help you organize your growing image library, the Painter tool is the most flexible. By simply dragging across your images in the Grid view with the Painter tool you can “spray on” keywords, metadata, labels, ratings, and flags—and even apply developing settings, rotate your photos, or add them to the Quick Collection.
When you pick up the Painter tool from its well in the Toolbar, the Paint menu appears beside the empty tool well. From the Paint menu, you can choose which settings or attributes you wish to apply to your images. Once you’ve made your choice, the appropriate controls appear to the right of the Paint menu.

![]() Tip
Tip
In Keywords mode, the Painter tool can apply entire keyword sets or any selection from your favorite set. With the Painter tool in Keywords mode, press the Shift key to activate the eyedropper and access the Keyword Set picker.
In this exercise, you’ll use the Painter tool to mark images with a color label.
Click the lesson04 folder in the Folders panel. If necessary, press G to switch to the Grid view, and then make sure that none of the images are currently selected. If you don’t see the Painter tool in the Toolbar, click the triangle at the right side of the Toolbar and choose Painter from the tools menu.
Click the Painter tool to pick it up from its well in the Toolbar, choose Label from the Paint menu beside it, and click the red color label button.

The Painter tool is now “loaded.” Move the pointer over any of the thumbnails in the Grid view and a red spray can icon appears.
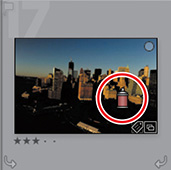
Click the thumbnail in the Grid view and the Painter tool applies the red label. Whether you see the color as a tint in the image cell depends on your Library View Options settings and on whether the image is currently selected (our example is not). If you don’t see the red color label marker (circled in the illustration at the right), choose View > Grid View Style > Show Extras.
Move the pointer back over the same thumbnail, then hold down the Option/Alt key and the cursor changes from the Painter tool spray can to an eraser. Click the thumbnail with the eraser cursor and the red color label is removed.
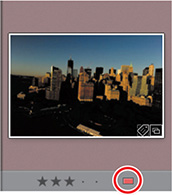
Release the Option/Alt key and click the image once more, but this time drag the spray can across several photos to apply the red color tag to multiple images with one stroke. Hold down the Option/Alt key again, and remove the label from all but one of the photos.
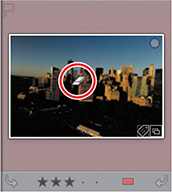
Click Done at the right side of the Toolbar, or click the Painter tool’s empty well, to drop the Painter tool and return the Toolbar to its normal state.
Finding and filtering files
Now that you’re familiar with the different techniques for categorizing and marking your photos, it’s time to see some results. Next you’ll look at how easy it is to search and sort your images once they’ve been prepared in this way. You can now filter your images by rating or label, or search for specific keywords, GPS locations, and other metadata. There are numerous ways to find the images you need, but one of the most convenient is to use the Filter bar across the top of the Grid view.
Using the Filter bar to find photos
If you don’t see the Filter bar above the Grid view, press the backslash key () or choose View > Show Filter Bar. In the Folders panel, select the lesson04 folder. If you don’t see all 31 photos, choose Library > Show Photos In Subfolders.
The Filter bar picker contains three filter types: Text, Attribute, and Metadata; choose any of these and the Filter bar will expand to display the settings and controls you’ll use to set up a filtered search. You can either use the different filters separately or combine them for a more sophisticated search.
Use the Text filter to search any text attached to your images, including filenames, keywords, captions, and the EXIF and IPTC metadata. The Attribute filter searches your photos by flag status, star rating, color label, or copy status. The Metadata filter enables you to set up to eight columns of criteria to refine your search; choose to add or remove a column from the menu at the right end of the column headers.

If the Text or Metadata filters are active, click None to disable them. Click Attribute to activate the Attribute filters. If any of the flag filters is still active from the previous exercise, click the highlighted flag in the Filter bar to disable it, or choose Library > Filter By Flag > Reset This Filter.
In the Rating controls, click the third star to search for any image with a rating of three stars or higher.

The grid view displays only the images that have a three-, four-, or five-star rating.
There are many options for refining your search. Click Text in the header of the Filter bar to add an additional filter. In the Text filter bar, open the first menu to see the search target options. You can narrow the search to Filename, Copy Name, Title, Caption, Keywords, or searchable IPTC and EXIF metadata, but for this exercise you can choose Any Searchable Field as the search target. Click the second menu and choose Contains All.

In the search text box, type clearwater. Your narrowed search returns only one image in the Grid view.

In the Rating controls, click the third star to disable the current Rating filter or choose Library > Filter By Rating > Reset This Filter. Click Attribute in the header of the Filter bar to close the Attribute filter controls.
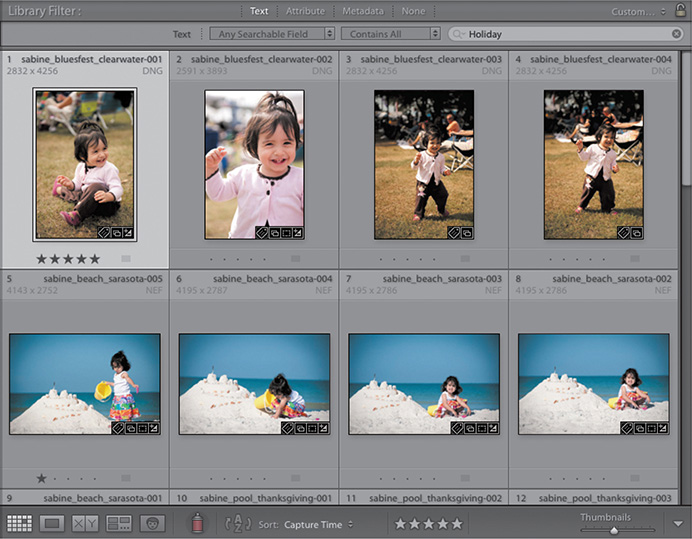
In the Text filter bar, clear the previous search by clicking the X icon at the right of the text box, and then type Holiday.
The Grid view now displays 28 images in the lesson04 folder.
Using the filters in the Filmstrip
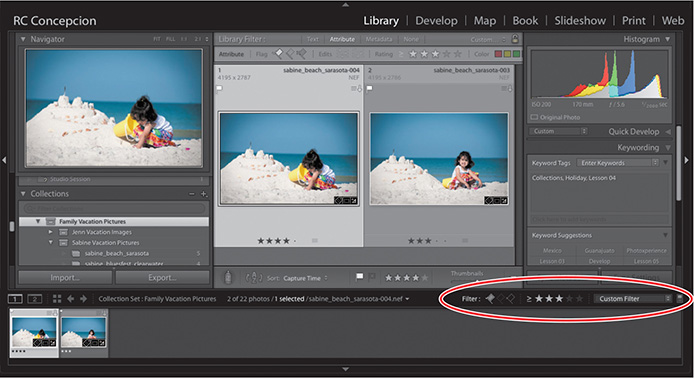
The Attribute filter controls are also available in the header of the Filmstrip. As in the Filter bar, the Filter menu lists the different attributes you can filter by and offers the option to save your filter settings as a custom preset, which is then added to the menu.
![]() Tip
Tip
If you don’t see any filter presets in the Filter menu, open Lightroom Preferences and click Restore Library Filter Presets under Lightroom Defaults on the Presets tab.
The Default Columns preset opens the four default columns of the Metadata search options—Date, Camera, Lens, and Label—in the Filter bar.
Choose Filters Off to turn off all filters and collapse the Filter bar. Choose Flagged to display only photos with a Pick flag.
Choosing Rated displays any photos that match the current star rating criteria. Click a different star to change the star rating and the symbol before the stars to choose whether to see photos with three stars or more, three stars or less, or exactly three stars. Choose Unrated to see all the photos without a star rating.
For the illustration above, I filtered to images that have been picked and have a rating of three stars or higher. This returned a result of two images.
To disable all filters and display all the images in the lesson04 folder, choose Filters Off from the Filter menu or click the switch at the far right of the Filmstrip’s header.
Review questions
1 What is a smart collection?
2 Why would you create a stack?
3 What are keyword tags?
4 What are the three modes in the Filter bar?
5 How can you search for images by location?
Review answers
1 A smart collection can be configured to search the library for images that meet specified criteria. Smart collections stay up to date by automatically adding any newly imported photos that meet the criteria you’ve specified.
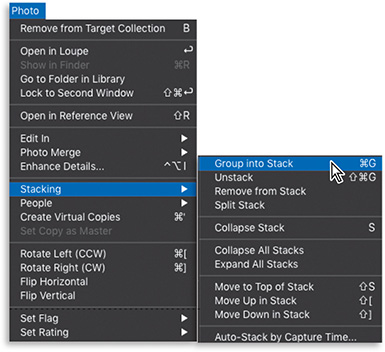
2 Stacks can be used to group similar photos and thereby reduce the number of thumbnails displayed at one time in the Grid view and the Filmstrip. Only the top image in a stack appears in the thumbnail display, but the stack can be expanded and contracted by clicking the thumbnail.
3 Keyword tags are text added to the metadata of an image to describe its content or classify it in one way or another. Shared keywords link images by subject, date, or some other association. Keywords help to locate, identify, and sort photos in the catalog. Like other metadata, keyword tags are stored either in the photo file or (in the case of proprietary camera raw files) in XMP sidecar files. Keywords applied in Lightroom Classic CC can be read by Adobe applications such as Bridge, Photoshop, or Photoshop Elements, and by other applications that support XMP metadata.
4 The Filter bar offers three filter groups: Text, Attribute, and Metadata filters. Using combinations of these filters, you can search the image library for metadata or text, filter searches by flag, copy status, rating, or label, and specify a broad range of customizable metadata search criteria.
5 Once your photos are tagged with locations, you can search your library from the Map module by using the Location Filter bar above the map and the Saved Locations panel. In the Library, you can use the metadata filters, set to GPS Data or GPS Location.
