6 Advanced Editing
Lesson overview
The Develop module offers a series of sliders that can quicky change your images, bringing out their best. But, not all problems can be solved with global sliders. Some images have localized problems that need correcting. Often, the difference between a good print and a great print lies in you paying attention to those little details. This lesson builds upon what you’ve learned in the Develop module and pushes your toolbox even further. In this lesson, you’ll learn how to:
Use Graduated and Radial Filters to adjust specific image areas.
Use Spot Retouching tools to fix sensor spots and problem areas.
Learn how to use the HSL and Tone Curve panels with precision.
Create compelling black-and-white images.
Experiment with Range Mask tools for adjusting light and color.
Develop panoramic and HDR images with ease.
Synchronize your changes to multiple images using presets.

This lesson will take 2 to 2-1/2 hours to complete. Please log in to your account on peachpit.com to download the files for this lesson, or go to the “Getting Started” section at the beginning of this book and follow the instructions under “Accessing the lesson files and Web Edition.” Store the files on your computer in a convenient location. Your Account page is also where you’ll find any updates to the lessons or to the lesson files. Look on the Lesson & Update Files tab to access the most current content.
Fine-tune and polish your photographs with precise, easy-to-use tools, and then take your developing a step beyond just correcting your images; use the Develop module tools and controls creatively to customize your own special effects, and then save them as custom develop presets.
Getting started
Before you begin, make sure you’ve set up the LRClassicCIB folder for your lesson files and downloaded the lesson06 folder from your Account page at peachpit.com to the LRClassicCIBLessons folder, as described in “Accessing the lesson files and Web Edition” in the “Getting Started” section at the start of this book. Also, be sure you have created the LRClassicCIB Catalog file to manage the lesson files, as detailed in “Creating a catalog file for working with this book,” also in the “Getting Started” section.
![]() Note
Note
This lesson assumes that you already have a basic working familiarity with the Lightroom Classic CC workspace. If you need more background information, refer to Lightroom Classic CC Help, or review the previous lessons.
Start Lightroom Classic CC.
In the Select Catalog dialog, make sure that LRClassicCIB Catalog.lrcat is selected, and then click Open.
Lightroom Classic CC will open in the screen mode and workspace module that were active when you last quit. If necessary, switch to the Library module by clicking Library in the Module Picker at the top of the workspace.

![]() Tip
Tip
If you can’t see the Module Picker, choose Window > Panels > Show Module Picker, or press the F5 key. If you’re working on macOS, you may need to press the fn key together with the F5 key, or change the function key behavior in the system preferences.
Importing images into the library
The first step is to import the images for this lesson into the Lightroom library.

In the Library module, click the Import button below the left panel group.
If the Import dialog box appears in compact mode, click the Show More Options button at the lower left of the dialog box to see all the options in the expanded Import dialog box.
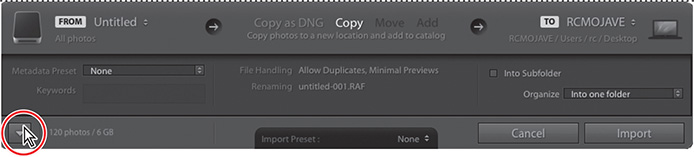
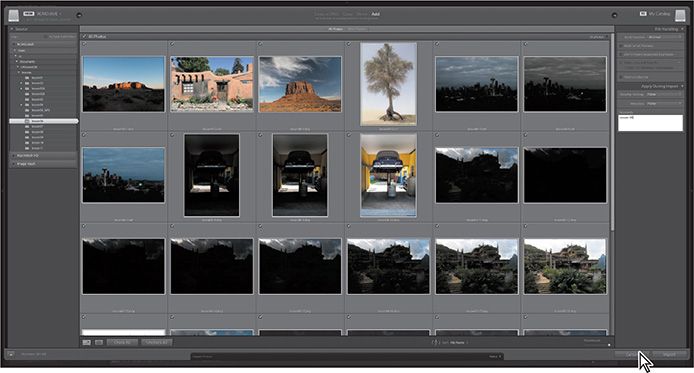
Under Source at the left of the expanded Import dialog box, locate and select your LRClassicCIBLessonslesson06 folder. Ensure that all 28 photos in the lesson06 folder are selected for import.
In the import options above the thumbnail previews, select Add so that the imported photos will be added to your catalog without being moved or copied. Under File Handling at the right of the expanded Import dialog box, choose Minimal from the Build Previews menu and leave the Don’t Import Suspected Duplicates option unselected. Under Apply During Import, choose None from both the Develop Settings menu and the Metadata menu and type Lesson 06 in the Keywords text box. Make sure that your import is set up as shown in the illustration below, and then click Import.
![]() Tip
Tip
The first time you enter any of the Lightroom Classic CC modules, you’ll see tips that will help you get started by identifying the components of the workspace and stepping you through the workflow. Dismiss the tips by clicking the Close button. To reactivate the tips for any module, choose [Module name] Tips from the Help menu.
The 28 photos are imported from the lesson06 folder and now appear in both the Grid view of the Library module and in the Filmstrip across the bottom of the Lightroom workspace.
Creating a collection for your images
While we’re in the Library module, let’s create two collections for this lesson.
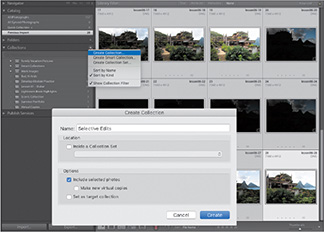
Make sure Previous Import is selected in the Catalog panel, then press Command+A/Ctrl+A to select all of the images. Click the plus sign (+) button at the upper right of the Collections panel and make a collection called Selective Edits, making sure the Include Selected Photos option is selected.
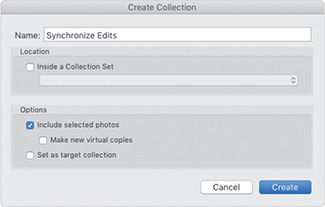
Click the Develop Module Practice collection we made in the last lesson. Select the three images of my daughter Sabine, and create a new collection called Synchronize Edits, again making sure Include Selected Photos is selected.
Using the Graduated Filter tool
The Graduated Filter tool lets you apply adjustments to part of a picture in a linear direction. The effect uses sliders that are similar to the ones in the Basic panel, but that let you fade out the effect in the direction you drag. In this exercise, you’ll apply two Graduated Filter tool adjustments to a single photo.
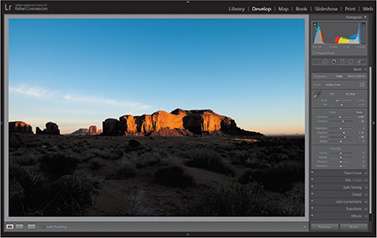
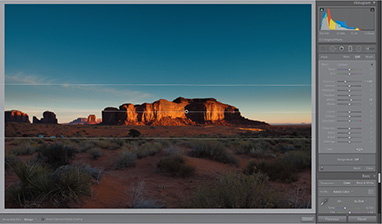
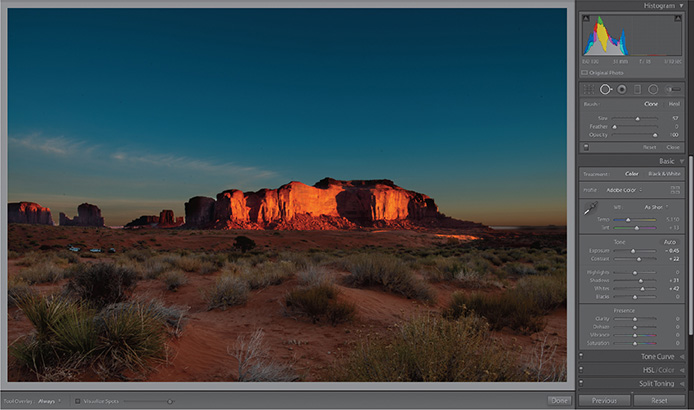
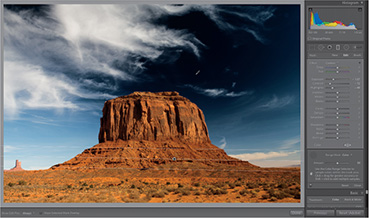
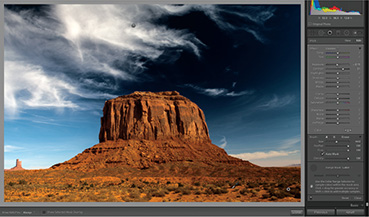
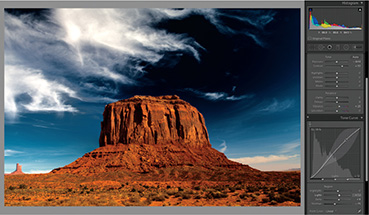
Click the Selective Edits collection in the Collections panel and select the lesson06-1 picture, an image from Monument Valley, Utah, then press the D key to switch to the Develop module. The sky is a little bright in this image. We want to darken that sky a bit, slowly fading the darkening as it reaches the horizon. This will draw the viewer’s attention toward the horizon. At the same time, the bottom part of the picture seems a little too dark. Ideally, I’d want to lighten the foreground a little in the bottom of the picture, without lightening the top part of the picture.
We’re going to add two different gradients to the picture—one to darken and one to lighten and remove the color cast from the shadows—then remove some of the spillover in the effect by erasing the gradient with a brush, a newer feature offered in Lightroom Classic CC.
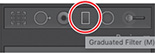
Select the Graduated Filter tool in the tool strip above the Basic panel (it’s the fourth tool from the left), or press M on your keyboard. The Graduated Filter options panel appears below the tool strip.
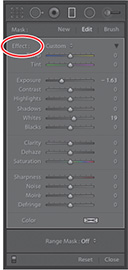
The sliders for all the local adjustment tools are sticky, so it’s important to remember to reset them. To reset an individual slider to its default value, double-click the slider label or the slider itself. To reset all the sliders to 0, double-click the Effect label at the upper left of the panel or hold down the Option/Alt key, and when the Effect label changes to Reset, click it.
Reset all the sliders in the Graduated Filter options panel, then drag the Exposure slider to the left to about –1.63 and the Whites slider to the right to 19. Setting one or more sliders before you use the tool loads it with those settings so they’re applied as soon as you drag on the photo.
To apply the filter, Shift-drag from the middle of the photo down to slightly past the butte, so the adjustment covers the sky and the rocks (holding down the Shift key keeps the filter straight).
![]() Tip
Tip
Press O on your keyboard to turn on the gradient mask overlay in light red. Press the same key to turn it back off (alternatively, select Show Selected Mask Overlay at the left side of the toolbar, below the photo). To change the mask color, press Shift+O on your keyboard (this is helpful when the mask color also appears in your photo).
Lightroom adds a mask in a linear gradient over the area where you dragged. This gradient mask controls where the adjustment is visible. Drag the pin in the middle of the gradient to reposition the filter. When the pin is selected, it’s black and you can adjust the filter’s sliders; when it’s unselected, it’s light gray and adjusting the sliders no longer affects that filter. To delete a filter, click its pin and press the Delete/Backspace key.

The filter’s three white lines represent the strength of the adjustment from the direction you dragged: 100%, fading to 50%, and then down to 0%. You can contract or expand the filter’s gradient by dragging the top or bottom lines toward or away from the center line. To rotate the filter, move your cursor near the center line, and when it turns into a curved arrow, drag it clockwise or counterclockwise.
![]() Tip
Tip
Lightroom automatically hides the pins when you move your mouse away from the preview area. To change this, use the Show Edit Pins menu in the toolbar below the photo. (If you don’t see the toolbar below your photo, press T on your keyboard.)
In this instance, we were able to add a little darkening to the sky, but it looks like we also darkened the butte. We will deal with that a little later.
![]() Tip
Tip
You can create overlapping graduated filters too!
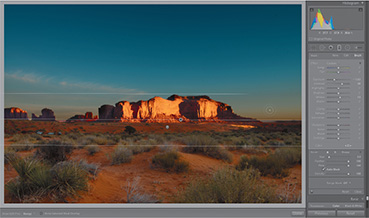
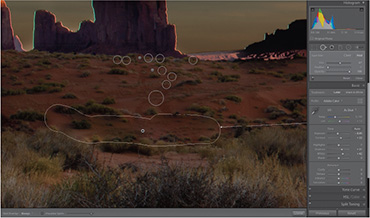
To add another graduated filter, click New at the upper right of the panel, and then drag another filter from halfway down the foreground up to the top of the butte. This deselects the first pin, which changes to light gray.
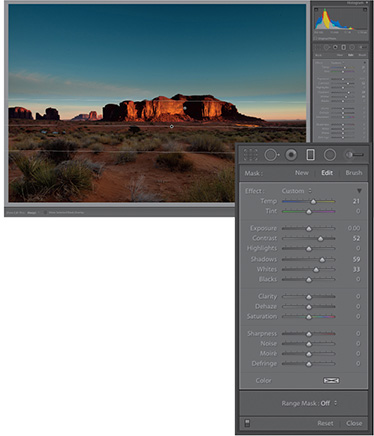
Double-click Effect to reset all the sliders, and then drag the Temp slider to the right, to about 21, to remove the blue color cast from the shadows. Then, drag the Contrast to 52, the Shadows to 59, and the Whites to 33 to lighten the foreground a little.
Click the panel switch at the bottom left of the Graduated Filter panel to turn both filters off, and then click it again to turn both filters back on to see the change so far.
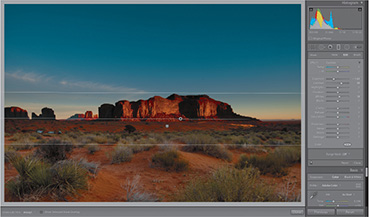
The first filter doesn’t darken the entire sky, so click its pin to make it active, then drag the pin downward to the base of the butte. This darkens the butte too, but we’ll fix that in the next step. Before we do that, drag the Contrast slider to 38.

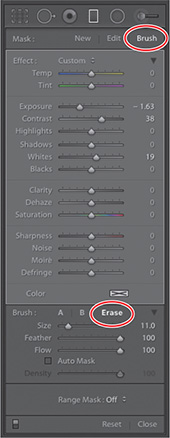
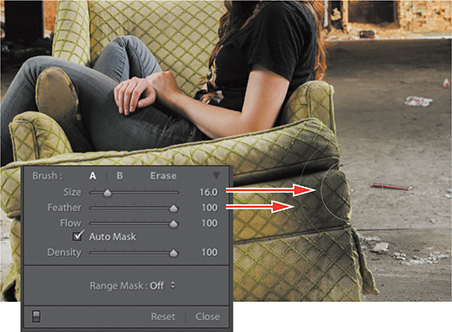
To remove the filter and its darkening from the butte, we’ll erase part of the gradient mask. Click Brush at the upper right of the panel, and at the top of the Brush options that appear at the bottom of the panel, click Erase. Use the Right Bracket key to make your brush larger (]) or the Left Bracket key to make it smaller ([). Paint over the butte.
Don’t worry if you brush too much, as in the previous step. Click A (to the left of Erase) to switch to your A brush. Make the brush smaller, be sure Feather, Density, and Flow are all set to 100, and select Auto Mask below the brush sliders to have Lightroom determine where the edge of the butte is. Paint over the areas you didn’t mean to erase, keeping the crosshair in the center of the brush off the butte.
The Graduated Filter tool can help accentuate portions of your picture and make them stand out. Here are a few more things that are helpful to know about using this tool (these tips work with the Radial Filter and Adjustment Brush too):
You can use a brush to erase portions of a filter. If the filter bleeds onto an area where you don’t want it, click the filter’s pin to select it. Click Brush at the upper right of the filter’s panel. Click Erase in the Brush section at the bottom of the panel to switch to Erase mode. Paint over any areas where you want to remove the filter (notice the minus sign [–] inside your brush cursor).
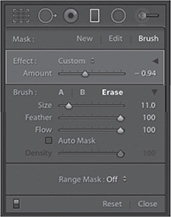
You can lower the strength of all the settings of a single filter at once by selecting its pin and clicking the black triangle at the upper right of the tool panel (just above the sliders and to the right of the Effect label) to collapse the panel and reveal an Amount slider. Drag it to the left to reduce the opacity of all the settings you applied with that filter.
You can save tool settings as a preset. To do that, click the Effect menu near the top of the tool’s panel (shown at right) and choose Save Current Settings as New Preset. In the resulting dialog box, enter a meaningful name and click Create. From this point on, your preset will be available in the Effect menu. This is useful if you’re making several adjustments with a single filter.
There are plenty of other problems with this picture, but we’ll cover them a little later. Instead, let’s talk about how to use the Radial Filter tool, which can be found next to the Graduated Filter tool in the tool strip and works in a similar manner.
Using the Radial Filter tool
You can use the Radial Filter tool to apply the same adjustments as the Graduated Filter tool, but in a circular pattern instead of a linear gradient. The Radial Filter tool is handy for spotlighting a specific area of your photo by brightening, darkening, blurring, or shifting the color of a background, or for creating an edge vignette that you can move around (say, to draw attention to a subject that is off-center).

In this exercise, you’ll learn how to add a radial filter that draws your attention to a non-circular area. This area will be off-center (common in photography).
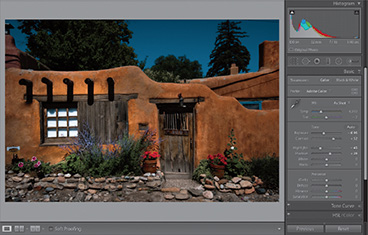
In your Selective Edits collection, click the lesson06-2 image in the Filmstrip, a photo of a home in New Mexico. A post-crop vignette may seem needed here, darkening the edges of the image. If we want the center of the attention to be the door, however, the darkening needs to happen off-center, only in the door area.

Click the Radial Filter tool in the tool strip above the Basic panel (it’s the fifth tool from the left) or press Shift+M on your keyboard. The Radial Filter options panel appears beneath the tool strip.

Double-click the Effect label at the upper left of the panel to reset all sliders to 0.
Near the bottom of the tool options, set the Feather to around 41. This ensures a gradual, soft transition at the outside edge of your radial filter.
Click the field to the right of the Exposure slider to highlight it, and enter –0.91.
Position your cursor near the center of the door and then drag diagonally downward and to its right side (the filter is created from the center out).
![]() Tip
Tip
Using the Tab key will let you move down the specific fields in the options panel and manually enter a number. If you’d like to move up in those fields, press Shift+Tab.
The adjustments you made immediately darken the area around the door. While this is a good start, we want to angle this oval to better redirect the light.
Reposition and resize the filter to your liking using the following techniques:
Reposition the filter by dragging its pin to a different area.
Resize the filter by moving your cursor over one of the square anchor points on the filter’s outline. When your cursor changes to a double-headed arrow, drag toward or away from the center of the filter to resize it. Do this to adjacent anchor points to reshape it.
Rotate the filter by moving your cursor outside the filter’s outline. When your cursor changes to a curved arrow, drag to rotate the filter.
Click the panel switch at the lower left of the Radial Filter panel to turn it off; click the switch again to turn it back on.
It’s important to note that you can add multiple Radial Filter adjustments to one photo. To do that, after you finish adjusting your first radial filter, click New at the upper right of the filter’s panel, and then double-click the Effect label to reset all the sliders to 0. Adjust the sliders for the next filter (you can tweak them later), and then drag over your photo to apply it.
I want to add a little more attention to the window on the left side of the picture.
Click the New button at the upper right of the Radial Filter tool’s options panel, and drag a new radial filter over the window on the left side of the picture. The effect immediately darkens the previous radial effect you made because these filters are cumulative—they don’t pay attention to your previous filters and skip them.

Set the Exposure to 1.22 and your Contrast to 51, then select Invert near the bottom of the tool panel. This reverses the effect, highlighting the window area. Click Done to get back to the Basic panel.
Looking at the picture as a whole, I want to make some additional changes in the Basic panel. You can adjust the picture as you wish, but here are the settings that I used:
Exposure: –0.95
Contrast: +52
Highlights: –45
Shadows: +26
While the Gradient and Radial Filters offer detailed control, the Adjustment Brush gives you the most control. Let’s explore that now.
Using the Adjustment Brush tool
While the Graduated Filter and Radial Filter allow you to make specific adjustments to an image, they do not have the fine control that is sometimes needed. Ideally, you would pinpoint every adjustment in the Basic and Detail panels to the specific areas that need them. This is where the Adjustment Brush comes in.
The Adjustment Brush is perfect for making precise changes to specific areas, such as lightening and darkening (dodging and burning), blurring, sharpening, reducing noise, boosting color, and so on. In this section, you’ll learn how to use it to do some photo finishing.
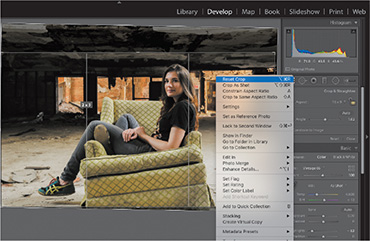
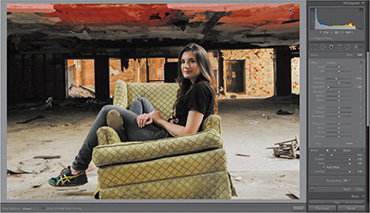
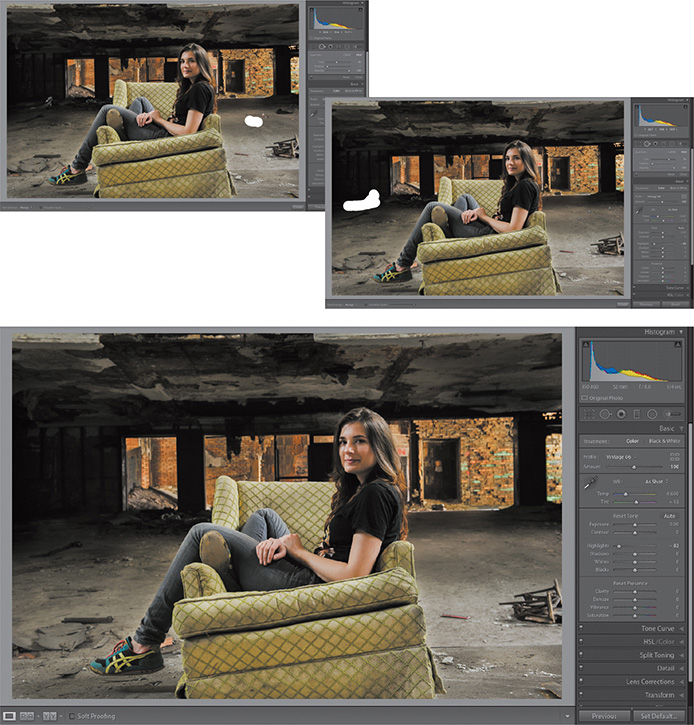
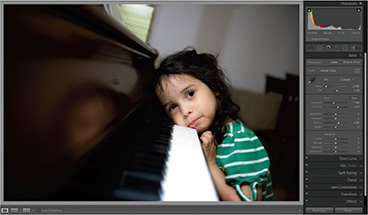
Go back to the Develop Module Practice collection (using the Collections panel in the Develop module) and select the lesson05_001 image, the picture of Kena. If you performed a crop on the picture, press the letter R to enter the crop overlay, right-click the center of the picture, and select Reset Crop from the menu.
Select the Adjustment Brush tool, and reset all of the sliders. Type in –0.95 for Exposure and –100 for Highlights. Using a brush size of 16, with Feather and Flow set to 100, paint along the top portion of the picture.
A pin is dropped on the picture, letting you know that an adjustment has been painted. If you move your pointer over the pin, an overlay appears, showing you where you applied the effect. Press Shift+O while your pointer is over the pin to cycle through the overlay colors.
![]() Note
Note
You can change the size of the Brush by using the [ and ] keys on your keyboard.
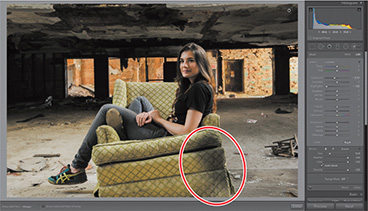
Continue to use the brush along the right side of the picture. While we started using the brush to darken the ceiling, it provides an added benefit by adding some texture to the floor. Paint into the couch a little bit (circled in the illustration at right). The settings for the brush you use will affect how much it paints onto the couch.
The Size of the brush is indicated by the smaller solid circle in the center.
The Feather of the brush creates a soft-edged transition between the area you’re working on and the surrounding pixels. The distance between the inner and outer circle represents the feather amount.
Flow controls the rate at which the effect is painted.
Density controls the transparency of the effect.
Auto Mask confines the brush stroke you made to areas of similar color.
Holding down the Option/Alt key allows you to temporarily access the Erase tool. With it selected (keep holding down the Option/Alt key), make the brush smaller, and erase the effect from the couch.
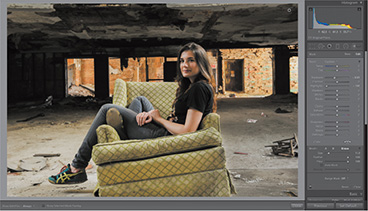
Click New at the upper right of the options panel to add another adjustment, this one on the back brick area (shown in the overlay here). Set the Exposure to –0.72 and Highlights to –100 to bring back some detail in that wall.
We’ll add a couple more finishing touches to this image later. Before we do, we need to learn another key finishing move: the Spot Removal tool.
Hardware suggestion: Digital tablets
I’ve always found that using brush-based tools with a mouse makes it a little harder than it needs to be. To that end, I’ve always invested in a digital tablet.
Having a surface and a tool that let you mimic the actions of a pen or pencil on paper is more efficient when doing detail work, like painting your adjustments.
The Wacom tablet on my desk has been with me for years—inside my bookbag, and thrown almost everywhere—and it’s still ticking. They make a great product.

There are two versions of the Intuos, and three sizes. For my students, I recommend the smallest size to make it easier when traveling. The Pro versus regular question is largely based on your own needs. All of the specifics that you need, from a brush-based tool perspective, are included in the regular tablet, saving you hundreds. I’ve opted for the Pro tablets in the past for the extra sensitivity.

Whichever you choose, it will last, and make your job so much faster.
Removing distractions with the Spot Removal tool
Lightroom’s Spot Removal tool does a nice job of removing smaller distractions such as sensor dust spots, objects with lots of open space around them (say, power lines), blemishes, and so on. It also can be used to perform some quick photo retouching of subjects.
The Spot Removal tool works in both Heal and Clone modes, which lets you determine whether you want an automatic blending of surrounding pixels or a straight copy and paste, respectively.
Removing sensor spots and syncing changes
In this exercise, you’ll use the Spot Removal tool to get rid of sensor spots from this picture in Monument Valley.
In the Develop module’s Collections panel, click the Selective Edits collection and select lesson06-3 from the Filmstrip.
Before we make any changes to the spots, in the Basic panel, let’s set the Exposure to –0.10 and Contrast to +52. Crop the image so that the horizon seems straighter—you can do that with the Crop Overlay tool by rotating the crop and pressing Return/Enter.
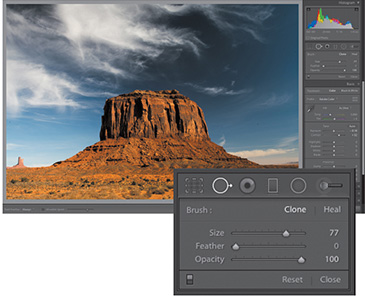
The Spot Removal tool is above the Basic panel (it’s the second tool from the left) or press Q on your keyboard. The Spot Removal options panel appears beneath the tool strip.
In the Spot Removal options panel, click Heal so Lightroom blends the change with surrounding pixels. Set the Size slider to around 77, the Feather to 0, and the Opacity to 100.
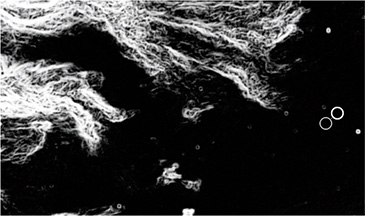
In the toolbar beneath the image preview, select Visualize Spots. Lightroom inverts the image in black and white, making it like a negative so the outlines of its content are visible. Any sensor spots in the photo appear as white circles or grayish dots. Drag the Visualize Spots slider to the right to increase sensitivity and see more spots; drag to the left if you see too many spots.

![]() Tip
Tip
If you don’t see a toolbar beneath your image in the preview area, press T on your keyboard to summon it.
The Visualize Spots feature is critical for revealing spots caused by dust on your lens, sensor, or scanner. Although these tiny imperfections may not be noticeable onscreen, they often show up when you print the photo. You can see a number of them easily on the right side of this photo.
Zoom in to the photo by clicking 1:1 in the Navigator panel at the upper left. Hold down the Spacebar on your keyboard, and drag to reposition the photo so you can see one of the spots.
![]() Tip
Tip
When a local adjustment tool is active, you can also zoom in by pressing the Spacebar on your keyboard as you click the photo, and then continue to hold it down to move around. When a local adjustment tool isn’t active, simply clicking the photo zooms in and out.
![]() Note
Note
Because the Tool Overlay menu in the toolbar beneath the photo is set to Auto here, the circles disappear when you mouse away from the preview area, just like the pins of the Graduated Filter, Radial Filter, and Adjustment Brush tools. To change this behavior, click the Tool Overlay menu and choose Always, Never, or Selected (to see only the selected fix).
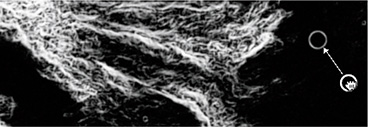
Move your cursor over one of the spots, resize it so it’s slightly bigger than the spot itself, and then click the spot to remove it.
Lightroom copies content from a nearby area in the photo and uses it to remove the spot. You see two circles: One marks the area you clicked (the destination), and another marks the area Lightroom used to remove the spot (the source), with an arrow that points to where the spot used to be.
If you don’t like the results, try changing the area Lightroom used for the fix, or try changing the tool size. To do that, click the destination circle to select the spot and then:
Press the Forward Slash (/) key on your keyboard to have Lightroom pick a different source area. Keep tapping the key until the removal looks good.
Manually change the source area by moving your cursor over the source circle and, when your cursor turns into a tiny hand, dragging the circle to another location in the photo.
To resize the destination or the source, move your cursor over either circle, and when your cursor changes to a double-sided arrow, drag outward to increase or inward to decrease the size of the circles. Alternatively, you can drag the Size slider in the Spot Removal panel.

Of course, you can always start over by removing the fix. To do that, select the destination circle and then press the Delete/Backspace key on your keyboard.
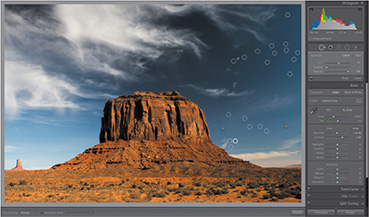
Spacebar-drag to reposition the photo, and repeat these instructions to remove all the spots.
Turn off Visualize Spots in the toolbar to return to regular view, and see if all the spots are gone.
You can remove spots in either view, or you can switch back and forth between views as you work by turning Visualize Spots on and off.
![]() Tip
Tip
To thoroughly inspect a photo for spots (if, say, you’ll print it or submit it to a stock photography service), press the Home key on your keyboard to start at the upper-left corner of the photo. Press the Page Down key on the keyboard to page through the photo from top to bottom in a column-like pattern.
You can select multiple photos taken at the same time and location before removing spots, but be sure to inspect the other photos to be certain the spots were successfully removed. If the spots weren’t in exactly the same place in the other photos, reposition the removals by dragging the destination circles.
Don’t put away the Spot Removal tool yet, because you’ll use it in the next exercise.
Removing objects from photos
Now let’s take a look at how you can use the Spot Removal tool to remove slightly larger objects by dragging.
![]() Tip
Tip
You can adjust the Feather slider after you drag to remove an object, which is helpful to add more or less smoothing in the transition area.
![]() Tip
Tip
Remember that you can also press the Forward Slash (/) key on your keyboard to have Lightroom pick a different source area if you don’t like the initial results.
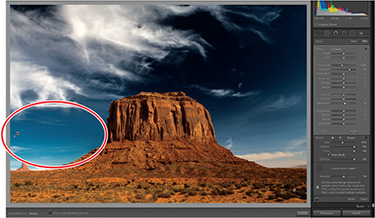
Select the lesson06-1 photo in the Filmstrip. We’re going to work on removing the cars and photographers on the left side of the photo. Zoom in to a 1:1 view to see them better.
In the Spot Removal panel, set the tool to Clone at the top of the options, then adjust the Size to 57 and drag a wide brush stroke around the cars. Lightroom will attempt to find another area to sample from and remove the cars from view.

Press the Spacebar and drag around the area just above the cars to find the people. Click each of the photographers to remove them from the image. Make sure that you resize the brush to be slightly larger than each person before you click. When finished, your image should look like it does at right.

Let’s go back to the big brush stroke we did to remove the cars. Notice that the sample that we have there does not look blended into the picture. This is because the tool was set to Clone. Click this pin to select, switch the blending mode to Heal, and the texture will blend better with the surrounding environment, leading to a better picture.
Let’s apply the same spot removal techniques to the portrait of Kena that we worked on previously. Navigate back to the image, and with the Spot Removal tool still active, we’re going to use a combination of clicking and dragging to remove some of the debris, leaving the picture with a cleaner look.
Range selection for specific control
Although Lightroom has the ability to adjust localized color with brushes and gradients, neither it nor Photoshop has had a quick way to localize adjustments based on color and luminosity. With the 2018 release of Lightroom, though, users now have the ability to use color and luminosity controls in all of the local adjustment tools, taking your editing that much further.
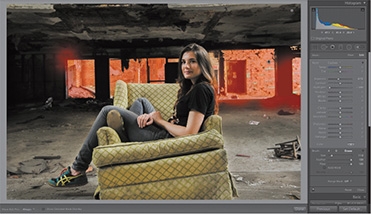
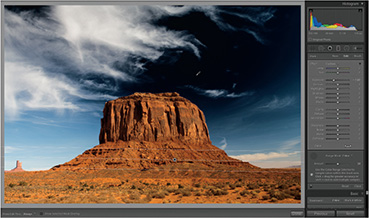
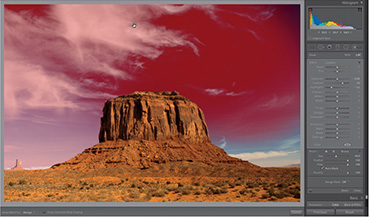
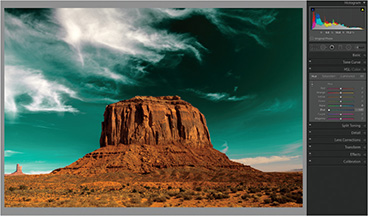
Select the lesson06-3 image and use the Linear Gradient tool to make a gradient over the image similar to what you see here. Set the Exposure to something really dark, like –1.60.

Notice that all of the elements in the picture above the top part of the line are dark. The butte, clouds, and sky have all been made darker because of this effect.
Range Selection allows us to limit the effect in a given area to a specific color or a specific luminance in the picture. Let’s try to limit this darkening effect to the blue part of the sky.
At the bottom of the Gradient Filter options is the Range Mask menu. Choose Color from that menu.
Select the eyedropper tool in the upper left of the Range Mask area and move it over to a blue portion of the picture. Click any of the blue area indicated in this region.

All of the darkening that we had in the image has now been limited to the color that we sampled with the eyedropper (you’ll see an eyedropper icon in the spot you clicked). This gives us a great amount of control over the sky. We can darken it and be confident that the clouds will not be affected.

With the Range Mask tool active and that color selected, you can add additional samples of color by holding down the Shift key as you click. In the example above, I added a color sample from the area on the left side, but I was not happy with the results. Holding down the Option/Alt key will turn that cursor into scissors, allowing you to click that eyedropper to cut the sample from the list.
The Range masks in Lightroom CC allow you to do the following:
Luminance (another word for brightness) allows you to select specific areas based on the luminance range you select.
Color allows you to create a selection mask based on the colors that you sample within the mask area.
The Depth Range option was released in October 2018. It allows you to select an area based on depth map information (for photos that include it).
Now that we have the sky darker, let’s see about getting the clouds to pop a little more. Select the Adjustment Brush tool. Double-click the Effect label to reset the sliders to 0, and make sure Auto Mask is still selected.
Paint over the sky in the image using a large brush starting on the blue part of the sky and continuing over the clouds. Because Auto Mask is on, it will do a good job of staying away from the butte.
Switching the Range Mask menu to Luminance gives you another eyedropper. This time, click some of the wispy clouds in the image. Enter –0.04 for Exposure, 62 for Contrast, –76 for Highlights, and 57 for Whites.
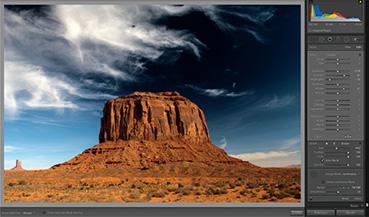
While I think the numbers are helpful here, they’re only helpful to this exercise. It’s important to talk about what we actually did. We selected a specific brightness in an image—the clouds—and attempted to bring back some of their fine detail (contrast and highlight adjustments), while trying to make them a bit brighter (whites). Making the sky darker makes that color recede into the picture. Making the wisps brighter brings them forward. The play between the three colors almost gives the image a 3D look.
Click New at the upper right of the Adjustment Brush options, then reset the sliders. Paint across the bottom portion of the picture using a large brush.
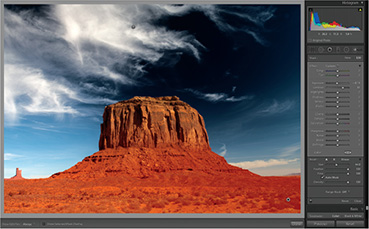
Set the Range Mask menu to Color and sample some of the color in the rocks (not the grass). Darken the area using an Exposure of –0.61 and a Contrast of +55.
Finally, use one last Adjustment Brush to darken some of the color in the sky at the lower left, with Color chosen in the Range Mask menu.
It will take a couple of tries with range masking to get the hang of how to work with luminance and color, and when to use each, but I guarantee you it is an incredibly powerful tool that gets the very best out of specific areas in an image.
HSL and Tone Curve adjustments
The HSL/Color, Tone Curve, and B&W panels all operate with a similar toolset, making it easier for us to learn how to use all three panels by learning one of them. Let’s start by exploring how to manipulate the HSL/Color panel.
Working with the HSL/Color panel
Inside the HSL/Color panel, there are a series of sliders that allow you to change colors by dragging them to the left or right. While the sliders can offer you a very detailed way to adjust color, I believe that the Targeted Adjustment tool can give you even more control.
Click the Targeted Adjustment tool in the upper left of the HSL/Color panel (it looks like a small bullseye), and make sure Hue is selected above it.
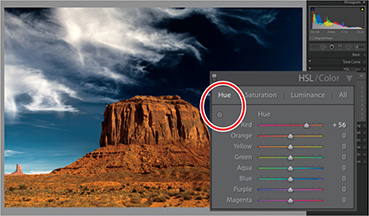
Click the sky and drag up or down, and Lightroom will determine which colors are under the tool and adjust the sliders of only those colors, adjusting their hue. As you drag, the sliders in the Hue panel automatically change to adjust the color.
Click Saturation at the top of the panel and use the Targeted Adustment tool to drag up and down on any colors in a specific area and desaturate them (drag down) or oversaturate them (drag up). Note that the changes are not confined to the area you drag, but to the colors where you drag. If those colors appear elsewhere in the photo, they will be affected there too.
Click the Luminance tab and use the Targeted Adustment tool to drag up and down on the colors in a specific area to make them brighter (drag up) or darker (drag down).

Working with the Tone Curve panel
If you want to add a little more contrast outside of what you have added in the Basic panel, you can use the Tone Curve panel. Expand the Tone Curve panel to see the tone curve and the sliders that let you adjust the curve (if you don’t see the sliders, click the curve icon to the right of Point Curve at the bottom of the panel).
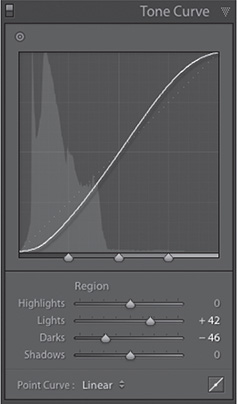
This curve represents changes made to the tonal scale of your picture. The horizontal axis shows the original tonal (input) values, with black on the left and moving progressively brighter to the right.
The vertical axis represents the changed tonal (output) values, with black on the bottom and progressing to white at the top.
If a point on the curve moves up, it becomes a lighter tone; if it moves down, it becomes darker. A straight, 45°-angle line indicates no change to the tonal scale.
While this gives you an understanding of how to adjust tonal regions in your picture, I find it much more intuitive to use the same Targeted Adjustment tool we used in the HSL panel to make adjustments to the picture.
Click the Targeted Adjustment tool in the Tone Curve panel and hover over the picture. Notice that as you hover over an area of the picture, the corresponding area in the tone curve is highlighted.
Drag downward to make that area of the picture darker; drag upward to make that tonal region brighter. Keep an eye on how dragging up or down affects your tone curve.
You can do a lot of creative experimentation with the Tone Curve panel, but your ability to add contrast and detail to an image using the Targeted Adjustment tool cannot be overstated.
Creative color and black & white effects
According to famed environmental portrait photographer Gregory Heisler, black-and-white imagery “allows you to see the structure of the image in a way that color cannot.” While we often see photographs in black and white as nostalgic, the lack of color in the image allows the viewer to focus on stronger components of the picture—composition, structure, gesture, and so on.
Your camera may have settings that allow you to make black-and-white pictures. These settings, however, are only for images shot in JPEG format. Allowing your digital camera to produce black-and-white images robs you of the ability to target specific colors in a picture and decide how you want them to appear.
Taking this technique further, Lightroom lets you add individual colors to an image, creating a hand-tinted photograph that can expand your exploration. These coloring techniques can start with a single color, and move on to several colors to produce retro effects in a snap.
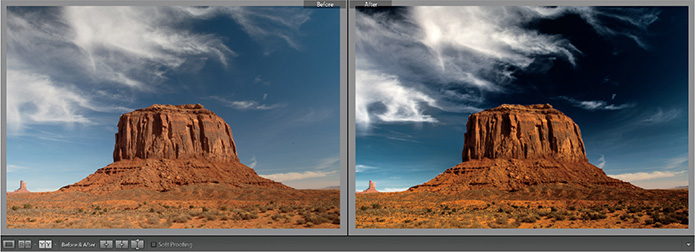
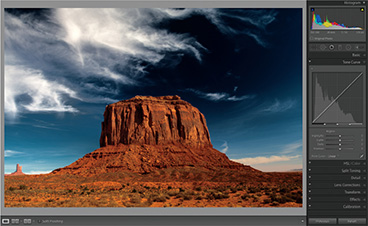
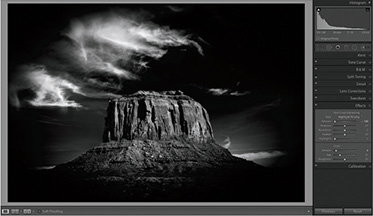
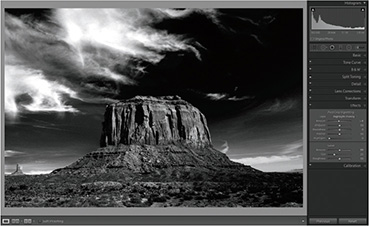
When I made this picture in Monument Valley, I was trying to make a series of images that had an Ansel Adams feel to them—very contrasty black-and-whites with an ethereal feel. We’ve been working on setting up a lot of contrast on this butte. It’s time to take it to black and white.
Converting a color photo to black and white
By now, your image should have quite a bit of contrast. In the Basic panel, I dragged the Exposure slider to –0.10 and the Contrast to 52.
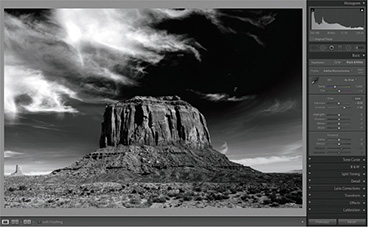
Click Black & White in the upper right of the Basic panel. The image undergoes a basic black-and-white conversion and the HSL/Color panel changes to the B&W panel.
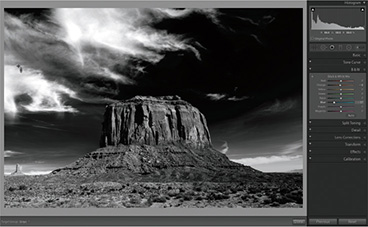
Expand the B&W panel, and there are a series of sliders representing different colors in your image. Dragging any of the sliders to the right will make any color in that range more white; dragging to the left will make that range of colors more black.

The biggest problem that we run into here is that we are attempting to adjust color sliders in an image that is now black and white. This is where the Targeted Adjustment tool comes in handy. Click the tool, then move to a part of your photo you’d like to adjust, and drag upward to brighten the colors underneath the tool, or drag downward to darken them.

![]() Note
Note
Often, I’ll oversaturate the image to better see the color representation of the photo. I also adjust Highlights, Shadows, Blacks, Whites, and Dehaze to make sure every bit of detail in the image is available. All of the color will disappear shortly, but it’s good to see this beforehand.
![]() Note
Note
In previous versions of Lightroom, creating a black-and-white image required you to go to the HSL panel to start. With the 2019 release, this option is now located in the Basic panel. Clicking Black & White at the upper right of the panel will change the HSL/Color panel into the B&W panel for you to adjust the black-and- white mix.
Applying split-toning and retro effects
Lightroom’s Split Toning panel lets you add a color tint to the highlights and another one to the shadows in your photo. The best results often come from using colors that are opposite each other on a color wheel, such as orange and blue, yellow and purple, green and red, and so on.
Expand the Split Toning panel. There are Hue sliders for both the highlights and shadows, as well Saturation sliders for both. Drag the Highlights Saturation slider to 58, so we’ll see something when we move the Hue slider.
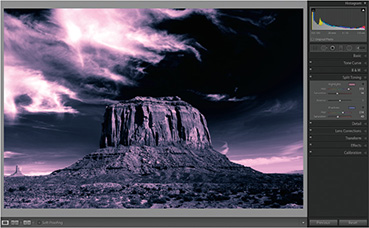

Drag the Highlights Hue slider to the right to experiment with the different colors you can apply to the highlights of the image. Then adjust the Saturation slider to your liking. I ultimately settled on +37 for Hue and +40 for Saturation.
Set the Shadows Saturation slider to 80 and play with the colors in the Hue slider. I ultimately decided to reset the Saturation slider to 0, as I liked the overall effect of the hue tint only in the highlights.
Adjust the blending between the highlights and shadows tints with the Balance slider for different effects.
The Effects panel
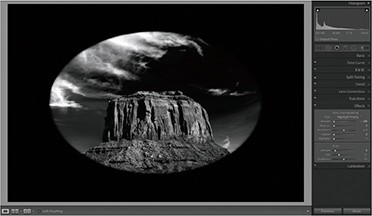
The Effects panel in Lightroom allows you to add grain and post-crop vignetting to your images. Post-crop vignetting is a great feature when you want to add a specific focus to the center of the picture, but it requires a lot of care or you risk your image looking kitschy.
We’re going to keep using the same photo, so set the Highlights Saturation slider back to 0, and then expand the Effects panel. We’ll start with the Post-Crop Vignetting sliders at the top of the panel.

Post-crop vignetting is an effect that evolved from the undesirable darkening in the corners of images taken using specific lenses. People started to like this effect of “burning the edges” in, as it drew attention to the center of the picture.
Lightroom introduced a Vignetting slider in the original release of the program that was supposed to be used to correct the effect, not add it. Photographers, however, began using it to apply a vignetting effect, but when they cropped their pictures, the vignette effect disappeared.
Lightroom has since moved the Vignetting sliders (to remove vignetting) into the Lens Corrections panel and added Post-Crop Vignetting (which retains the size and centeredness of the vignetting even if you crop the image) in the Effects panel.
There are three Style menu choices available under Post-Crop Vignetting:
Highlight Priority can bring back some blown-out highlights, but can lead to color shifts in darkened areas of a photo. It’s good for images with bright areas, such as clipped specular highlights.

Color Priority minimizes color shifts in darkened areas of a photo, but cannot perform highlight recovery.
Paint Overlay mixes the cropped image values with black or white pixels and can result in a flat appearance.
There are five sliders available to you under Post-Crop Vignetting:
Amount darkens the edges of the picture as you drag to the left, and lightens as you drag to the right.
Midpoint adjusts how tight to the corners the effect is created. A low number moves it away from the corners, toward the center; a higher number moves it closer to the corners.
Roundness adjusts whether the effect looks like an oval or a circle. Drag to the left and it becomes more of an oval; drag to the right and you get a circle.

Feather adjusts how soft the effect’s transition appears. Drag to the right and the effect appears softer; drag to the left for a hard transition.

Highlights is available only when Highlight Priority or Color Priority is chosen in the menu. This slider controls the degree of highlight contrast that is preserved.
Grain is a little more straightforward. You can control the amount of grain added to your image, how big the individual grains are, and how jagged they are. The grain looks pretty realistic and can add an extra punch to images, especially if you’re working in black and white.
I am not a fan of post-crop vignetting, as I would rather have the greater control of the Adjustment Brush tool and Radial Filter. Let’s reset all of the post-crop vignetting by double-clicking the sliders for each of the values. I did, however, add a little grain to finish off the image.
Making panoramas
Panoramic images can give people a feeling of complete immersion in a picture. But, taking panoramic pictures used to require specialized lenses that were wide enough to fit the scene you wanted to capture. Lightroom has made such incredible strides in making panoramic images out of regular-sized images that it borders on magic. Simply take a series of pictures, and let Lightroom take care of the rest.
There are a couple of key things that Lightroom does when making panoramic images that really make it stand out.
First and foremost, Lightroom includes a Boundary Warp slider that all but negates the need to crop the resulting panorama due to the spherical distortion necessary to align so many images. Previously, you had to rely on Photoshop to use Content-Aware Fill to avoid cropping, but now more of that can be done in Lightroom.
Second, the resulting file in Lightroom is also a raw file (specifically, a DNG), allowing you to work in the Develop module with a much greater range than you were able to previously. Third, the panorama merge now supports a headless mode.
Lastly, the October 2018 release of Lightroom added another tool to its panorama arsenal: you can now make HDR panoramas, making the task of creating individual HDR files and then merging them into a panorama a thing of the past.
Merging to a panorama in Lightroom
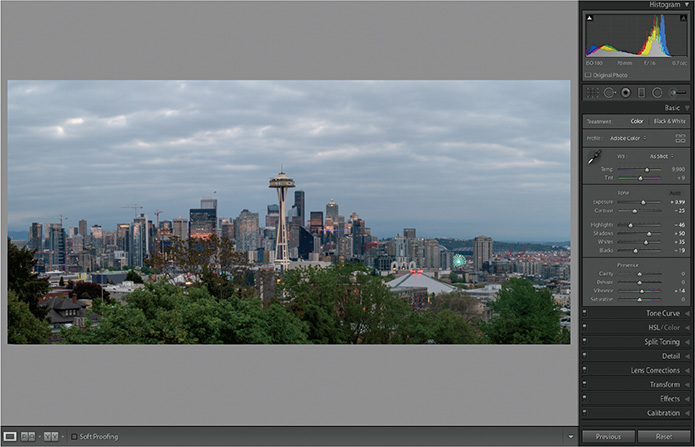
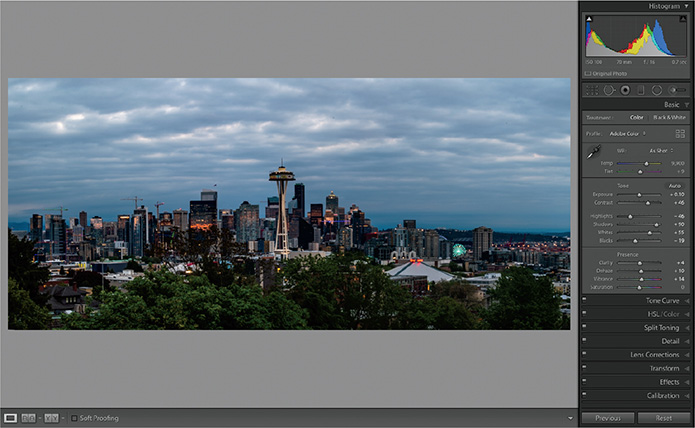
In this exercise, you’ll stitch three photos together of a Seattle skyline to create a panorama. Happily, it doesn’t matter what order the photos are in because Lightroom intelligently analyzes the photos to see how they logically fit together. You can wait to adjust tone and color until after you’ve merged the images.
![]() Tip
Tip
When capturing images for a panorama, try to overlap each shot with the preceding one by about 30 percent. Set your camera to manual focus and manual exposure so that those parameters don’t change automatically as the camera moves from shot to shot. If possible, use a tripod.
Select lesson06-5.nef through lesson06-7.nef in the Library module by clicking the first image in the series and Shift-clicking the last image.
Right-click one of the thumbnails and choose Photo Merge > Panorama or press Control+M/Ctrl+M.
One of the first things that is apparent is the speed at which the panorama is built. In recent versions of Lightroom, it uses the embedded JPEG images to create your preview. There’s nothing more frustrating than waiting a while to see if the panorama is good, only to find out it’s a bust.
The options in the Panorama Merge Preview dialog box control the layout method Lightroom uses to align the individual images. It’s worth taking each method for a spin, although if your pano is really wide (and this example is), Adobe suggests using Cylindrical. If it’s a 360-degree or multi-row pano (you took two rows of photos), try Spherical. If it has a lot of lines in it (say, an architectural shot), try Perspective.
In this case, Spherical works well; however, there are white areas all around the image that need to be cropped out or filled in.
Drag the Boundary Warp slider to the right until the white areas disappear and your image fills the preview area. This slider corrects the distortion so well that you may never need to crop or fill in the edges of your panorama again. If you decide that you want to crop out the edges, select the Auto Crop option.

Click Merge to close the dialog box. Lightroom merges all four images, and the result is a seamlessly blended panorama of Seattle, the great city of the Northwest. If you left the Auto Settings option selected in the Panorama Merge Preview dialog box, Lightroom will try to develop your image. Select the panorama in the Filmstrip (it has the word pano in its name) to see how it did.
![]() Warning
Warning
If the panorama doesn’t immediately appear in the Library module’s Grid view or the Filmstrip, give it a few seconds. The same goes for merging to HDR.
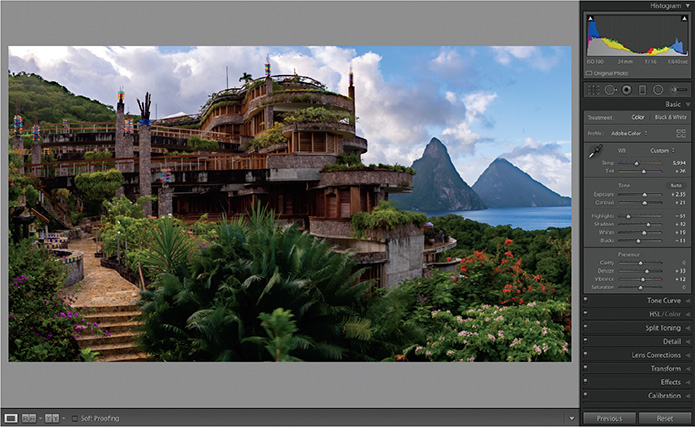
Use the panels in the Develop module to produce the tone and color that you want. The merged file is a DNG, so you have all of the tonal benefits of a raw file.
Headless mode for panoramas
Since panoramas take some time to perform their final merge, I tend to use headless mode to speed things up a bit. Hold down the Shift key as you select Photo Merge > Panorama, and the file will skip the Panorama Merge Preview dialog box and render the file in the background. In the next lesson, we’ll cover some common photographic problems and how you can fix them in Lightroom.
![]() Note
Note
Even if you’re shooting in raw, it’s worth knowing how to quickly turn on your camera’s bracketing feature. For example, you may want to capture multiple exposures of a poorly lit scene in case you can’t achieve the results you want by tone mapping only one exposure. If the single exposure gets you where you want to go, then you can always delete the other exposures from your Lightroom catalog or hard drive.
Making HDR images
Very few images exploit the full range of possible brightness tones, from the lightest lights to the darkest darks. Often, you’ll have more info on one end of the histogram than the other, meaning that either the highlights or the shadows are well exposed and full of detail, but not both. That’s because digital cameras have a limited dynamic range; they can collect only so much data in a single shot. If you have a scene with both light and dark areas, you have to choose which area to expose correctly. In other words, you can’t expose for both areas in the same photo.
To create photos that take advantage of the full range of tones from light to dark, you need to do one of the following:
Shoot in raw format and tone map the photo in Lightroom. As long as you capture good detail in the highlights—check the histogram on the back of your camera to make sure you do—you may be able to pull out an incredible amount of detail using the sliders in the Basic panel.
Shoot multiple versions of the same shot at different exposure values (EVs), and then merge them into a high dynamic range (HDR) image. You can do this manually by taking three to four photos with, say, a single f-stop difference between them, or you can have your camera do it automatically by turning on its bracketing feature.
Bracketing lets you tell the camera how many shots to take (use a minimum of three, though more is better) and how much of an exposure difference you want between each one (pick one or two EV stops if you have the choice). For example, for three shots, you’d have one at normal exposure, one that’s one or two stops lighter than normal, and another that’s one or two stops darker than normal.
In the last couple of releases, Lightroom has taken great leaps forward in the ease of creating HDR images. While both Lightroom and Photoshop can merge to HDR, it’s easier to do it in Lightroom because you can quickly switch to the Basic panel to tone map the merged result.
Let’s cover how to create an HDR image in Lightroom and how to speed up the process when we need to work with more than one set of images. You will be shocked to see how simple it actually is.
Merging to HDR in Lightroom
In this exercise, you’ll use Lightroom to merge three exposures of an antique car in a garage into a single image that you’ll then tone map.
Select lesson06-8.dng through lesson06-10.dng in the Library module by clicking the first image in the series and Shift-clicking the last image in the series.
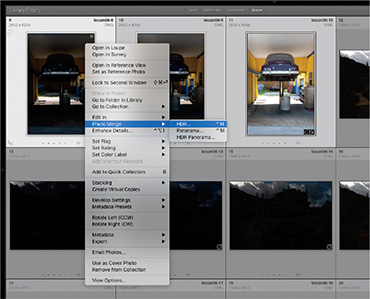
Right-click one of the thumbnails and choose Photo Merge > HDR or press Control+H/Ctrl+H.
As with the panorama, the overall speed with which Lightroom creates an HDR preview of your images is fast. I’ve merged really large image files to HDR and been amazed at how fast the preview renders.
The HDR Merge Preview dialog box gives you a quick series of options to help you along with the process:
Auto Align automatically corrects any movement in between the capture of the images—perhaps you moved the tripod slightly as you made the images.
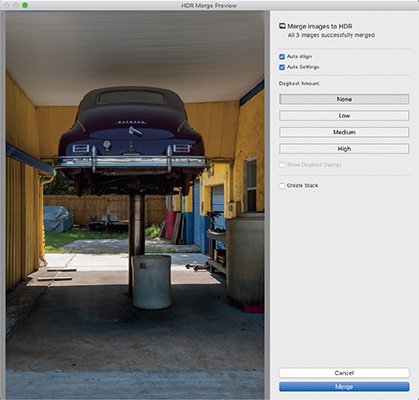
Auto Settings applies Develop module settings you normally see in the Basic panel, so you get a good result out of the gate. It’s okay to leave it on since you can always change any settings when the merge is complete.
Deghosting compensates for anything inside the frame that moved. Imagine there was a strong wind and the trees moved when you made the picture, or people walked through the frame. Deghosting gives you a choice of intensities to remove the movement. Select this setting on a case-by-case basis.
If you have selected a Deghost Amount, you can select the Show Deghost Overlay option to see where changes will be made.
Finally, you have the option to create a stack of all the component images and the resulting HDR. Stacks are outside the realm of this book, so let’s leave this unselected.
![]() Note
Note
An HDR image can be tone mapped to look realistic or surrealistic. The realistic approach brings out detail but leaves the image looking natural. The surrealistic look emphasizes local contrast and detail, and is either very saturated or undersaturated (for a grungy style). There’s no right or wrong here; it’s purely subjective.
Once you click Merge, the HDR processing happens in the background—another benefit of doing this in Lightroom. In older versions, merging HDR images in Lightroom meant that you were locked out of doing any work until the HDR image was complete. Now, you can go back into Lightroom and continue to work until the HDR is finished.
![]() Tip
Tip
If you are interested in exploring how to make realistic and surrealistic HDR images, your author wrote a book on the subject. Go check out The HDR Book, second edition.
One of the other powerful features of HDR in Lightroom is that the resulting HDR file that is created is still a raw file (a DNG, specifically). This means that you can change temperature and tint, and perform Develop adjustments, with much greater range than if the image were turned into pixel data. Dragging the Exposure slider from one side to the other in the two images on the next page shows just how much tone you have available to you in the resulting image.
When Lightroom finishes merging your HDR, it will appear next to the images you merged. Click it in the Filmstrip (it has HDR in its name), and press D to go to the Develop module if necessary. Expand the Basic panel so you can see, and make changes to, the settings Lightroom applied.
Headless mode for HDR
Another great feature that has been added to HDR in Lightroom is headless mode. There are plenty of times when you do not need to see the HDR Merge Preview dialog box to make any decisions—you just want Lightroom to get to work. Hold down the Shift key when you choose Photo Merge > HDR, and Lightroom bypasses the preview dialog box and starts making your HDR file immediately.
Creating HDR panoramas
With the October 2018 release of Lightroom, you can now create panoramas with a series of HDR images all at once. Previously, you had to merge each bracketed series of exposures into an individual HDR file, and then merge those files into a panorama. Lightroom has automated the entire process and still kept the resulting file as a DNG, letting you tone it with great detail.
Some time ago, I took a series of bracketed exposures (nine stops each) of Jade Mountain, an amazing resort I’ve had the pleasure of staying at in St. Lucia. I wanted to make sure that I captured all of the tonality of the momemt, while making an image large enough to feel like you can get lost in it. Let’s see how Lightroom handles the process.
Select lesson06-11.dng through lesson06-28.dng in the Library module by clicking the first image in the series and Shift-clicking the last image.
Right-click one of the thumbnails and choose Photo Merge > HDR Panorama. With 18 images being merged to HDR and then merged as a panorama, you might expect it to take quite a while, but it’s actually faster than you’d think.
The result of the HDR pano looks like what you’d expect to see from the merged files, with white areas in the corners.
Selecting the Auto Crop option eliminates the top portion of the resort. While I appreciate the efficiency of it, I think Boundary Warp will work much better for this image.
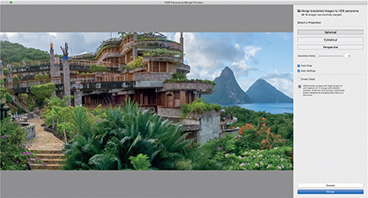
Deselect the Auto Crop option and drag the Boundary Warp slider to the right. This corrects the perspective while bringing the edges back.
Click Merge and Lightroom will start merging your HDR pano.
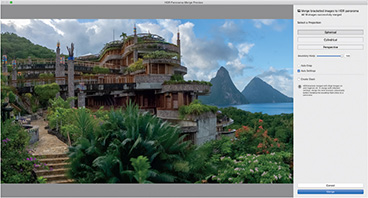
The final result is an extremely compelling HDR panorama, and it was all done automatically. Go to the Develop module to further tone and pull details from it.
Saving time in Lightroom
One of the things that I really like about Lightroom is how easy working with images is for the most part. The goal for all of this technology is to make it easier for you to realize your vision, and to get back to making more images. All of the skills you’ve learned help in the process of realizing your vision, but how do we make it go faster? Synchronizing your changes across images is a great first start.
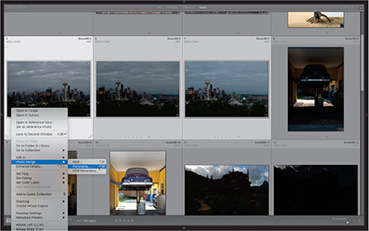
Applying previous corrections
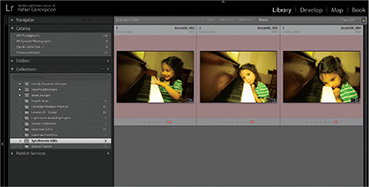
Click the Synchronize Edits collection in the Develop module’s Collections panel to work with three images of my daughter, Sabine. I’d like to correct the white balance and exposure for one of the images, and make sure those changes are applied to the other two images.
Click the first image and press the letter D to enter the Develop module. Near the top of the Basic panel, get the White Balance Selector tool, and click the back wall in the picture to automatically correct the white balance.

Once you’ve set your white balance, enter +23 for Contrast and +30 for Whites.
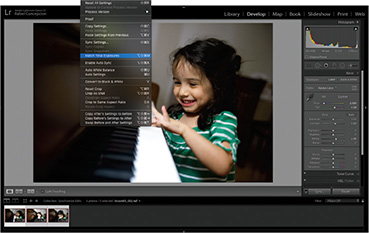
Press the right arrow key to move to the next picture. You’ll notice the same white balance and exposure problem as before. This time, click the Previous button below the right-side panels. Lightroom will copy all of the settings that you added on the other image and apply them to the new picture.
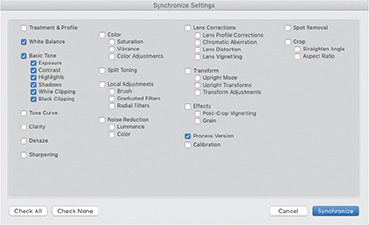
Synchronizing corrections
Clicking the Previous button to apply corrections to another picture is a great way to make it easier if you have one or two pictures, but what if you have 50 of them? For that, you’ll want to use the Synchronize command.
Press Command+Z/Ctrl+Z to undo the correction we just made to the second image.
Click the first image in the filmstrip, then Shift-click the last image in the series. The first image that was selected will be the source image from which your corrections will synchronize.
Click the Sync button below the right-side panels.

In the Synchronize Settings dialog box, click the Check None button in the lower left, and then select the settings that we changed in this image. I selected Process Version, White Balance, and the Basic tone information. Once you’ve selected all of the options to synchronize, click the Synchronize button.
You’ll notice that all of the settings were synchronized between all three images, but there is a new problem with two of the images. It appears that the second and third images were overexposed a little. The initial changes we made to the first image were okay, but the settings seem to overexpose the second and third images. Here’s another secret setting in Lightroom I like to use in situations like this.
With the three images still selected, choose Settings > Match Total Exposures. This will take the first image and match the other images to that exposure. You now have three images that are similar in exposure, in no time at all.

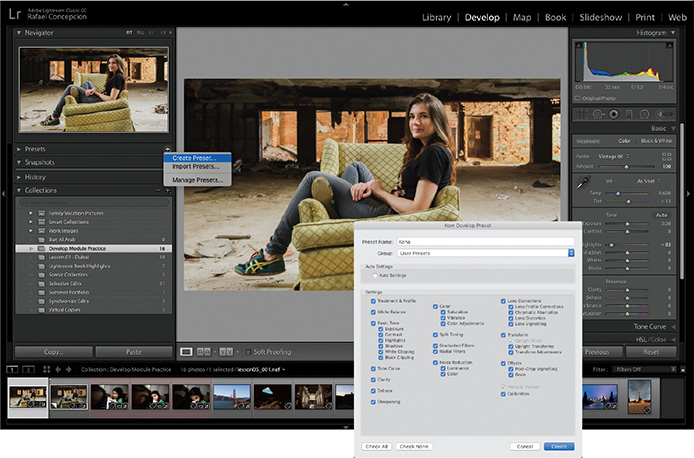
Creating a Develop preset
Another great way to develop images quickly is through the use of a preset. Click Kena’s picture in the Filmstrip. As with the Synchronize process, clicking the plus sign (+) button at the right of the Preset panel’s header and choosing Create Preset will bring up a dialog box that allows you to save specific settings for the toning of your images. Type Kena as your preset name and click Create, as seen below.
Once the preset is saved, you can access it under User Presets in the Presets panel. Navigate to any other image in the Filmstrip in the Develop module and move your pointer over the preset to see a preview of what the picture will look like.
Press G to return to the Library module’s Grid view. You can even select a series of images in the Grid (by clicking the first one and Shift-clicking the last one), and apply the same preset using the Saved Preset menu at the top of the Quick Develop panel. Now that’s a timesaver.

Review questions
1 How do you reset all the sliders in the local adjustment tools’ options panels?
2 How do you remove part of a Graduated Filter’s or Radial Filter’s effect?
3 How do you create a vignette for an off-center subject?
4 What is the difference between the Spot Removal tool’s Heal and Clone modes?
5 What are the three Range Mask choices and what does each one do?
6 How do you synchronize changes to one photo with multiple similar photos?
Review answers
1 When using a local adjustment tool (the Graduated Filter, the Radial Filter, or the Adjustment Brush tool), you can reset all the sliders in the options panel by double-clicking the Effect label.
2 Once you have created a Graduated Filter or Radial Filter, if you need to remove a portion of the effect, click Brush in the upper right of the options panel, then click Erase in the Brush settings at the bottom of the options. Adjust your brush settings, as needed, and paint over the area you want to remove from that adjustment.
3 If your subject is off-center in the photo, you can create a Radial Filter around your subject and use it to darken the area outside of your subject.
4 When using the Spot Removal tool, Heal gives you an automatic blending of surrounding pixels, while Clone gives you a straight copy and paste.
5 The three Range Mask choices are Luminance, Color, and Depth Range, and they allow you to select the specific areas of your image that will be affected by that local adjustment. Luminance allows you to select what is affected based on a luminance (brightness) range you choose. Color allows you to select an area based on the colors you sample in the image. Depth Range lets you choose the area affected based on depth map information.
6 If you have multiple photos taken in the same lighting, you can make your tonal adjustments to one photo, select all the photos, and then click the Sync button at the bottom of the right panel group. In the Synchronize Settings dialog box, select all the settings you changed in the first image, and click Synchronize.