8 Creating a Slideshow
Lesson overview
Once you’ve spent time bringing out the best in your images, showing them off in a slideshow is one of the easiest and most effective ways to share your photos with friends and family or to present them to a client. Choose a template as a starting point, then customize the layout, color scheme, and timing. Add backdrops, borders, text overlays—even music and video—to create a dynamic presentation that will complement your work and captivate your audience. In this lesson, you’ll learn how to:
Group the images for your slideshow as a collection.
Choose a slideshow template, adjust the layout, set a backdrop image, and add a text overlay, sound, and motion.
Save your slideshow and your customized template.
Export your presentation.
View an impromptu slideshow.

This lesson will take 1 to 2 hours to complete. Please log in to your account on peachpit.com to download the files for this lesson, or go to the “Getting Started” section at the beginning of this book and follow the instructions under “Accessing the lesson files and Web Edition.” Store the files on your computer in a convenient location. Your Account page is also where you’ll find any updates to the lessons or to the lesson files. Look on the Lesson & Update Files tab to access the most current content.
In the Slideshow module you can quickly put together an impressive onscreen presentation complete with stylish graphic effects, transitions, text, music, and even video. Lightroom Classic CC makes it easier than ever to share your images with family and friends, clients, or the world at large by giving you the option of exporting your slideshow to PDF or video.
Getting started
Before you begin, make sure you’ve set up the LRClassicCIB folder for your lesson files and created the LRClassicCIB Catalog file to manage them, as described in “Accessing the lesson files and Web Edition” and “Creating a catalog file for working with this book” in the “Getting Started” section at the start of this book.
![]() Note
Note
This lesson assumes that you already have a basic working familiarity with the Lightroom Classic CC workspace. If you need more background information, refer to Lightroom Classic CC Help, or review the previous lessons.
If you haven’t already done so, download the lesson08 folder from your Account page at www.peachpit.com to the LRClassicCIBLessons folder, as detailed in “Accessing the lesson files and Web Edition” in the “Getting Started” section.
Start Lightroom Classic CC.
In the Select Catalog dialog box, make sure the file LRClassicCIB Catalog.lrcat is selected under Select A Recent Catalog To Open, and then click Open.

![]() Tip
Tip
If you can’t see the Module Picker, choose Window > Panels > Show Module Picker, or press the F5 key. If you’re working on macOS, you may need to press the fn key together with the F5 key, or change the function key behavior in the system preferences.
Lightroom Classic CC will open in the screen mode and workspace module that were active when you last quit. If necessary, switch to the Library module by clicking Library in the Module Picker at the top of the workspace.

Importing images into the library
The first step is to import the images for this lesson into the Lightroom library.
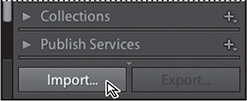
In the Library module, click the Import button below the left panel group.
If the Import dialog box appears in compact mode, click the Show More Options button at the lower left of the dialog box to see all the options in the expanded Import dialog box.
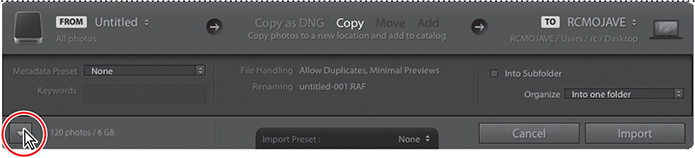
Under Source at the left of the expanded Import dialog box, locate and select your LRClassicCIBLessonslesson08 folder. Ensure that all 12 images in the lesson08 folder are selected (checked) for import.
In the import options above the thumbnail previews, select Add so that the imported photos will be added to your catalog without being moved or copied. Under File Handling at the right of the expanded Import dialog box, choose Minimal from the Build Previews menu and leave the Don’t Import Suspected Duplicates option unselected. Under Apply During Import, choose None from both the Develop Settings menu and the Metadata menu and type Lesson 8, New York in the Keywords text box. Make sure that your import is set up as shown in the illustration below, and then click Import.
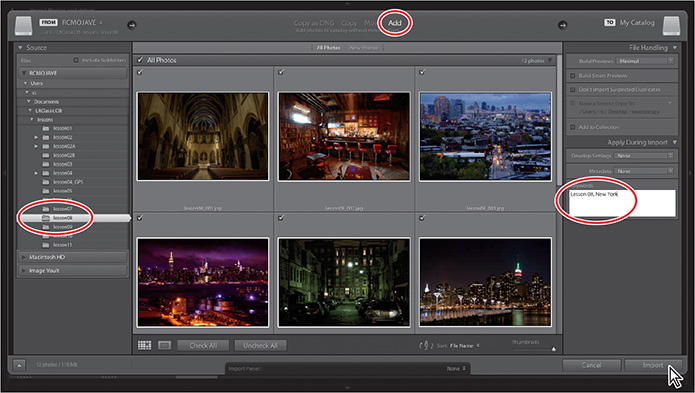
The 12 images are imported and now appear in both the Library module’s Grid view and the Filmstrip across the bottom of the Lightroom workspace.
Assembling photos for a slideshow
The first step in creating a slideshow is to gather the photos you wish to include. Since we just imported them, the images for this lesson are already isolated from the rest of your catalog in the Previous Import folder, which is selected.

![]() Tip
Tip
Your slideshow can include video as well as still images.
Although you could move to the Slideshow module now, this isn’t a good solution. The Previous Import folder is a temporary grouping. The next time you import images into Lightroom, the Previous Import will contain another set of images. Also, the images there cannot be reorganized.
With the Previous Import folder selected, in the Grid view, drag the second picture down after the fourth picture. You’ll see a warning dialog letting you know that this picture cannot be reorganized into a custom order.
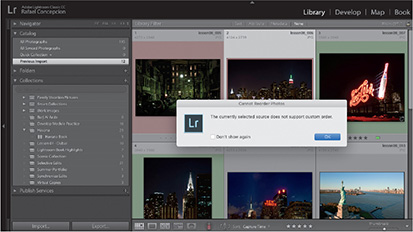
There will be many times that you’ll want to organize a set of images for a slideshow that come from a variety of folders in your catalog. If you want to make a slideshow of the best pictures you took all year, you’ll need them all in one place, but they’ll come from different folders.
What do you do? Create a collection to group the photos for your project, where you can rearrange the image order and add to it from different sources. A collection has a permanent home in the Collections panel, which is accessible in every module, making it easy to retrieve the set of images at any time.
![]() Tip
Tip
You can reorder photos in a collection by simply dragging the thumbnails in the Grid view or the Filmstrip. Your custom display order will be saved with the collection.
With the Previous Import folder still selected, press Command+A/Ctrl+A or choose Edit > Select All. Click the plus sign (+) button in the Collections panel’s header and choose Create Collection from the menu. In the Create Collection dialog box, type NYC as the name for the new collection. Make sure the Include Selected Photos option is selected and the rest of the options are unselected, then click Create.
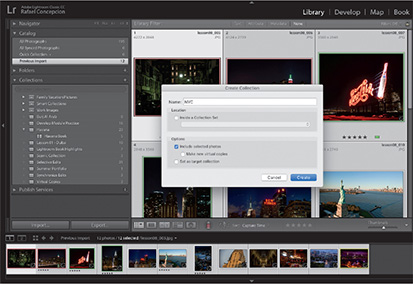
Your new collection appears in the Collections panel, where it’s automatically selected. The image count at the right indicates that the NYC collection contains 12 photos.
![]() Tip
Tip
The first time you enter any of the Lightroom modules, you’ll see tips that help you identify the components of the workspace and understand the workflow order. You can dismiss the tips by clicking the Close button. To reactivate the tips for any module, choose [Module name] Tips from the Help menu.
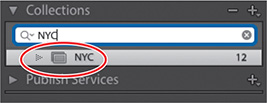
This is also a good time to point out that as your list of collections increases, it may become harder to find a collection. Directly under the Collections panel’s header, there is a search box. Type in any collection name, and it searches all the collections in the panel for a match.
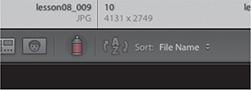
With the NYC collection selected, in the Toolbar below the Grid view, change the Sort menu to File Name (you can reorganize them later, while setting up your slideshow).
Press Option+Command+5/Alt+Ctrl+5, or click Slideshow in the Module Picker to switch to the Slideshow module.
Working in the Slideshow module
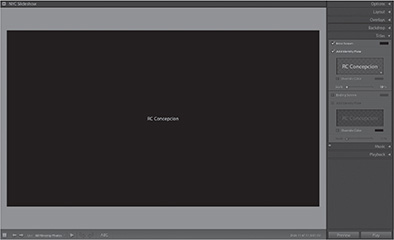
The Slide Editor view is the main area where you’ll work on your slide layouts and preview your slideshow in operation.
![]() Note
Note
Your preview may look slightly different from the illustration, depending on the size and proportions of your computer display.
In the left panel group, the Preview panel displays a thumbnail preview of whichever layout template is currently selected (or under the pointer) in the Template Browser panel, while the Collections panel provides easy access to your photos.
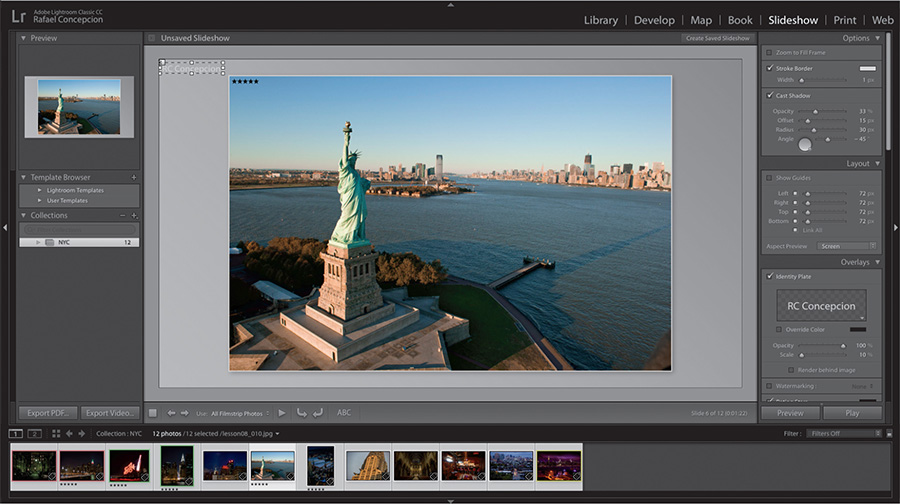
The Toolbar below the Slide Editor view offers controls for navigating through the images in your collection, previewing the slideshow, and adding text to your slides.
Choosing a slideshow template
Each of the preset Lightroom slideshow templates incorporates a different combination of layout settings—such as image size, borders, backgrounds, shadows, and text overlays—that can be customized to create your own slide designs.
![]() Tip
Tip
The default template will be used when you launch the impromptu slideshow from another module. To designate a different template for this purpose, right-click its name in the Template Browser and choose Use For Impromptu Slideshow. A plus sign (+) appears after the name of the new default template.
In the Template Browser panel, expand the Lightroom Templates folder, if necessary, then move the pointer slowly up and down the list of Lightroom templates. The Preview panel shows you how the selected image looks in each template layout as you move over it. Select a different image in the Filmstrip, and then preview the templates again.
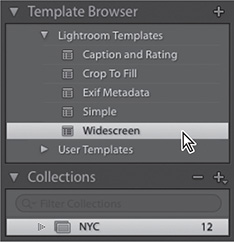
When you’re done previewing the options in the Template Browser, click to select the Widescreen template.
In the Toolbar below the slide preview, choose All Filmstrip Photos from the Use menu. In the Filmstrip, select the first image, lesson08-001.
Click the Preview button at the bottom of the right panel group to preview your presentation in the Slide Editor view. When you’re done, press the Esc key on your keyboard, or click in the Slide Editor view to stop the preview.
Customizing your slideshow template
For the purposes of this lesson, you won’t be adding an identity plate or metadata information to your slides, so the Widescreen template will serve as a good basis for setting up a customized layout.
Adjusting the slide layout
Once you’ve chosen a slide template, you can use the controls in the right panel group to customize it. For this project, you’ll start by modifying the layout, and then change the background to set up the overall look of the design before you make decisions about the style and color of borders and overlaid text. The Layout panel enables you to change the size and position of the photo in the slide layout by setting the margins that define the image cell.
If the Layout panel in the right panel group is currently collapsed, expand it by clicking the triangle beside its name. Make sure that the Show Guides and Link All options are selected. If your screen has an aspect ratio other than 16:9, choose 16:9 from the Aspect Preview.
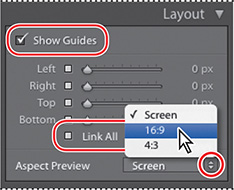
Move the pointer over the lower edge of the image in the Slide Editor view. When the pointer changes to a double-arrow cursor, drag the edge of the image upward. As you drag, gray layout guide lines appear against the black background around the scaled-down image. All four guides move at the same time because the Link All option is selected in the Layout panel. As you drag upward, watch the linked sliders and numerical values change in the Layout panel and release the mouse button when the values reach 55 px.

![]() Tip
Tip
Video clips in a slideshow are placed in your slide layout in the same way as still images, complete with borders and shadows.
![]() Tip
Tip
You could also drag the sliders in the Layout panel, or click the pixel values and type new numbers, to adjust the size of the image in the slide layout. With the settings linked, you only need to drag one slider or enter one value. Remember that the proportions of your slides may differ from what you see in the illustrations in this lesson, depending on the aspect ratio of your computer display.
Now you can increase the width of the slide’s top margin to create a space where you can add text later in the lesson.
In the Layout panel, deselect the Link All option, and then either drag the Top slider to the right, type over the adjacent pixel value, or drag the top guide in the Slide Editor to set a value of 135 px. Deselect the Show Guides option, and then collapse the Layout panel.
Setting up the slide background
In the Backdrop panel, you can set a flat background color for your slides, apply a graduated color wash, or place a background image—you can even mix all three elements to create an atmospheric frame for your photos.
![]() Note
Note
When all three of the backdrop options are disabled, the slide background is black.
In the Filmstrip, select any image other than the third photo in the series.
If necessary, expand the Backdrop panel in the right panel group. Select the Background Image option, and then drag the third image, lesson08-003, from the Filmstrip into the Background Image well. Drag the Opacity slider to the left to reduce the value to around 50%, or click the Opacity value and type 50.
![]() Tip
Tip
You can also drag an image from the Filmstrip directly onto the slide background in the Slide Editor view.

With the Background Color option disabled, the default black background shows through the partially transparent image, effectively darkening it. However, the background is still competing too much with the featured photos. You can use the Color Wash feature to darken the backdrop a little more. Color Wash applies a graduated wash that fades from whatever color is set in the Color Wash swatch to the background image (or color).
Select the Color Wash option. Click the Color Wash swatch, and then click the black swatch at the top of the Color Picker.
Click the Close button at the upper left of the Color Picker, and then use the Opacity slider to set the color wash opacity to 50%. Set the Angle of the wash to 45. When you’re done, collapse the Backdrop panel.

With the background photo set to partial transparency, your backdrop design is now a composite of all three optional elements: a graduated color wash, an image, and the default background color.
Adjusting stroke borders and shadows
Now that you’ve established the overall layout and feel for your slides, you can “lift” the images to make them stand out more against the background by adding a thin stroke border and a drop shadow. We’ll choose a border color that will provide a contrast to the predominantly blue backdrop.
In the right panel group, expand the Options panel. Select the Stroke Border option, and then click the color swatch beside it to open the Color Picker.
To set a pale blue color for the stroke border, click to select the R, G, and B percentages at the lower right of the Color Picker in turn and type values of 70, 85, and 90 respectively. Click outside the Color Picker to close it.
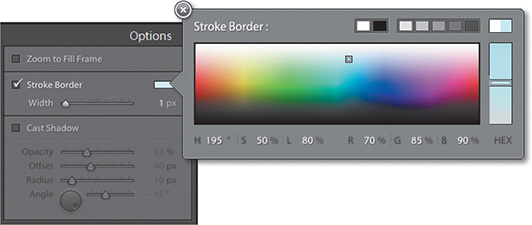
Use the Width slider to set a width of 1 pixel or type 1 in the text box.
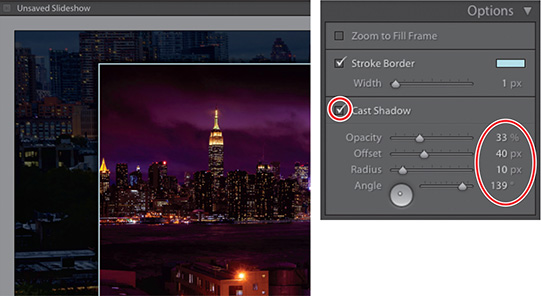
Select the Cast Shadow option in the Options panel and experiment with the controls. You can adjust the opacity of the shadow, the distance the shadow is offset from the image, the angle at which it is cast, and the Radius setting, which affects the softness of the shadow’s edge. When you’re done, set the controls as in the illustration at the right, and then collapse the Options panel.
Adding a text overlay
In the Overlays panel, you can add text, an identity plate, or a watermark to your slides and have Lightroom display the rating stars you’ve assigned to your images or the captions that you’ve added to their metadata. In this exercise, you’ll add a simple headline that will be overlaid on the background for every slide.
![]() Note
Note
For this exercise, you won’t incorporate an identity plate or watermark in your slideshow. For more information on identity plates, refer to the online bonus chapter “Publishing Your Photos” or the Lightroom Classic CC Help topic “Add your identity plate to a slideshow.”
Expand the Overlays panel and select the Text Overlays option. If the Toolbar is not visible just below the Slide Editor view, press the T key. In the Toolbar, click the Add Text To Slide button (ABC).

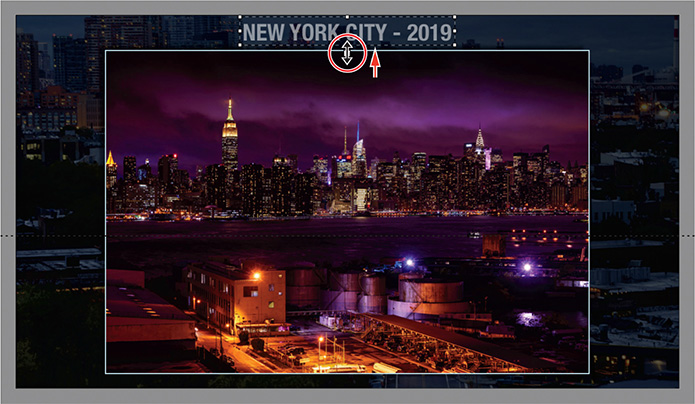
Type NEW YORK CITY - 2019 in the Custom Text box, and press Return/Enter. The text appears in the lower-left corner of the slide, surrounded by a bounding box.

The settings in the Text Overlays area of the Overlays panel are updated to show the default font details. Click the double triangle beside the font name and choose a different font, then choose the face. Here, I chose Helvetica Neue Condensed Bold. Leave the text color set to the default white (the swatch at the right of Text Overlays), but decrease the Opacity to 80% to soften the effect.
Drag the text upward, and allow it to attach itself to the anchor at the center of the slide’s upper edge. Drag the handle at the bottom of the text bounding box upward to scale the text, making it a little smaller, then use the up and down arrow keys to position the title as shown in the illustration below.
As you drag text on a slide layout, Lightroom tethers the bounding box either to the nearest of various reference points around the edge of the slide or to a point on the border of the image itself.
To see this in operation, drag the text around the slide, both inside and outside of the image, and watch the white tether-line jump from point to point. When you’re done, return the text to its original position.
Throughout a slideshow, the tethered text will maintain the same position either relative to the slide as a whole, or to the border of each image, whatever its shape.
You can use this feature to ensure that photo-specific caption text, for instance, will always appear just below the left corner of each image no matter what its size or orientation, while a title that applies to the presentation as a whole—as does the text in our example—will remain in a constant position on the screen. In the latter case, the text is tethered to one of the anchors around the edge of the slide; in the former, the text would be tethered to an anchor on the border of the feature image.
The color and opacity controls in the Text Overlays area operate just as they do in the Color Wash and Stroke Border areas. On macOS, you can also set up a drop shadow for your text.
Collapse the Overlays panel and deselect the text box in the Slideshow Editor.
Select the first slide in the Filmstrip and click the Preview button at the bottom of the right panel group to preview your slideshow in the Slideshow Editor view. When you’re done, press Esc to stop playback.
Using the Text Template Editor
In the Slideshow module, you can use the Text Template Editor to access and edit the metadata that is stored in your photos and set up text overlays to be displayed on each slide, drawn from that information. You can add custom text and choose from titles, captions, image size, camera info, and a wide range of other options, then save your choices as a text template preset that will help you streamline and automate your workflow for similar projects in the future.
To call up the Text Template Editor, first click the Add Text To Slide button (ABC) in the Toolbar, then click the double triangle beside the Custom Text box in the Toolbar and choose Edit from the menu.
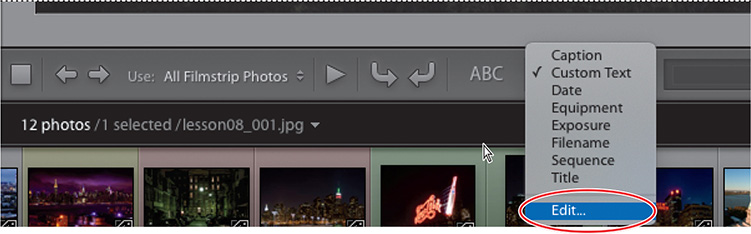
In the Text Template Editor, you can set up a string of one or more text tokens, place-
holders that represent the information items to be drawn from each photo’s metadata for display in your slideshow.

In the Preset menu at the top of the editor, you can apply, save, and manage text over-
lay presets, saved sets of info tokens that are customized for different purposes.
Use the Image Name menu to set up a text string with the current or original filename, copy name, or folder name.
Use the Numbering menu to number the images in your slideshow and display image capture dates in a variety of formats.
Choose from EXIF metadata including image dimensions, exposure, flash settings, and many other attributes.
IPTC metadata includes copyright, creator details, and numerous other options.
Creating a saved slideshow
Since you entered the Slideshow module, you’ve been working with an unsaved slideshow, as is indicated in the bar across the top of the Slideshow Editor view.

Until you save your slideshow, the Slideshow module works like a scratch pad. You can move to another module, or even close Lightroom Classic CC, and find your settings unchanged when you return, but if you click a new slideshow template—or even the one you started with—in the Template Browser, the “scratch pad” will be cleared and all your work will be lost.
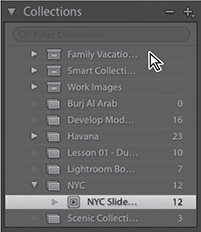
Converting your project to a saved slideshow not only preserves your layout and playback settings, but also links your design to the particular set of images for which it was designed. Your slideshow is saved as a special kind of collection—an output collection—with its own listing in the Collections panel. Clicking this listing will instantly retrieve the images you were working with, and reinstate all of your settings, no matter how many times the slideshow scratch pad has been cleared.
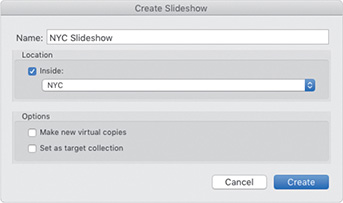
Click the Create Saved Slideshow button in the bar at the top of the Slideshow Editor view, or click the plus sign (+) button in the header of the Collections panel and choose Create Slideshow.
In the Create Slideshow dialog box, type NYC Slideshow as the name for your saved presentation. In the Location options, select Inside and choose the NYC collection from the menu, then click Create.
![]() Tip
Tip
The Make New Virtual Copies option is useful if you wish to apply a particular treatment, such as a developing preset, to all the pictures in your slideshow, without affecting the photos in the source collection.
The title bar above the Slide Editor now displays the name of your saved slideshow, and no longer presents the Create Saved Slideshow button.
Your saved slideshow appears in the Collections panel, marked with a Saved Slideshow icon and nested inside the original source collection, NYC. The image count shows that the new output collection, like the source, contains 12 photos.
You can save your slideshow at any point in the process—you could create a saved slideshow as soon as you enter the Slideshow module with a selection of images or wait until your presentation is polished. Once you’ve saved your slideshow, any changes you make to the layout or playback settings are auto-saved as you work.
For the purposes of this lesson, saving the project at this stage enables you to delete and rearrange slides to refine your presentation, without affecting the source collection. Any image you exclude from the slideshow now will be removed from the NYC Slideshow output collection, but will remain a part of your NYC collection.
This could be useful if you also plan to use the photos in the NYC collection to produce a print layout and a web gallery, for instance. Your original collection remains intact, while the output collection for each project may contain a different subset of images, arranged in a different order.
Refining the content of a slideshow
It’s a good idea to finalize the photo set for your slideshow at this point, before you go on to specify playback settings. If you remove an image later, you might need to readjust the time allocated for each slide and transition, especially if your slideshow is timed to match the duration of a sound file.
![]() Tip
Tip
Adding more photos to your saved slideshow is easy: simply drag images to the slideshow’s listing in the Collections panel. Click the white arrow that appears to the right of the image count when you move the pointer over your saved slideshow in the Collections panel to jump from the Library to your presentation in the Slideshow module.

In the Filmstrip, right-click the lesson08-003 image—the photo you used as a background image—and choose Remove From Collection.
Note that, although the photo disappears from the Filmstrip and will not feature on any slide in the presentation, it is not removed from the slide background in the Slide Editor view. The background image has become part of the slide layout, rather than merely one of the selected photos to be displayed.
Even if you fill your slideshow with a different set of photos entirely, the background image will remain in place. Your saved slideshow includes a link to the photo that is independent of the output collection or its parent collection.
In the Collections panel, the nested NYC Slideshow output collection now shows an image count of 11 photos, while its parent collection still contains the original count of 12.
In the Filmstrip, drag the photo lesson08-007 to a new position between the lesson08-005 and lesson08-006 images, releasing the mouse button when the black insertion bar appears.

Adding sound and motion to your slideshow
One way to make your presentation more dynamic is to add video clips, which are placed on their own slides according to your layout, just like your photos—complete with stroke borders, shadows, and overlays.
Even for a slideshow composed entirely of still images, you can easily create atmosphere and generate emotional impact by adding music, and bring your photos to life with filmic pan and zoom effects.
You’ll find a sound file named nyc-rc.mp3 in your lesson08 folder. This piece of music will underline the moody, urban theme of the slideshow; however, feel free to choose any other file from your music library that you’d like. With only 11 images in the slideshow, a fairly short piece will probably work best.
Expand the Music and Playback panels in the right panel group. Click the switch at the left of the Music panel’s header to enable the soundtrack for your slideshow. Click the Add Music button, then navigate to your LRClassicCIBLessonslesson08 folder, select the nyc-rc.mp3 file, and click Open/Choose.
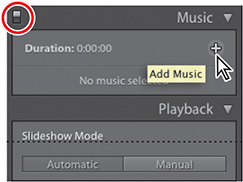
The name of the sound file and its duration are displayed in the Music panel.
Expand the Titles panel and select both the Intro Screen and Ending Screen options. Deselect the Add Identity Plate option for both screens.
The next step is to fine-tune the timing of the slideshow by setting the duration of the slides and the transitions between them to match the length of the music file.
In the Playback panel, watch the Slide Length and Crossfades values change as you click the Fit To Music button below the sliders.

The timing is adjusted to fit the 11 images and two title screens to the duration of the music file.
Drag the Crossfades slider to the right to increase the duration of the fade transitions to 4 seconds, and then click the Fit To Music button once more, keeping an eye on the Slide Length value as you do so. Lightroom recalculates the slide duration so that the slideshow fits the music file despite the lengthened fades.
Deselect the Repeat Slideshow and Random Order options, farther down in the Playback panel. In the Filmstrip, select the first image, then click the Preview button at the bottom of the right panel group to preview the slideshow in the Slideshow Editor view. When you’re done, press Esc to stop playback.
Adding music has created a sense of narrative for the presentation; now it’s time to add some movement that will help to make it not just a story, but a journey.
Select the Pan And Zoom option in the Playback panel. Drag the slider to set the level for the effect about one-third of the way between Low and High.
The higher you set the Pan And Zoom slider, the faster and broader the movement; a low setting creates a slow drift that never moves too far from a full-frame view.
Make sure the first photo is selected in the Filmstrip, and then click the Play button at the bottom of the right panel group to see the slideshow in full-screen mode. If you wish, you can press the spacebar to pause and resume playback. When you’re done, press the Esc key to end the slideshow.
For a slideshow that contains more images than our lesson project, use the Add Music button to attach more sound files. If your slideshow includes multiple sound files, clicking the Fit To Music button will fit your slides and transitions to the combined duration of the music tracks.
![]() Tip
Tip
You can add up to 10 music files to your slideshow soundtrack; to change the order in which they’ll play, drag files to new positions in the Music panel list.
The Sync Slides To Music option disables the Slide Length and Crossfades controls and the Fit To Music button. Lightroom analyzes the sound file and sets the timing of the slideshow not only to match the tempo, but also to respond to prominent sounds in the music.
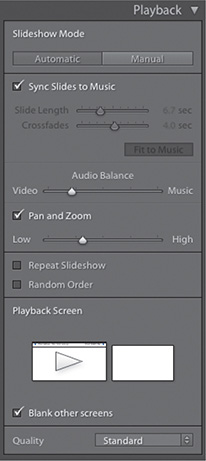
The Playback panel also incorporates an Audio Balance slider that enables you to mix your soundtrack music with the audio from video clips in your slideshow.
If you have a second display attached to your computer, you’ll see the Playback Screen area at the bottom of the Playback panel, where you can choose which screen will be used when you play your slideshow at full screen, and whether the other screen will be blanked during playback.
Saving a customized slideshow template
Having spent so much time customizing your slideshow template, you should now save it so that it becomes available as a new choice in the Template Browser panel. This is not the same as saving your slideshow, as you did earlier. As mentioned earlier, a saved slideshow is actually an output collection, an arranged grouping of images saved with slidehow settings. In contrast, a saved custom template records only your slide layout and playback settings—it’s not linked to any images.
Saving your customized slideshow template will save you a lot of time later should you wish to put together a related presentation, or simply use the template as a starting point for creating a new design.
By default, your customized template will be listed with the User Templates in the Template Browser panel.
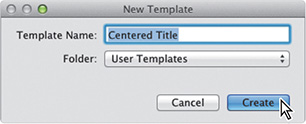
With your slideshow still open, click the Create New Preset button in the header of the Template Browser panel, or choose Slideshow > New Template.
In the New Template dialog box, type Centered Title as the new template name. Leaving the default User Templates folder selected as the destination folder in the Folder menu, click Create.
![]() Tip
Tip
When saving a customized template, it’s a good idea to give it a descriptive name. This will make it easier to find as you add more new templates to the Template Browser.
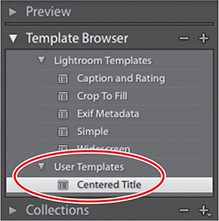
Your new customized template is now listed under User Templates in the Template Browser panel.
Exporting a slideshow
To send your slideshow to a friend or client, play it on another computer, or share it on the web, you can export it as a PDF file or as a high-quality video file.
In the Slideshow module, click the Export PDF button at the bottom of the left panel group.
Review the options available in the Export Slideshow To PDF dialog box, noting the settings for size and quality, and then click Cancel.
![]() Note
Note
PDF slideshow transitions work when viewed using the free Adobe Reader® or Adobe Acrobat®. However, slideshows exported to PDF will not include music, randomized playback order, or your customized slide duration settings.
Repeat the process for the Export Video button. Review the Export Slideshow To Video dialog box, noting the range of options available in the Video Preset menu. Select each export option in turn to see a brief description below the Video Preset menu.
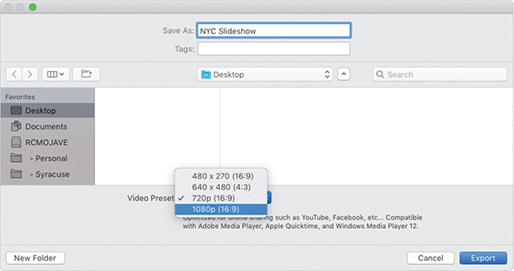
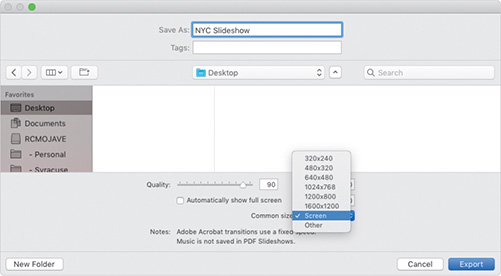
Lightroom Classic CC exports slideshows in the MP4 movie format so that you can share your slideshow movies on video sharing sites or optimize them for playback on mobile devices. Preset size and quality settings range from 480 x 270, optimized for personal media players and email, to 1080p, optimized for high-quality HD video.
In the Export Slideshow To Video dialog box, type a name for your exported video and specify a destination folder. Choose an option from the Video Preset menu, and then click Export.
A progress bar in the upper-left corner of the workspace shows the status of the export process.

Playing an impromptu slideshow
Even outside the Slideshow module you can play an impromptu slideshow. In the Library module, for instance, this makes a convenient way to see a full-screen preview of the photos you’ve just imported.
![]() Tip
Tip
To change the slideshow template used for the impromptu slideshow, right-click a template in the Slideshow module Template Browser and choose Use For Impromptu Slideshow.
The impromptu slideshow can be launched from any of the Lightroom Classic CC modules. The slide layout, timing, and transitions for the impromptu slideshow will depend on the template currently set in the Slideshow module for use with the impromptu slideshow. If you haven’t set one, it will use the current settings in the Slideshow module.
Switch to the Library module. In the Catalog panel, select Previous Import. Use the Sort menu in the Grid view Toolbar to set the sorting order to either Capture Time or File Name. Choose View > Sort > Ascending, or click the Sort Direction button beside the Sort menu, if necessary, to set an ascending sort direction (the Sort Direction button should show an “A” above a “Z”).
Select the first photo in the Grid view, then press Command+A/Ctrl+A or choose Edit > Select All to select all of the images from the previous import.
Choose Window > Impromptu Slideshow or press Command+Return/Ctrl+Enter to start the impromptu slideshow.
Use the spacebar to pause and resume playback. The slideshow will repeat, cycling through the selected images until you either press the Esc key on your keyboard or click the screen to stop playback.
![]() Tip
Tip
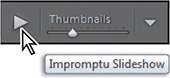
In the Library and Develop modules, you can also use the Impromptu Slideshow button in the Toolbar. If you don’t see the Impromptu Slideshow button in the Toolbar, choose Slideshow from the content menu at the right end of the Toolbar.
Well done! You have successfully completed another Lightroom Classic CC lesson. In this lesson you learned how to create your own stylish slideshow presentation. In the process, you’ve explored the Slideshow module and used the control panels to customize a slideshow template.
In the next lesson, you’ll find out how to present your work in printed format, but before you move on, take a few moments to read through my recommended settings, and then reinforce what you’ve learned by reading through the review questions and answers on the last page.
My suggested settings for a slideshow
This lesson was designed to take you through a tour of all of the features in the Slideshow module. It’s important to note that while all of the features are there, you aren’t required to use every one of them. In fact, when I create slideshows for myself, I often opt for a very stripped-down experience, but with some key changes to make sure that my branding is taken into account. I wanted to take a couple of seconds to share those changes with you here.
![]() Note
Note
You don’t have to follow along with this section. As you’re getting into the professional Lightroom user territory, you can see these sections as mere suggestions for what to do with your workflow.
I tend to want my pictures to be the center of the discussion, so select the Simple template in the Template Browser. In the Layout panel, set the margins to 72 px. In the Options panel, set the stroke border to a dark gray (R=20%, G=20%, B=20%) and the width to 1 px, and make sure that the only thing selected in the Backdrop panel is a black background color. All Overlay panel options are deselected.

Where I do dedicate a little bit of time is adding intro and ending screens in the Titles panel.
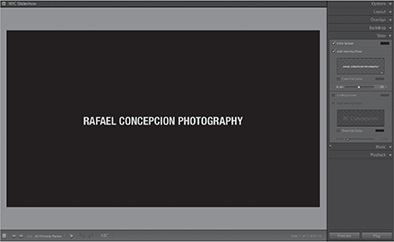
If you are presenting a slideshow to a group of people or a client, you want to be sure you make the biggest impact out of the gate. I do not want my slideshow displaying the first image until I am ready to show it. I may want to introduce the project, or speak a little before it starts.
The Intro Screen area allows you to use an identity plate with your branding information. The easiest is to select Use A Styled Text Identity Plate. Here, I chose Helvetica Neue Condensed Bold for my font, and just typed in my company’s name.
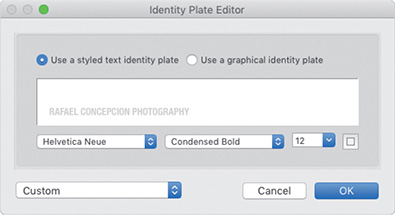
Once your identity plate is set up, you can use the Scale slider in the Titles panel to make the text bigger and fit the presentation. While the text is a good start, I want to personalize this even further.
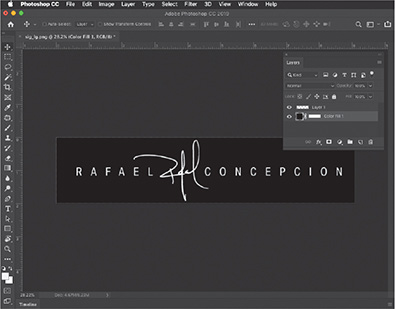
If you are using Lightroom CC, there’s a good chance you also have Photoshop available to you. I created a logo graphic in Photoshop with my signature (easy to create with a tablet and pen) and one text layer. I saved this graphic as a transparent PNG file (the color fill layer at the bottom is only there to show you how the white type looks).
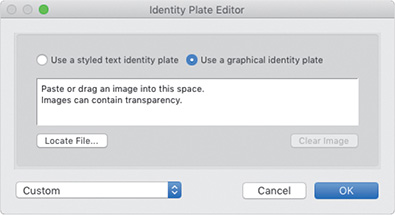
Back in the Identity Plate Editor in Lightroom CC, select Use A Graphical Identity Plate instead. Then, click the Locate File button and select the PNG image.
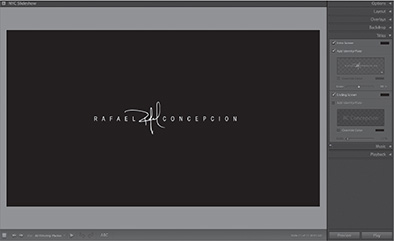
The slideshow now has my own custom branding. Select the Ending Screen option and leave it set to black. Leave Add Identity Plate unselected. When it comes to presentation time, you can start the presentation and immediately pause it. This leaves your name or logo on the screen, and lets you introduce yourself or your work before you start the show.
Review questions
1 How can you change which template is used for the impromptu slideshow?
2 Which Lightroom slideshow template would you pick if you wished to display metadata for your images?
3 What options do you have when customizing a slideshow template?
4 How does tethered text help you design your layout?
5 What is the difference between saving your customized slideshow template and saving the slideshow you’ve created?
Review answers
1 In the Slideshow module, right-click the name of a slideshow template in the Template Browser and choose Use For Impromptu Slideshow.
2 The EXIF Metadata template, which centers photos on a black background and displays star ratings and EXIF information for the images, as well as an identity plate.
3 In the right panel group you can modify the slide layout, add borders and text overlays, create shadow effects for images or text, change the background color or add a backdrop image, adjust the durations of slides and fades, and add a soundtrack.
4 Tethered text is anchored to either the outside edge of the slide, which can be used to ensure that title text appears on every page in the same place, or to the image border, which ensures that photo-specific text will appear in the same place on each photo.
5 A saved custom template records only your layout and playback settings—it is like an empty container that is not linked to any particular set of images. A saved slideshow is actually an output collection—an arranged grouping of images, saved together with a slide layout, text overlays, and playback settings.