10 Making Backups and Exporting Photos
Lesson overview
Lightroom Classic CC makes it easy to back up and export all the images and data connected with your library, streamlining your workflow and minimizing the impact of accidental data loss. You can create backup copies of your photos on external storage during import, make full or incremental backups of your photos and develop settings, or have Lightroom back up automatically. Export files in a range of formats, from images optimized for onscreen viewing to archival copies. In this lesson, you’ll learn how to:
Back up the catalog file and your entire image library.
Make incremental backups and export metadata.
Export photos for onscreen viewing or archival purposes.
Export photos to be edited in another application.
Use export presets.
Set up automated post-export actions.

This lesson will take 1 to 2 hours to complete. Please log in to your account on peachpit.com to download the files for this lesson, or go to the “Getting Started” section at the beginning of this book and follow the instructions under “Accessing the lesson files and Web Edition.” Store the files on your computer in a convenient location. Your Account page is also where you’ll find any updates to the lessons or to the lesson files. Look on the Lesson & Update Files tab to access the most current content.

Safeguard your photographs and develop settings against loss using Lightroom Classic CC’s built-in backup tools. Back up just your catalog file or your entire photo library, complete with develop settings and copies of your master files. Export photos in different file formats for multimedia presentations or email attachments, for further editing in an external editor, or to be stored for archival purposes.
Getting started
Before you begin, make sure you’ve set up the LRClassicCIB folder for your lesson files and created the LRClassicCIB Catalog file to manage them, as described in “Accessing the lesson files and Web Edition” and “Creating a catalog file for working with this book” in the “Getting Started” section at the start of this book.
![]() Note
Note
This lesson assumes that you already have a basic working familiarity with the Lightroom Classic CC workspace. If you need more background information, refer to Lightroom Classic CC Help, or review the previous lessons.
If you haven’t already done so, download the lesson10 folder from your Account page at www.peachpit.com to the LRClassicCIBLessons folder, as detailed in “Accessing the lesson files and Web Edition” in the “Getting Started” section.
Start Lightroom Classic CC.
In the Select Catalog dialog box, make sure the file LRClassicCIB Catalog.lrcat is selected under Select A Recent Catalog To Open, and then click Open.
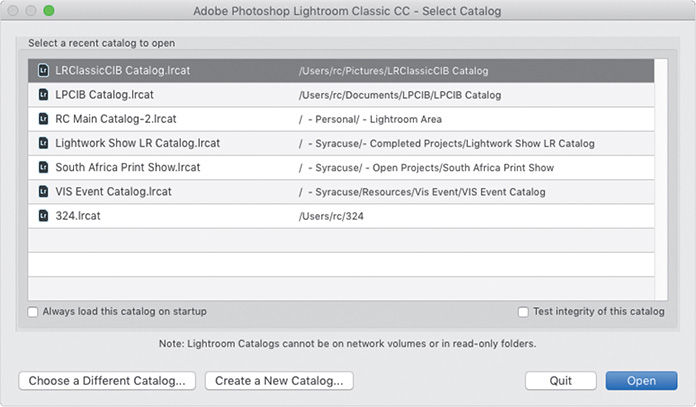
Lightroom Classic CC will open in the screen mode and workspace module that were active when you last quit. If necessary, switch to the Library module by clicking Library in the Module Picker at the top of the workspace.

![]() Tip
Tip
If you can’t see the Module Picker, choose Window > Panels > Show Module Picker, or press the F5 key. If you’re working on macOS, you may need to press the fn key together with the F5 key, or change the function key behavior in the system preferences.
Importing images into the library
The first step is to import the images for this lesson into the Lightroom library.
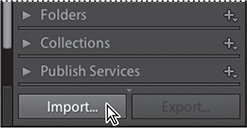
In the Library module, click the Import button below the left panel group.
If the Import dialog box appears in compact mode, click the Show More Options button at the lower left of the dialog box to see all the options in the expanded Import dialog box.

Under Source at the left of the expanded Import dialog box, locate and select your LRClassicCIBLessonslesson10 folder. Ensure that all six images in the lesson10 folder are selected (checked) for import.
In the import options above the thumbnail previews, select Add so that the imported photos will be added to your catalog without being moved or copied. Under File Handling at the right, choose Minimal from the Build Previews menu and leave the Don’t Import Suspected Duplicates option unselected. Type Lesson 10 in the Keywords text box. Make sure that your import is set up as shown in the illustration below, and then click Import.
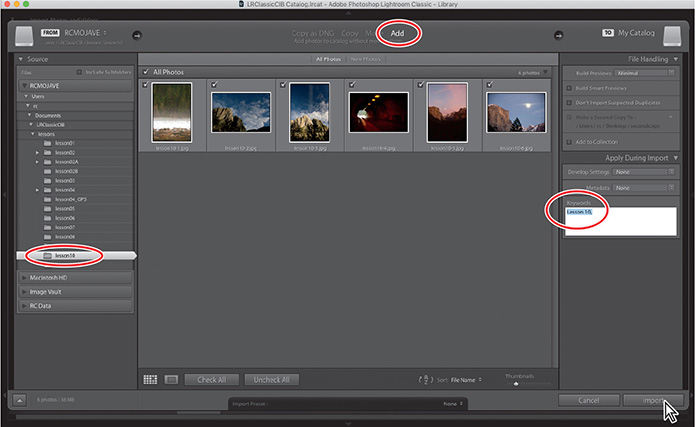
The six images are imported from the lesson10 folder, and now appear in both the Grid view of the Library module and in the Filmstrip across the bottom of the Lightroom Classic CC workspace. Create a collection called Lesson 10 and place the images in it.
Preventing data loss
The importance of a good backup strategy is often only understood too late. How much damage would be done if your computer was stolen right now? How many files would be irrecoverably lost if your hard disk failed today? How much work and money would that cost you? You can’t prevent a disaster from happening but it is in your power to reduce the risks and the cost of recovery. Backing up regularly will reduce the impact of a catastrophe and save you time, effort, and money.
Lightroom Classic CC delivers a range of options that make it easy to safeguard your photo library; as for the rest of the files on your computer, you really should have your own backup strategy in place.
Backing up the catalog file
The Lightroom catalog file stores a great deal of information for the photos in your library—not only the locations of the image files, but the metadata attached to them, including titles, captions, keyword tags, flags, labels, and ratings, together with all your developing and output settings. Every time you modify a photo in any way—from renaming the file during import to color correction, retouching, and cropping—all your work is saved to the catalog file. It records the way your images are grouped and ordered in collections, and records the publishing history, slideshow settings, web gallery designs, and print layouts associated with them as well as your customized templates and presets.
Unless you back up your catalog, you could lose hundreds of hours of work in the event of a hard disk failure, accidental deletion, or a corrupted library file, even if you do have copies of your original images stored safely on removable media. You can set Lightroom to initiate a regular backup of your catalog file automatically.
Choose Catalog Settings from the Lightroom/Edit menu. On the General tab, choose When Lightroom Next Exits from the Back Up Catalog menu.

Click the Close button/OK to close the Catalog Settings dialog box, then quit Lightroom Classic CC. If you get a dialog box asking if you really want to quit Lightroom, click Yes.
In the Back Up Catalog dialog box, click the Choose button to change the folder where the backed-up catalog will be stored. Ideally the backup should be located on a different disk than your original catalog file; for the purpose of this exercise you can select the LRClassicCIB folder on your hard disk. In the Browse For Folder/Choose Folder dialog box, select the LRClassicCIB folder as the backup directory and click Choose/Select Folder.
Make sure the Test Integrity Before Backing Up and Optimize Catalog After Backing Up options are selected. It’s a good idea to keep these options selected whenever you back up your catalog; it would defy the purpose of a backup if your original catalog file was not in good working order. Click Back Up.

![]() Note
Note
Backing up the catalog file in this way does not make backup copies of the original image files or the preview images that Lightroom Classic CC displays in the workspace. The previews will be regenerated as your catalog file is restored from the backup, but you’ll need to back up your original image files separately.
Each time you back up your catalog, Lightroom Classic CC will create a complete copy of the catalog file in the directory you specified, inside a new folder with a name composed from the date and time of the backup. To save space on your backup drive, you can either delete your older backup files or compress them. Catalog files compress very effectively; you can expect a compressed catalog to be as small as 10% of the size of the original. Make sure to decompress the file before attempting to restore your catalog from the backup.
Should your catalog be accidentally deleted or become corrupted, you can now restore it either by copying the backup file to your catalog folder or by creating a new catalog and importing the contents of your backup file. To avoid inadvertently modifying your backup file, it’s preferable not to open it directly from the Lightroom Classic CC File menu.
Start Lightroom Classic CC. In the Adobe Photoshop Lightroom - Select Catalog dialog box, make sure that the file LRClassicCIB Catalog.lrcat is selected under Select A Recent Catalog To Open, and then click Open.
Choose Lightroom > Catalog Settings/Edit > Catalog Settings.
In the Catalog Settings dialog box, click the General tab and set your preferred backup frequency by choosing from the Back Up Catalog menu.
Click the Close button/OK to close the Catalog Settings dialog box.
Exporting metadata
The catalog is a central storage location for all the information associated with every image in your library; exporting and distributing the catalog file’s content is another strategy that will lessen the impact if your catalog file is lost or damaged. By saving the information from the catalog file that is specific to each photo to the respective image file on your hard disk—and keeping this exported information in sync with your catalog file, which can be done automatically—you have, in effect, a distributed backup of the metadata and develop settings for each of your photos.
When a photo has changes to its metadata that have not yet been saved to the original image file—such as the Lesson 10 keyword tag you applied to the images for this lesson during the import process—its image cell in the Expanded Cells Grid view and the Filmstrip is marked with the Metadata File Needs To Be Updated icon.

If you don’t see the Metadata File Needs To Be Updated icon in the Grid view image cells, choose View > View Options. On the Grid View tab in the Library View Options dialog box, select the Unsaved Metadata option under Cell Icons. Click the Close button to close the Library View Options dialog box.
Select the first image in the Grid view. Right-click the thumbnail and choose Metadata > Save Metadata To File from the menu. Click Continue to confirm the operation; after a brief processing time, the Metadata File Needs To Be Updated icon disappears from the thumbnail cell.
Command-click/Ctrl-click to select the other five photos, and then click the Metadata File Needs To Be Updated icon in the image cell of any of the selected images. Click Save to update the image files on your hard disk.

After a brief processing time, the Metadata File Needs To Be Updated badge disappears from each of the image cells.
If you edit or add to an image’s metadata in another application, such as Adobe Bridge or the Photoshop Camera Raw plug-in, Lightroom Classic CC will show the Metadata Was Changed Externally icon above the thumbnail in the Grid view. To accept the changes and update your catalog file accordingly, choose Metadata > Read Metadata From Files. To reject the changed metadata and overwrite it with the information in your catalog file, choose Metadata > Save Metadata To Files.
You can update the metadata for a batch of modified images—or even for the entire catalog with all its folders and collections—by selecting the images or folders to be updated and choosing Metadata > Save Metadata To Files, as you did in step 2.
You can use the Metadata Status filter in the Filter bar to quickly find those photos in your library with changes made externally to the master files on disk, any image with a metadata conflict—with unsaved changes made by both Lightroom and another application since the file’s metadata was last updated—those with unsaved changes made in Lightroom, or images with metadata that is up to date.
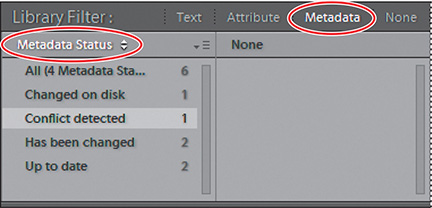
For DNG, JPEG, TIFF, and PSD file formats—which have defined spaces within the file structure where XMP information can be stored separately from the image data—Lightroom writes metadata into the image file itself. In contrast, changes made to camera raw images are written into a separate XMP sidecar file that records the metadata and develop settings exported to the image from Lightroom.
Many camera manufacturers use proprietary and undocumented formats for their raw files, some of which become outdated as new ones appear. Because of this, storing the metadata in a separate file is the safest approach, avoiding the possibility of corruption in the raw file or loss of the metadata exported from Lightroom.
From the Lightroom/Edit menu, choose Catalog Settings. On the Metadata tab select Automatically Write Changes Into XMP so that metadata is exported automatically whenever a raw image is modified; the sidecar file will always be up to date with your catalog.
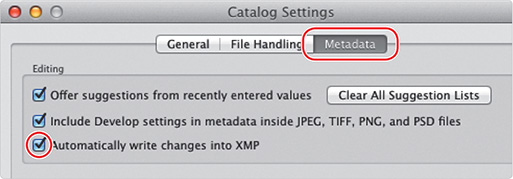
However, XMP information exported in this way contains only the metadata specific to the individual images: keywords, flags, labels, ratings, and develop settings. It does not include higher-level data relevant to the catalog as a whole such as information relating to stacks, virtual copies, and settings used in presentations.
Backing up the library
In the first exercise you backed up your catalog file without any images. In the second exercise, you updated your images files with metadata and develop information from the library catalog. This time, you’ll export your entire Lightroom Classic CC library: images, catalog, stacks, collections—the works!
Exporting images as a catalog
When you export your photos as a catalog, Lightroom creates a copy of the catalog file and gives you the option to make copies of the master files and the image previews at the same time. You can choose to export the entire library, or just a selection of your images, as a catalog. Exporting images in this way is ideal for moving your photos together with all the associated Lightroom catalog information from one computer to another. You can use the same technique to restore your entire library from a backup after a data loss.
In the Catalog panel, click All Photographs, then choose File > Export As Catalog.
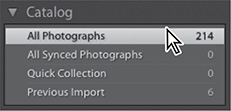
Ideally, you should save your backup files to a hard disk other than the one that stores your catalog and the master image files—but for this exercise, you can save the backup files to your desktop.
![]() Tip
Tip
Don’t be concerned if you see a message saying that Lightroom could not find photo previews for the lesson files lesson06-3.png and content-1-scale-Edit.psd; simply click past the alert to continue.
Backup in the Save As/File Name text box, then navigate to your Desktop folder. Make sure the Build/Include Smart Previews and Export Selected Photos Only options are unselected, and that Export Negative Files and Include Available Previews are selected. Click Export Catalog/Save.

A progress bar is displayed at the upper left as the new catalog is being created; for such a small catalog, backing up should take only a few seconds. Lightroom copies the image files associated with the catalog to their new location as a background task.
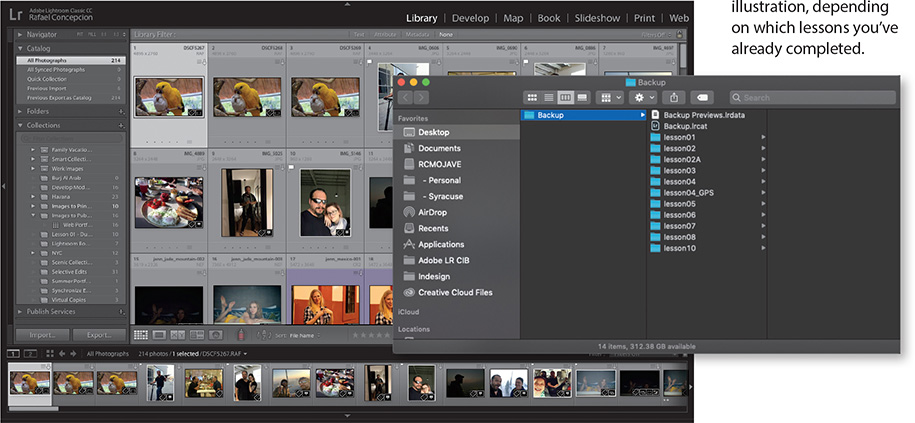
When the export process is complete, switch to the Finder/Windows Explorer and navigate to your desktop. Open the new Backup folder.
![]() Note
Note
You may see a different set of folders than is shown in the illustration, depending on which lessons you’ve already completed.
You can see that the folder structure nested inside the Backup folder replicates the arrangement of folders you see in the Folders panel. All the master images in your Lightroom Classic CC library have been copied into these new folders and the file Backup.lrcat is a fully functional copy of your original catalog.
In Lightroom Classic CC, choose File > Open Catalog. In the Open/Open Catalog dialog box, navigate to the new Backup folder inside your Desktop folder. Select the file Backup.lrcat, and then click Open. If the Open Catalog dialog box appears, click Relaunch. Lightroom will open the backup catalog.
Other than the filename in the title bar of the workspace, this catalog will be almost indistinguishable from your original work catalog. Only some temporary status information has been lost; for example, in the Catalog panel you can see that the Previous Import folder is now empty, as is the listing for All Synced Photographs. You can sync only one catalog from Lightroom Classic CC, so any synced collections in your work catalog will not be marked as synced here.
Some of your preferences have been reset to defaults that may differ from the choices you’ve made for your LRClassicCIB catalog. Choose Catalog Settings from the Lightroom/Edit menu. Click the General tab in the Catalog Settings dialog box. You can see that the backup frequency has been reset to the default. Click the Close button/Cancel to close the Catalog Settings dialog box.
Choose File > Open Recent > LRClassicCIB Catalog.lrcat. In the Open Catalog dialog box, click Relaunch. If the Back Up Catalog dialog box appears, click Skip This Time.
Exporting photos
The backup techniques that we’ve discussed so far all produce backup files that can be read only by Lightroom or another application that is capable of reading and interpreting the exported XMP metadata. If you wish to send your work to somebody who doesn’t have Lightroom installed on their computer, you’ll first need to convert the images to an appropriate file format. This is comparable to saving a Word document as plain text or as a PDF document for distribution; some of the functionality is lost, but at least the recipient can see what you’re working on. Your choice of file format will depend on the purpose for which the images are intended.
To export a photo for use as an email attachment intended to be viewed onscreen, use the JPEG file format and minimize the file size by reducing the resolution and dimensions of the image.
To export an image to be edited in another application, convert the photo to either the PSD or TIFF file format at full size.
For archival purposes, export the images in their original file format or convert them to DNG.
Exporting JPEG files for onscreen viewing
For this exercise, you’ll use a saved preset to edit the lesson images before you export them so that you’ll be able to see at a glance that your develop settings have been applied to the exported copies.
Select the Lesson 10 collection in the Collections panel, and choose Edit > Select All. From the Saved Preset menu at the top of the Quick Develop panel, choose User Presets > Kena.
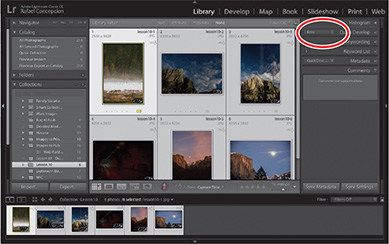
With all six images still selected in the Grid view, choose File > Export from the menu. You can also right-click any of the images and select Export > Export, or click the Export button at the lower left.

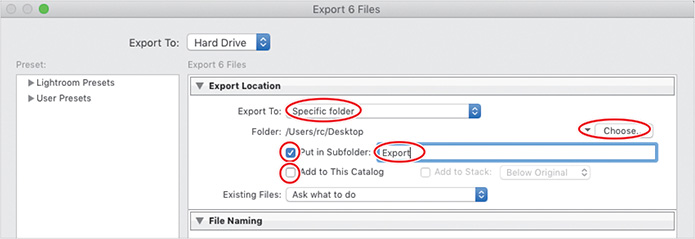
Under Export Location in the Export dialog box, choose Specific Folder from the Export To menu, and then click the Choose button below it to specify a destination folder (see illustration after step 4). Navigate to your desktop and click Choose/Select Folder.
Select the Put In Subfolder option and type Export as the name for the new subfolder. Deselect the Add To This Catalog option.
![]() Tip
Tip
If you are asked whether Lightroom should overwrite the information embedded in the image files, click Overwrite Settings.
Under File Naming in the Export dialog box, select the Rename To option, then choose Date - Filename from the menu.
Under File Settings, choose JPEG from the Image Format menu and set a Quality value of between 70% and 80%—a range that generally makes an acceptable compromise between image quality and file size. From the Color Space menu choose sRGB. The sRGB color space is a good choice for images intended to be viewed on the web, or in other circumstances where you are unsure what form of color management is used, if any at all.

Scroll down in the Export dialog box, if necessary, so that you can see the Image Sizing controls. Select the Resize To Fit option and choose Width & Height from the menu. Enter 1,500 for both width (W) and height (H) and choose Pixels from the units menu. This will proportionally scale each image so that its longest side is 1500 pixels. Our lesson images are all larger than this, so you won’t need to select Don’t Enlarge to avoid smaller images being upsampled. Set the Resolution to 72 Pixels Per Inch—although resolution settings are generally ignored for onscreen display. The reduction in file size is the result of reducing the total number of pixels that make up the image.

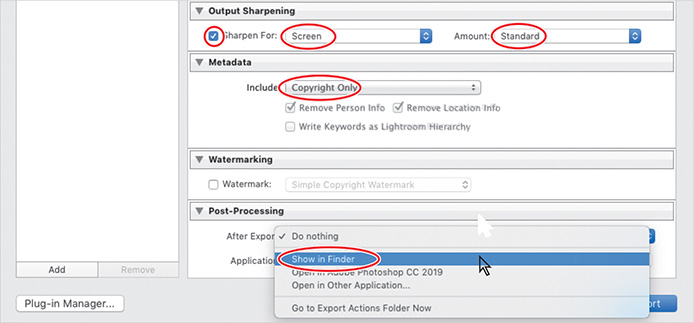
In the Output Sharpening settings, select the Sharpen For option, choose Screen, and set the Amount to Standard. Under Metadata, choose the Copyright Only option. Note the other options available under Metadata; even with the All metadata option selected, you can still protect your privacy by removing GPS location information. Deselect Watermark. Choose Show In Finder/Show In Explorer from the After Export menu under Post-Processing.
![]() Note
Note
To have Lightroom notify you by playing a sound when the export process is complete, choose a sound from the menu under Completion Sounds on the General tab in the Preferences dialog box.
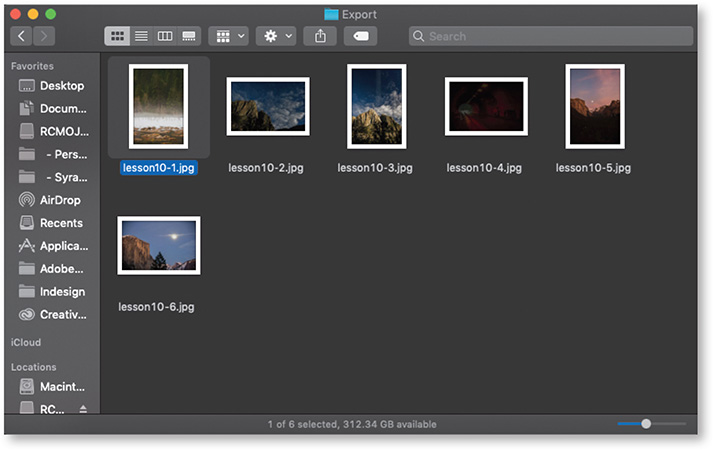
Click Export, then watch the progress bar on the left side of the top panel in the workspace. When the export process is complete, your Export folder on the desktop will open in macOS Finder/Windows Explorer.
In Windows Explorer, show the Preview Pane or click Slideshow view to see a preview of the images in the folder. In the macOS Finder, select an image in Column view or in Cover Flow to see its preview. You can see that the Kena preset has been applied to these copies of the lesson photos during the export process. The copies are 1500 pixels wide and have much reduced file sizes.
Delete the images from the Export folder, then return to Lightroom Classic CC. With the six images still selected, choose Edit > Undo Kena to revert all six images to their original colors.
Exporting as PSD or TIFF for further editing
In the Grid view, choose Edit > Select None, and then click to select lesson10_1. In the right panel group, expand the Quick Develop panel and choose Creative > Soft Mist from the Saved Preset menu.

![]() Tip
Tip
To export more images using the same settings that you used for the previous export (and without calling up the Export dialog box) choose File > Export With Previous.
Choose File > Export. In the Export dialog box, you’ll notice that all your settings from the previous exercise are still in place.
In File Settings, choose TIFF from the Image Format menu. When saving in TIFF format, you have the option to apply ZIP data compression—a lossless form of compression—to reduce the resulting file size. From the Color Space menu, choose AdobeRGB (1998).

![]() Tip
Tip
Choose your preferred external editor, file format, color space, bit depth, compression settings, and file naming options on the External Editing tab of the Preferences dialog box. In the Lightroom Classic CC workspace, choose Photo > Edit In, and then choose your preferred external image editing application from the menu. Lightroom will automatically export an image in the appropriate file format, open it in the external editor, and add the converted file to the Lightroom library.
When you intend to edit an image in an external application after exporting it, you should use the AdobeRGB (1998) color profile rather than the sRGB color profile. The AdobeRGB (1998) color profile has a larger color gamut, which results in fewer colors being clipped and the original appearance of your images being better preserved. The ProPhoto RGB color gamut is even larger, capable of representing any color from the original raw image. However, to correctly display images using the AdobeRGB (1998) or ProPhoto RGB color profiles onscreen, you need an image editing application capable of reading these color profiles. You’ll also need to turn color management on and calibrate your computer display. Without taking these measures, your images will look bad onscreen with the AdobeRGB (1998) color profile—and even worse with ProPhoto RGB.
Change the image format to PSD. Choose 8 Bits/Component from the Bit Depth menu. Unless you have a particular need to output 16-bit files as part of your workflow, 8-bit files are smaller and compatible with more programs and plug-ins, but do not preserve fine tonal detail as well as 16-bit files. Lightroom actually operates in a 16-bit color space, but by the time you’re ready to export images, you’ve usually already made any important corrections or adjustments that were necessary, so you won’t lose much in terms of editing capability by converting the files to 8-bit for export.

In Image Sizing, deselect Resize To Fit and set the Resolution to 300 pixels per inch, to match the original image; to preserve all the image information for further editing, we wish to export every pixel of the source file.
Leave the Output Sharpening and Metadata settings unchanged. If you have Adobe Photoshop installed on your computer, choose that application from the After Export menu in the Post-Processing options. Alternatively, choose Open In Other Application, and then click Choose to select your preferred image editor. Click Export.
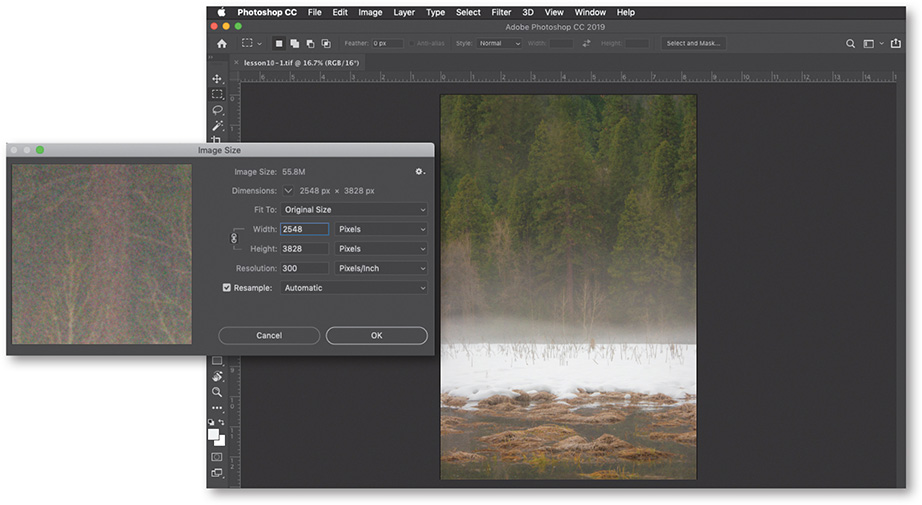
Wait until the export is complete and the photo has opened in the external editor. The image has been exported with the Creative presets Soft Mist preset that you applied in the Quick Develop panel. Its dimensions are the same as those of the original image—3000 by 2000 pixels.
Quit the external editor, delete the file from the Export folder in the Finder/Windows Explorer, and then return to Lightroom Classic CC.
Exporting as original or DNG for archiving
![]() Note
Note
When you choose to export images in DNG file format, you have additional options that affect the way the DNG files are created, but the original image data remains essentially unchanged.
Navigate to the Develop Module Practice collection in the Collections panel and select lesson05_008, the picture of the antique car in Bodie.
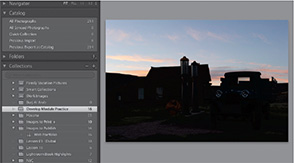
Choose File > Export. In the Export dialog box, under Export Location, deselect Put In Subfolder and simply export the image to the desktop.
In File Settings, choose Original from the Image Format menu. Note that there are now no other File Settings, Image Sizing, or Output Sharpening options available; Lightroom will export the original image data unaltered.
In the Post-Processing options, choose Show In Finder/Show In Explorer from the After Export menu, then click Export.
When the export process completes, the folder opens in the Finder/Windows Explorer. In the Finder/Windows Explorer window, note that an XMP sidecar file has been saved together with the copy of the RAW image file, which was originally provided without an XMP file. The XMP file records changes to the image’s metadata (the keyword you added at import) as well as its detailed editing history (the Quick Develop adjustments you made).

In the Finder/Windows Explorer, delete both files from the Desktop folder, and then return to Lightroom Classic CC.
Using export presets
Lightroom Classic CC provides presets for commonly performed export tasks. You can use any preset as is or as a starting point for setting up your own.
If you find yourself performing the same operations over and over again, you should create your own presets to automate your workflow.
Navigate back to the Lesson 10 collection in the Library module. In the Grid view, select any of the images and then choose File > Export.
In the list of presets on the left side of the Export dialog box, choose For Email from the Lightroom Presets.
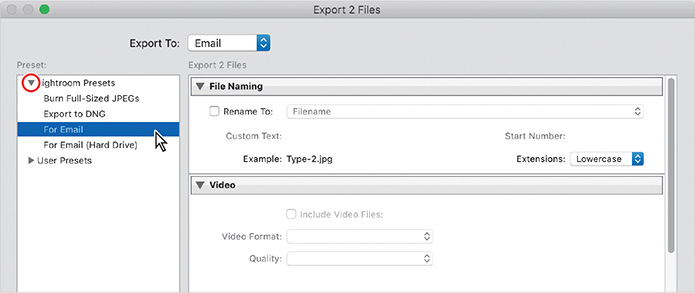
Examine the settings associated with this preset. With the current File Settings, an exported file will be an sRGB JPEG file with a Quality setting of 60 (%). Under Image Sizing, the exported image is set to be scaled down so that its longest side will be 500 pixels. Output Sharpening and Watermarking are unselected and the Metadata options are set to export copyright details only. Note that there are no export location settings or post-processing settings.
![]() Tip
Tip
For more detail on exporting photos as email attachments, see “Sharing your work by email” in Lesson 1.
Lightroom will export the image directly to an email, so there are no export location settings associated with this preset. Post-processing options are also unnecessary—Lightroom automatically generates an email and attaches the photo, and your email is sent from within Lightroom, with no need to launch an email client.
In the list of presets on the left side of the Export dialog box, click to select the Burn Full-Sized JPEGs export preset.
Note the changes in the export settings. CD/DVD is now selected in the Export To menu at the top of the Export dialog box, instead of Email (so, once again, export location settings are redundant). Under File Settings, the JPEG Quality setting has been set to 100 (%).
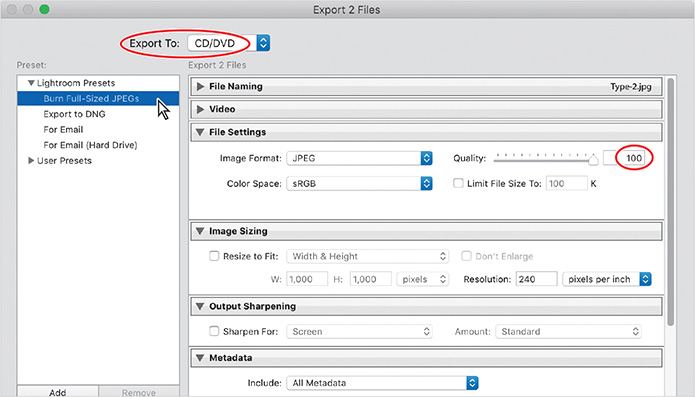
Scroll down to examine the rest of the preset options. Under Image Sizing, the Resize To Fit option is unselected, and the file will be exported with all of its metadata, except for People tags and GPS location information.
You can adjust any of the preset settings if you wish, and then save your custom configuration as a new preset by clicking the Add button below the Presets list.
Creating user presets
You can save your customized export settings as a new user preset. Export presets are always available from the File menu (File > Export With Preset), where you can start your export without opening the Export dialog first. Let’s create a preset that will export an image suitable to posting for Facebook. The preset will save an image to the desktop at 1400 pixels on the long edge, that has a JPEG quality of 85, and uses the sRGB profile.
Navigate to your Images to Publish collection and select the lesson10-6 image. Click the Export button at the lower left of the Library module.

To export the images, follow the settings outlined in the image to the right. The only settings that need changing are:
Top Export To: Hard Drive
Export To: Specific Folder
Folder: Desktop
File Settings: JPEG
Color Space: sRGB
Resize To Fit: Long Edge
Pixels: 1400
Resolution: 72 pixels per inch
All of the other settings can stay unselected.
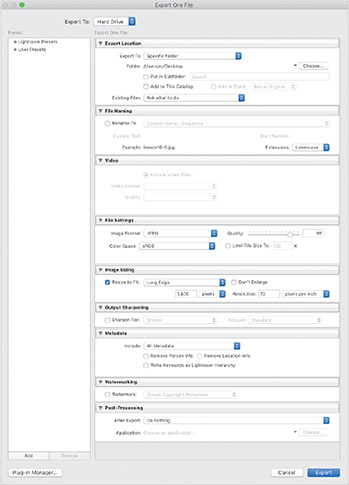
Click the Add button at the lower left of the Export dialog box and give the preset a name—I am going to call this one “Facebook Export 1400px”—and click Create. Now that we have the preset set, click Cancel in the Export dialog box.

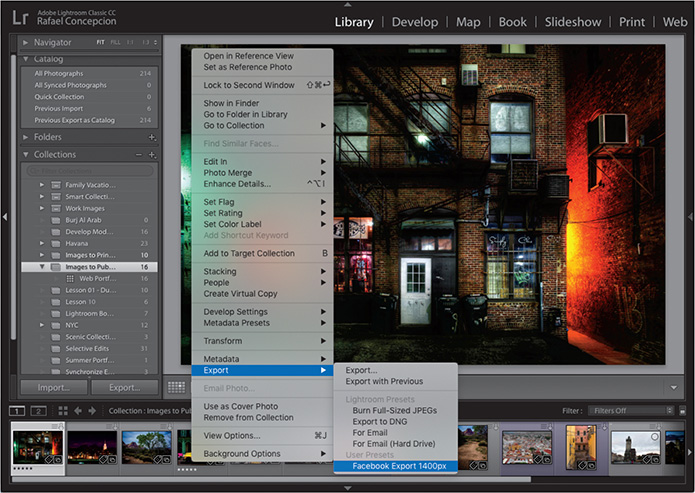
With the image still selected, right-click it, scroll down to Export, and you’ll see the new Facebook Export 1400px in the list. This will make it easier to save pictures with just the right settings whenever you need them.
Congratulations! You’ve completed this lesson on backing up your Lightroom Classic CC files, and exporting your images. You’ve learned how to use the built-in catalog backup feature and to save metadata to your files. You’ve backed up all your images by exporting them as a catalog, and exported them individually for viewing onscreen, for further editing, and for archiving. You have also used and created your own export presets.
Before you move on to the next lesson, take a moment or two to review some of your new skills by reading through the questions and answers on the next pages.
Review questions
1 What are the two basic components of your photo library that need to be backed up?
2 How can you move a selection of images or your entire image library with all the associated catalog information from one computer to another?
3 How can you tell if any updated metadata have been saved to a file?
4 How would you choose between file formats for exporting your photos?
5 How do you create your own export preset?
Review answers
1 The two basic components of the image library are the original image files (or master files) and the library catalog file, which records all the metadata and the complete editing history for every image in the library as well as information about collections, user templates and presets, and output settings.
2 On one computer, use the Export As Catalog command to create a catalog file together with copies of the original images and the available previews. On the other computer, go to File > Open Catalog, navigate to your exported file, select the exported .lrcat file, and choose to open it.
3 In Grid view and in the Filmstrip, any images that have metadata to be saved will display the Metadata File Needs To Be Updated icon. You can also find any files that need to be updated by using the Metadata Status filter in the Filter bar.
4 The appropriate choice of a file format depends on the intended use of the exported images. To export images for onscreen viewing as email attachments, you’d use the JPEG file format and minimize the file size. To export an image to an external image editing application, you’d use PSD or TIFF and export the image at full size. For archival purposes, export the images in their original format or convert them to DNG.
5 Open the Export dialog box, change the settings to your liking, then click the Add button at the lower left of the dialog box. In the New Preset dialog box, name your preset, and click Create.
