1 A Quick Tour of Lightroom Classic CC
Lesson overview
This lesson starts with a quick look behind the scenes to show you how Lightroom Classic CC makes it easy to navigate, search, and manage your ever-growing image library and frees you to work on your photos without damaging the original files. The exercises then provide a hands-on introduction to Lightroom, familiarizing you with the workspace as they guide you through a typical workflow:
Bringing photos into Lightroom Classic CC.
Reviewing and comparing photos.
Sorting and organizing your image library.
Adjusting and enhancing photos.
Sharing your work.

This lesson will take 1 to 2 hours to complete. Please log in to your account on peachpit.com to download the files for this lesson, or go to the “Getting Started” section at the beginning of this book and follow the instructions under “Accessing the lesson files and Web Edition.” Store the files on your computer in a convenient location. Your Account page is also where you’ll find any updates to the lessons or to the lesson files. Look on the Lesson & Update Files tab to access the most current content.
Note: The downloaded lesson images won’t appear in Lightroom until you’ve imported them into the library catalog file; you’ll do that in the exercise “Importing photos,” after the overview that begins this lesson.
Whether you’re a beginner or a professional, Lightroom Classic CC delivers a complete desktop-based workflow solution for today’s digital photographer, allowing you to work more efficiently and bring out the very best in your images.
Understanding how Lightroom works
Working with Lightroom Classic CC will be easier and more productive if you have an overview of how Lightroom works—and how it differs from other image processing applications in the way it handles your pictures.
About catalog files
In order to work with a photo in Lightroom Classic CC you must first bring it into your library catalog by importing it.
Think of the Lightroom catalog as a master notebook that keeps track of the location of your pictures (hard drive, external drives, network-attached storage), as well as what you’ve done to these pictures (rank, sort, pick, develop, etc.). This digital notebook keeps track of all of the changes you make inside the catalog file, and never touches the original images. This allows you to work with images more quickly and offers you better ways to organize and sort your growing photographic library.
A single catalog can easily manage thousands of files (my catalog file manages more than 350,000 images), but you’re free to create as many catalogs as you wish and switch between them. The one thing to consider is that you will not be able to work with or search for images across multiple catalogs. Because of this, I recommend that you keep all of your images in one catalog.
Managing the photos in your catalog
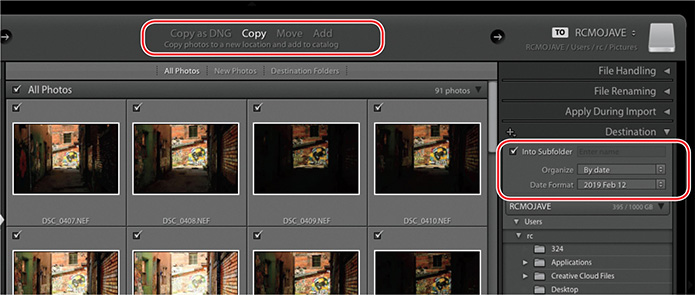
Lightroom Classic CC lets you organize your photos right from the point of import; you can choose to add photos to your catalog without moving the image files from where they live on a hard drive, copy them to a new location leaving the originals intact, or move them and delete the originals to avoid duplicating files. If you choose to copy or move your files during the import process, you have the option to select how folders are structured in your new location.
During this import process, Lightroom can rename your images, create backup duplicates (your digital negatives), attach keywords and other metadata, and even apply develop presets—all before you’ve opened a single image!
![]() Note
Note
You’ll learn more about setting up import options in Lesson 2, “Bringing Photos into Lightroom. Classic CC.”
The Library module will let you organize your images, and attach keywords and captions. Additionally, you can separate and organize your images by using pick flags, and star and color ratings—both on single images or a group of images—in no time at all. Lightroom even gives you the option to sort images by places on a map or to sort by face. All of this information goes into your digital notebook, giving you access to it whenever you need it.
Managing files and folders
While all of this is quite useful, I’ll add a word of caution. If you wish to rename or move an image file or folder that you’ve already imported into your catalog or any folder containing photos from your library, you should always do so from within Lightroom so that the changes can be tracked in the catalog. If you make these changes outside of Lightroom, it will no longer be able to find them (we’ll talk about how to recover them later).
Non-destructive editing
While storing information about your images in a central catalog makes it easy to navigate, search, and manage your photo library, the greatest benefit of this catalog file is that your edits are non-destructive. When you modify or edit a photo, Lightroom makes a record of each step you take in the catalog file, rather than saving changes directly to the image. This ensures that the original raw data is always safe. I like to think of it like this: the raw data is my ingredients, but the recipe is what I save in my notebook (catalog file).
Non-destructive editing not only frees you to experiment with your photos without fear of losing information from the original files, but also makes Lightroom a very powerful editing environment. All of your edits remain “live,” so you can return at any time to undo, redo, or tweak any modification that you’ve made; Lightroom applies your edits permanently only to output copies—and it does that quickly.
Editing photos in another application
Should you wish to edit an image from your catalog using an external program, always launch the process from within Lightroom so that Lightroom can keep track of changes made to the file. For a JPEG, TIFF, or PSD image, you have the option to edit the original file or a copy—either with or without the adjustments that you’ve already applied in Lightroom. For other file formats, you can edit a copy to which your Lightroom adjustments have already been applied. The edited copy will automatically be added to your catalog.
![]() Tip
Tip
You can specify your favorite external editors in the External Editing preferences; your choices will appear in the Photo > Edit In menu. If you have Photoshop installed on your computer, it will be listed by default.
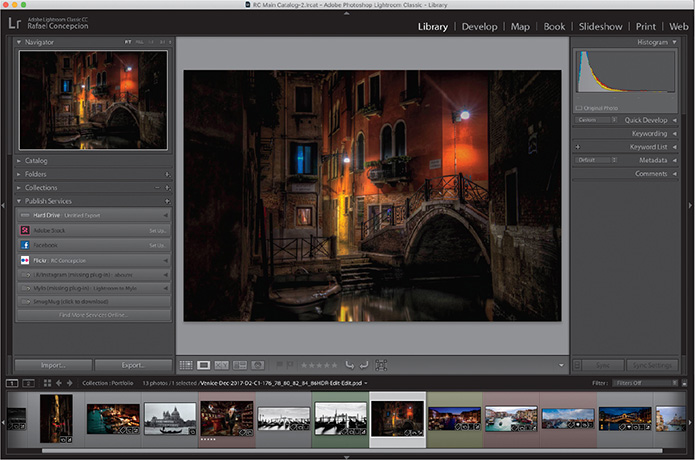
The Lightroom Classic CC workspace
Lightroom is split into seven main panels. At the center of the program is the preview and work area, and panel groups appear to the left and right of it. Directly above the work area and to the left is the identity plate. The Module Picker sits above and to the right. Finally, the area beneath the work area is the Toolbar, and below that, across the bottom of the workspace, the Filmstrip.
![]() Note
Note
The illustration at the right shows the macOS version of Lightroom. On Windows, the workspace is the same, except for minor differences between the two operating systems; on Windows, for example, the menu bar is located under the title bar, whereas on macOS it’s anchored at the top of the screen.
This visual arrangement of panels is identical in all of the seven modules. Only the contents of the panels vary from module to module.
The top panel
The top panel displays an identity plate on the left and the Module Picker on the right. This identity plate can be customized to feature your own company name or logo and will be temporarily replaced by a progress bar whenever Lightroom is performing a background process (clicking the progress bar brings up a menu that shows you the processes Lightroom is working on). To the right, you’ll use the Module Picker to move between the different modules by clicking their names. Finally, the name of the currently active module is always highlighted in the Module Picker.
![]() Tip
Tip
The first time you enter any of the Lightroom modules, you’ll see module tips that will help you get started by identifying the components of the Lightroom workspace and stepping you through the workflow. Dismiss the tips by clicking the Close button. To reactivate the tips for any module, choose [Module name] Tips from the Help menu.
The work area
The main preview and work area sits at the center of Lightroom—you’ll spend most of your time here. This is where you select, review, sort, compare, and apply adjustments to your images, and where you preview the work in progress. This center window will change as you move across modules, showing you book designs, slideshow presentations, web galleries, and print layouts as needed.
The Toolbar
Underneath the work area is the Toolbar. This toolbar will offer a different set of tools and controls for each of the modules. You can customize the Toolbar for each module independently to suit your needs, choosing from a variety of tools and controls for switching viewing modes; setting ratings, flags, or labels; adding text; and navigating through preview pages. You can show or hide individual controls, or hide the Toolbar altogether until you need it.
![]() Tip
Tip
You can show and hide the Toolbar by pressing the T key
Here, we see the Toolbar for the Library module, with the view mode buttons at the left, and a selection of task-specific tools and controls that can be customized by choosing from the menu at the far right of the Toolbar.

Tools and controls that are currently visible in the Toolbar have a check mark beside their names in the Select Toolbar Content menu. The order of the tools and controls from left to right in the Toolbar corresponds to their order from top to bottom in the menu. Most of the options presented in the Toolbar are also available as menu commands or keyboard shortcuts.
The Filmstrip
The Filmstrip gives you access to all of the images in your catalog or collection at any stage in your workflow. You can use the Filmstrip to quickly navigate through a selection of images, or to switch between different sets of images without returning to the Library module.
![]() Tip
Tip
If you don’t see the Filmstrip across the base of the workspace, choose Show Filmstrip from the Window > Panels menu, or press the F6 key.
You can work directly with the thumbnails in the Filmstrip—just as you do in the Library module’s Grid view—to assign ratings, flags, and color labels, apply metadata and develop presets, and rotate, move, or delete photos.

By default, the Filmstrip displays the same set of images as the Grid view in the Library module; it can show every image in the library, the contents of a selected source folder or collection, or a selection filtered by a range of search criteria.
The side panels
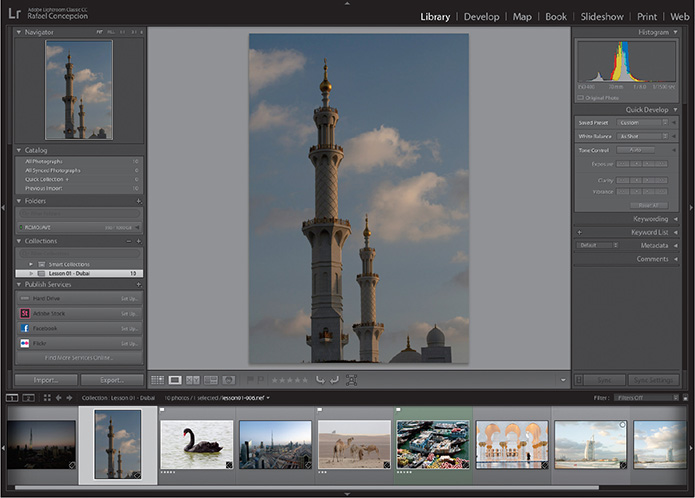
As you move from module to module, the content of the side panels will change, offering you tools specific to that module. A quick way to think of this layout is that the panels in the left group of any module help you navigate to, preview, find, and select images, while panels in the right group allow you to edit or customize the settings for your selected photo.
In the Library module, for example, you’ll use the panels on the left, below the Navigator preview (Catalog, Folders, Collections, and Publish Services), to locate and group the images you want to work with or share, and the panels on the right, below the Histogram panel (Quick Develop, Keywording, Keyword List, Metadata, and Comments), to apply changes to your selected photo.

In the Develop module, you’ll choose develop presets on the left, and fine-tune their settings on the right. In the Slideshow, Print, and Web modules, you’ll select a layout template on the left, and customize its appearance on the right.

Customizing the workspace
As you spend more time working through Lightroom, you’ll notice that you won’t work with every single panel. Thankfully, you have the option to quickly modify the layout of each of the panels to your specific workflow. Keep in mind that the configuration of each of the layouts is on a module-by-module basis. This is a good thing, as your needs will vary as you move across the modules.
![]() Tip
Tip
Make sure you check out the downloadable content to see a video on how to customize your workspace. See the “Getting Started” section at the beginning of the book for how to access them.
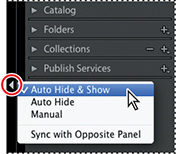
Click the outer margin at the top, sides, and bottom of the workspace (the black bar with the gray triangle at its center), or use the commands and shortcuts listed in the Window > Panels menu, to show or hide any of the panels that surround the work area. Right-click the side and bottom margins, and in the menu, you can set the side panels or the Filmstrip to show and hide in response to your pointer movements so that information, tools, and controls appear only when you need them. You can also drag to adjust the width of the side panel groups or the height of the Filmstrip panel as needed.
You can expand any of the panel groups on the right and left sides by clicking the triangle beside their name. Right-click any panel header to access a menu where you can hide panels you seldom use, creating more space for those you access more often, or reduce clutter by choosing Solo Mode so that all the panels other than the one you’re working with close automatically.
![]() Note
Note
The December 10, 2018, release of Lightroom Classic CC introduced the ability to reorganize the panels in the Develop module. We’ll cover how (and why) to set up your own configuration in the Develop module lesson.
The View > Grid View Style menu and the Library View Options dialog box (View > View Options) allow you to customize the appearance of the thumbnail image cells in the Grid view. You can have thumbnails displayed in either compact or expanded cells, and specify how much information about the images will be shown for each view style.
If you use a second monitor, click the Second Window button (the rectangle with a “2” inside, located at the upper left of the Filmstrip) to set up an additional view that is independent of the module and view mode on your main monitor. You can use the view picker at the top of secondary display, or right-click the Second Window button to access its menu, to customize the view and the way it responds to your actions in the main workspace.
![]() Tip
Tip
To choose from a more limited set of display options for the thumbnails in the Filmstrip, right-click the Filmstrip and choose View Options from the menu.
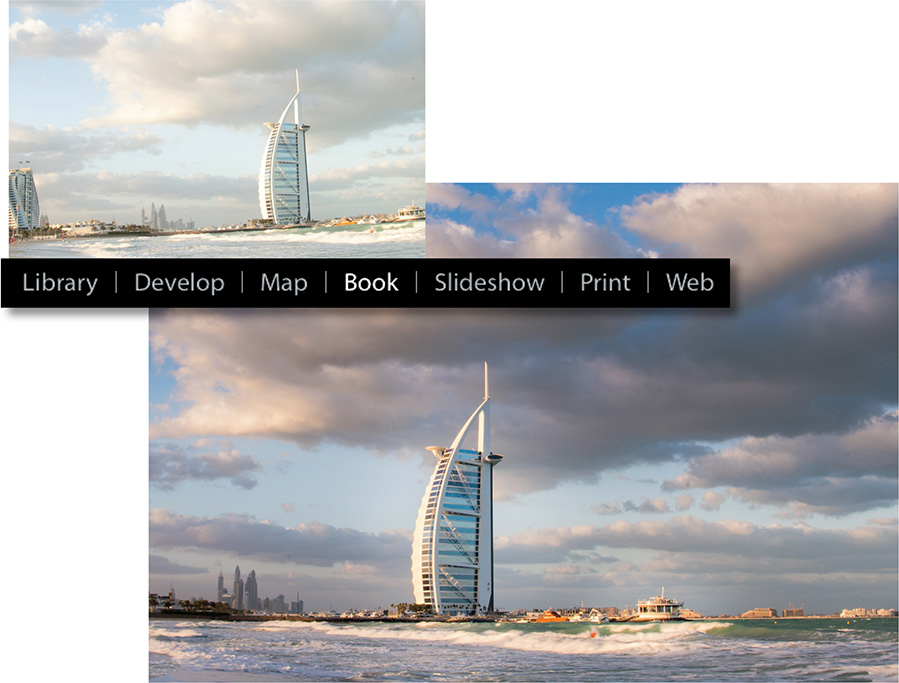
The Lightroom Classic CC modules
Lightroom Classic CC has seven modules: Library, Develop, Map, Book, Slideshow, Print, and Web. Each module offers a set of tools for a different phase of your workflow: the Library for importing, organizing, and publishing your photos, the Develop module for correcting, adjusting, and enhancing images, and specialized modules for creating stylish presentations for screen, print, or web.
Use the Module Picker, or the commands and keyboard shortcuts listed in the Window menu, to move between each of these modules as you work.

The Lightroom Classic CC workflow
The Lightroom Classic CC interface makes it easy to manage every stage of your workflow, from image import to the final print:
Import In the Library module, you can import images from your memory card, hard disk, storage media, or directly into your Lightroom catalog through a tethering session.
Organize You can attach keywords and other metadata to your photos during the import process, making this task much quicker. Once the photos have been added to your catalog, use the Library and Map modules to manage them—to tag, sort, and search your image library and create collections to group your photos. You can even share these collections online with others, providing feedback on your images.
Process Crop, adjust, correct, retouch, and apply effects to your images one at a time or en masse in the Develop module.
Create In the Book, Slideshow, Print, and Web modules, you can put together polished presentations and layouts to showcase your work.
Output The Book, Slideshow, Print, and Web modules each have their own output options and export controls. The Library module hosts the Publish Services panel for sharing your images online. With each of these, you have the opportunity to export the right image, at the right resolution, for the right task.
In the exercises that follow, you’ll go through a typical workflow as you familiarize yourself with the Lightroom Classic CC workspace.
![]() Tip
Tip
If you wish to process your images further in your favorite pixel-based editor as part of your workflow, you can launch an external application from inside the Library or the Develop module and Lightroom will keep track of the changes that you make.
Importing photos
You can import photos into your Lightroom Classic CC library from your hard disk, from your camera or memory card reader, or from external storage media. (We’ll cover this in a lot more detail in Lesson 2.)
Before you start on the exercises, make sure you’ve set up the LRClassicCIB folder for your lesson files and created the LRClassicCIB Catalog file to manage them, as described in “Accessing the lesson files and Web Edition” and “Creating a catalog file for working with this book” in the “Getting Started” section at the beginning of this book.
If you haven’t already, log in to your peachpit.com account to download the files for this lesson, or follow the instructions under “Accessing the lesson files and Web Edition” in the “Getting Started” section.
Start Lightroom Classic CC. In the Select Catalog dialog box, make sure that the file LRClassicCIB Catalog.lrcat is selected in the list of recently opened catalogs, and then click Open.
Lightroom Classic CC will open in the screen mode and workspace module that were active when you last quit. If necessary, switch to the Library module by clicking Library in the Module Picker at the top of the workspace.
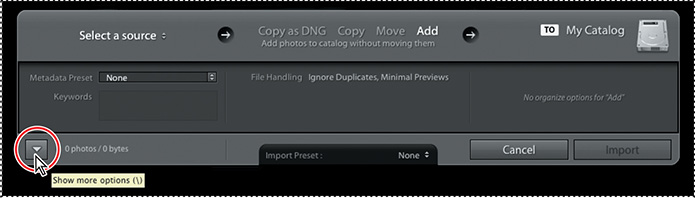
Choose File > Import Photos And Video. If the Import dialog box appears in compact mode, as shown in the illustration below, click the Show More Options button at the lower left of the dialog box to access all of the options available in the expanded Import dialog box.
![]() Tip
Tip
If you can’t see the Module Picker, choose Window > Panels >
Show Module Picker, or press the F5 key. Note that in macOS, the function keys are assigned to specific operating system functions by default and may not work as expected in Lightroom. If you find this to be the case, either press the fn key (not available on all keyboards) together with the F5 key, or change the keyboard behavior in the system preferences.
The layout of the header bar of the Import screen reflects the steps in the import process: working from left to right, first specify the source location of the files you wish to import; next, select the appropriate type of import, and then designate a destination (for Copy and Move imports) and set batch processing options.
In the Source panel at the left of the expanded Import dialog box, navigate to the Lessons folder inside the LRClassicCIB folder on your hard disk.
Select the lesson01 folder. Click the Check All button at the lower left of the preview grid to ensure that all of the images in the lesson01 folder are selected for import.
In the import options just above the thumbnail previews, click Add so that the imported photos will be added to your catalog without being moved or copied.
In the File Handling panel at the right of the expanded Import dialog box, choose Minimal from the Build Previews menu. Disable the Build Smart Previews option and ensure that Don’t Import Suspected Duplicates is selected.
In the Apply During Import panel, choose None from both the Develop Settings menu and the Metadata menu, and then type Lesson 01, Dubai (including the comma) in the Keywords text box. Make sure that your import is set up as shown in the illustration below, and then click Import.

Thumbnails of the Lesson 1 images appear in the Grid view of the Library module and also in the Filmstrip at the bottom of the workspace. If you don’t see the Filmstrip, press the F6 key or choose Window > Panels > Show Filmstrip.
Reviewing and organizing
When you’re working with a library with many images, you’ll need to be able to find exactly what you’re looking for quickly. Lightroom provides multiple tools that make organizing and finding your files easy.
I make it a habit of going through my images immediately to sort them into groups and place them into collections. Investing a little time on the front end can help you later by making it easier to find what you need.
You’ve already taken the first step toward structuring your catalog by tagging the lesson images with the keyword Dubai as they were imported.
Tagging photos with keywords is an intuitive and versatile way to organize your catalog, because it lets you sort and search your library based on whatever words you choose to associate with your images, making it easy to find the files you need, regardless of how they are named or where they are located.
About keywords
Keyword are labels (such as desert or Dubai) that you can attach to your images to make them easy to find and organize. Shared keywords create virtual groupings within your library, linking photos by association, although the image files may actually be stored in many separate locations.
Assign one or more keywords to your images and you can easily retrieve them by searching your library using the Metadata and Text filters located in the Filter bar across the top of the work area.
You can use keywords to sort your photos into photographic categories, organizing them according to content by tagging them with the names of people, places, activities, or events. The key here is to tag your images with general keywords to start, and then add more refined keywords later on in the organizational process.
Attach multiple keywords to your images to make retrieving the pictures you want even easier: you could quickly find all the photos that you’ve tagged with the keyword Dubai, and then narrow the search to only those that are also tagged desert. The more tags you attach to your photos, the more chances you have of finding exactly the right image when you need it.
For more on working with keywords, see Lesson 4, “Managing Your Photo Library.”
Culling your images
Once your images are imported, it’s a good idea to do a quick sort. The goal here is to flag images that you know were not successful as rejected, and flag images that you believe were successful as picked images. We’ll talk about this method later on in more detail, but let’s quickly go over it here.
![]() Note
Note
Press Command+Return/Ctrl+Enter to see your images large in a slideshow. The slideshow plays according to the settings current in the Slideshow module and will repeat until you press the Esc key to return to the Library.
Press the Spacebar or double-click an image to see it larger. Then, press Shift+Tab to hide all of the panels around the main work area. Once those panels are hidden, press the L key to dim everything on your screen except your image by 80%, known as Lights Out mode. Pressing the L key again will dim everything outside your images to 100% black.
Dimming the interface allows you to simply focus on the image that is in front of you. At this point you are trying to make only one choice: is this image successful or not?
Press the P key on your keyboard to flag the image currently displayed in your slideshow as a pick (
 ), press the X key to flag it as rejected (
 ), or press the U key to remove any flags. Press the right arrow key to move to the next image. Flag several of the Lesson 1 images as picks, and mark at least one as a reject.
The most important thing to remember is that if you have to think for a second about whether the image should be picked or rejected, skip it by pressing the right arrow key.
Press the Esc key to return to Grid view, then press L again to leave Lights Out mode.
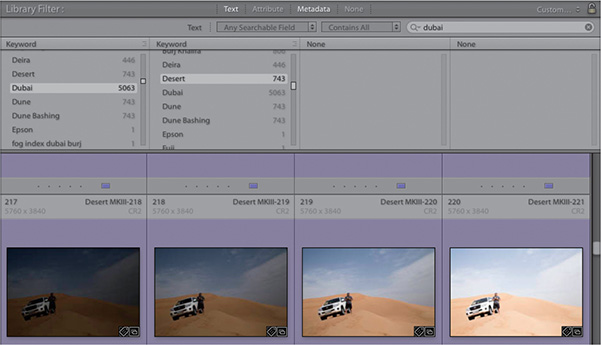
In the Library module, you can use the Filter bar above the thumbnail grid to search your images by text or metadata, and then refine your search by filtering for one or more of the searchable attributes—flag status, edits, rating, label color, or file type—so that only those photos you want are displayed in the Grid view and the Filmstrip. For now we only want to show the images that are unflagged.

If the Filter bar is not already visible above the work area, open it by choosing View > Show Filter Bar. Click Attribute, and in the Attribute bar, select the center Unflagged option (the gray flag, circled above).
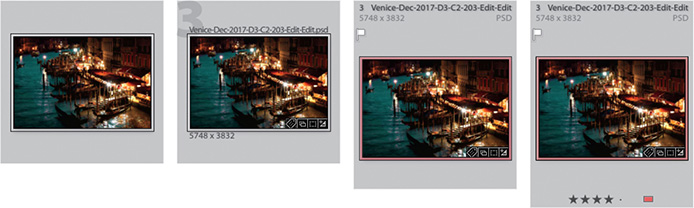
Repeat the process of hiding your panels and turning off your interface so you can focus on marking images as a pick or as rejected. You’ll know when you are finished with the culling process when you get to a completely dark screen. From here, Press the L key to turn the lights back on, press Shift+Tab to bring back the interface, and deselect the Unflagged option in the Attribute bar. You can choose to display flags, along with other information, in the image cells in the Library views and in the Filmstrip. Images flagged as rejects appear grayed out, while those marked as picks are indicated by a white border.

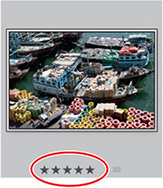
Stars can also help you rank your images in order of importance. To quickly assign a rating to the image that’s currently displayed, press a number from 1 (for 1 star) to 5 (for 5 stars) on your keyboard. To remove the rating, press 0. You can attach only one rating to each photo; assigning a new rating will replace the old one. For the purposes of this exercise, mark three or four images with either 3, 4, or 5 stars.
![]() Tip
Tip
Whenever you use your keyboard to mark a photo in the impromptu slideshow, the rating, flag, or label you assign appears briefly in the lower-left corner of the screen to confirm your action.
Rating stars are displayed below the thumbnail images in all of the Library module views and in the Filmstrip, as shown in the illustration above.
Finally, color labels can be very useful to mark images for specific purposes or projects. You might use a red label for images you intend to crop, green for those that need correction, or blue to identify photos you wish to use in a particular presentation.
To assign a color label to the image currently displayed, use the number keys. Press 6 on your keyboard to assign a red color label, press 7 for yellow, 8 for green, or 9 for blue. There’s no keyboard shortcut to assign a purple color label. To remove a color label simply press the same number again. Assign different color labels to several of the images, and then remove one.

In the Library module‘s Grid view, and in the Filmstrip, a photo with a color label will be framed in that color when it’s selected, and surrounded by a tinted image cell background when it’s not, as shown in the illustration at the right.
Remember, you can go back into the Library Filter and find specific images using all of these criteria. For example, can you find a picked image that is a 5-star image, and selected as a color label of Green?
Select all three of those markers and you will see an image that matches those criteria. If an image is not available, make sure to rank one with all three before you apply the filter.
Working with collections
Once you’ve marked specific images with flags, ratings, or color labels, you can group the resulting photos as a collection. A collection is an organization of images from anywhere in your Lightroom catalog. While we’ll get into this in more detail in a later lesson, I think collections are a cornerstone of your organization, and merit getting under your belt as soon as possible. Here’s a quick look at the different types of collections:
The Quick Collection: a temporary holding collection in the Catalog panel, where you can assemble a selection of images on an ad-hoc basis.
A “standard” collection: a more permanent grouping of images in the Collections panel.
A smart collection: a selection of images automatically filtered from your library according to specific criteria.
A collection set: a container that allows you to store multiple collections or other collection sets in it. It is largely used for organization.
For this exercise, you’ll create a standard collection.
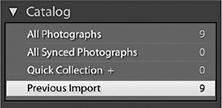
Ensure that Previous Import is selected in the Catalog panel. Choose View > Sort > File Name; the Grid view and the Filmstrip should display all images. If you cannot see all of your images, make sure that you deselect any attributes or click None in the Library Filter bar.

![]() Note
Note
A selected image is highlighted in the Grid view and the Filmstrip by a narrow white border (or a colored border if the image has a color label) and a lighter cell background color. If more than one photo is selected, the active photo is shown with an even lighter background. Some commands will affect only the active photo, while others affect all selected photos.
Once you import more images, the Previous Import folder will update and you’ll no longer be able to isolate this particular group of images by selecting that entry in the Catalog panel. In this case, you could still retrieve this group by selecting its folder in the Folders panel or searching the Lesson 01 keyword, but it isn’t as easy to retrieve a group of photos that don’t share a keyword or that are spread across separate folders. Because of this, it’s best to create a collection, a virtual grouping that is permanently listed in the Collections panel, allowing you to access that same set at any time with a single click.
![]() Tip
Tip
Collections can be nested using collection sets. For example, you could create a Portfolio collection set, and then create nested collections for Portraits, Scenic, Product Shots, Black & White, etc. Each time you import an outstanding new image, add it to one of these collections to slowly build up your portfolio.
Before we create this collection, press Command+A/Ctrl+A to select all of the images in the Grid view.
Click the plus sign (+) icon at the upper right of the Collections panel and choose Create Collection. In the Create Collection dialog box, type Lesson 01 - Dubai as the collection name. Under Location, leave the Inside A Collection Set option disabled. Under Collection Options, ensure that Include Selected Photos is selected and the other two options are unselected, then click Create.
Your new collection is now listed in the Collections panel. The listing includes an image count showing that this collection contains 10 photos.
Rearranging and deleting images in a collection
One drawback to working with images in the Previous Import or All Photographs folder (listed in the Catalog panel) is that you don’t have many options for reorganizing your images. The thumbnails are ordered either by capture time (the default) or by the other choices in the Sort menu in the Toolbar.
With a collection, however, you’re free to rearrange the images in either the Grid view or the Filmstrip in any order, and even remove them from the working view without deleting them from the catalog.
If your new collection is not already selected in the Collections panel, click to select it now. Choose Edit > Select None or press Command+D/Ctrl+D.
In the Filmstrip, Command-click/Ctrl-click to select the fourth and sixth images and drag the selection over the dividing line between the first and second thumbnails in the Filmstrip. Release the mouse button when the black insertion line appears.
![]() Tip
Tip
Drag the thumbnail of one of your selected images, rather than the image cell frame, to move it.

The selected photos snap to their new positions in the Grid view and the Filmstrip.
Deselect the photos by clicking an empty area in the main work area. Click to select the first thumbnail in the Grid view and drag it over the border between the fifth and sixth images. Release the mouse button when the black insertion line appears. In the Toolbar, the Sort criterion has changed to Custom Order.

Choose Edit > Select None. Click the first image in the grid (lesson01-004), which is underexposed, to select it. Then, right-click the selected image and choose Remove From Collection from the menu.
In the Collections panel (and in the header bar of the Filmstrip) the image count shows that the new collection now contains only nine images.

Although you’ve removed a photo from the collection, it has not been deleted from your catalog. The Previous Import and All Photographs folders in the Catalog panel still contain all 10 images. A collection contains only links to the files in your catalog; deleting a link does not affect the file in the catalog.
![]() Tip
Tip
Should you wish to edit the same image differently in two collections, you’ll first need to make a virtual copy—an additional catalog entry for the image—for inclusion in the second collection. You’ll learn about this in Lesson 6, “Advanced Editing.”
There are two benefits to using images in collections. First, you can add an image to as many collections as you like since they are simply references to images in your Lightroom catalog, not copies. Second, if you make any change to one of the images in a collection, all of the other instances of that image in other collections will be changed as well. This allows for better picture housekeeping and gives you even more opportunity to experiment with your work. We’ll go into more examples of how to make collections really work for you in Lesson 4, “Managing Your Photo Library.”
Comparing photos side by side
Sometimes you’ll need the ability to compare images to one another to find the best in a series. Lightroom’s Compare mode will prove very useful here:
![]() Tip
Tip
If you have any images selected before you start, press Command+D/Ctrl+D to deselect all images.
Select two images in the Filmstrip, and then click the Compare View icon in the Toolbar to switch to Compare view. Alternatively, choose View > Compare or press C on your keyboard.

The Select photo is active by default on the left. The right arrow key on your keyboard will let you move the next photo in the Filmstrip into the Candidate position. Keep pressing the right arrow to cycle through the other images.

Press the Tab key on your keyboard, and then press F5 to hide the side and top panels so that your photos can be displayed at a larger size in the Compare view.
Once you find an image that should replace the selected image, click the Swap icon in the Toolbar below the Candidate image to swap the Candidate and Select images. Go back to using the arrows to compare the new Select photo with other candidates from the collection.
![]() Tip
Tip
If you’re on a Mac without a full-size keyboard, press the Fn key and press the F5 key at the top.

Once you have the image you want, click the Done button at the right end of the Toolbar. The Select image will appear in the single-image Loupe view.
Comparing several photos
While Compare view lets you compare two images, Survey view is better when you are trying to pick the best image out of a series. In Survey view, you can compare several photos at once and narrow your selection until only the best one remains.
![]() Tip
Tip
Having a group of images side by side can be helpful in selecting a 5-star image or an image that needs to be flagged for editing. You can continue to use flags, stars, and color labels to classify your images while in Survey view.
Choose Edit > Select None. In the Filmstrip, Command-click/Ctrl-click any five images and then click the Survey view icon in the Toolbar. Alternatively, choose View > Survey or press N on your keyboard.
Survey view displays all the selected images; the more images you select, the smaller the individual previews in Survey view. The active image has a thin white border; to activate a different photo, you can either click its thumbnail in the Filmstrip or click the image directly in the work area.
![]() Tip
Tip
If you eliminate a photo accidentally, choose Edit > Undo to return it to your Survey view, or Command-click/Ctrl-click the image in the Filmstrip. You can easily add a photo to the selection in the same way.
If you have two images you’d like to compare more directly, simply drag one next to the other. The rest of the images will shuffle automatically.
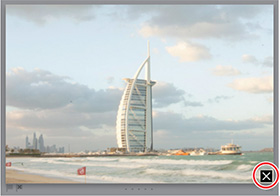
As you move the pointer over each image, a Deselect Photo icon (
 ) appears in the lower-right corner. Click this icon to remove a photo from the selection in Survey view.

As you eliminate candidates, the photos remaining in the work area are progressively resized and shuffled to fill the space available. When you eliminate a photo from Survey view, the image is simply dropped from the selection, not removed from the collection.
Eliminate another photo from Survey view so that your selection is narrowed down to a single image, and then press E on your keyboard to switch to the single-image Loupe view.
Press Shift+Tab (twice if necessary) to show all the workspace panels. Press G on your keyboard to return to the Grid view. Choose Edit > Select None.
Developing and editing
Once you have the images you want to edit selected, it’s time to bring out the very best in them. While the Develop module is extremely powerful, you can start your edits right inside the Library module with Quick Develop.
The Quick Develop panel offers simple controls for basic color correction and tonal adjustment, and a choice of preset crop and develop settings. For a finer degree of control, the Develop module offers an extended suite of sophisticated image processing tools in a more comprehensive and convenient editing environment.
Using Quick Develop in the Library module
In this exercise you’ll quickly improve the color and tonal balance of an image, and then tweak the results with the controls in the Quick Develop panel.
Select the Lesson 01 - Dubai collection to see all nine of the lesson images.
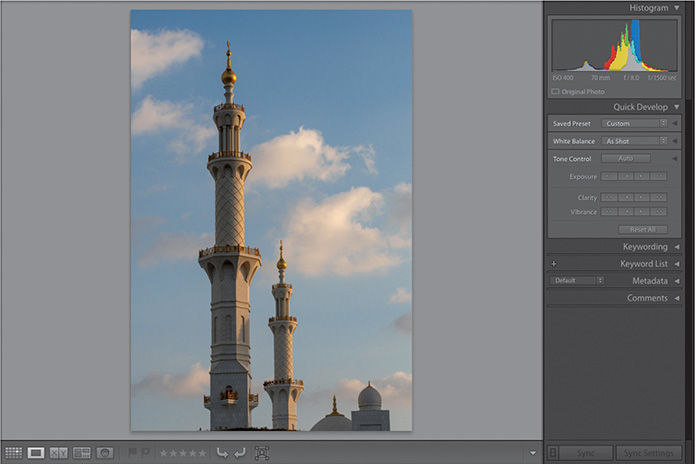
In the Filmstrip or Grid view, hold the pointer over the mosque spires at sunset to see the filename and basic image details displayed in a tooltip. Click the thumbnail to select it; the filename is also displayed in the status bar above the thumbnails in the Filmstrip.
Double-click the selected image in the Filmstrip to see it enlarged in Loupe view. Expand the Histogram and Quick Develop panels in the right panel group by clicking the arrows beside the panel names.
![]() Tip
Tip
If the Filmstrip is not visible, choose Window > Panels > Show Filmstrip or press F6 on your keyboard.
![]() Tip
Tip
If you can’t see any images in your collection, check the Library Filter bar to make sure None is selected.
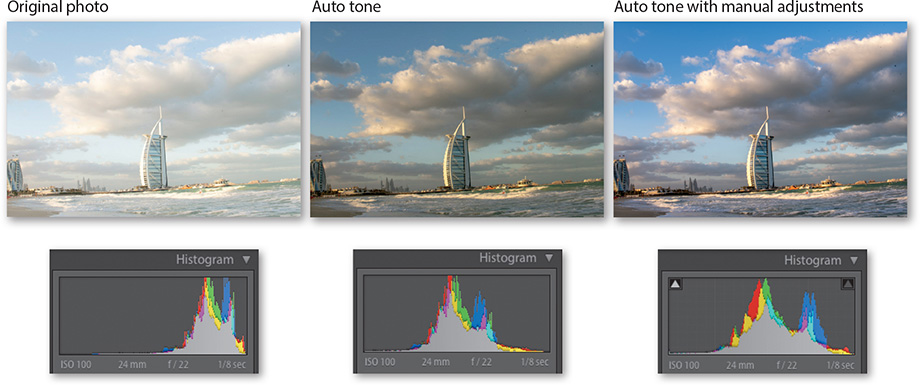
As you can see from both the image preview and the histogram, in this photo, everything but the sky is significantly underexposed and lacks midtone contrast, giving it a dull, flat look. Let’s see how much we can make it better.
![]() Tip
Tip
To make more space for the image in Loupe view, use the commands in the Window > Panels menu to hide the left panels, the Module Picker, and the Filmstrip. Commands for showing and hiding the Toolbar and Filter bar are listed in the View menu.
Click the Auto Tone Control button in the Quick Develop panel and watch the tone distribution curve shift in the Histogram panel.
Although the automatic adjustment isn’t perfect, it could be an improvement. A lot of tone and color detail has been recovered from the darker shadows. These changes are reflected in the histogram, which has been pushed slightly over to the right. The tonal balance is better, but the image could still use a little help.
![]() Tip
Tip
Click back and forth between the Reset All button at the bottom of the Quick Develop panel and the Auto Tone Control button to assess the results in the Loupe view.
Click the triangle to the right of the Auto button to expand the Tone Control area. Click the second button (the left-facing single arrow) once for the Exposure control and twice for Highlights. Click the right-most button once for Contrast, Whites, Blacks, and Vibrance, and twice each for Shadows and Clarity.

The adjusted image has more detail than the original in both the brightest and most shadowed areas, and the overall contrast and color is much better. If you press D to switch to the Develop module and press the backslash () key, you can see how much we were able to get back from this raw file by seeing a before and after view of the picture.
Working in the Develop module
The controls in the Quick Develop panel let you change settings but don’t show you absolute values for the adjustments you make to your images.
In our example, there is no way to tell which parameters were modified by the Auto tone adjustment or how much they were shifted. For finer control, and a more comprehensive editing environment, you need to move to the Develop module.
Keeping the image from the previous exercise selected, switch to the Develop module now by doing one of the following:
Click Develop in the Module Picker at the top of the workspace.
Choose Window > Develop.
Press Command+Option+2/Ctrl+Alt+2.
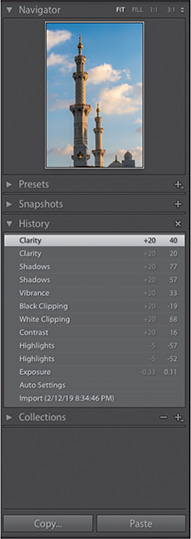
If necessary, expand the History panel in the left panel group and the Basic panel in the right panel group by clicking the triangle beside each panel’s name. Collapse any other panels that are currently open, except the Navigator on the left and the Histogram at the right. Press F6 to hide the Filmstrip.
The History panel not only lists every modification you’ve made to a photo—even Quick Develop adjustments made in the Library module—but also enables you to return the image to any of its previous states.
The most recent Clarity adjustment you applied is at the top of the History list. The entry at the bottom of the list records the date and time of import. Clicking this entry will revert the photo to its original state. As you move the pointer over each entry, the Navigator displays a preview of the image at that stage of development.
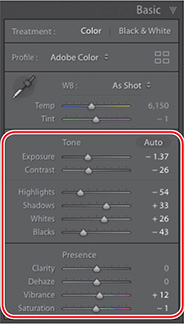
The Basic panel displays numerical values for the adjustment settings that were unavailable in the Quick Develop panel. For our image in its most recent state, the Exposure is set to +0.11; Contrast is set to +16; Highlights, Shadows, Whites, Blacks, Clarity, and Vibrance are set to –57, +77, +68, –19, +40, and +33, respectively. Don’t be concerned if your settings differ from these fractionally.

In the History panel, click the entry for the first modification you made to this photo—the Auto tone adjustment—and inspect the settings in the Basic panel.
For this image, clicking the Auto button modified all the settings in the Tone area and one under Presence, but applying Auto tone to another photo may affect fewer settings and produce very different adjustment values.
Click the top entry in the History list to return the photo to its most recent state.
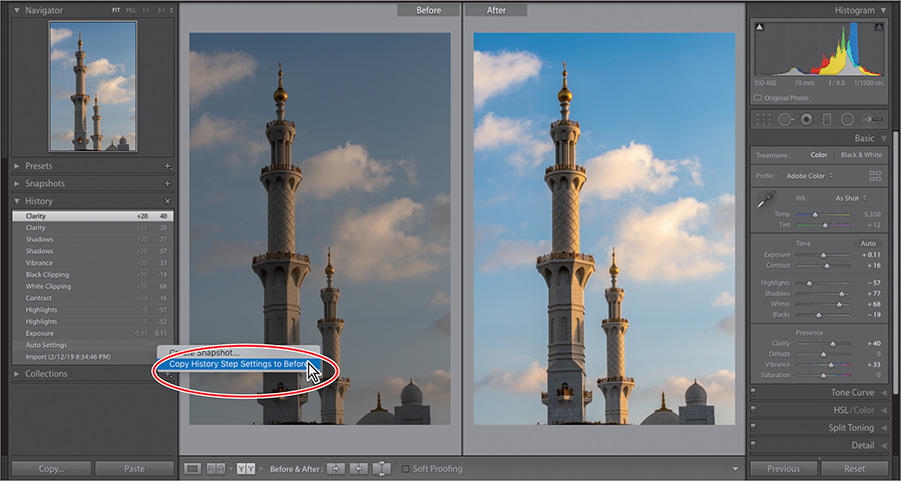
In the Toolbar (View > Show Toolbar), click the small triangle to the right of the Before/After button and choose Before/After Left/Right from the menu.
![]() Tip
Tip
If you don't see the Before/After button in the Toolbar, click the triangle at the right of the Toolbar and choose View Modes in the Toolbar menu.

By comparing the Before and After images, you can see how much you’ve improved the photo with just a few clicks. Now let's look at how much difference your manual Quick Develop adjustments made after applying Auto tone.
Leaving the most recent Clarity adjustment activated in the History panel, right-click the entry for the Auto Settings adjustment, and choose Copy History Step Settings To Before from the menu.
There’s much more to learn about the correction and adjustment tools in the Develop module, but we’ll leave that for later. For now, you’ll straighten this slightly tilted photo and then crop it.
Straightening and cropping an image
Press D on your keyboard to switch to Loupe view in the Develop module.
Click the Crop Overlay tool (circled on top here), located just below the Histogram in the right panel group, or press the letter R. The Crop Overlay tool enables you to both crop and straighten an image.
A panel with tool-specific controls opens below the tool strip. Click the Straighten tool (circled here). The pointer changes to a crosshairs cursor, and the level icon follows your movement across the image preview.
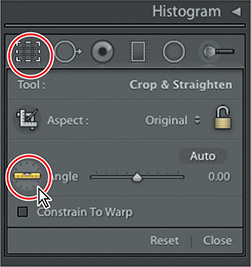
With the Straighten tool, drag a line that follows one of the horizontal lines of the spire. Release the mouse button and the image is rotated so that your line becomes horizontal, and the Straighten tool returns to its place in the Crop Overlay tool options. If you are not satisfied with the result, undo the step (Command+Z/Ctrl+Z) and try again; the text box beside the Straighten tool slider should indicate a rotation of close to –0.36 degrees.

![]() Tip
Tip
To maintain the original aspect ratio of an image when you crop it manually, make sure that Original is selected from the cropping Aspect menu and that the aspect ratio is locked.
Lightroom has overlaid a cropping rectangle on the straightened photo, automatically positioned to achieve as large a crop as possible with the original aspect ratio while trimming away the angled edges.
If you wished to adjust the crop, you could drag any of the eight handles on the cropping rectangle. To assist with manual cropping, you can choose from a variety of grid overlays in the Tools > Crop Guide Overlay menu, or hide the grid by choosing Tools > Tool Overlay > Never Show.
When you’re done, apply the crop by clicking the Crop Overlay tool, the Close button at the lower right of the tool options, or the Done button in the Toolbar. You can reactivate and adjust the crop at any time by clicking the tool again.
Adjusting lighting and tonal balance
Previously, we used the Quick Develop tone controls to adjust a picture. Let’s go into the Basic panel with another picture to see just how much tone we can pull out of an image.
While in the Develop module, press F6 and F7 (or use the Window > Panels menu) to show the Filmstrip and hide the left panels. In the Filmstrip, click to select lesson01_009.nef.

This image is very overexposed, crooked, and lacking detail. There is some color in the sky, but you cannot see any of the details in the building. The image also has a ton of spots (the perils of shooting in a desert).
The histogram above the right panels gives you an idea of what you are working with. It looks like a lot of the pixels sit to the right side of the exposure graph.

In the Basic panel, click the Auto adjustment button at the upper right of the Tone area, noting the effect on the histogram curve as well as the image in the work area.

The image is changed pretty dramatically with one button push. From a histogram point of view, the range is pushed toward the middle, hence the darkening, and it seems a little more spread out, giving us increased contrast. This is a good starting point, but I think we can make it even better.
In the Basic panel, the Auto tone adjustment affected all six of the settings in the Tone area, as well as the Vibrance and Saturation settings under Presence.
As the automatic adjustment moved this photo in the right direction, you can now use these settings as a starting point, and then make manual adjustments to tweak the tonal balance, as you did with the simplified Quick Develop controls in the previous exercise.
Watch the change in the histogram, as well as the photo, as you move the Highlights slider to the left, or type in the text box, to reduce the value to –100.
Reducing the highlights may seem counterintuitive, but it has effectively drawn image data inward from the ends of the histogram curve toward the center, reducing the tonal range most affected by the trough. We can then use Shadows and Contrast to push that trough out to an acceptable range, and finish with Whites, Temperature, and Tint.
Increase the Shadows to +71, the Contrast to +23, and the Whites to +40. This will bring out a little more detail in the image.

The problem with the image at this point is that the yellow in it looks a bit too unnatural. Cooling the image off a little can pull those yellows back. I’ll also share another trick here: increase your Tint setting ever so slightly when you make a sky image cooler and it adds an ethereal look to it.
Drop your Temp to 5714 and increase your Tint to a value of 12. This little tinge of magenta should do the trick to finalize the image.
Press F7, or use the Window > Panels menu, to show the left panels. In the History panel, click back and forth between the current state at the top of the list, the Import state at the bottom, and the Auto Settings entry just above it, comparing the changes in the histogram as well as the results in the Loupe view. When you’re done, leave the image open in Loupe view for the next exercise.
Creating effects with the Radial Filter tool
You can use the Radial Filter tool to create off-center custom vignettes by applying local adjustments to a selected area in an image through a feathered (soft-edged) elliptical mask.
Unlike the centered post-crop vignette in the Effects panel, you can place the center of your Radial Filter adjustment anywhere in the photo, focusing attention on whichever part of the image you choose.
By default, your local adjustments are applied to the area outside the ellipse, leaving the inside unaffected, but the Radial Filter’s Invert option enables you to reverse the focus of the filter.
By applying multiple Radial Filter adjustments, you can treat the inside and outside areas differently, highlight more than one area in the same image, or create an asymmetrical vignette, as shown here.

You can experiment with adding custom vignettes to your own photos later. In this exercise, you’ll learn how to work with the Radial Filter tool as you set up a more complex effect that will add a little more color and atmosphere to our photo.
You’ll start by setting up a combination of adjustments that will be applied to the photograph through your first Radial Filter.
Click to activate the Radial Filter tool—the fifth editing tool, located right below the Histogram in the right panel group.
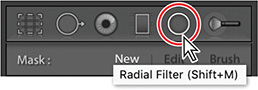
Once it is activated, its own panel of tool options appears immediately below the tool strip.
Set the Temperature to 9. Reduce the Exposure setting to –0.18, increase the Contrast to 2, and increase the Highlights to 46. Set the Clarity value to 20 and the Saturation to 7. Make sure that the Feather control is set to the default value of 50 and the Invert option is unselected.
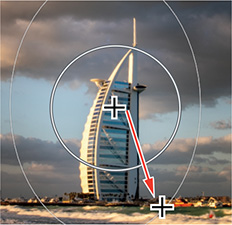
Drag in the Loupe view with the Radial Filter tool’s crosshair cursor, starting from a point at the center of the building. When you’ve created an oval, positioned and scaled as shown in the illustration at the right, release the mouse button.
![]() Tip
Tip
Make sure the color swatch at the bottom of the tool options shows a black X on a white background (no color selected). If this is not the case, click the swatch and reduce the Saturation setting to 0.
![]() Tip
Tip
Radial Filter adjustments scale from the center by default. Hold down Option/Alt to scale from one side.
Once created, the active Radial Filter adjustment is displayed with a circular pin at its center and four square control handles around its circumference. Whenever the tool is active, you can select an existing filter for editing by clicking its central pin, reposition it by dragging the pin, and resize the adjustment area or change its shape by dragging any of the square control handles.
By default, the Radial Filter adjustments are applied evenly across the unmasked parts of the image like an overlay, but you can set up the Range Mask control so the adjustments are applied only to a specific brightness (luminance) or a specific color in the image.
Near the bottom of the tool options, below the Feather control, choose Color from the Range Mask menu. Instead of attempting to manually enter a specific color, let’s use the Color Range Selector to sample a specific area in the image.
Click the eyedropper icon ( the Color Range Selector), then click the small buildings at the lower right of the Burj Al Arab. You’ll notice that the effect that we created with the radial gradient is now removed from the image and only applied to the areas that fall within the color that we have selected. The outcroppings of buildings are affected, as well as some portions of the sky on the left side of the picture. With this effect selected, drop the Exposure a little further to –0.49. You’ll notice that the buildings come into better view.
![]() Tip
Tip
If the colors you see on-screen differ significantly from those illustrated, consider calibrating your display. See macOS/Windows help for instructions. Slighter differences may be a result of conversion from RGB to CMYK color for printing.

The image has dramatically changed from where we started, but the spots that appear across the image take away from the overall feel. To get rid of these, we’ll quicky tour the Spot Removal tool in Lightroom CC.
Using the Spot Removal tool
Try as we may to prevent it, there will always be spots in our images that need to be removed. A spot can come from particles that have collected on your sensor after changing lenses several times (or in this case, after changing lenses in a desert, never a good idea). Blemishes can also be things in a picture that you don’t want to call attention to, like a hand that doesn’t belong in the frame or a telephone pole that appears to be coming out of someone’s head. Lightroom’s Spot Removal tool helps you clone or heal these imperfections away and provides you with a tool that helps you see them better.
![]() Tip
Tip
Press the bracket keys ([, ]) to increase and decrease the brush size of the Spot Removal tool.
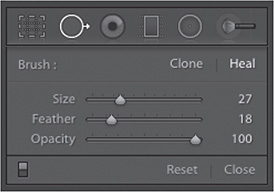
Activate the Spot Removal tool (the second tool from the left, directly under the Histogram) by clicking it or pressing the letter Q on your keyboard.
The Spot Removal tool has two options: Clone and Heal. The Clone option allows you to make a direct copy from one area to another. Heal attempts to blend the pixels to give you a more natural look. For this quick tour, we will leave the tool set to Heal. You can also control the size of the brush, the softness of the brush’s edge (feather), and how opaque your result is (opacity).
At the lower left of the preview there is a great feature in the Toolbar that you need to become familiar with: Visualize Spots. Select that option and the image is inverted in black and white, making it easier to see any spots. You also have a slider that adjusts how much contrast appears in the image. Oftentimes, we are not aware that there are spots in a picture until after we have printed the picture, so to head this problem off early isn’t just a good idea, it can save you quite a bit of money in printing costs.

Adjust the brush to the size of the spot, click once right over the spot, and Lightroom attempts to find another area of the picture that matches it. When it does, a second circle appears with a line connecting it to the first one. If you’re not happy with where the result landed, you can always click it and move it.
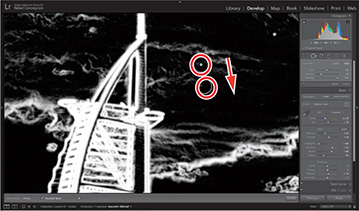
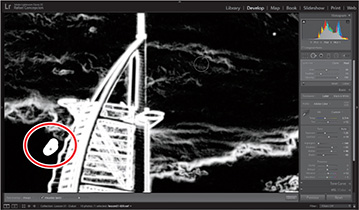
The great part about the Spot Removal tool is that it’s not just limited to spots. You can drag in a larger area of a picture (like this area next to the Burj) and a highlighted stroke will appear. Release the mouse button and Lightroom will attempt to find an area to replace it with. As before, you can always move the result after the fact.
Let’s take a look at where we were with spots, and just how far we’ve come.

While removing spots can be a time-consuming process, it can lend a nice finishing touch to your image by removing things that will divert the attention of the viewer. The number of spots that you have in your picture will vary (this was on the higher side), but it’s much cleaner now. It’s time to send this picture off.

Sharing your work by email
Now that you’ve edited and enhanced your photos, the final step in your workflow is to present them to your client, share them with friends and family, or publish them for the world to see on a photo-sharing website or in your own web gallery. In Lightroom Classic CC, it takes only minutes to create a sophisticated photo book or slideshow, customize a print layout, publish your photos online, or generate a stylish interactive gallery ready to be uploaded directly to your web server from within Lightroom.
Lesson 7, “Creating a Photo Book,” Lesson 8, “Creating a Slideshow,” Lesson 9, “Printing Images,” and the online bonus lesson, “Publishing Your Photos,” will provide much more detail on the many Lightroom Classic CC tools and features that make it simple to create professional-looking presentations, layouts, and galleries to showcase your photos. In this exercise, you’ll learn how you can attach your finished images to an email without leaving Lightroom Classic CC.
Press G to return to Grid view, then press Command+D/Ctrl+D or choose Edit > Select None. In the Filmstrip, Command-click/Ctrl-click to select the two photos that you’ve edited in this lesson, lesson01_006.jpg and lesson01_009.jpg.
Choose File > Email Photos.
![]() Note
Note
For Windows users: if you have not specified a default email application in Windows, the sequence of dialog boxes you see may differ slightly from that described and illustrated here (from macOS). The process is basically the same, but you may need to refer to steps 8, 9, and 10 to set up an email account before returning to this step.
Lightroom automatically detects the default email application on your computer and opens a dialog box where you can set up the address, subject, and email account for your message, and specify the size and quality of the attached images.
Click the Address button to open your Lightroom address book. Click New Address, then enter a contact name and email address and click OK.
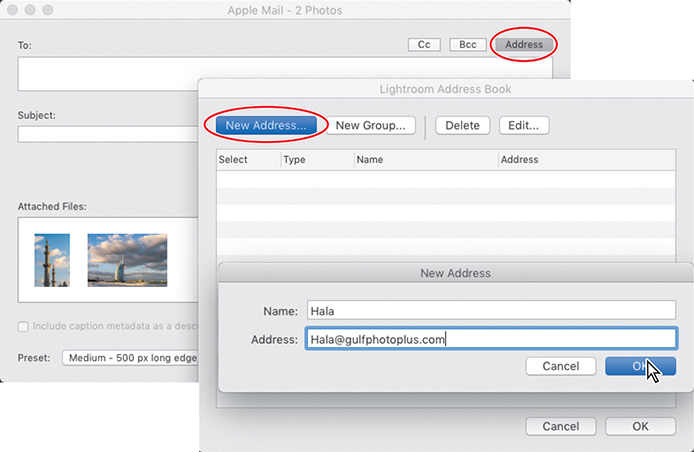
Click the Address button again, if necessary, to reopen the Lightroom Address Book dialog box. Here you can specify as many recipients for your message as you wish. For now, select your new contact, and then click OK.
Now type a subject line for your email.
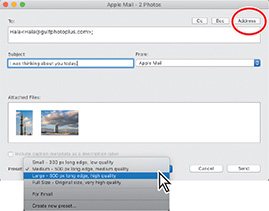
Choose your image size and quality options from the Preset menu at the bottom.
If you intend to use your default email application, you’re ready to click Send and add your message in the standard email window.
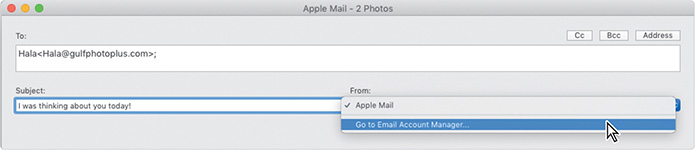
If you’d prefer to connect directly to a web-based mail service, you need to set up an account. In the From menu, choose Go To Email Account Manager.
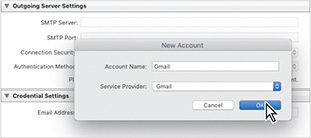
In the Lightroom Email Account Manager dialog box, click the Add button at the lower left. In the New Account dialog box, enter your email account name and choose your service provider, then click OK.
Enter your email address and password under Credential Settings in the Lightroom Email Account Manager dialog box, and then click Validate.
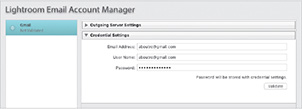
Lightroom uses your credential settings to verify your account online. In the Lightroom Email Account Manager dialog box, a green light indicates that your web-based email account is now accessible by Lightroom.
Click Done to close the Lightroom Email Account Manager. Type a message in the text box above the thumbnails of your attached images, change the font, text size, and text color if you wish, and then click Send.
Review questions
1 What is non-destructive editing?
2 What are the seven Lightroom workspace modules and how do they relate to your workflow?
3 How can you increase the viewing area without resizing the application window?
4 What advantage is there to grouping images in a collection, rather than by keyword?
5 Why is it recommended to create a special collection for each book, slideshow, print, or web project?
Review answers
1 Whatever modifications you make to an image in your library—cropping, rotation, corrections, retouching, or effects—Lightroom records the editing information only in the catalog file. The original image data remains unchanged.
2 The Lightroom workflow begins in the Library module: a hub where you’ll import, organize, sort, and search your photos, manage your growing catalog, and keep track of the images you publish. You can leverage GPS metadata to organize your photos by location in the Map module. Move to the Develop module for a comprehensive editing environment with all the tools you need to correct, retouch, and enhance digital images and ready them for output. The Book, Slideshow, Print, and Web modules each provide a range of stylish preset templates together with a suite of powerful, intuitive controls to help you customize them so that you can quickly create sophisticated layouts and presentations to share and showcase your work in its best light.
3 You can hide any of the panels and panel groups surrounding the work area. The working view automatically expands into the space available. The work area is the only part of the Lightroom workspace that you cannot hide from view.
4 The difference between grouping images in a collection and applying shared keywords is that, in a collection, you can change the order of the photos displayed in the Grid view and the Filmstrip, and easily remove an image from the group.
5 In a collection, you can change the order in which your images are displayed, which affects their placement in your project or layout. Images that are not included in a collection are displayed in a fixed order reflecting your choice of sorting criteria, such as capture date, filename, or star rating.