2 Bringing Photos into Lightroom Classic CC
Lesson overview
Lightroom Classic CC allows a great deal of flexibility when importing photos: you can download them directly from a camera, import them from an external drive, or transfer them between catalogs on separate computers. During the import process, you can organize folders, add keywords and metadata to make your photos easier to find, make backup copies, and even apply editing presets. In this lesson, you’ll learn how to:
Import images from a camera or card reader.
Import images from a hard disk or removable media.
Evaluate images before importing.
Organize, rename, and process images automatically.
Implement a backup strategy.
Set up automatic importing and create import presets.
Acquire images from other catalogs and applications.

This lesson will take 1 to 2 hours to complete. Please log in to your account on peachpit.com to download the files for this lesson, or go to the “Getting Started” section at the beginning of this book and follow the instructions under “Accessing the lesson files and Web Edition.” Store the files on your computer in a convenient location. Your Account page is also where you’ll find any updates to the lessons or to the lesson files. Look on the Lesson & Update Files tab to access the most current content.

Lightroom Classic CC helps you to begin organizing and managing your growing photo library from the moment you click the Import button; you can make backups, create and organize folders, inspect images at high magnification, and add keywords and other metadata that will save you hours sorting and searching your image library later—and all this before your photos even reach your catalog!
Getting started
Before you begin, make sure you’ve set up the LRClassicCIB folder for your lesson files and downloaded the lesson02 folder from your Account page at peachpit.com to the LRClassicCIBLessons folder, as described in “Accessing the lesson files and Web Edition” in the “Getting Started” section at the start of this book. Also, be sure you have created the LRClassicCIB Catalog file to manage the lesson files, as detailed in “Creating a catalog file for working with this book,” also in the “Getting Started” section.
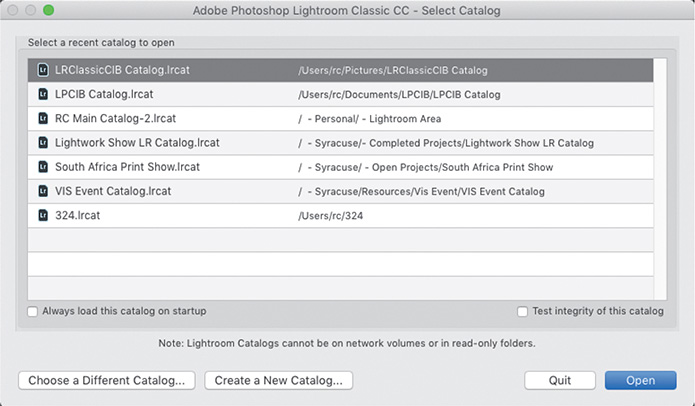
Start Lightroom Classic CC. In the Select Catalog dialog, make sure that LRClassicCIB Catalog.lrcat is selected, and then click Open.
Lightroom Classic CC will open in the screen mode and workspace module that were active when you last quit. If necessary, switch to the Library module by clicking Library in the Module Picker at the top of the workspace.

![]() Tip
Tip
If you can’t see the Module Picker, choose Window > Panels >Show Module Picker, or press the F5 key. If you’re working on macOS, you may need to press the fn key together with the F5 key, or change the function key behavior in the system preferences.
Lightroom is your digital notebook
Before we begin, I want to share with you an analogy that I think helps explain what Lightroom does in terms of organization. I’ll come back to this analogy from time to time throughout the book.
Imagine you are sitting at home when someone knocks on the door and gives you a box of pictures. They ask you to store the pictures for safekeeping, so you take the box into your home and place it on top of your desk in the living room. In order to remember where you placed those pictures, you pull out a notebook and write down that they are in a box on the desk in the living room.
There’s another knock at the door, and another box of pictures appears. You take these pictures and place them inside one of the drawers in your bedroom. You want to remember where they are, so you write it down in your notebook. More boxes of pictures appear, and you continue to place them in different areas of your house, writing down the location of each box of pictures in your notebook—there are a lot of pictures, and you don’t want to forget!
That notebook becomes the central record of where the boxes of pictures are stored in your home.
Now, imagine that you’re bored one day while at home, and you take the pictures that are in the box on top of the desk in the living room, and place them in a par-ticular order. You want to make a note of this change, so you write down in your notebook that the pictures on top of the desk in the living room have been orga-nized in a specific fashion.
The notebook you’ve been using serves as the master record of the location of each box of pictures inside your home, as well as a record of all the changes you’ve made to each picture.
That notebook is your Lightroom catalog—it’s a digital notebook that keeps track of where your images are and what you have done to them.
Lightroom doesn’t store your images; it stores information about your images in the catalog. This catalog includes a ton of information about each image (or video), including where the file lives on your drives; the camera settings at capture; any descriptions, keywords, ratings, and so on, that you apply in Lightroom’s Library module; and a running list of every edit you make in Lightroom’s Develop module.
When you think of your Lightroom catalog, just think of a digital notebook that’s keeping track of where you put your stuff and what you are doing with it.
The import process
Lightroom Classic CC has a number of options for importing your images. You can import directly from a digital camera or card reader, your hard disk, or any external storage media, or you can transfer them from another Lightroom catalog or from other applications. You can import at the click of a button, use a menu command, or simply drag and drop. Lightroom can launch the import process as soon as you connect your camera, or import automatically whenever you move files into a specified folder. Wherever you’re acquiring photos from, it will be important to become familiar with the Import dialog box.
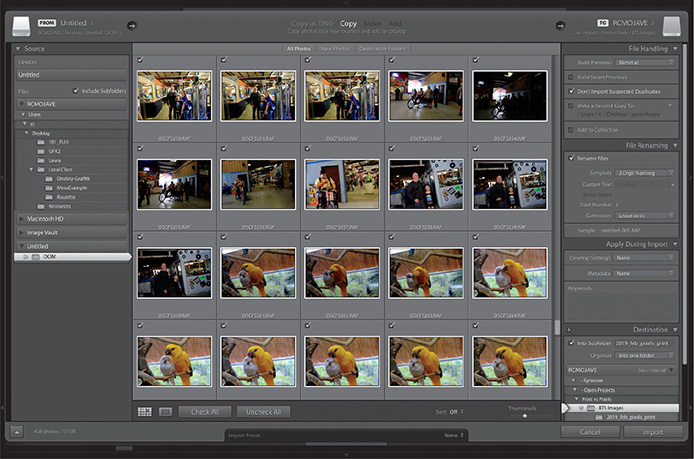
The top section of the Import dialog box presents the basic steps in the import process, arranged from left to right: choose an import source, specify how Lightroom is to handle the files you’re importing, and then—if you choose to copy or move the source files—set up an import destination. If these are all of the details that you require for the importing of the images, you can leave the dialog box set to compact mode. For even more information, click the triangle at the lower left to expand the full panel.

In expanded mode, the Import dialog box looks and works like the Lightroom Classic CC workspace modules. The Source panel at the left accesses your files on any available drive. The Preview area in the center displays images from the source as thumbnails in Grid view or enlarged in Loupe view. Depending on the type of import, the right panel group offers a Destination panel that mirrors the Source panel, and a set of controls for processing your images while they’re being imported.
Importing photos from a digital camera
While this next section outlines the process of importing from a camera pretty clearly, I would recommend that you try this with some sample images of your own. Take your camera and make 10–15 images of anything, really, just have something on the memory card that we can use for the import process.
The first step is to ensure the Lightroom preferences are set so that the import process is triggered automatically whenever you connect your camera or a memory card to your computer.
![]() Note
Note
You’ll find more options relating to the creation of DNG files during import on the File Handling preferences tab, but for the purposes of this exercise, you can ignore those settings. For more detailed information on DNG files, see the sidebar “About file formats,” later in this lesson.
Choose Lightroom > Preferences (macOS)/Edit > Preferences (Windows). In the Preferences dialog box, click the General tab. Under Import Options, select Show Import Dialog When A Memory Card Is Detected.

Some cameras generate folder names on the memory card. If you don’t find these folder names helpful for organizing your images, select Ignore Camera-Generated Folder Names When Naming Folders. You’ll learn more about folder naming options later in this lesson.
Click the Close button or OK to close the Preferences dialog box.
Connect your digital camera or card reader to your computer, following the manufacturer’s instructions.
This step may vary depending on your operating system and the image management software on your computer:
In Windows, if the AutoPlay dialog box or settings pane appears, select the option to open image files in Lightroom Classic CC. If you wish, you can set this option as the default.
If you have more than one Adobe image management application—such as Adobe Bridge—installed on your computer and the Adobe Downloader dialog box appears, click Cancel.
If the Import dialog box appears, continue to step 5.
If the Import dialog box does not appear, choose File > Import Photos And Video, or click the Import button below the left panel group.
If the Import dialog box appears in compact mode, click the Show More Options button at the lower left of the dialog box to see all the options in the expanded Import dialog box.

The top panel of the Import dialog box—visible in both the compact and expanded modes—presents three steps in the import process, arranged from left to right:
Selecting the source location of the images you wish to add to your catalog.
Specifying how you want Lightroom to handle the files you’re importing.
Setting the destination to which the image files will be copied and choosing any develop presets, keywords, or other metadata that you would like applied to your photos as they are added to your catalog.
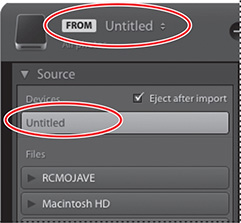
Your camera or memory card is now shown as the import source in the FROM area at the left of the top panel and under Devices in the Source panel at the left of the Import dialog box.
Depending on your computer setup, it’s possible that your camera’s memory card will be recognized as a removable storage disk. If this is the case, you may see some differences in the options available in the Import dialog box, but it shouldn’t affect anything.
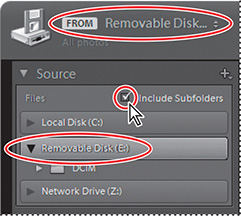
If your memory card is listed as a removable disk—rather than a device—in the Source panel, click to select it from the Files list and make sure that Include Subfolders is selected.
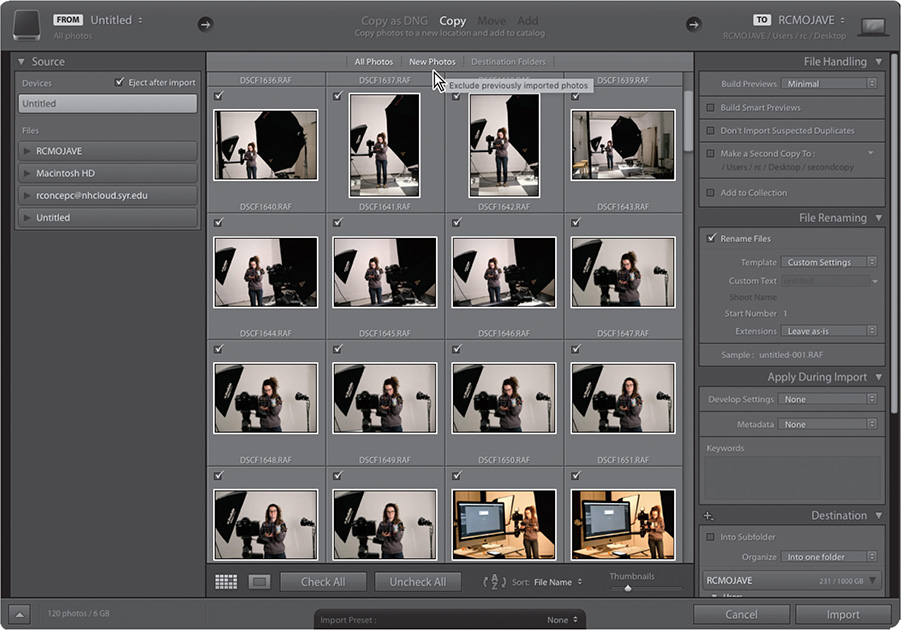
From the import type options in the center of the top panel, choose Copy, so that the photos are copied from your camera to your hard disk and then added to your catalog, leaving the original files on your camera’s memory card.
![]() Note
Note
If your memory card has been recognized as a removable disk, the Move and Add options may not be disabled as illustrated at the right and below; these import options will be discussed later in this lesson.
Lightroom displays a brief description of the action that will be taken for whichever option is currently selected.

Move your pointer over each of the options shown in the bar across the top of the Preview pane to see a tool tip describing the option. For this exercise, leave the default All Photos option selected and don’t click the Import button yet.
![]() Tip
Tip
Use the slider below the preview pane to change the size of the thumbnails.
A check mark in the upper-left corner of an image cell indicates that the photo will be imported. By default, all the photos on your memory card will be selected for import. If you do not want to import an image, you can exclude it by clicking its checkbox to deselect it.
You can select multiple images, and then change all of their check marks simultaneously. To select a contiguous range of images, select the first image in the range by clicking the thumbnail or the surrounding image cell, then hold down the Shift key and select the last image in the series. To select individual additional images, Command-click/Ctrl-click their thumbnails. Click the check mark of any selected image to change the import status for the entire selection.
Notice that at the top of the import dialog, Copy is selected rather than Add. Keep in mind that, during the import process, Lightroom does not actually import the image files themselves; it only adds entries to the Lightroom catalog to record their locations. Because you’re copying the files, you’ll need to specify a destination.
If you selected Add rather than Copy, you wouldn’t have to specify a destination folder; the photos would stay where they are already stored. However, because memory cards are expected to be erased and reused, they should not be the permanent home for your pictures. Thus, you’re not offered the Add or Move options when you import from a camera—Lightroom expects to copy your photos from your memory card to a more permanent location.
The next step, then, is to specify a destination folder to which your photos should be copied. This is the time to give some thought to how you intend to organize your photos on your hard drive. For now, leave the Import Photos dialog box open; you’ll choose a destination folder and deal with the rest of the import options in the following exercises.
Organizing your copied photos in folders
By default, Lightroom tries to organize your images in the Pictures folder. You can choose any other location, but as a general rule, it is a good idea to keep all of your images organized into one location—no matter where that is. Nailing down that location (or workflow) early will help a ton in finding missing images (we’ll talk about the workflow later in the book).
Before beginning the lessons in this book, you created a folder named LRClassicCIB inside your Users/username/Documents folder on your computer. This folder already contains subfolders for your LRClassicCIB Catalog file and for the image files used for the lessons in this book. For the purposes of this exercise, you’ll create another subfolder inside the LRClassicCIB folder as the destination for the images that you import from your camera’s memory card:
In the right panel group of the Import dialog box, collapse the File Handling, File Renaming, and Apply During Import panels; then, expand the Destination panel.
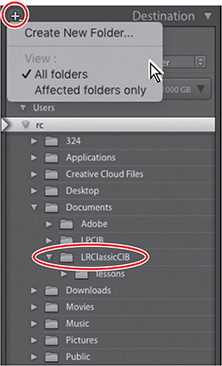
In the Destination panel, navigate to and select your LRClassicCIB folder; then, click the plus sign (+) button at the left of the Destination panel header and choose Create New Folder from the menu.
In the Browse For Folder/Create New Folder dialog box, navigate to and select your LRClassicCIB folder, if it’s not already selected. Click the Make New Folder/New Folder button, type Imported From Camera as the name for your new folder, and then click Create (macOS) or press Enter (Windows).
Make sure the new Imported From Camera folder is selected in the Browse For Folder/Create New Folder dialog box, and then click the Choose/Select Folder button to close the dialog box. Note that the new folder is now listed, and selected, in the Destination panel.
The name of the new destination folder also appears in the TO area at the right of the top panel of the Import dialog box.

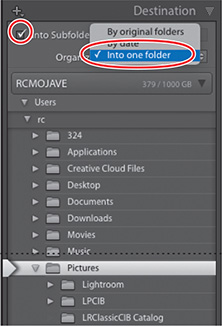
The Organize menu, near the top of the Destination panel, offers various options to help you organize your photos into folders as you copy them onto your hard disk:
Into One Folder With the current settings, the images would be copied into the new Imported From Camera folder. Instead, you could select Into Subfolder to create a new subfolder for each import from your camera.
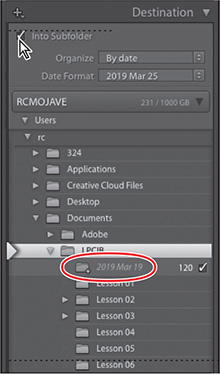
By Date: [Date Format] These options are all variations on organizing your photos by capture date. Your images would be copied into one or more subfolders, depending on your choice of date format. Choosing the format “2019/03/25,” for example, would result in one folder per year, containing one folder per month, containing one folder per day for each capture date. Or, choosing 2019 Mar 25 simply creates one folder per date, as shown in the illustration at the right.
![]() Note
Note
If your memory card has been recognized as a removable disk, you may also see the Organize option By Original Folders; this option will be discussed later in this lesson.
Think about which system of folder organization best suits your needs before you import photos from your camera, and then maintain that system for all your camera imports.
For the purposes of this exercise (and what I recommend to everyone as a default) choose Into One Folder from the Organize menu.
Select the Into Subfolder option at the top of the panel, and type Lesson 2 Import in the adjacent text box as the new subfolder’s name. The subfolder should then appear inside the folder you choose in the bottom section of the Destination panel.
Backup strategies
Your next choice is whether or not to make backup copies of the images from your camera at the same time as Lightroom creates primary copies in the location you’ve just specified and adds them to the library catalog. For some, it’s a good idea to create backup copies on a separate hard disk or on external storage media so you don’t lose your images should your hard disk fail or in case you accidentally delete them.
In the right panel group of the Import dialog box, expand the File Handling panel and select the Make A Second Copy To option.
Click the small triangle to the right and select Choose Folder to specify a destination for your backup copies.

In the Browse For Folder/Choose Folder dialog box, navigate to the folder in which you wish to store the backup copies of your images, and then click OK/Choose.
Keep in mind that the purpose of this backup is mainly as a precaution against loss of data due to disk failure or human error during the import process; it’s not meant to replace the standard backup procedure you have in place—or should have in place—for the files on your hard disk.
For the most part, I don’t use this backup option, but rely instead on a combination of my computer’s backup system (Time Machine) and the use of my network-attached storage drive. This is part of my personal workflow strategy, which I’ll share with you and explain later on in the book.
Renaming files as they are imported
The cryptic filenames created by digital cameras are not particularly helpful when it comes to sorting and searching your photo library. Lightroom can help by renaming your images for you as they are imported. You can choose from a list of predefined naming options, or create your own customized naming templates.
![]() Tip
Tip
An option you should consider, if it’s supported by your camera, is to set the camera to generate filenames with unique sequence numbers. When you clear your memory card, or change memory cards, your camera will continue to generate unique sequence numbers rather than starting the count from one again. This way, the images you import into your library will always have unique filenames.
In the right panel group of the Import dialog box, expand the File Renaming panel and select Rename Files. Choose Custom Name - Sequence from the Template menu, type a descriptive name in the Custom Text box, and then press the Tab key on your keyboard. A sample name at the bottom of the File Renaming panel shows how your settings will be applied for the first image imported. You can enter a number other than 1 in the Start Number text box; this is useful if you’re importing more than one batch of images from the same shoot or series (often from multiple memory cards).
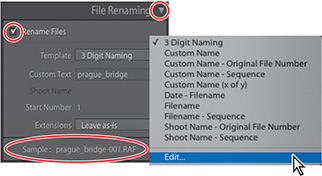
Click the small triangle to the right of the Custom Text box; your new text has been added to a list of recently entered names. You can choose from this list if you import another batch of files that belong in the same series. This not only saves time and effort, but helps you ensure that subsequent batches are named identically. Should you wish to clear the list, choose Clear List from the menu.
Choose Custom Name (x of y) from the Template menu. Note that the sample name at the bottom of the File Renaming panel is updated to reflect the change.
Choose Edit from the Template menu to open the Filename Template Editor.
In the Filename Template Editor dialog box, you can set up a filename template that makes use of metadata information stored in your image files—such as filenames, capture dates, or ISO settings—adding automatically generated sequence numbers and any custom text you specify. A filename template includes placeholders—or tokens—that will be replaced by actual values during the renaming process. A token is highlighted in blue on macOS and framed by curly brackets on Windows.
You could rename your photos prague_bridge-March 25, 2019-01, and so on, by setting up a filename template with a custom text token, a date token, and a two-digit sequence number token, separated by typed hyphens, as shown in the illustration at the right. After closing the Filename Template Editor you could type prague_bridge in the Custom Text box; the words “prague_bridge” would then replace the custom text token in the filename. The capture date from the images’ metadata and the sequence number are added automatically.

![]() Tip
Tip
For more information on using the Filename Template Editor, please refer to Lightroom Help.
Click Cancel to close the Filename Template Editor without making any changes.
Despite all of the options available for renaming your images during the import process, there’s only so much information you can squeeze into a single filename. One of the immediate changes I make in the template is to change the sequence to a three digit number and use simpler date and description information for the name of the files. It’s better to take advantage of things like metadata, keywords, and collections for organizing and searching your image library. If you need to find images solely based on name, that must mean a lot went wrong in your computer.
You’ll learn about working with metadata, keywords, and collections in the following exercises and in Lesson 4, “Managing Your Photo Library.”
For now, click Import if you wish to bring your photos into the LRClassicCIB catalog, or Cancel to close the Import dialog box without importing any images.
You have now completed this exercise on importing photos from a digital camera or a memory card. You’ll learn about the other options that are available in the Import dialog box in the exercises to follow.
Importing images from a hard disk
When you import photos from your hard disk or from external drives, Lightroom Classic CC offers you more options for organizing your image files than are available when importing from a camera.
You can still choose to copy your images to a new location during the import process, as you did in the previous exercise, but you also have the option to add them to your catalog without moving them from their current location. You might choose to do this if the images you wish to import are already well organized in a folder structure on your drive.
For images that are already located on your hard disk, you have an extra option: to move them to a new location and remove them from their original location at the same time as they are added to your catalog. This option might appeal if the images on your hard disk are not already well organized.
![]() Note
Note
The same commands apply for importing images from a CD, DVD, or other external storage media.
To import the images for this exercise from your computer hard disk, either choose File > Import Photos And Video, press Shift+Command+I/Shift+Ctrl+I, click the Import button below the left panel group in the Library module, or drag the folder onto Lightroom’s Library module.

In the Source panel at the left of the Import dialog box, navigate to the Lessons folder inside the LRClassicCIB folder on your hard disk. Click the lesson02 folder and select Include Subfolders at the upper right of the panel.
An image count in the lower-left corner of the Import dialog box shows that the lesson02 folder and its subfolder contain a total of 37 photos with a combined file size of 1 GB.
From the import type options in the center of the top panel, choose Add so that your photos will be added to your catalog without being moved—an option that is not available when importing images from a camera. Do not click Import yet!

Use the scrollbar at the right of the Preview pane to view all of the images in the lesson02 folder and its subfolders. Drag the Thumbnail slider below the Preview pane to the left to reduce the size of the thumbnails so that you can see as many of the images as possible in the Preview area.
In the Source panel, deselect the Include Subfolders option. The Preview area now displays only 27 images in the lesson02 root folder and the image count in the lower-left corner of the Import dialog box reads: 27 photos/798 MB. Make sure to go back and select Include Subfolders again to get all of the images.
Before we go any further, let’s review each of the import type options above the Preview area.
Click each of the import type options in turn, from left to right:
Copy As DNG will have Lightroom make copies of your images in DNG (digital negative) file format, which will be stored in a new location and then added to your catalog. You’ll notice that for the Copy As DNG, Copy, and Move options, the right panel group offers the same suite of panels—File Handling, File Renaming, Apply During Import, and Destination.
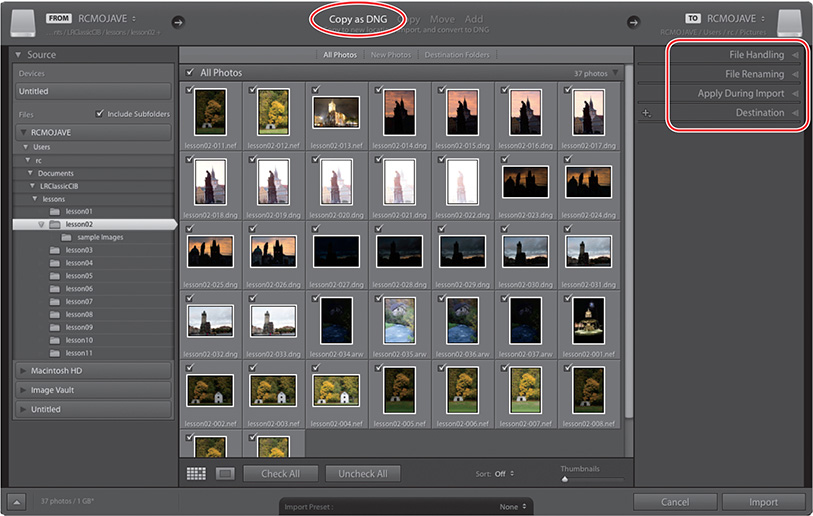
Click Copy to have Lightroom create copies of your images in a new location, and then add them to your catalog, leaving the originals in their current locations. You can set a destination for your copies in the Destination panel, as you did in the previous exercise. Expand the Destination panel and click the Organize menu. When you use either the Copy As DNG, Copy, or Move options to import images from your hard disk or from external storage media, the Organize menu offers you the option to copy your photos into a single folder, into subfolders based on the capture dates, or into a folder structure that replicates the original arrangement.
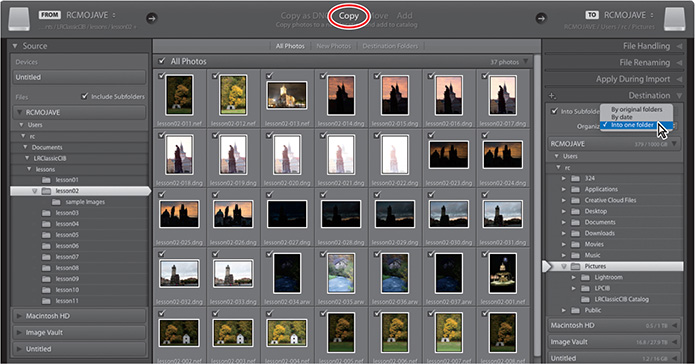
Click Move to have the images moved to a new location on your hard disk, arranged in whatever folder structure you choose from the Organize menu, and then deleted from their original locations.
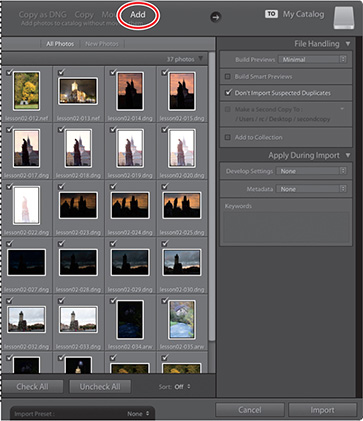
Click the Add option to have Lightroom add the images to your catalog without moving or copying them from their current locations, or altering the folder structure in which they are stored. For the Add option, the right panel group offers only the File Handling and Apply During Import panels; you cannot rename the original source images during import, and there’s no need to specify a destination because the files will remain where they are.
![]() Note
Note
Expand the File Handling and Apply During Import panels to see the options available.
Applying metadata
Lightroom uses information attached to files to enable you to quickly find and organize your photos. This information is known as metadata. Some of this metadata is automatically added to the file at the point of creation (shutter speed, ISO, camera type, and so on), and some of it can be added after the fact (keywords, your name, and so on).
You can search your image library and filter the results by all of this metadata, as well as things like flag status, color label, shooting settings, or any combination of a wide range of other criteria.
You can also choose specific information about your images from this metadata and have Lightroom display it as a text overlay applied to each image in a slideshow, web gallery, or print layout.
Let’s add some important information into our files quickly, and make sure we don’t have to reinvent the wheel every time. For this, we’ll use metadata presets.
![]() Note
Note
Remember that any image that is shared with metadata online can be read by anyone online. While adding your email address and website are totally fine, do not put in any more personal information, such as your home address or phone number. That information in the wrong hands could be bad, so leave it out!
In the Apply During Import panel, choose New from the Metadata menu.
Let’s create a metadata preset that includes your copyright information in each file. In the New Metadata Preset dialog box, for Preset Name, type 2019 Copyright. Then, enter your copyright information into the IPTC Copyright fields and contact information into the IPTC Creator fields. This should give anyone online enough information to get a hold of you should someone find your image interesting and want to use it. It does happen at times.
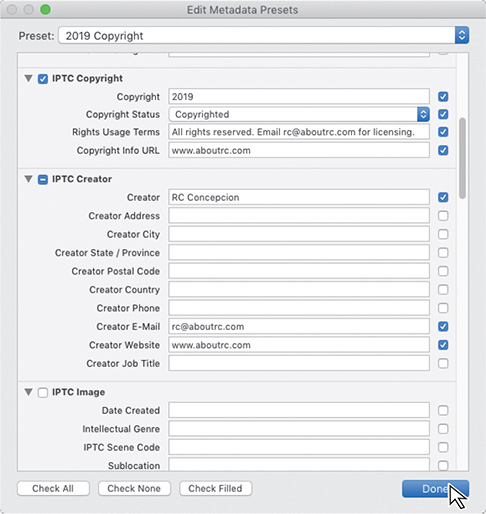
Click Done/Create to close the New Metadata Preset dialog box, and then confirm that your new metadata preset is selected in the Metadata menu.
In the Apply During Import panel, choose None from the Develop Settings menu and type Lesson 02, Europe in the Keywords text box.
In the File Handling panel, choose Minimal from the Build Previews menu. Check that your settings are the same as those shown in the illustration below, and then click Import.

The images from the lesson02 folder are imported into your library catalog and thumbnails of the images appear in the Grid view and the Filmstrip in the Library module.
Right-click the lesson02-013 image in the Grid view and choose Go To Folder In Library from the menu.
In the Folders panel in the left panel group, the lesson02 folder is highlighted and the image count indicates that it contains 37 photos.
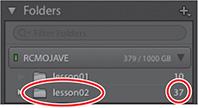
Right-clicking the folder at this point gives you options to update folder locations, or even find the folder of images inside of Finder (on macOS) or Explorer (on Windows). This comes in handy when you are missing folders, but we’ll talk more about that later in the book. For now, choose Show In Finder/Show In Explorer to see the folder.
Importing via drag and drop
Perhaps the easiest way to add photos to your image library is to simply drag a selection of files—or even an entire folder—directly into Lightroom Classic CC.
The Finder/Explorer window, where you can see the lesson02A folder, should still be open from the previous exercise. Position the window so that you can see the Grid view in the Lightroom Classic CC workspace behind it.
Open the lesson02A folder, and then drag the folder from the Finder/Explorer window onto the Grid view.
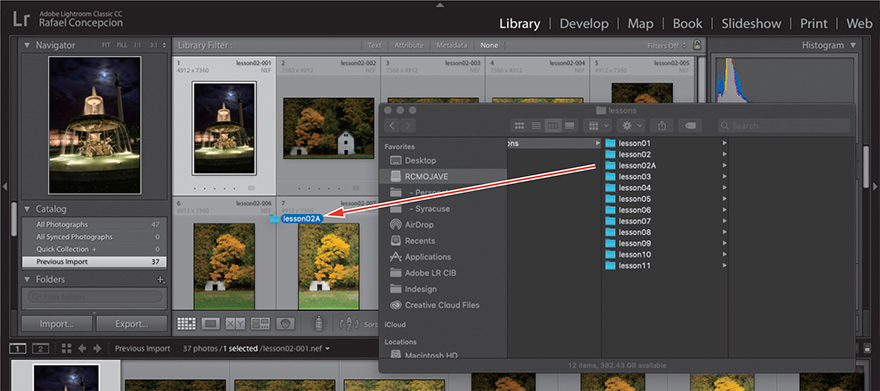
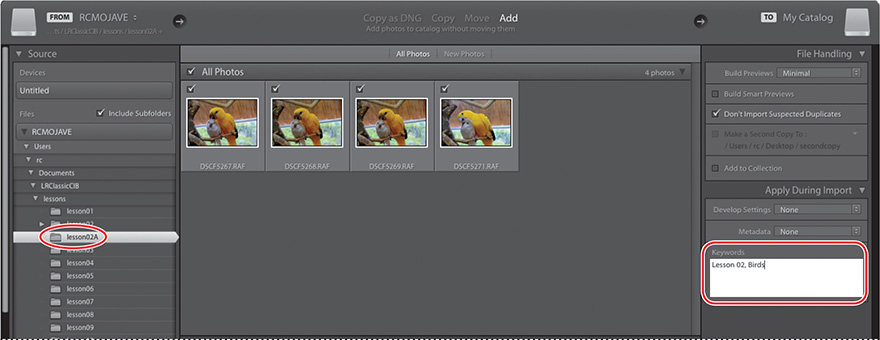
In the Import dialog box, the subfolder is now selected in the Source panel and the photos it contains are displayed in the Preview area.
In the Apply During Import panel, choose None from the Metadata menu and type Lesson 02, Birds in the Keywords box. Don’t click Import just yet.
Evaluating photos before importing
Lightroom Classic CC makes it easy to decide which of your photos you wish to import by providing an enlarged Loupe view in the Import dialog box; you can examine each image in detail so that you can choose between similar images or exclude a photo that is out of focus.
Double-click any of the thumbnails to see the photo in Loupe view, or select the thumbnail and click the Loupe view button at the left of the Toolbar below the preview pane; the image is enlarged to fit the preview area and the pointer becomes a magnifying glass cursor. Depending on the size of your display and/or the application window, you may first see a Zoom Out cursor.
If necessary, click the image again to further magnify the image to a zoom ratio of 1:1. Use the Zoom slider below the preview pane to see even more detail. Drag the enlarged image in the preview pane to pan the view so that you can inspect portions of the photo that are not currently visible.
While you’re examining the photo in Loupe view, you can select or deselect the Include In Import option in the Toolbar below the image preview.
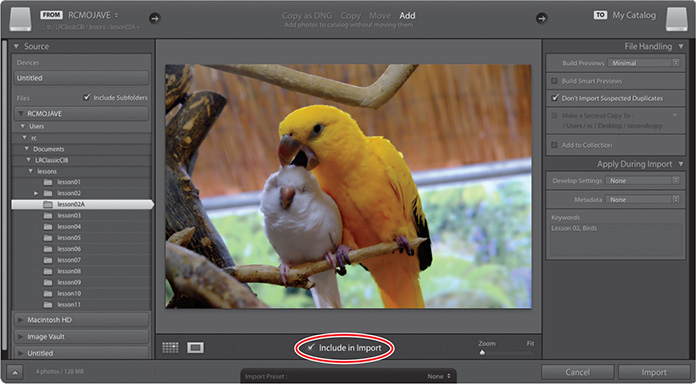
Click the enlarged preview to return to the Fit view, where the entire image is visible. Double-click the image, or click either the Loupe view button or the Grid view button beside it, to return to the thumbnail display.
For the purposes of this exercise, deselect the Include In Import option for one of the images to exclude it, and then click Import.
Images that are already imported
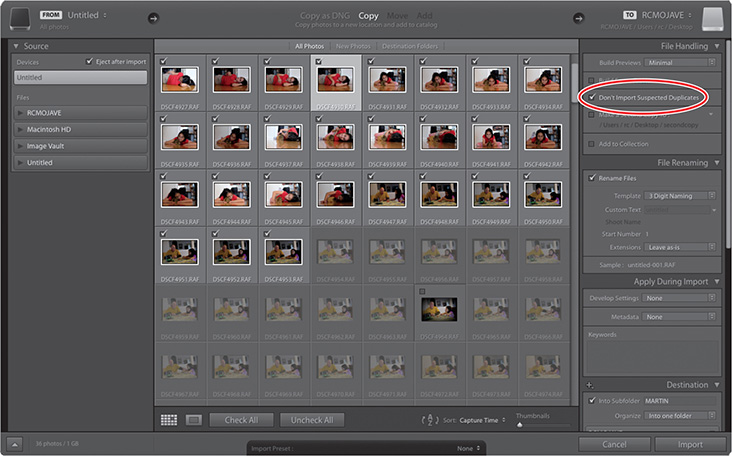
Lightroom does a great job at trying to keep your collection organized and free from duplicates. During the import process, you’ll notice that there is an option in the File Handling panel on the right side that prevents you from importing images that have already been added to your Lightroom catalog. When you are just starting out wth Lightroom, it’s a great idea to keep this selected.
When you try to import from a memory card that you have already imported from, any of the images that are duplicates (they are already in your Lightroom catalog) appear in gray and will not be selected for import. If the card has new images, those images will be visible and will already be selected, letting you specify where you would like them imported.
As a general rule, I often advise photographers never to format their memory cards until after they have used up all the cards they own. For example, if I have four memory cards (A, B, C, and D) and I make images on card A, I will import that card into Lightroom but will not format it. At the next shoot, I use card B and repeat the process. The following shoot? Card C.
Should something go wrong on my computer, I have a much better chance of recovering the images from the memory cards if I stagger the formatting in this manner. Working this way, you may forget to format a card and shoot with one that you’ve already imported. Thankfully, Lightroom is there to catch these kinds of things.
![]() Note
Note
While I suggest you stagger your shoots across multiple memory cards, I am not suggesting that you automatically need to go out and buy four memory cards. You can stagger shoots across as many cards as you own. Think of this as more of a workflow suggestion. That said, I can’t emphasize enough how many times this has saved me from losing images.
![]() Note
Note
Beginning with Lightroom Classic CC 8.0 and Lightroom CC 2.0 (October 2018 releases), you can no longer import new AVI files on macOS. The existing AVI files in your catalog play as expected in Lightroom CC and in a separate window from the Library Loupe view in Lightroom Classic. On Windows, the support for AVI files is still available.
![]() Note
Note
HEVC video files are supported for import and playback on macOS High Sierra (10.13) only. On Windows and earlier macOS versions, the support for HEVC (MOV) files is not available.
Importing to a specific folder
From within the Library module, you can import photos directly to a folder in the Folders panel without needing to specify a destination in the Import dialog box.
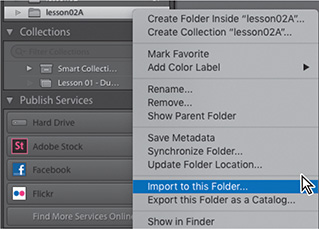
In the Folders panel, right-click the lesson02A folder and choose Import To This Folder from the menu.
This will automatically bring up the Import dialog box. Notice that the Destination is already selected for you.
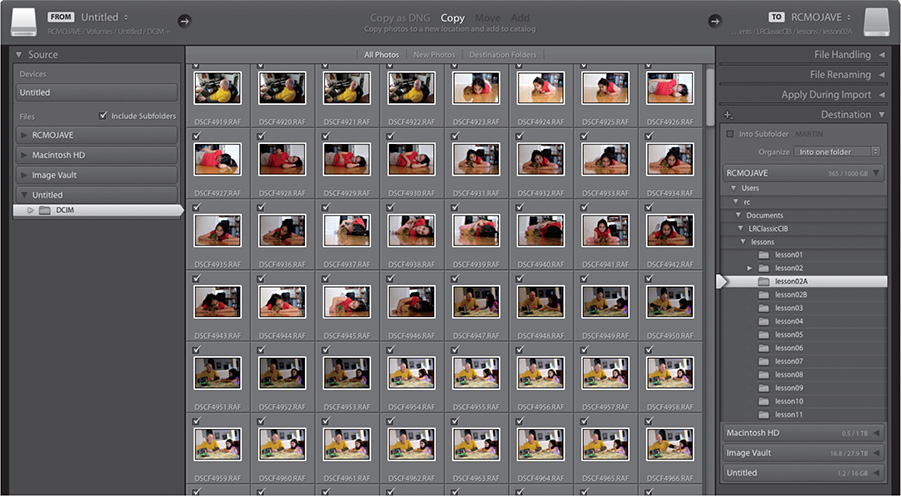
In the Source panel, you’ll notice that you have your hard drive, any connected memory cards, and any network drives available to you for import.
All of the other panels are available for you to use. From here, you can still apply metadata templates, change the filename, add keywords, and so forth.
This feature is useful when you are working with multiple memory cards and want to have all of them available to import to a shoot. That said, Lightroom does a great job of remembering the last location you saved to, so you may find that you rely on this a lot less than you’d think.
Importing from a watched folder
Designating a folder on your hard disk as a watched folder can be a very convenient way to automate the import process. Once you’ve designated a folder that is to be watched, Lightroom will detect any photos that are placed or saved into it, then automatically move them to a specified location and add them to the catalog. You can even have Lightroom rename the files and add metadata in the process.
Choose File > Auto Import > Auto Import Settings. In the Auto Import Settings dialog box, click the first Choose button to designate a watched folder. Navigate to your desktop and create a folder called Watch This, then click Choose/Select Folder.
![]() Tip
Tip
Once you’ve set a watched folder, you can activate or disable Auto Import at any time, without opening the Auto Import Settings dialog box, by choosing File > Auto Import > Enable Auto Import. A check mark beside this menu command indicates that the Auto Import feature is currently enabled.
Now that you have designated a watched folder, you can click the checkbox at the top of the Auto Import Settings dialog box to enable Auto Import.
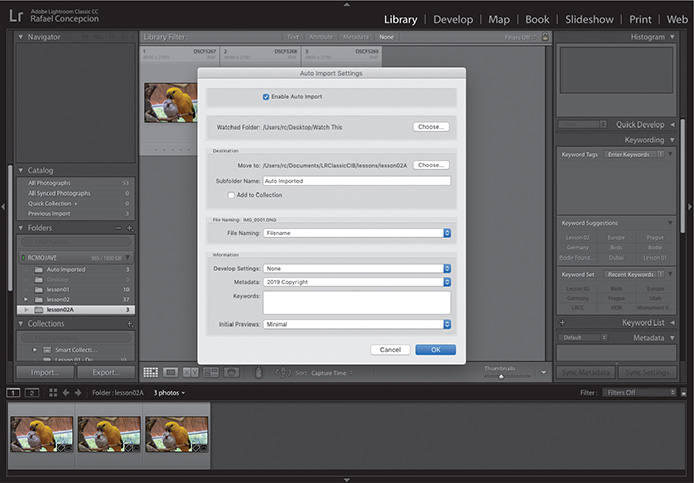
Click the second Choose button, under Destination, to specify a folder to which Lightroom will move your photos when adding them to the library catalog. Navigate to and select the lesson02A folder, and then click Choose/Select Folder. Type Auto Imported in the Subfolder Name text box.
Under Information, select the metadata preset that we made in the previous lesson, choose None from the Develop Settings menu and Minimal from the Initial Previews menu. Click OK to close the Auto Import Settings dialog box.
Switch to Finder/Windows Explorer and navigate to the Lesson02B folder. Open the Watch This folder and drag the image files inside to the Watched Folder.
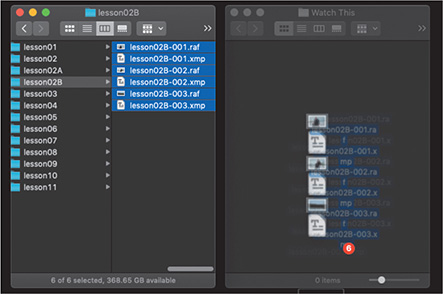

When Lightroom has finished importing, you’ll notice that the images are automatically placed into the Auto Imported folder we specified during the watched folder creation. Looking back at the Watch This folder, you’ll see that it is now empty.
If you nagivate to the lesson02A folder, you’ll notice that there are three more pictures that have been added to that folder.
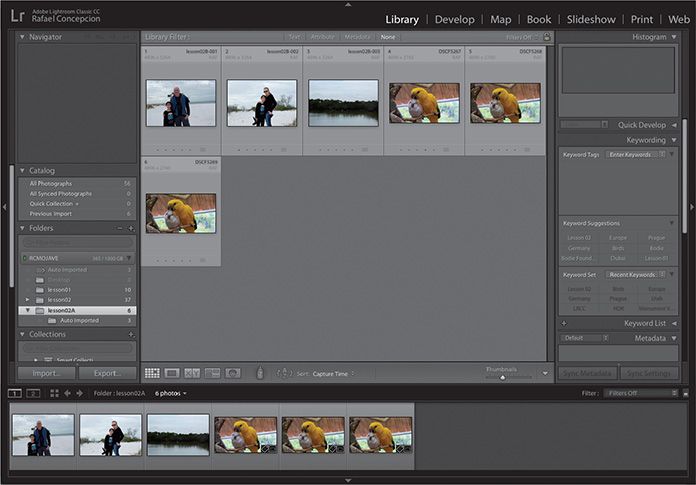
You’ll find that this feature is very commonly used by photographers who are performing tethered shooting and have their computers using the manufacturer’s software to control the camera. Dedicated to supporting photogaphers every step of the way, Lightroom also handles this type of shooting quite well. Want to learn more about tethered shooting? I’m glad you asked!
Tethered shooting
Many modern digital cameras support tethered shooting, a process where you connect—or tether—your digital camera to your computer and save images to the computer’s hard disk rather than to the camera’s memory card. With tethered shooting, you can view a photo on your computer screen immediately after you shoot it—a vastly different experience from seeing it on your camera’s LCD screen.
![]() Tip
Tip
Please refer to Lightroom Classic CC Help to see a list of cameras currently supported for integrated tethered shooting.
For a range of DSLR cameras, including many models from Canon and Nikon, you can capture photographs directly into Lightroom Classic CC without the need for any third-party software. If your camera allows tethered shooting but is not on the list of models supported by Lightroom Classic CC, you can still capture images into your Lightroom Classic CC library using either the image capture software associated with the camera or any of a number of third-party software solutions.
You can have Lightroom name the photos, add metadata, apply developing settings, and organize them in your library then and there. If necessary, you can adjust your camera settings (white balance, exposure, focus, depth of field, and others), or even change cameras, before taking the next shot. The better the quality of the captured image, the less time you’ll need to spend adjusting it later.
![]() Note
Note
Depending on your camera model and the operating system your computer uses, you may also need to install the necessary drivers for your camera.
Tethered shooting with a supported camera
Connect your camera to the computer.
In the Library module, choose File > Tethered Capture > Start Tethered Capture.
In the Tethered Capture Settings dialog box, type a name for your shooting session. Lightroom will create a folder with this name inside the destination folder of your choice; this session folder will appear in the Folders panel.
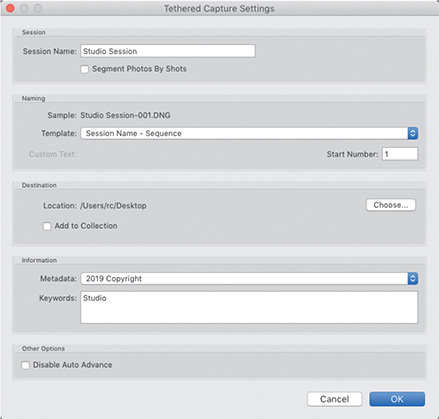
Choose a naming scheme for your shots, select a destination folder, and specify any metadata or keywords that you want Lightroom to apply as the newly captured images are imported.
Click OK to close the Tethered Capture Settings dialog box. The tethered capture control bar appears.

![]() Tip
Tip
To collapse the control bar to just the shutter button, hold down the Option/Alt key and click the Close button at the upper right. Repeat to expand the control bar again.

The control bar displays the model name of the connected camera, the name you entered for the shooting session, and the current camera settings, all of which you can change. You can choose from a wide range of Develop presets in the Develop Settings menu at the right. You can trigger the shot with your camera’s shutter button by clicking the large circular button at the right of the control bar or by pressing F12 on your keyboard.
As you shoot, the images captured will appear in both the Grid view and the Filmstrip. To see each captured photo as large as possible, switch to the Loupe view and hide unwanted panels or choose Window > Screen Mode > Full Screen And Hide Panels.

Viewing imported photos in the work area
In the Library module, the main display area—the work area—in the center of the application window is where you select, sort, search, review, and compare images. The Library module work area offers a choice of view modes to suit a range of tasks, from organizing your photos to choosing between similar shots.
If you’re not already in the Library module, switch to it now.
![]() Note
Note
You’ll learn more about using the Filter bar controls in Lesson 4.
Depending on your workspace setup in the Library module, you may see the Filter bar across the top of the work area. You can use filters to limit the images that are displayed in the Grid view and the Filmstrip so that you’ll see only those photos with a specified rating, or flag status, or containing particular metadata content.

The Toolbar, located at the bottom of the work area, is common to all the workspace modules, but contains different tools and controls for each.
If the Filter bar is not already visible at the top of the work area, show it by pressing the backslash key () on your keyboard or by choosing View > Show Filter Bar. Press the backslash key again or choose View > Show Filter Bar again to hide it.
If the Toolbar is not already visible, press T to show it. Press T again to hide it. Switch to the Develop module. If the Toolbar is not already visible, press T to show it. Switch back to the Library module. In the Library module, the Toolbar is still hidden; Lightroom remembers your Toolbar setting for each module independently. Press T to show the Toolbar in the Library module.
Double-click an image in Grid view to switch to Loupe view. The Loupe view is available in both the Library and Develop modules, but the controls available in the Loupe view Toolbar differ for each of these modules.
To hide or show individual tools, click the white arrow at the right end of the Toolbar and choose their names from the pop-up menu. Tools that are currently visible in the Toolbar have a check mark in front of their names.
![]() Tip
Tip
If you activate more tools than can be displayed in the width of the Toolbar, you can increase the Toolbar’s width by hiding the side panel groups, or disable tools that you don’t need at the moment.
Setting Grid and Loupe view options
You can choose from many options in the Library View Options dialog box to customize the information Lightroom Classic CC displays for each image in the Grid and Loupe views. For the Loupe view overlay and thumbnail tooltips, you can activate two sets of options, then use a keyboard shortcut to switch between them.
Press G to switch to Grid view in the Library module.
Choose View > View Options. The Library View Options dialog box appears with the Grid View tab already selected. Position the Library View Options dialog box so you can see some of the images in the Grid view.
At the top of the Grid View tab, deselect Show Grid Extras. This disables most of the other options.
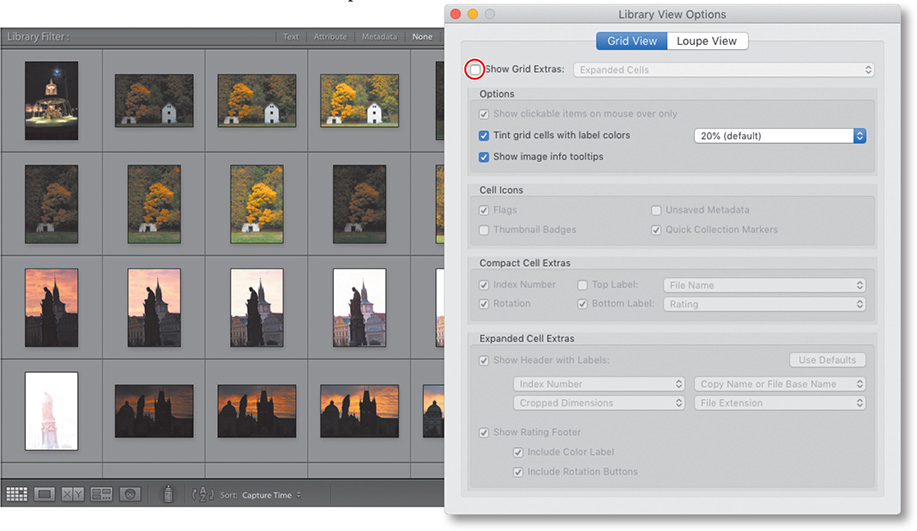
The only options still available are Tint Grid Cells With Label Colors and Show Image Info Tooltips. If they’re not already activated, select both of these options. As this lesson’s images have not yet been assigned color labels, activating the first option has no visible effect in the Grid view. Right-click any image—you can do this while the Library View Options dialog box is open—and choose a color from the Set Color Label menu.
In the Grid view and the Filmstrip, a color-labeled image that is currently selected will show a thin colored frame around the thumbnail; a color-labeled image that is not selected has a tinted cell background.

Position the pointer over a thumbnail in the Grid view or the Filmstrip; a tooltip appears. In macOS you’ll need to click anywhere in the Lightroom Classic CC workspace window to bring it to the front before you can see the tooltips.
By default, the tooltip will display the filename, the capture date and time, and the cropped dimensions. You can specify the information to be displayed in the tooltip by choosing from the Loupe View options.
On macOS, if the Library View Options dialog box is now hidden behind the main application window, press Command+J to bring it back to the front.
On the Grid View tab, select the Show Grid Extras option and choose Compact Cells from the menu beside it. Experiment with each setting to see its effect in the Grid view display. Select and deselect the settings for Options, Cell Icons, and Compact Cell Extras. Position the pointer over the various icons in the image cells to see tooltips with additional information.

Under Compact Cell Extras, click the Top Label menu to see the long list of choices available. For some choices, such as Title or Caption, nothing will be displayed until you add the relevant information to the image’s metadata.
Now choose Expanded Cells from the Show Grid Extras menu. Experiment with the Expanded Cell Extras options to see the effects in the Grid view. Click any of the Show Header With Labels menus to see the many choices available to customize the information that is displayed in the cell headers.
Click the Loupe View tab. The work area switches to Loupe view so you can preview the changes you’ll make in the Library View Options dialog box.

![]() Note
Note
When you choose an information item such as Capture Date And Time, those details are drawn from the image metadata. If the image’s metadata does not contain the specified information, nothing will be displayed for that item. For both the Grid and Loupe view options you can choose the information item Common Attributes, which will display the flag status, star rating, and color label for each image.
For the Loupe view, you can select the Show Info Overlay option to display image information in the upper-left corner of the view. Choose items from the menus in Loupe Info 1 and Loupe Info 2 to create two different sets of information, and then choose either set from the Show Info Overlay menu.
You can reset either group to its default state by clicking its Use Defaults button. Select Show Briefly When Photo Changes to show the info overlay for only a few seconds when a new image is displayed in the Loupe view. Select the Show Message When Loading Or Rendering Photos option to display a notification in the lower part of the view while the image preview is updated.
Click the Close button to close the Library View Options dialog box.
You can choose which of the two information sets will be displayed by choosing an option from the View > Loupe Info menu, or by pressing the I key to cycle the info overlay through Loupe Info 1, Loupe Info 2, and its disabled state.
Switch to the Grid view. From the View > Grid View Style menu you can choose whether or not to display additional information, using either the Compact Cells layout or the Expanded Cells layout. Press the J key to cycle through the different cell layouts.
Review questions
1 When would you choose to copy imported images to a new location on your hard disk and when would you want to add them to your library catalog without moving them?
2 What is DNG?
3 When would you use the Import dialog box in compact mode?
4 Why would you use tethered shooting in Lightroom Classic CC?
5 How can you specify the information displayed for images in the Grid and Loupe views?
Review answers
1 When importing photos from a camera or memory card, the images need to be copied to a more permanent location, as memory cards are expected to be erased and reused. Copying or moving images might also be useful when you want Lightroom to organize the files into a more ordered folder hierarchy during the import process. Images that are already arranged in a useful way on the hard disk or removable media can be added to the library catalog in their current locations.
2 The Digital Negative (DNG) file format is a publicly available archival format intended to address the lack of an open standard for raw files generated by cameras. Converting raw files to DNG in Lightroom will help ensure that you’ll be able to access your raw files in the future even if the original proprietary format is no longer supported.
3 Once you’ve created import presets to suit your workflow, you can speed up the import process by using the Import dialog box in compact mode. Use your import preset as a starting point, and then modify the settings as required.
4 When shooting tethered into Lightroom, you can see the images much larger on your computer screen than on the LCD on your camera, allowing you to adjust your camera settings as you shoot to reduce the amount of post-production work needed.
5 You can choose from the many options in the Library View Options dialog box (View > View Options) to customize the information Lightroom Classic CC displays for each image in the Grid and Loupe views. For the Loupe view and thumbnail tooltips, you can define two sets of options and then press the I key to switch between them. From the View > Grid View Style menu you can switch between Compact or Expanded Cells and activate or disable the display of information for either style.
