7 Creating a Photo Book
Lesson overview
Whether it’s produced for a client or as a professional portfolio, designed as a gift or as a way to preserve precious memories, a photo book makes a stylish way to share and showcase your images. The Book module makes it easy to design beautiful, sophisticated book layouts, and then publish them without leaving Lightroom. This lesson will give you the skills to create your own professional-looking photo book. You’ll learn how to:
Work with text and photo cells to modify page layout templates.
Set a page background.
Place and arrange images in a layout.
Add text to a book design.
Use the Text Adjustment tool.
Save your photo book, and custom page and book layouts.
Export your creation.

This lesson will take 1 to 2 hours to complete. Please log in to your account on peachpit.com to download the files for this lesson, or go to the “Getting Started” section at the beginning of this book and follow the instructions under “Accessing the lesson files and Web Edition.” Store the files on your computer in a convenient location. Your Account page is also where you’ll find any updates to the lessons or to the lesson files. Look on the Lesson & Update Files tab to access the most current content.

The Book module delivers everything you need to create polished book designs that can be uploaded directly from Lightroom Classic CC for printing through the on-demand book vendor Blurb, or exported to PDF and output on your own printer. Template-based page layout, an intuitive editing environment, and state-of-the-art text tools make it easy to present your photographs in their best light.
Getting started
Before you begin, make sure you’ve set up the LRClassicCIB folder for your lesson files and created the LRClassicCIB Catalog file to manage them, as described in “Accessing the lesson files and Web Edition” and “Creating a catalog file for working with this book” in the “Getting Started” section at the start of this book.
![]() Note
Note
This lesson assumes that you already have a basic working familiarity with the Lightroom Classic CC workspace. If you need more background information, refer to Lightroom Classic CC Help, or review the previous lessons.
If you haven’t already done so, download the lesson07 folder from your Account page at www.peachpit.com to the LRClassicCIBLessons folder, as detailed in “Accessing the lesson files and Web Edition” in the “Getting Started” section.
Start Lightroom Classic CC.
In the Select Catalog dialog box, make sure the file LRClassicCIB Catalog.lrcat is selected under Select A Recent Catalog To Open, and then click Open.
![]() Tip
Tip
If you can’t see the Module Picker, choose Window > Panels > Show Module Picker, or press the F5 key. If you’re working on macOS, you may need to press the fn key together with the F5 key, or change the function key behavior in the system preferences.
Lightroom Classic CC will open in the screen mode and workspace module that were active when you last quit. If necessary, switch to the Library module by clicking Library in the Module Picker at the top of the workspace.

Importing images into the library
The first step is to import the images for this lesson into the Lightroom library.
In the Library module, click the Import button below the left panel group.

If the Import dialog box appears in compact mode, click the Show More Options button at the lower left of the dialog box to see all the options in the expanded Import dialog box.
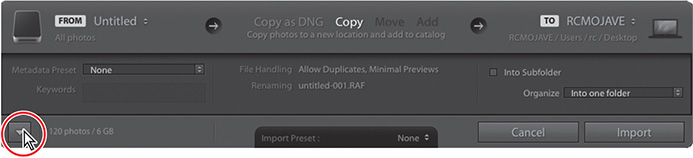
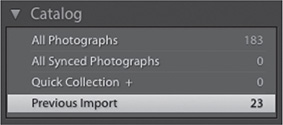
Under Source at the left of the expanded Import dialog box, locate and select your LRClassicCIBLessonslesson07 folder. Ensure that all 23 images in the lesson07 folder are selected (checked) for import.
In the import options above the thumbnail previews, select Add so that the imported photos will be added to your catalog without being moved or copied. Under File Handling at the right of the expanded Import dialog box, choose Minimal from the Build Previews menu and leave the Don’t Import Suspected Duplicates option unselected. Under Apply During Import, choose None from both the Develop Settings menu and the Metadata menu and type Lesson 07, Havana in the Keywords text box. Make sure that your import is set up as shown in the illustration below, and then click Import.
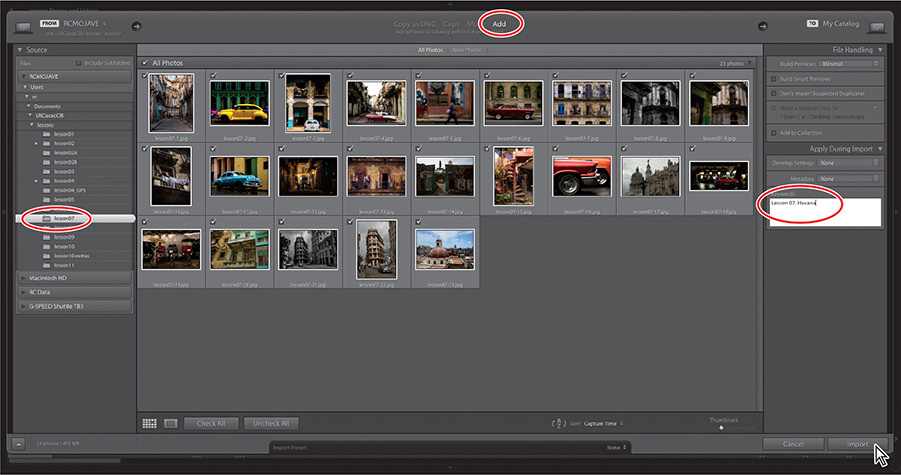
The 23 images are imported and now appear in both the Library module’s Grid view and the Filmstrip across the bottom of the Lightroom workspace.
Assembling photos for a book
The first step in creating a book is to gather the photos you wish to include. Since we just imported them, the images for this lesson are already isolated from the rest of your catalog in the Previous Import folder, which is selected as the image source.
![]() Tip
Tip
The first time you enter any of the Lightroom Classic CC modules, you’ll see tips that will help you get started by identifying the components of the workspace and stepping you through the workflow. Dismiss the tips by clicking the Close button. To reactivate the tips for any module, choose [Module name] Tips from the Help menu.
The Previous Import folder is merely a temporary grouping and you can’t rearrange the images inside it, or exclude a photo from your project without removing it from the catalog entirely. Instead, use either a collection or a single folder without subfolders as the source for the images in your book; both will let you reorder photos in the Grid view or the Filmstrip. For this exercise, you’ll create a collection—you can exclude an image from a collection without deleting it from your catalog.
Make sure that either the Previous Import folder in the Catalog panel or the lesson07 folder in the Folders panel is selected as the image source, then press Command+A/Ctrl+A or choose Edit > Select All.
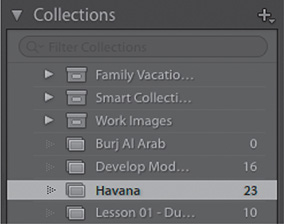
Click the plus sign (+) button in the Collections panel’s header and choose Create Collection. In the Create Collection dialog box, type Havana as the name for the collection. Make sure that the Include Selected Photos option is selected and all the other options are disabled, and then click Create. Your new collection appears in the Collections panel, where it is automatically selected.
Choose Edit > Select None. In the Toolbar, set the Sort order to File Name, then click Book in the Module Picker at the top of the workspace.

Working in the Book module
Whether you want to commemorate a family moment, organize your memories from a special trip, or create a vehicle to show your work, a photo book is an attractive and sophisticated way to showcase your photography. The Book module delivers everything you need to create stylish books that can be uploaded directly from Lightroom for printing through the on-demand book vendor Blurb, or exported to PDF and printed on your own printer.
Setting up a photo book
In the work area, you may or may not see photos already placed in page layouts, depending on whether you’ve already experimented with the Book module’s tools and controls. You can start this project by clearing the layout and setting up the workspace so that we’re all on the same page.
Click the Clear Book button in the header bar across the top of the work area. If you don’t see the header bar, choose View > Show Header Bar.

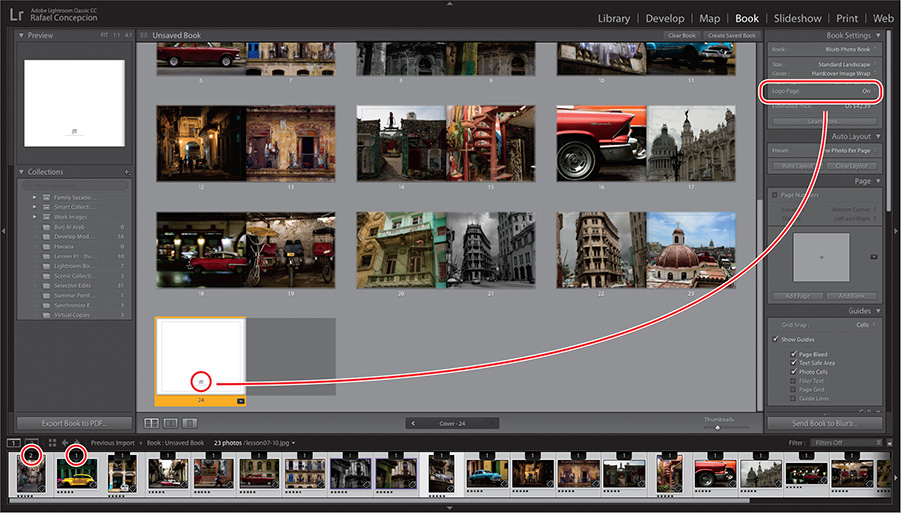
In the Book Settings panel at the top of the right panel group, select Blurb Photo Book from the Book menu and make sure that the Size, Cover, Paper Type, and Logo Page are set to Standard Landscape, Hardcover Image Wrap, Premium Lustre, and On, respectively. The estimated price of printing the book at the current settings is displayed at the bottom of the panel.

If it’s not already selected, click the Multi-Page View button at the far left of the Toolbar at the bottom of the work area. In the View menu, disable Show Info Overlay.

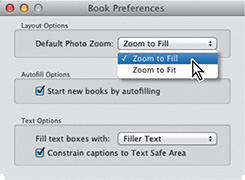
Choose Book > Book Preferences and examine the options. You can choose whether photos are zoomed to fit their image cells or cropped to fill them, toggle the Autofill feature for new books, and set your preferences for text behaviors. Leave the settings at the defaults and close the Book Preferences dialog box.
The Autofill feature is activated by default; if you just entered the Book module for the first time, you would have seen the images from the Havana collection already placed in the default book layout. An automatically generated layout can be a great starting point for a new book design, especially if you’re beginning without a clear idea of exactly what you want.
![]() Note
Note
If you’re publishing to Blurb.com, auto-layout is limited to books of 240 pages. There is no auto-layout page limit for books published to PDF.
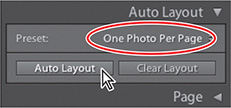
Expand the Auto Layout panel, if necessary. From the Auto Layout Preset menu, choose the Left Blank, Right One Photo, With Photo Text layout, then click the Auto Layout button. Scroll in the work area to see all the page thumbnails. Click the Clear Layout button and repeat the procedure for the One Photo Per Page auto-layout preset.
Take a look at the book results in the work area; scroll, if necessary, to see all the page thumbnails arranged as two-page spreads in the Multi-Page view. Hide the Module Picker and the left panel group by pressing F5 and F7, or by clicking the triangles at the top and left edges of the Lightroom workspace. Drag the Thumbnails slider in the Toolbar to reduce or enlarge the thumbnails.
![]() Note
Note
Blurb offers a discounted price for photo books that incorporate the Blurb logo on the last page.
Lightroom generates a book with a cover, separate pages for each of the images in the collection—placed in the order in which they appear in the Filmstrip—and a twentieth page reserved for the Blurb logo. You can’t place a photo on the Blurb logo page, but you can disable it in the Book Settings panel, if you prefer.
![]() Tip
Tip
If you want to rearrange the order of images in the Filmstrip before you click Auto Layout, you’ll first need to save your book.
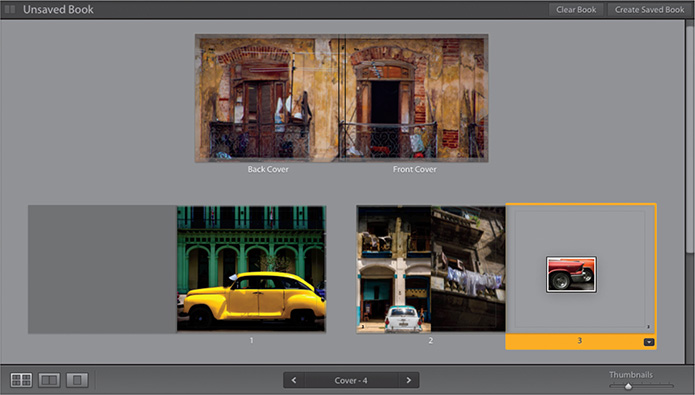
The first image in the Filmstrip is placed on the front cover; the last photo in the series becomes the back cover image. The number above each photo in the Filmstrip indicates how many times it has been used in the book; the first and last images have each been used twice—on the cover and also on pages 1 and 23.
Changing page layouts
Using an auto-layout preset can help you get started on your book. Then you can focus on individual spreads and pages to introduce subtlety and variety to the design. For this project, however, you’ll build your book layout from scratch.
In the Auto Layout panel, click the Clear Layout button.
Right-click the Page panel header and choose Solo Mode from the menu.
In the Multi-Page view, double-click the front cover (the right side of the spread).

The cover layout fills the work area in the Single Page view, with the front cover’s photo cell selected, as indicated by the yellow border. The Page panel shows a diagrammatic preview of the default cover template: two image cells (identifiable by central cross-hairs) and a narrow text cell positioned along the book’s spine.
Click the Change Page Layout button (it’s black with a gray triangle) to the right of the layout preview thumbnail in the Page panel, or in the lower-right corner of the cover spread displayed in the work area.
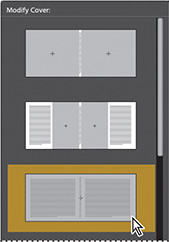
Scroll down in the page template picker to see all of the available cover layout templates. Gray areas with central cross-hairs indicate image cells; rectangles filled with horizontal lines represent text cells. Click to select the third template in the menu. The single cross-hairs at the center of the spread shows that this template has a single image cell that extends across both covers, and three text cells: one on the back cover, one on the spine, and one on the front cover.
Expand the Guides panel. Make sure that the Show Guides option is selected, then watch the layout in the work area as you toggle each of the guides in turn. Move the pointer over the layout to see the borders of the text cells.
The Page Bleed guide’s wide gray border shows the area to be cut off after printing. A thin gray line borders the Text Safe Area, where your text will be well clear of accidental trimming. The Filler Text guide shows filler text (here, the word Title) to mark the position of text cells. Filler text disappears when you click a text cell.
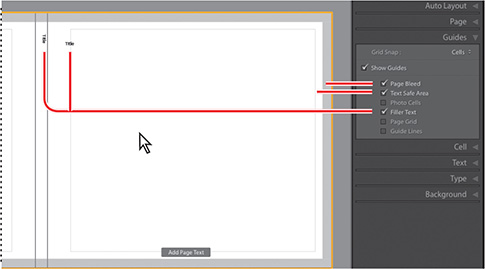
Disable Photo Cells, leaving the three options mentioned above selected, then click the Multi-Page View button in the Toolbar.
The first page in a photo book is always on the right side of the first spread; the grayed-out left side represents the inside of the front cover, which is not printed. Likewise, the last page in a photo book to be published to Blurb must always occupy the left side of the final spread. At this stage, your book consists of a cover and a single double-sided page, the back of which is the Blurb logo page.
Right-click page 1 and choose Add Page from the menu. A second spread appears in the Multi-Page view. Right-click page 2 and choose Add Page to copy the same page layout to page 3.
Click to select page 2, and then click the Change Page Layout button below the lower-right corner of the page.

For inside pages, unlike the cover, the page template picker groups layout templates in categories according to style, project type, or the number of photos per page.
![]() Tip
Tip
To add a page layout to the Favorites category in the template picker, click the circle that appears in the upper-right corner of the template’s thumb-nail when you move the pointer over it.
Click 2 Photos to see all the templates with two image cells. Select the fourth template: a layout without text cells that fills the page with two portrait-format images, side by side. In the Guides panel, select Photo Cells so that you can see the changed page layout.
![]() Note
Note
The context menu of a page number cell also lists commands that enable you to hide the page number on a selected page, or set the page numbering to start from a page other than page 1.
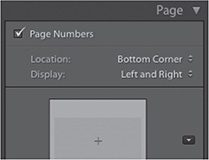
Adding page numbers to a photo book
Double-click page 1 to shift to Single Page view, then select Page Numbers at the top of the Page panel. From the Location menu, choose Bottom Corner, and choose Left and Right from the Display menu. Right-click page 1 and make sure that the Apply Page Number Style Globally option is activated in the menu.
Click the new page number cell in the page preview, then expand the Type panel and inspect the default font, style, size, and opacity settings. With Apply Page Number Style Globally activated, any change to these type style settings is made throughout the book; for now, leave them unchanged.
Placing photos in a book layout
You can add photos to a page layout in any of the three views.
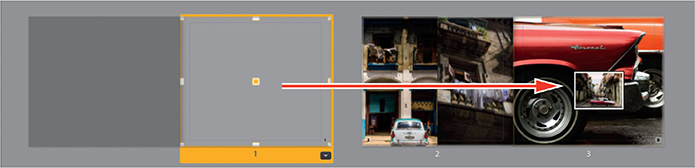
Click the Multi-Page view button at the left of the Toolbar, then drag the thirteenth thumbnail in the Filmstrip, lesson07_13.jpg, onto the cover spread. Drop it onto the spread when you see the green plus sign (+) appear.

Drag the lesson07_2 image from the Filmstrip to page 1 in the Multi-Page view. Place the lesson07_3 and lesson07_10 photos in the left and right image cells on page 2, respectively, and the lesson07_16 image on page 3.
![]() Note
Note
An exclamation mark badge in the upper-right corner of an image cell indicates that the image may not be of a high enough resolution to print well at the current size. You can either reduce the size of the image in your layout, or ignore the alert if you are prepared to accept a lower print resolution.
Changing the images in a photo book
You can remove a photo from a page layout by right-clicking the image in the layout and choosing Remove Photo from the menu. If you simply want to replace a photo, you don’t need to remove it first.
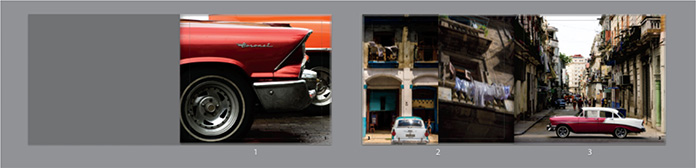
Drag the lesson07_4 photo—the fourth image in the Filmstrip—onto page 1. This new photo replaces the original lesson07_2 image.
In the Multi-Page view, drag the image on page 1—lesson07_4—onto the photo on page 3—lesson07_16. The photos on pages 1 and 3 swap places.
![]() Tip
Tip
You should see the image thumbnail move as you drag, not the page itself. If you move the page instead, drag it back into place and try again, making sure to drag from well inside the photo cell.
![]() Tip
Tip
You can easily rearrange the order of the pages in your photo book—or even shuffle entire spreads—in the same way; simply drag them to new positions in the Multi-Page view.
Working with photo cells
The photo cells in a page layout template are fixed in place; you can’t delete them, resize them, or move them on the page. Instead, you can use the cell padding—the adjustable space around a photo within its cell—to position the images in your page layout exactly as you want them.
Double-click page 3. The Book Editor switches from Multi-Page view to Single Page view.

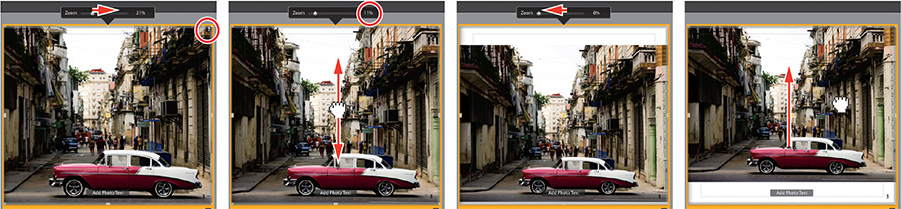
Click the photo to select it, and then experiment with the Zoom slider. When you enlarge the image too much (for this photo, above 18%), an exclamation-point badge appears in the upper-right corner to alert you that the photo may not print well. Right-click the photo and choose Zoom Photo To Fill Cell; the image is scaled so that its shortest edge fills the cell (at a zoom value of 11%, for this photo). Drag the photo to position it vertically within the cell. Drag the slider all the way to the left; the minimum setting reduces the image so that its longest edge fits within the image cell. Click well within the borders of the photo and drag it to the top of the cell.
![]() Tip
Tip
If you don’t see the Amount slider, click the triangle above the padding values.
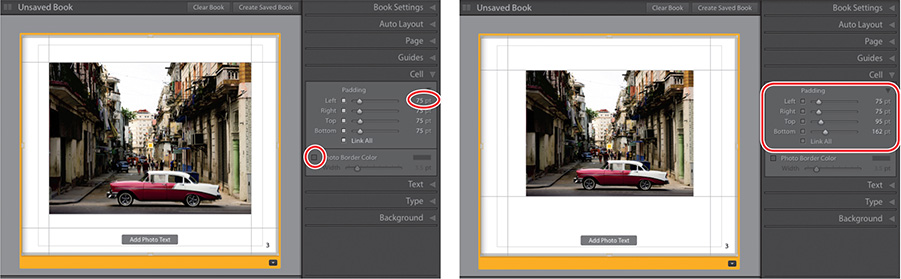
Leave the photo at the 0% zoom setting. Expand the Cell panel and increase the padding by dragging the Padding Amount slider or typing a new value of 75 pt.
Click the black triangle above the Padding value to expand the padding controls. By default, the four controls are linked so the adjustment you made in the previous step changed all four values. Disable the Link All option (the checkbox darkens), then set the Top padding to 95 pt and the Bottom value to 162 pt.
By starting with the right template and then setting the photo cell padding, you can position an image anywhere on the page, cropped however you wish.
In the Cell panel, select Link All, and then drag any of the sliders to set all of the padding settings to zero. Right-click the photo in the Single Image view and choose Zoom Photo To Fill Cell. Drag the image vertically inside its cell to find a pleasing crop.
Click the Spread View button in the Toolbar to see pages 2 and 3 as a spread.

Select the image on the left of page 2. Set the linked padding controls to 50 pt, then unlink them and reduce the Right padding to 15 pt. Repeat the process for the photo on the right of page 2, but this time, reduce the Left padding to 15 pt.

Double-click the yellow frame below page 2 to see it enlarged in the Single Image view. In the illustration at the right, the photo on the left is zoomed to about 8%, and the photo on the right is zoomed to about 10%. Drag the images inside their cell padding to position them as shown. For a clearer view, click the gray space outside the page to deselect it.
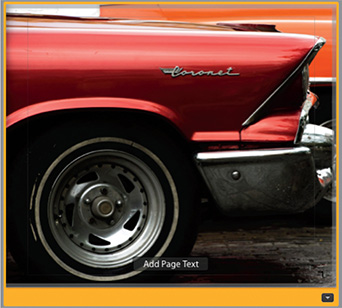
In the Toolbar below the Single Image view, click the left navigation arrow to jump to page 1. The car is a little off to the left. Drag the car in the photo cell to get the bumper of the Coronet to be on the right edge.
Click away from the page to deselect it, and then click the Multi-Page View button in the Toolbar for an overview of the changes you’ve made.
Setting a page background
By default, all the pages in a new book share a plain white background. You can change the background color, set up a partially transparent backdrop image, or choose from a library of graphics, applying this design to the entire book or just one of the pages.
You can start by adding two more spreads to your book layout.
Right-click page 4 and choose Add Page from the menu. To apply the default layout to page 5, right-click page 5 and choose Add Page. Right-click page 6 and choose Add Blank Page.
Click to select page 6 in the Multi-Page view, and then click the Spread View button in the Toolbar.
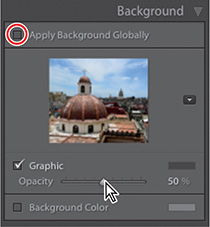
Expand the Background panel. Deselect the Apply Background Globally option, then drag the last photo in the Filmstrip, lesson07_23.jpg, to the preview pane in the Background panel. Drag the slider to set the opacity of the image to 50%.
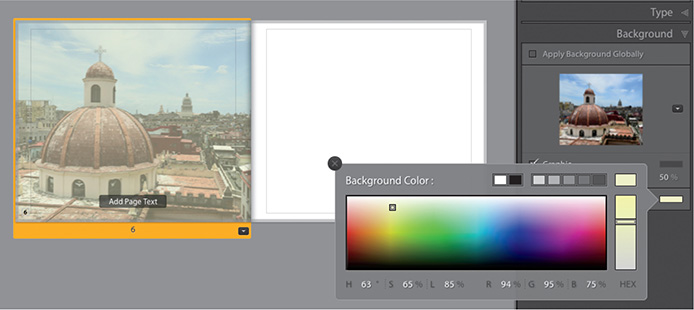
Select the Background Color option, and then click the adjacent color swatch to open the color picker. Drag the saturation slider at the right of the color picker about two thirds of the way up its range, and then drag the eyedropper cursor in the picker to find a muted tone; I chose a color with R, G, and B values of 94, 95, and 75, respectively. Press Return/Enter to close the picker.
In the Background panel, activate the Apply Background Globally option, and then click the Multi-Page View button in the Toolbar.
Your background is applied to every page (except the Blurb logo page, where only the color is applied); it can be seen on page 7 and behind the images on page 2. On other pages, the background design is hidden behind photo cells.
Deselect the Background Color option, then right-click the image in the background preview pane and choose Remove Photo. Deselect Apply Background Globally.
Select page 2 in the Multi-Page view, and then reactivate the Background Color option. Click the color swatch to open the color picker, and then click the black swatch at the top of the picker. Press Return/Enter to close the color picker.
Adding text to a photo book
There are several ways to add text to your pages in the Book module, each useful in different situations:
Text cells that are built into page layout templates are fixed in position; they can’t be deleted, moved, or resized, but you can use the adjustable cell padding to position text anywhere on a page.
A photo caption is a text cell that is linked to a single image in the layout. It can be positioned above or below an image, or overlaid on the photo, and can be moved vertically on the page.
A page caption is a text cell that is linked to the page as a whole, rather than any particular image. Page captions span the full width of the page; you can move them vertically, and then adjust the cell padding to position text horizontally, enabling you to place custom text anywhere in your layout.
On a single page, you can add a page caption, and a separate photo caption for each image—even if the page is based on a layout template that has no fixed text cells.Fixed text cells and photo captions can be configured for custom text or set to display captions or titles extracted automatically from your photos’ metadata.
The Book module incorporates state-of-the-art text tools that give you total control over every aspect of the text styling. Type attributes can be adjusted using sliders or numerical input, or tweaked visually with the Text Adjustment tool.
Working with text cells
As mentioned above, text cells incorporated in a page layout template are fixed in place. Instead, you can use the adjustable cell padding—the space surrounding the text within its cell—to position text in your page layout exactly as you want it.
![]() Tip
Tip
To select a page or a spread, rather than the text and image cells in the layout, click near the edge of the thumbnail or just below it.
Click the Multi-Page View button to see your entire book layout, then double-click just below the cover spread to zoom in on the layout. Click in the center of the front cover to select the fixed text cell.
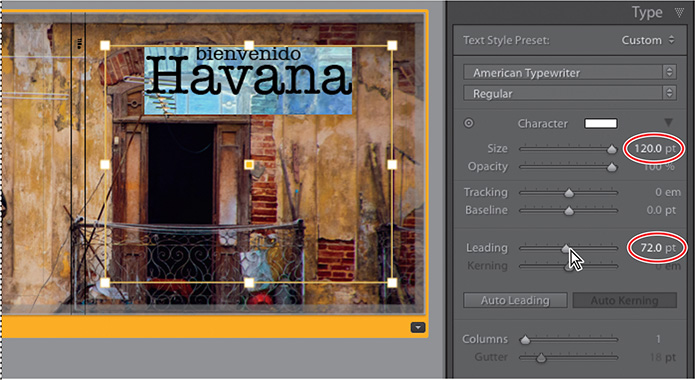
Expand the Type panel. Make sure that the Text Style Preset is set to Custom to accommodate manually entered text, rather than metadata from the image.
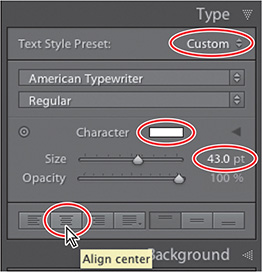
Choose a font and type style from the menus below the preset setting. I chose American Typewriter, Regular. Click the Character color swatch to open the color picker, click the white swatch at the top of the picker, and then press Return/Enter to close the picker. Set the type size to 43 pt, and leave the opacity set to 100%. Click the Align Center button at the lower left of the Type panel.
Type the word bienvenido, then, press Return/Enter and type Havana. Double-click the word Havana to select it, and then type 120 pt in the Size text box to increase the size of the selected text.
Keeping the text selected, click the black triangle at the right of the Character color swatch to see the type attribute controls. Reduce the Leading—the spacing between the selected text and the line above it—to 72 pt.
![]() Tip
Tip
Once you’ve changed the Leading value, the Auto Leading button becomes available below the text adjustment controls, making it easy for you to quickly reinstate the default setting. The Auto Kerning button works the same way.
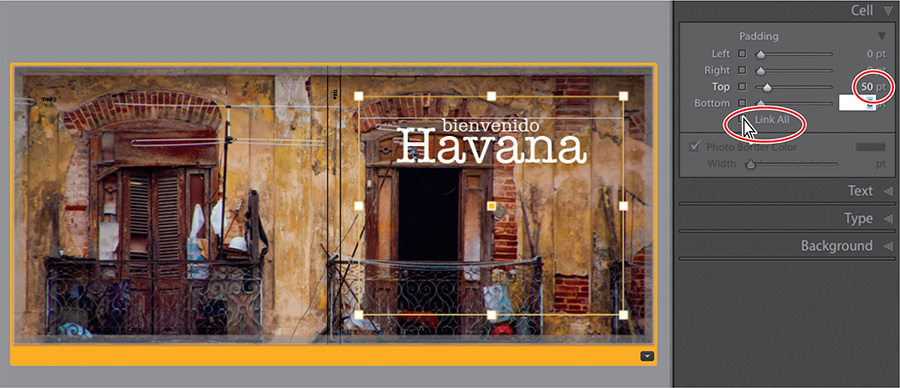
Click inside the text cell, but away from the text, to keep the cell selected while deselecting the text, then expand the Cell panel. Deselect the Link All option, and then increase the Top padding to 50 pt.
Fine-tuning type
In the Type panel, Lightroom incorporates a suite of sophisticated, yet easy-to-
use, type tools that allow you detailed control over the text styling. You can use the adjustment sliders and numerical input to set type attributes in the Type panel, or tweak your text visually in any view using the intuitive Text Adjustment tool.
Expand the Type panel and examine the four controls below the Size and Opacity sliders. Be sure to undo any changes you make at this stage.
Tracking adjusts the letter spacing throughout a text selection. You can use tracking to change the overall appearance and readability of your text, making it look either more open or more dense.
Baseline adjusts the vertical position of selected text relative to the baseline—the imaginary line on which the text sits.
Leading adjusts the space between selected text and the line above it.
Kerning adjusts the letter spacing between specific pairs of letters. Some pairings produce optical effects that cause letter spacing to appear uneven; place the text insertion cursor between two letters to adjust the kerning.
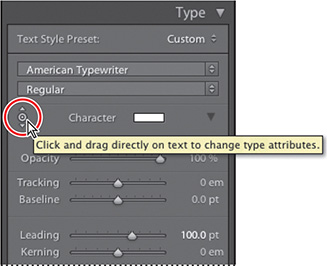
Select all of the text in the front cover text cell, and then click to activate the Text Adjustment tool, to the left of the Character color setting in the Type panel.
Drag horizontally across the selection to adjust the text size. The adjustment is applied relatively; the different sizes of text are changed by relative amounts. Choose Edit > Undo or press Command+Z/Ctrl+Z to undo the change.
Drag vertically over the selection to adjust the leading, then choose Edit > Undo or press Command+Z/Ctrl+Z to undo.
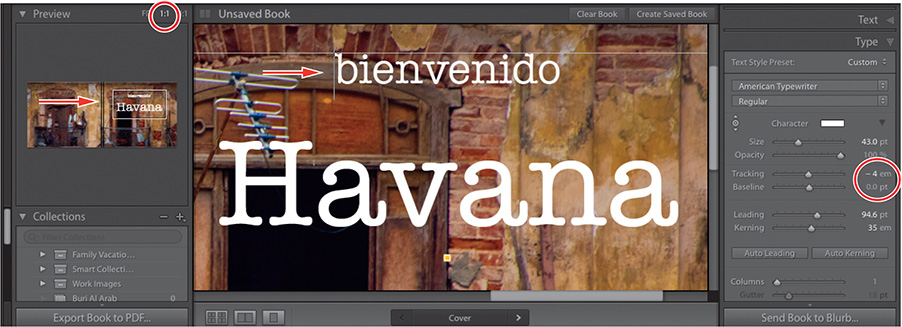
Hold down the Option/Alt key—to temporarily disable the Text Adjustment tool—and drag to select the words bienvenido, leaving the word Havana unselected (you may have to increase the leading on Havana to do this). Release the Option/Alt key and the mouse button, and hold Command/Ctrl as you drag horizontally over the selected text to decrease the tracking slightly. Watch the Tracking control in the Type panel as you drag to set a value of –4 em.
Release the Option/Alt key and the mouse button. Hold Command/Ctrl and drag vertically over the selected text to shift it in relation to its baseline. Undo the change and click away from the text to deselect it.
If necessary, press F7, or choose Window > Panels > Show Left Module Panels. In the zoom ratio picker in the header of the Preview panel, click 1:1. Drag the white rectangle in the preview to focus on the front cover text. Make sure that the Text Adjustment tool is still active, then click once to position the text insertion cursor to the left of the word bienvenido. Drag to the right over the insertion point. Watch the Type panel as you drag to set a Kerning value of 35 em.
Reset your leading for the type by selecting the text and dragging the leading slider to an area you find desirable. Click the Text Adjustment tool in the Type panel to disable it, and then click the Multi-Page View button in the Toolbar to see your entire book layout. Double-click page 1 to zoom to the Single Page view.
Working with captions
Unlike the fixed text cells built into layout templates, page and photo caption cells can be moved vertically; horizontal placement of captions is achieved by adjusting padding. Each page can include one page caption text cell and one photo caption cell for each photo on the page, even if the page template has no built-in text cells.
Right-click the header of the Type panel and disable Solo Mode; then, leaving the Type panel open, expand the Text panel.
Move the pointer over page 1. The template for this page has no fixed text cell; hence, nothing is highlighted. Click the photo, then click the Add Photo Text button. In the Text panel, the Photo Text controls become active. Press Command+Z/Ctrl+Z to undo the photo caption. Now click the yellow footer below the photo to switch the Add Photo Text button to the Add Page Text button. Click the Add Page Text button, and the Page Text controls are activated in the Text panel.
 Tip
TipIf you prefer, you can add a photo or page text caption by selecting the respective option in the Text panel, rather than using the floating buttons.
To anchor the page caption to the top of the page, click the Top button in the Page Text controls, then drag the Offset slider to 9 pt.
 Note
NoteUnlike fixed template text cells and photo captions, page captions can’t be set to display information drawn from a photo’s metadata; they can only be used for custom text.
With the page caption active, set up the Type panel as you did for steps 2 and 3 of the “Working with text cells” exercise earlier in this lesson, but set the Size to 60 pt, set the Tracking to 3 em, and click the Auto Leading button. Then type whatever you like in the page caption, using the Return/Enter key to break the lines so that the text is shaped to fit the image, as in the illustration below.

Click the Multi-Page View button in the Toolbar.
Creating a custom text preset
You can save your text settings as a custom text preset, so you can apply the same style elsewhere in your book or reuse it in a different project, by choosing Save Current Settings As New Preset from the Text Style Preset menu in the Type panel.
Saving and reusing custom book page layouts
Once you’ve used cell padding and caption text to modify a page layout, you can save your design as a custom template that will be listed in the Page Layout menus.
Expand the Page panel, then watch the layout thumbnail as you right-click the page 1 preview and choose Save As Custom Page.
The original single-photo layout now is overlaid by a text cell with the proportions and position of the page caption we just created.
Click the Change Page Layout button below the lower-right corner of the page preview, or to the right of the Page panel’s layout thumbnail. The saved layout is listed in the Custom Pages category.
Another way to reuse the work you’ve put into a layout is to copy and paste it directly onto another page in your book, where you can use it as is or make further modifications to the design. You’ll find the Copy Layout and Paste Layout commands in the same menu you used in step 1 when you right-clicked the page.
Creating a saved book
Since you entered the Book module, you’ve been working with an unsaved book, as is indicated in the bar across the top of the work area.

Until you save your book layout, the Book module works like a scratch pad. You can move to another module, or even close Lightroom, and find your settings unchanged when you return, but if you need to clear the layout to begin another project, all your work will be lost.
Converting your project to a saved book not only preserves your work, but also links your book layout to the particular set of images for which it was designed.
Your photo book is saved as a special kind of collection—an output collection—with its own listing in the Collections panel. Clicking this listing will instantly retrieve the images you were working with and reinstate all of your settings, no matter how many times the book layout scratch pad has been cleared.
Click the Create Saved Book button in the bar at the top of the work area, or click the New Collection button in the header of the Collections panel and choose Create Book.
In the Create Book dialog box, type Havana Book as the name for your saved layout. Make sure that, in the Location options, the Inside option is selected with the Havana collection chosen from the menu, then click Create.
![]() Tip
Tip
Adding more images to your saved photo book is easy: simply drag photos to the book’s collection in the Collections panel. To jump directly from the Library to your layout in the Book module, move the pointer over your saved book in the Collections panel and click the white arrow that appears to the right of the image count.
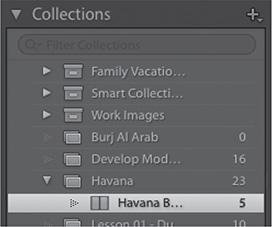
Your saved book appears in the Collections panel, marked with a Saved Book icon and nested inside the source collection. The image count shows that the output collection includes only five of the photos in the source collection. The bar above the work area shows the name of the book.

Depending on the way you like to work, you can save your book layout at any point in the process—you could create a saved book as soon as you enter the Book module with a selection of images, or wait until your design is finalized.
Once you’ve saved your book project, any further changes you make to the design are auto-saved as you work.
Copying a saved book
Your saved photo book design represents a lot of effort. If you want to try something different without losing what you already have, or add pages and photos without a clear idea of what you’d like to achieve, you can duplicate your saved book and make changes to it without the risk of losing your work thus far.
Right-click your saved book in the Collections panel and choose Duplicate Book from the menu.
If you’re happy with your extended design, you can delete the original saved book, and then rename the duplicate.
Right-click the original saved book in the Collections panel and choose Delete, then confirm the deletion.
Right-click the duplicated book in the Collections panel and choose Rename. In the Rename Book dialog box, delete the word Copy from the end of the book’s name, and then click Rename.
Exporting a photo book
You can upload your book to Blurb.com, or export it to PDF and print it at home.
To publish your photo book to Blurb.com, click the Send Book To Blurb button below the right panel group.
In the Purchase Book dialog box, either sign in to Blurb.com with your email address and password, or click “Not A Member?” in the lower-left corner and register to get started.
Enter a book title, subtitle, and author name. You’ll see an alert at this stage warning that your book must contain at least 20 pages; the Upload button is disabled. Click Cancel, or sign out of Blurb.com first and then cancel.
Books published to Blurb must have between 20 and 240 pages, not including the front and back covers. Blurb.com prints at 300 dpi; if a photo’s resolution is less than 300 dpi, an exclamation point badge (!) appears in the upper-right corner of the image cell in the work area. Click the exclamation point to find out what print resolution can be achieved for that photo. Blurb.com recommends a minimum of 200 dpi for optimum quality.
For help with printing, pricing, ordering, and other Blurb.com issues, visit the Blurb.com Customer Support page.
To export your photo book as a PDF file, first choose PDF from the Book menu at the top of the Book Settings panel. Examine the controls that appear in the lower half of the Book Settings panel. You can leave the JPEG Quality, Color Profile, File Resolution, Sharpening, and Media Type settings at their defaults for now (these will change based on the printer and paper you’re using). Click the Export Book To PDF button below the right panel group.

In the Save dialog box, type Havana as the name for the exported book. Navigate to your LRClassicCIBLessonslesson07 folder, and then click Save.
To export your Blurb photo book as a PDF file for proofing purposes, leave the Book selection set to one of the Blurb choices, and click the Export Book To PDF button below the left panel group.
Well done! You’ve successfully completed another Lightroom Classic CC lesson. In this lesson, you learned how to put together an attractive photo book to showcase your images.
In the process, you’ve explored the Book module and used the control panels to customize page templates, refine the layout, set a backdrop, and add text.
In the next lesson, you’ll find out how to present your work in a dynamic slideshow, but before you move on, take a few moments to reinforce what you’ve learned by reading through the review questions and answers on the next page.
Review questions
1 How do you modify a photo book page layout?
2 What options are available for page numbering?
3 What is cell padding and how is it used?
4 What text attributes are affected by the Tracking, Baseline, Leading, and Kerning controls in the Type panel?
5 How can you use the Text Adjustment tool to fine-tune text?
Review answers
1 Click the Change Page Layout button to the right of the layout preview thumbnail in the Page panel, or in the lower-right corner of a selected page or spread displayed in the work area. Choose a layout category, and then click a layout thumbnail to apply that template. Use cell padding to tweak the layout.
2 Page numbering can be found in the Page panel, where you can also set the global position for the numbers, and whether you want them on both right and left pages. Use the Type panel to set text style attributes. Right-click a page number to apply the style globally, hide the number on a given page, or have the page numbering start on a page other than page 1.
3 Cell padding is the adjustable space around an image or text within its cell. It can be used to position text or a photo anywhere on the page. In combination with the Zoom slider, it also can be used to crop an image any way you wish.
4 Tracking adjusts the letter spacing throughout a text selection, making it look either more open or more dense. The Baseline setting shifts selected text vertically in relation to the baseline. Leading affects the space between selected text and the line above it. Kerning adjusts the letter spacing between specific pairs of letters.
5 Drag horizontally across selected text to adjust the text size. Drag vertically over the selection to increase or decrease the leading (line spacing). Hold down the Command/Ctrl key as you drag horizontally over selected text to adjust the tracking. Hold down the Command/Ctrl key and drag vertically over a text selection to shift it in relation to its baseline. Hold down the Option/Alt key to temporarily disable the Text Adjustment tool when you wish to change the text selection. Click between a pair of letters to place the text insertion cursor, and then drag horizontally across the text insertion point to adjust kerning.