11 An Overview of My Workflow
Lesson overview
Now that you have a solid command of how to use Lightroom, you’ll find that making and developing images comes quite easily. The harder part of the equation will be, what do you do when your computer fills up? Or what happens when you are using an external hard drive to store your images and it fills up? I often tell photographers that Lightroom is a program that organizes your images first and then happens to develop them. To truly master it, you’ll need to develop a solid workflow strategy.
After teaching thousands of students online and in live seminars, I’ve learned that it’s this part of the process that people find the most elusive. This lesson isn’t intended to be a follow-along step-by-step guide, but more of a peek at how I organize myself. By walking you through my process and showing you the gear that I find the most useful, perhaps you’ll get a better idea of how to get organized once and for all. In this lesson, you’ll learn how to:
Go from hard drive to external drive to network-attached storage (NAS) device, and how NAS devices can help with cloud sync.
Use built-in tools for backup of external drives.
Leverage virtual copies for offline use.
Implement smart collections for essential tasks.

This lesson will take 45 minutes to complete. There are no download files.

One of the best lessons I’ve ever received in photography is to revisit a location as many times as you can. I’ve traveled to Dubai on about 11 different occasions, waiting for the right atmospheric conditions to happen. At certain times of the year, fog rolls in from the desert and moves out into the Arabian Gulf. After many years and many visits, I finally was at the right place at the right time.
Keep your computer clean
If there’s one thing that I’ve noticed a direct correlation with, it’s that the more free space I have on my computer, the better it works. Anytime my computer gets closer to only 10 or 20 GB free, I start losing a lot of its performance. My goal, then, has always been to manage my projects in a manner that leaves as much free space on my computer as possible.
If you look at the All Photographs folder in my Lightroom Catalog panel, you’ll see that I have 321,825 pictures. (Don’t worry, I’d guess that 321,800 of them aren’t any good. I’m a bit of a pack rat.)
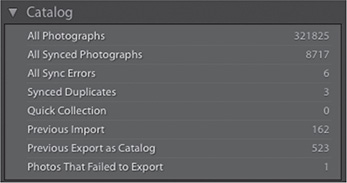
However, looking at my computer’s desktop, you’ll see that I have a little more than 300 GB of hard drive space free. This book is probably taking up about 100 GB of information, and I have a video project I’m working on that’s about 150 GB. So in actuality, I probably have about 550 GB of free space on my computer on a 1 TB hard drive.

How do I keep that much space free on my computer while still having more than 321,000 images in my Lightroom catalog? The answer is my workflow strategy, which I call a hot, medium, and cold strategy.
Workflow overview: Hot, medium, and cold
Before we work through my workflow, let me explain the process from a 35,000-foot view.
Whenever I work on a shoot—whether it’s a personal project, an assignment, or a commercial job—that project is known as a hot project. The project requires my near daily attention, and it will be the set of images that I am constantly going over in Lightroom every time it is opened.
Once the job is completed, the project moves into medium status. I may not need access to that folder of images all of the time, but there is a chance that I may be called on to provide something from it. Because of this, I move the job from the computer onto a removeable drive, and I use Smart Previews to manage it. That drive moves around with me, and is backed up by the built-in features of my operating system (for me, its Time Machine in Apple’s Mojave operating system). Should I need to do any work on the images, I can work on them in Lightroom, and synchronize the changes when I plug the external hard drive into my computer.
After a while, that project will not be accessed as much and it moves into cold status. When that happens, I move the folder from the removable drive and onto a network-attached storage device, or NAS. That NAS device lives in my home, and lets me have access to the images whenever I am connected to my home network. In a pinch, I can always keep the Smart Previews in my catalog, but even those get purged when the job becomes too cold. In an extreme case, I can always log in to my NAS device from a browser anywhere and do a download of a series of files should I need to.
Throughout this process, I use collection sets and collections to keep my work organized, and I try to be diligent about how I label the files, as well as the keywords that I apply to the images.
Let’s pick apart the pieces now, one by one.
Workflow: Hot status
For the purposes of this demonstration, I have created a new catalog in Lightroom and am starting the import process with a card that I had in my Fuji XT3.
Importing the pictures
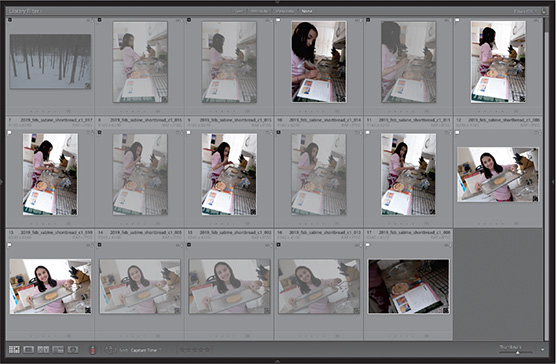
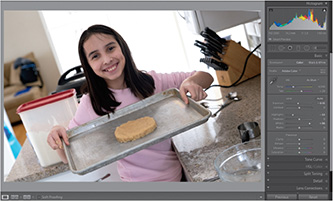
I took a couple of pictures of my daughter, Sabine, making shortbread and will use that as our work project. We won’t be developing any pictures, so we just need files to move across the process.

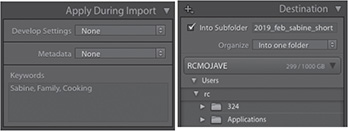
The key parts of the import are outlined here. In the Import dialog box’s File Handling panel, the Build Previews menu should be set to Minimal, and no other options selected. In the File Renaming panel, I use a custom naming template that uses an underscore instead of a dash in the custom text. It ends with a three-digit number. For the custom name, I entered 2019_feb_sabine_shortbread_c1.

![]() Note
Note
If you want to learn how to create a custom naming template like I used here, be sure to visit Lesson 2 to walk through it.
In the Apply During Import panel, I typed the keywords Sabine, Family, and Cooking, and I’m organizing all of the images into one folder called 2019_feb_sabine_shortbread (minus the c1 from the filename—it’s not an image from a memory card, it’s a folder).
![]() Note
Note
Saving files on the desktop is more a function of organization than a technical function. If you have a specific place on your computer that you want to store a hot project, by all means do so. Just make sure that all of the projects go there.
I create this folder on my desktop. Working on my computer, I treat my desktop as I treat my desk at home. If it is on my desk, it gets my attention and that is what I am working on for the day. Once I finish the job, it gets moved off my desktop and filed somewhere. Not having excessive files and folders on my desktop helps keep me focused, as I know exactly what I am supposed to be working on.
![]() Note
Note
Make sure you check out the culling method we covered briefly in Lesson 1 and covered in more detail in Lesson 4.
Iterative culling: picks and rejects
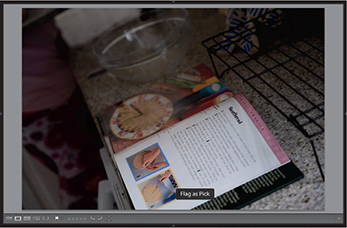
Now that the folder has been imported and is on my desktop, I immediately get to work culling the photos. The logic here is that, at this moment, you’ll know exactly which images are the bad ones from the shoot (out of focus, underexposed, cut off body parts, etc.), so you should go through them and mark all of those bad ones as rejected. If, during this process, you see an image that is a 5-star image, mark it as such. The bigger point here is to get all of the images sorted and ranked before you start developing.
This also has a very practical purpose. Imagine you are doing a portrait shoot for a client and you promised them six pictures. You import the photos and notice that there are 90 pictures in the take. After going through the images, you can weed out a majority of the bad ones, and find six images to focus on immediately.
At this point, you can be done with the job. You found six images you can give to the client, so you can mark them as your picks, develop them, and move on to the next job.
There will be plenty of photography jobs that will require hours of work deciding the best pictures. Commercial photographer Joe McNally once told me, “There is food for the soul, and food for the table.” Get the food for the table out as efficiently as you can so you can focus on the food for the soul.
Collection sets and collections
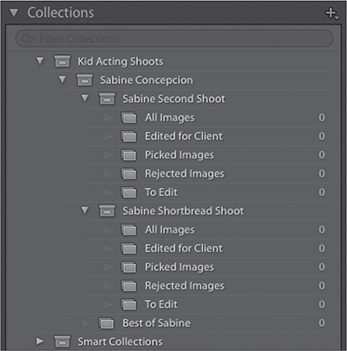
Before I start dragging anything around in Lightroom, I make a collection set for the shoot and create collections inside of it. The collection set has the shoot name, while the collections are used for different selections of images from the shoot. All of my collection sets include the collections you see in the illustration at right.
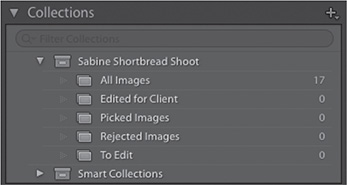
There is a Rejected Images collection in the collection set because, sometimes, clients ask that you don’t delete any images. In those cases, I place all the bad images in the Rejected Images collection.
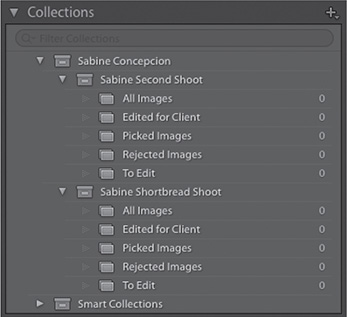
I organize my individual shoots in collection sets because it allows me to quickly find the images that I need. It also helps me organize future shoots with greater precision. For example, what if I did another shoot with Sabine? Wouldn’t I want to be able to quickly go through those images? I can make a second collection set for the second Sabine shoot and keep it organized like the first one.

Extrapolating this analogy, what if I wanted to group all the shoots that I do with Sabine in one place? I could make a collection set called Sabine Concepcion and place the two collection sets of the shoots with her inside it. If I want to see all the shoots, I can click the main collection set. If I want to see individual parts of a shoot, I can click the individual collections in that shoot.
![]() Note
Note
Make sure you check out how to make collections and collection sets in Lesson 4.
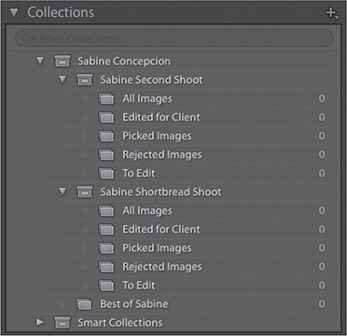
In this structure, I can see the picked images for each shoot in the individual collections, but what if I want to see the best of all of the shoots in one spot? I can create a collection named Best of Sabine and have that collection live inside the main collection set. I can drag any images into it from anywhere and have access to the best of the best in one spot.
One final example: what if Sabine is a client—a child actress—and this is my business? I can create another collection set called Kid Acting Shoots, and place the Sabine collection set inside it. This structure allows me to collapse the Kid Acting Shoots collection set, and all collection sets in it, showing them only when I need them.
![]() Note
Note
In the accompanying video series, I share a couple more sample collection set breakdowns that I think could be helpful if you are a landscape, portrait, wedding, or documentary photographer. To find and download the files, see the “Getting Started” section at the beginning of the book.
The one thing that I can guarantee you in photography is that you will be making a lot of pictures. Developing a system to organize yourself like this may seem slow at first, but it is absolutely necessary as your inventory of images grows. I urge you to spend time reviewing this part of the process and developing your own system.
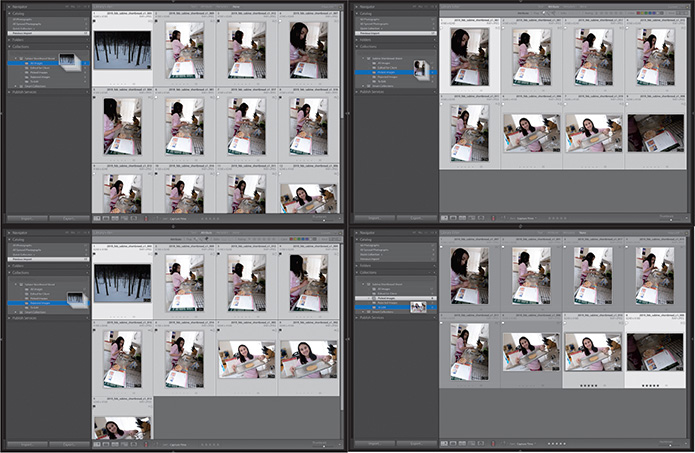
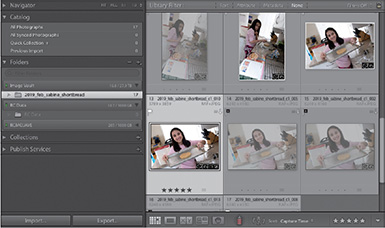
With Previous Import selected in the Catalog panel, I press Command+A/Ctrl+A to select all of the images and drag them into the All Images collection. Then I use the Metadata filter in the Filter bar at the top of the Grid view to find the picked images, select all of them, and drag them into the Picked Images collection. I do the same for the rejects, dragging them into the Rejected Images collection. If there are images that I have flagged for editing, they are placed in the To Edit collection.
At this point, I start working on developing images in Lightroom.
Backing up your images
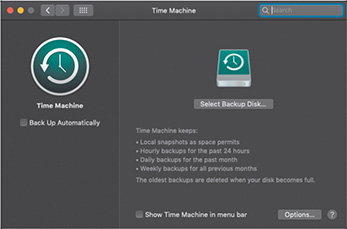
As I am working on one copy of the images on my computer, we need to start talking about the backup strategy here. As an Apple user, I have all of the backups of my computer done to two separate external drives using Time Machine.
From the Apple menu, choose System Preferences > Time Machine. When you connect your external hard drive to your computer, you can select it as a backup disk and Time Machine will start the backup process to it.
This gives me one copy of the images at one location.
The drive that I use for the Time Machine backup is a G-SPEED Shuttle with ev Series Bay Adapters from G-Technology. I’ve had just about every drive under the sun, and I can say that the drives from G-Technology have always been pretty reliable for me. While you can use any of their desktop drives (their G-RAID are some of my favorites), I use this particular drive because it uses two Thunderbolt 3 connections. Not only does this drive let me connect my other Thunderbolt 3 drives, but the ev bays allow me to plug in my external hard drives, and I have immediate access to them at my desk.

A second one of these lives in my studio, and I plug into it whenever I am there to have a second backup at another location.
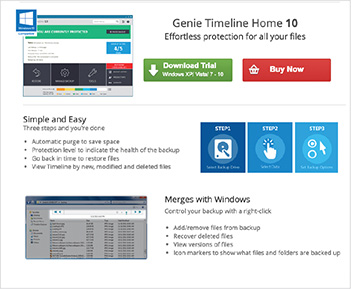
For Windows users, the closest thing I’ve seen to a backup for systems is Genie Timeline. While not exactly like Time Machine, it’s pretty robust and it handles the process of keeping your computer backed up quite well.
In a perfect world, you should have your computer backed up in two separate locations. This solves the machine problem and keeps the hot shoot on my computer safe.
Workflow: Medium status
Now that the images have been organized and edited, the prints have been sent, and the samples have been sent to Facebook, it’s time to start thinking about offloading your images to free up that space on your computer.
To do this, we will offload the hot project onto a removable drive. To make sure that we can work with the images disconnected, we will create Smart Previews. The goal is to move as much as we can off of the computer.
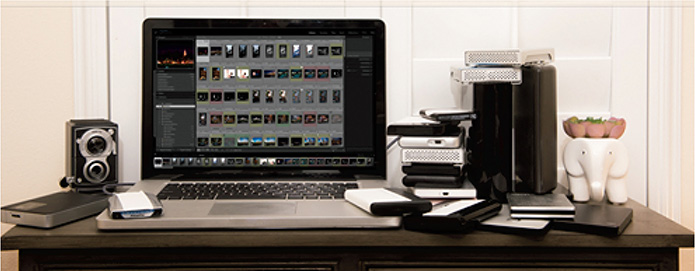
This is usually the part where photographers hear the collective record scratch and think to themselves, “Wait a minute, I want to be able to keep every picture that I’ve made with me, wherever I go, for however long I want it!” This is also the part where most photographers bail out of this process, and two years later, find themselves carrying a fleet of hard drives with no idea where any particular image is, let alone how to access them all. (This is an actual picture of a client’s setup.)
Your need to access pictures diminishes over time
To convince you that you don’t need to carry everything with you, I offer this example. If you look at your phone, there’s a good chance that you took a picture with it not too long ago. There is also a good chance that you will go back to that picture pretty frequently over the next few days.
How long has it been since you’ve gone back to the beginning of all of your photos in your phone? Probably quite a while. Over time, we stop looking at the pictures of the past, and focus on what we are doing right now. We don’t walk around with all of the pictures from our childhood with us; we know that they are safe at home (waiting for the right time to be brought out to embarrass us).
Your Lightroom CC collection should operate the same way. There are pictures that I look at daily, but over time, that need diminishes. The photos from that vacation I took seven years ago are tucked away on an external drive. I’ll occasionally use them, but I don’t need them with me.
If you can buy into this idea, you can save yourself a lot of headaches.
Creating Smart Previews
Before we move the folder to a removable drive, it’s a good idea to create Smart Previews of your images. During the import process earlier in the book, we deselected this option in the File Handling panel. It’s below the Build Previews menu.

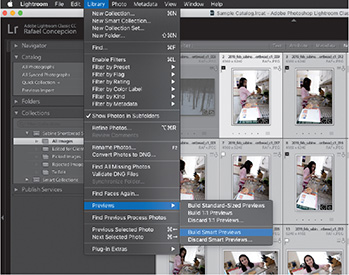
Smart Previews allow you to work on images without having the physical copy of them on the computer. Out of all of the preview types, they take up the most space, but they are a lot smaller than carrying the actual files with you. In Lightroom CC, you can make Smart Previews at any point in your workflow. Select the images you want to make Smart Previews for, then choose Library > Previews > Build Smart Previews.
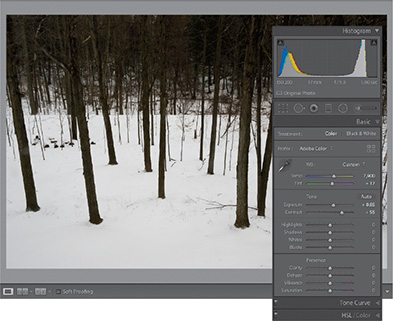
At the bottom of the Histogram panel, there is a symbol letting you know that a Smart Preview has been created for the active image.
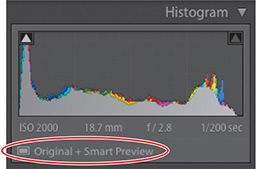
I purposely did not create a Smart Preview for the first image in the series to show you how this works. With this first image, you’ll see under the histogram that there is no Smart Preview.
I can go into the Develop module and make any changes—it’s business as usual.
The moment that the image is moved somewhere other than its original location, Lightroom cannot make changes to it, the Develop module panels turn gray, and a File Could Not Be Found error is displayed. If you want to go back to the digital notebook analogy of Lesson 1, it is as if I moved all the pictures in my house, but never wrote down where I put them.
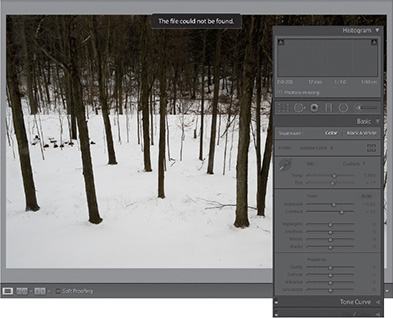

If an image is disconnected or moved from Lightroom CC with a Smart Preview, Lightroom continues to work with the Smart Preview alone, allowing you to make changes as you see fit. The moment that you relink or find the folder in question, Lightroom CC will take the changes and synchronize them with the original.
There are a couple of caveats to keep in mind when doing this, but we’ll cover them a little later on. For now, we’re ready for the move. Where do we move them to?
Selecting your external hard drive
The two qualities that I am looking for in a hard drive are that I want it to be dependable and I want it to be able to handle the rough and tumble of living in and out of my bag. If you’re going to be carrying it around at school or in the field, a rubber bumper doesn’t cut it.

The G-Technology G-Drive ev ATC is a shock-proof, dust-proof, water-proof (it floats) case that will keep the drive that is inside of it nice and secure. What I like even more is that it has its own rubber-capped cable that you can use to connect it to your laptop.
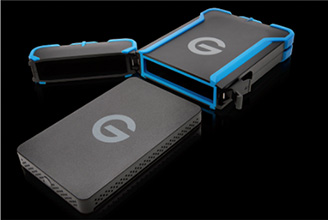
When I get home, I can take it out of the case and place it into a dock that is connected to my G-RAID, and it connects with the same cables I use at home. The dock is totally unnecessary, but a welcome addition for me.
For as good as this hard drive is, though, it’s important to keep in mind that in the end it is a spinning plate whose information is being read by a needle. Plug this drive in and go jogging or drop it and your results may vary.
Newer hard drives are being made from solid state memory, or SSD—the same type of memory that is used in your phone or tablet. With no moving parts to skip, I have started to upgrade to something like this to add another level of security. Looking at what gives you the most bang for the buck, I’m really enjoying the 1 TB Extreme Portable SSD from SanDisk. At the time of this writing, it’s almost on par with a 1 TB USB 3 drive.
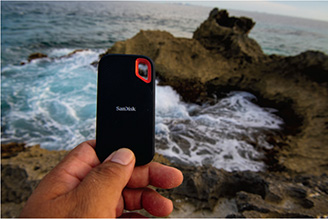
As an added bonus, if you are using a newer computer with Thunderbolt 3 or USB-C, the speeds of these newer drives are crazy. (I’m actually using one of these drives to run my whole computer’s operating system, but that’s another conversation for another time.)

Moving your images to the external drive
While you can use Lightroom CC’s Folders panel to move your images from one place to another, I prefer to use the file and folder management of my computer’s operating system. Apple’s Finder and Microsoft’s Windows Explorer are things that we are already used to, so it makes sense to use them now.
Also, this gives us another set of skills that we can use later: the finding and relinking of folders.
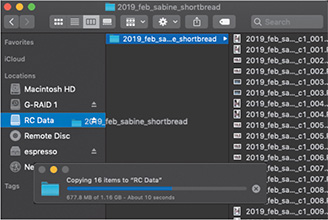
Copy the shoot folder from the desktop (or wherever you were storing it) onto your removeable drive. I prefer to copy the images and verify they reached their new location before deleting the original files, rather than moving the files. You never know what might happen in the middle of that move. It’s better to be safe than sorry.
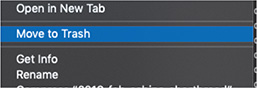
Once the move is complete, right-click the folder on your computer and choose Move To Trash.
Relinking missing folders
If you look inside the Lightroom Develop module, you’ll notice that the image is now relying on only the Smart Preview, although you can still edit it if you need to. Later, you’ll need to relink these folders to Lightroom so that you can access your original files or update them. Here are the steps to remember to do that.
Find the image that’s missing (or only has a Smart Preview).
Right-click the image and choose Go To Folder In Library.

Navigate to the highlighted folder in the Folders panel and confirm that there is a question mark on its folder. This means Lightroom cannot find the folder on your computer.
With the folder selected, right-click it and choose Find Missing Folder.
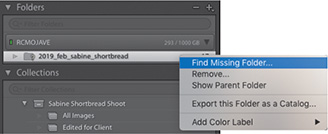
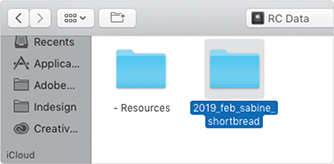
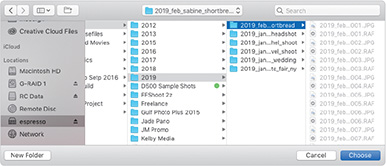
Navigate to the removable hard drive where we placed the folder, select it, and click Choose.
Your image is now relinked with your original. Your Smart Preview will sync all of your changes with the original image. If you did not have a Smart Preview created but were missing the folder, you should now have access to the Develop module with your files. All is well with the world again.
Relink subfolders faster with Show Parent
Moving to a bigger hard drive? Lost 100 subfolders? The process for the relinking of folders in Lightroom is one of the most useful things you will learn. Out of all the problems that I am asked about, this is the biggest one—bigger than how to develop pictures or how to make prints. I tell my students that I have clients from around the world that fly me in not to go to some cool exotic location and make pictures, but to sit in their basement and move files around on hard drives. It’s a living, and I do get to see cool airports.
We covered relinking a single folder when you are using Smart Previews. Here are two more scenarios with related solutions.
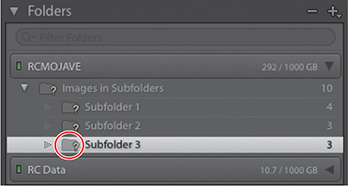
In the first scenario, imagine you discover that a file is missing in Lightroom. You go to the folder in the Library module’s Folders panel, and you realize that this image was in one of three subfolders of a parent folder. Does this mean that you need to update the folder location three times, one for each subfolder? Not at all.
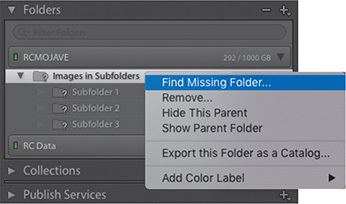
In this scenario, you would select the parent folder, the folder that is holding all of the subfolders. This is the one you should use to find the missing image. By updating the location of the parent folder, all of the other subfolders (which sometimes can be in the hundreds) will automatically be updated.
Now imagine your 1 TB hard drive is out of space, so you move all of the images in it to a new 4 TB hard drive. What do you do when Lightroom can’t find the images you need?

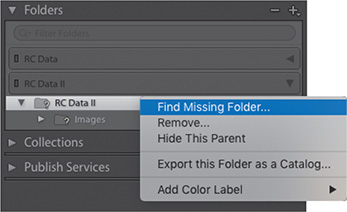
Right-click a missing image and choose Go To Folder In Library to find the folder of images that is missing from your computer. If you cannot see the name of the hard drive the folder resides on in your Folders panel, right-click the uppermost folder and select Show Parent Folder.
This should bring up the name of the external hard drive as a folder, a missing one that needs to be relinked. Right-click the external hard drive folder, and select Find Missing Folder from the menu.
Navigate to the new hard drive on your computer and select it. Don’t select any of the subfolders; just click the Choose button at the lower right.
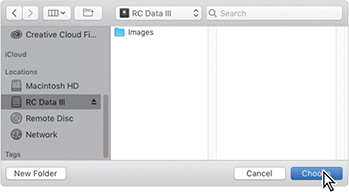
The locations of all of the subfolders inside the new drive will be updated, and you will save yourself hours of work relinking every single folder.
The key thing to keep in mind is that if there is a missing folder, look for a parent folder. If you can relink the parent folder first, you’re always going to do less work and save more time.
Backing up your external drive
Once the images are moved onto the external drive, we need to make sure that they are included in our routine backup of the computer. If you are an Apple user and have committed to Time Machine, here’s how to handle the very confusing yet useful dialog box.
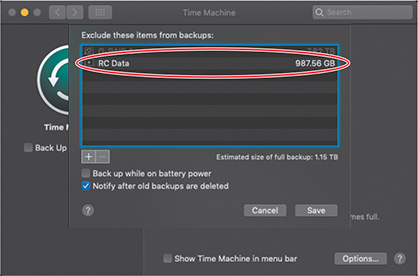
Clicking the Options button in the lower-right corner of the Time Machine window will show you a list of connected drives that Time Machine is excluding from the backup process. By default, Time Machine will not back up your external drives unless you tell it to. Select the removeable drive in the list, and then click the minus sign (–) button at the lower left of the list. Now your hard drive is excluded from the exclusion list (confusing, I know) and it will be backed up by Time Machine for you.
Workflow: Cold status
Now that I have spent some time with these images and edited them on a removable hard drive, I find myself accessing this project less and less. As our external drives are finite, I want to make sure that I am being smart about how I use that drive, and make sure that I am keeping all of the data that I am working on as safe as possible. In this section, we will move the folder from the external drive onto a network-attached storage device, or NAS device.
What is a NAS device?
A network-attached storage device is usually a collection of hard drives that are enclosed in a type of box. This box holds all of the drives in place, and via hardware or software, arranges all of the space for you to use it. (For the technologically inclined, it’s a RAID configuration.)
Instead of being connected to your computer via a USB or Thunderbolt cable, this box is connected to the cable modem or router at your home. Just as a PC would use Windows as an operating system or Apple would use Mojave, the NAS has its own operating system to manage all of the features of storage on the system.
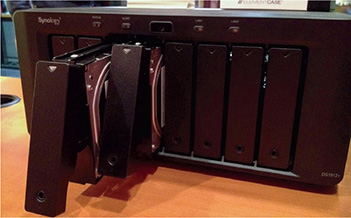
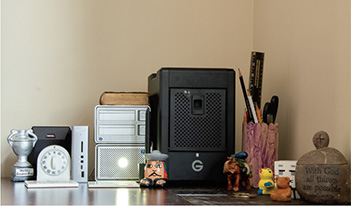
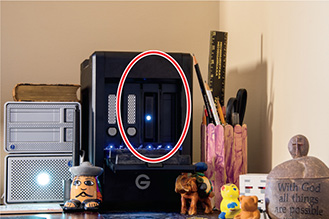
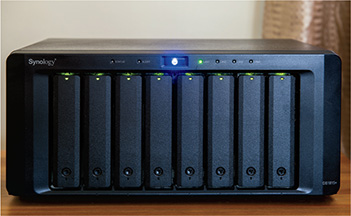
The NAS that I use is an 8-bay system from Synology similar to the one in the illustration at right. Synology has been rock solid in dependability, and plenty tough for the work that I do.

It’s important to note that usually when you purchase your NAS, you also need to supply the internal drives that will go with it. I opted to use Seagate IronWolf NAS hard drives inside my NAS because they are designed to last a lot longer than a traditional hard drive. Do you have to get an 8-bay unit right off the bat? No, you can certainly start with a much smaller unit. You can also leave some of the bays empty and fill it as your needs grow. The bigger point here is to get a NAS unit that you leave at your home, dedicated to holding all of your images in one location.

Moving your folder to the NAS device
Once I am ready to move the folder to my cold status, I power up my laptop and connect to my network (wired or wireless at home).
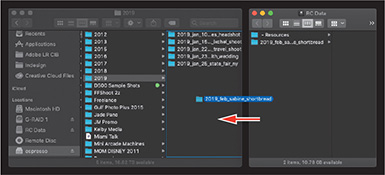
I plug in my external hard drive and navigate to the folder I want to move. Then I select the folder and copy it to the NAS device, usually into a folder that’s labeled for that year. In a few minutes, all of the information will reside on the NAS device and I can delete it from my external drive.

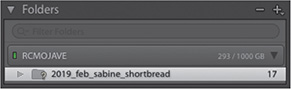
Back inside Lightroom, I will get the same error as before that it can’t find the file. At this point, I’ll go to the Folders panel in the Library module and update the folder location to its new location on the NAS device.
Because I have Smart Previews turned on, anytime that I am away from my network at home, I can edit the images using the embedded Smart Previews on my laptop. When I reconnect to the network at my home, the NAS device will become available, and all of the changes that I made on the road will be synchronized with the originals that are sitting on the NAS device.
Accessing files on the NAS over the internet
While the NAS device allows me to access my files freely when I am connected at home, there are some rare occasions when I may need to access a file from a folder that is on the NAS device. What do I do?
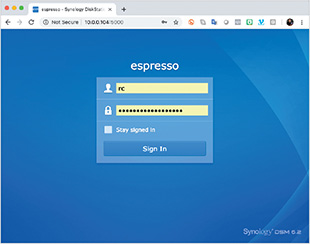
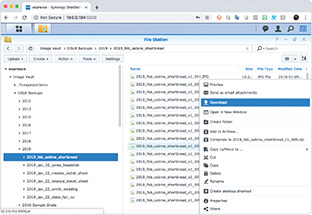
Earlier I explained that the NAS device is essentially a box with hard drives, connected to your internet at home, and governed by its own operating system. In the case of my Synology NAS device, its proprietary system is called Disk Station Manager, or DSM. One of the great features of this is that it allows me to create a special connection back to my NAS unit at home that I can access via a browser or mobile device. If I need a file stored on it, I can simply log in from anywhere and download the file.
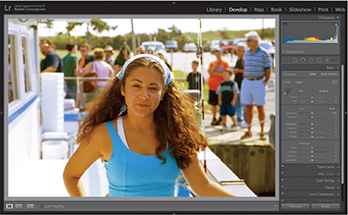
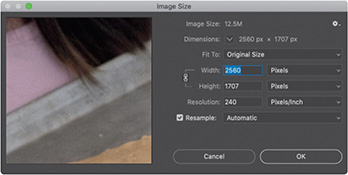
That said, the times I have needed to access something on it have been extreme situations. If you have a Smart Preview of a file in Lightroom, not only can you perform edits on it, but you can export a copy of the file for some general uses. As you can see in the illustration at right, exporting this Smart Preview as a JPEG at 240 ppi yields a file that is 2560 pixels on the long end—that’s equivalent to just larger than 7x10 inches. Not bad.
Using smart collections for catalog cleanup
By now you’re probably wondering why you wouldn’t import every file into Lightroom CC with Smart Previews turned on? They offer a lot to photographers, but you should keep an eye on them and use them sparingly. To keep track of them, I use smart collections. Let me explain:
During the import process, Lightroom builds a series of previews for you to use. You choose how large they are, with Minimal being the smallest size, then Standard, then 1:1 for when you want to zoom an image to 100%. The file size gets bigger with each preview choice, taking up more space on your computer.
Lightroom takes into account that the size of the preview impacts the amount of space a file takes on your computer by doing its own internal purging. In Lightroom’s Catalog Settings dialog box, on the File Handling tab, the default behavior for Lightroom CC is to delete the 1:1 previews (the ones that are the largest in the group) every 30 days. This is a good thing.
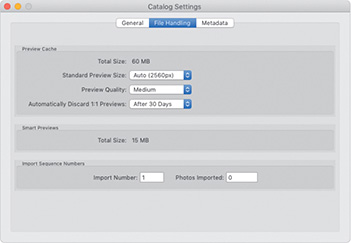
However, Smart Previews are theoretically bigger than 1:1 previews, as they allow you to edit them. Yet, in the Catalog Settings, these files that are bigger are not set to be deleted after a specific amount of time. We can import images with Smart Previews and in short order have a collection with much larger previews than we actually need, and with no way of knowing how many we have.
This is where smart collections come in handy. In my Lightroom catalog, I always keep two smart collections for cleaning out my catalog. The first one is pretty basic: it collects all the files that have the flagged status set to Rejected.

The next one is even more helpful. I have a smart collection that looks for whether the Smart Preview status of a file is set to True.
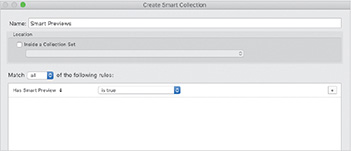
With that, I have a smart collection that lives in my Collections panel that is constantly scanning for how many Smart Previews I have. If I see that number get too large, or if I decide I no longer need to keep some for a job, I can select them in this collection and discard the Smart Preview by choosing Library > Previews > Discard Smart Previews.

That’s the workflow, from start to finish!
Review questions
1 What tool is important when organizing images into a hierarchical structure in Lightroom Classic CC?
2 What is one benefit of working with Smart Previews??
3 How can you quickly relink a series of folders that were on one hard drive, but that have been moved to another hard drive?
4 How can a NAS device help you organize your growing library in Lightroom?
5 What is the importance of culling your images in Lightroom at the start of the import process?
Review answers
1 Collection sets are containers that allow you to store a series of collections inside of them. Collection sets can also hold other collection sets, allowing you to make an even more detailed structure for your shoots. By using collection sets, you have the ability to organize a large number of collections into a hierarchical structure that can make it easier to find the most important images in the Library module.
2 Smart Previews allow you to edit images that are not physically connected to your computer in Adobe Lightroom. Without using Smart Previews, images that are disconnected (i.e., stored on a removable hard drive or located on a NAS) would show no sliders as active in the Develop module, generating a missing file error. When using Smart Previews, Lightroom makes any changes to a low-resolution copy that temporarily resides on your computer, and syncs the changes to your original images once they are reconnected to the Lightroom library.
3 Right-click the highest-level folder in the Folders panel that you have moved and choose Show Parent Folder. You can then point Lightroom to the folder in its new location (the new hard drive). Once you select the new hard drive and click Choose, all of the subfolders will automatically be resynced with the Lightroom catalog.
4 A NAS device is a drive or series of drives that are controlled by a machine that is connected to your home network. The images on your NAS device will be available to you when your computer is connected to your home network, giving you access to all of your images in one place. Moving the images that are less frequently accessed to a NAS device allows you to free up space on your computer, making it perform better once it stores only more recently captured images.
5 In every photographic session, there are images that are successful and others that are not. Sorting through your images and flagging the unsuccessful ones allows you to focus your attention on only the images that you need, and shortens the amount of time that you need to spend developing the most successful images in your shoot. Exercising good culling strategies at the start of the import process speeds up your workflow and lets you get back to making even more images.