Lesson 24
Manage Network Services
Goals
![]() Describe how macOS accesses shared network services
Describe how macOS accesses shared network services
![]() Configure built-in macOS network apps
Configure built-in macOS network apps
![]() Browse and access network file services using the Finder
Browse and access network file services using the Finder
![]() Troubleshoot network shared service issues
Troubleshoot network shared service issues
In this lesson, you learn about network services architecture. Then you’re introduced to the key network service apps built into macOS. You learn how macOS accesses popular file-sharing services. Finally, you learn techniques for troubleshooting network services.
Reference 24.1 Network Services
Shared network services are defined by client software (designed to access the service) and server software (designed to provide the service). The client and server software use network protocols and standards to communicate with each other.
By adhering to standards, software developers create unique yet compatible network client and server software. This enables you to choose the software tool that best fits your needs. For instance, you can use the built-in macOS Mail client created by Apple to access mail services provided by Apple, Google, Yahoo, Microsoft, and other service providers.
Network Services Software
Client software can be in the form of dedicated apps, as is the case with many Internet services, like email and web browsing. Other client software is integrated into macOS (for example, file and print services). In either case, when you establish a network service connection, settings for services are saved to preference files on the local Mac. These client preferences often include resource locations and authentication information.
Server software provides access to the shared resource. Server-side settings include configuration options, protocol settings, and account information.
When you troubleshoot a network service, you must know the port numbers or ranges that a service uses. For instance, the standard TCP port for web traffic is port 80. Apple maintains a list of commonly used network services and their associated TCP or UDP ports at Apple Support article HT202944, “TCP and UDP ports used by Apple software products.”
Network Service Identification
To access a network service, you must know the service’s local network or Internet location. Some network services feature dynamic service discovery, which enables you to locate a network service by browsing a list of available services. Or you must manually identify the service location with a network host address or name.
macOS can locate network services and appropriate network service resources. You can use Internet Account preferences to configure these services.
After you locate and connect to a network service, you often need to prove your identity (authenticate) to the service provider. Successful authentication to a network service is usually the last step in establishing a connection to it. After you establish a connection, security technologies are normally in place to ensure that you’re allowed to access only certain resources. This process is called authorization. Both of these fundamental network service concepts, authentication and authorization, are covered in this Lesson and the next, Lesson 25, “Manage Host Sharing and Personal Firewall.”
Dynamic Service Discovery
macOS supports dynamic network service discovery protocols to help you find the resources you need in situations like the following:
![]() You join a new network without knowing the exact names of all its available resources.
You join a new network without knowing the exact names of all its available resources.
![]() The shared resource you need is hosted from another client computer that doesn’t have a DNS host name or the same IP address every time.
The shared resource you need is hosted from another client computer that doesn’t have a DNS host name or the same IP address every time.
Dynamic network service discovery protocols enable you to browse local area and wide area network resources without knowing specific service addresses. Some devices that provide network services advertise the availability of their services on the network. As available network resources change, or as you move your client to different networks, the service discovery protocols dynamically update the list of available services.
macOS uses dynamic network service discovery. For example, dynamic network service discovery enables you to browse for available network file shares with the Finder or to locate new network printers from Printers & Scanners preferences. Other network apps built into macOS use service discovery to locate shared resources, including Image Capture, Photos, and iTunes. Third-party network apps also use dynamic network service discovery.
The discovery protocol only helps you locate available services. After it provides your Mac with a list of available services, its job is done. When you connect to a discovered service, your Mac establishes a connection to the service using the service’s protocol. For example, the Bonjour service discovery protocol can provide the Finder with a list of available screen-sharing systems, but when you select another Mac from this list, your Mac establishes a screen-sharing connection to the other Mac using the Virtual Network Computing (VNC) service, which uses the Remote Frame Buffer (RFB) protocol.
Bonjour
Bonjour is the Apple implementation of Zero Configuration Networking, or Zeroconf, a collection of standards drafts that provide automatic local network configuration, naming, and service discovery. Bonjour uses a broadcast discovery protocol known as multicast DNS (mDNS) on UDP port 5353.
Bonjour is the primary set of dynamic network service discovery protocols used by macOS native services and apps. Bonjour is based on TCP/IP standards, so it integrates well with other TCP/IP-based network services. macOS also includes support for Wide-Area Bonjour, which enables you to browse WAN resources as well as LAN resources.
Local Bonjour requires no configuration. Wide-Area Bonjour requires that you configure your Mac to use a DNS server and search domain that supports the protocol.
Server Message Block
Originally designed by Microsoft, Server Message Block (SMB) is the most common network service for sharing files and printers. SMB also includes a network discovery service that runs on UDP ports 137 and 138 and TCP ports 137 and 139. Most current operating systems that provide support for SMB sharing also support dynamic discovery with SMB.
Network Host Addressing
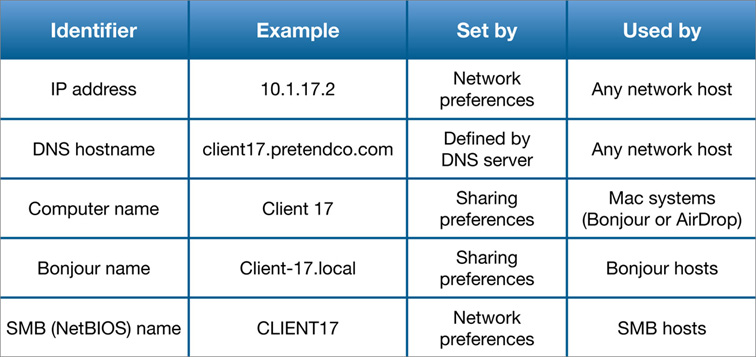
You can reach a network host by its IP address. But you can also use other technologies that give network hosts human-friendly network names. Network host identification methods include:
![]() IP address—An IP address can always be used to establish a network connection.
IP address—An IP address can always be used to establish a network connection.
![]() DNS host name—Your Mac has a host name configured by one of two methods. Your Mac attempts to resolve its host name by performing a DNS reverse lookup on its primary IP address. If your Mac can’t resolve a host name from the DNS server, it uses the Bonjour name instead.
DNS host name—Your Mac has a host name configured by one of two methods. Your Mac attempts to resolve its host name by performing a DNS reverse lookup on its primary IP address. If your Mac can’t resolve a host name from the DNS server, it uses the Bonjour name instead.
![]() Computer name—Other Apple devices use this to identify your Mac for AirDrop peer-to-peer file sharing and for Finder browsing. The computer name is part of the Apple Bonjour implementation, and you set it in Sharing preferences.
Computer name—Other Apple devices use this to identify your Mac for AirDrop peer-to-peer file sharing and for Finder browsing. The computer name is part of the Apple Bonjour implementation, and you set it in Sharing preferences.
![]() Bonjour name—Bonjour is the macOS primary dynamic network discovery protocol; in addition, Bonjour provides a convenient naming system for use on a local network. The Bonjour name is usually similar to the computer name, but it conforms to DNS naming standards and ends with .local. This allows the Bonjour name to be supported by other operating systems. When you use Sharing preferences to edit the Computer Name field and then click Edit, you see the updated Bonjour name, which is displayed in the Local Hostname field.
Bonjour name—Bonjour is the macOS primary dynamic network discovery protocol; in addition, Bonjour provides a convenient naming system for use on a local network. The Bonjour name is usually similar to the computer name, but it conforms to DNS naming standards and ends with .local. This allows the Bonjour name to be supported by other operating systems. When you use Sharing preferences to edit the Computer Name field and then click Edit, you see the updated Bonjour name, which is displayed in the Local Hostname field.
![]() NetBIOS/WINS name—This name is used for the legacy Windows dynamic network discovery protocols as part of the SMB service. This name is automatically generated based on the name that you set in Sharing preferences, but you can update it in the Network preferences by selecting an interface, clicking Advanced, clicking the WINS button, and then updating the NetBIOS Name field.
NetBIOS/WINS name—This name is used for the legacy Windows dynamic network discovery protocols as part of the SMB service. This name is automatically generated based on the name that you set in Sharing preferences, but you can update it in the Network preferences by selecting an interface, clicking Advanced, clicking the WINS button, and then updating the NetBIOS Name field.
Reference 24.2 Configure Network Service Apps
Services like email can work on a local level, but these services are also communicating across separate networks and between servers. macOS includes client apps that access different network services.
Although this book focuses on the network client software built into macOS, many excellent third-party network clients are available for Mac. When you troubleshoot a network access problem, using an alternative network client is a good way to determine whether the issue is your primary client software or the service you’re attempting to use.
Safari
The Hypertext Transfer Protocol (HTTP) handles web communication for Safari using TCP port 80. Secure web communication (HTTPS) encrypts HTTP over a Secure Sockets Layer (SSL) or, more recently, over a Transport Layer Security (TLS) connection that by default uses TCP port 443.
Generally, little additional network configuration is required to use web services. You must provide the web browser with the Uniform Resource Locator (URL) or web address of the resource to which you want to connect. Safari defaults to the most secure TLS communication even if you don’t specify HTTPS in the URL. The only exception is if you have to configure web proxies, as described in Lesson 22, “Manage Advanced Network Settings.”
Internet Accounts Preferences
Internet Accounts preferences enable you to configure network service accounts. When you enter a network service account in Internet Accounts preferences, it configures appropriate network service apps built into macOS.
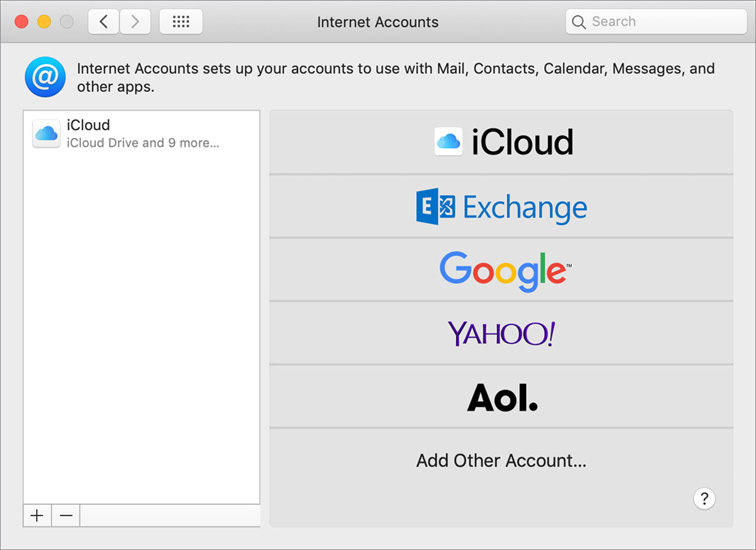
Through Internet Accounts preferences, you can configure macOS to use network service accounts for Apple iCloud, Microsoft Exchange, Google, Yahoo, and AOL. The Add Other Account option is covered later in this section.
Note ![]()
For Microsoft Exchange support, macOS Mojave requires Microsoft Office 365, Exchange 2016, Exchange 2013, or Exchange Server 2010. Installing the latest service packs from Microsoft for these services is recommended. For more information read Apple Support article SP777, “macOS Mojave - Technical Specifications.”
Internet Accounts preferences also includes support for services popular in countries whose primary language isn’t English. These services appear when you select the appropriate Language & Region preferences.
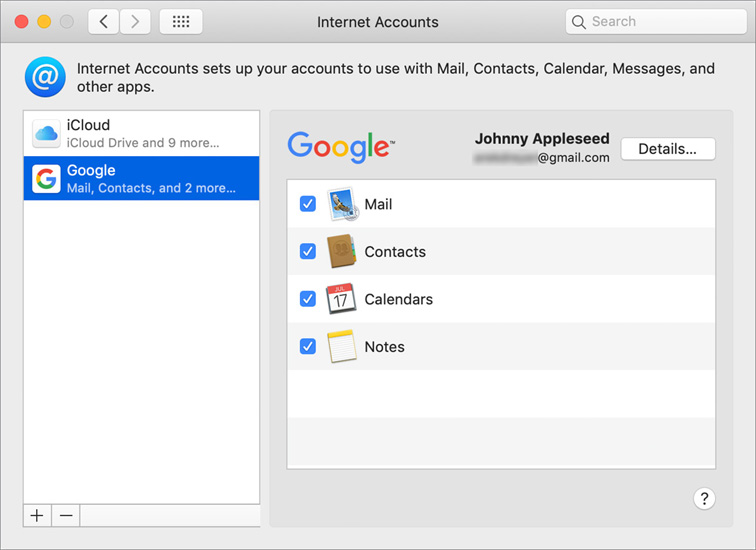
Each service type includes support for built-in macOS apps and services. When you sign in to a service that provides multiple features, like Google or Yahoo, you configure multiple apps, such as Mail, Notes, Calendar, Reminders, Contacts, and Messages. iCloud includes support for even more features, including iCloud Drive, Photos, Safari, iCloud Keychain, Find My Mac, and FaceTime.
Configure Network Service Accounts
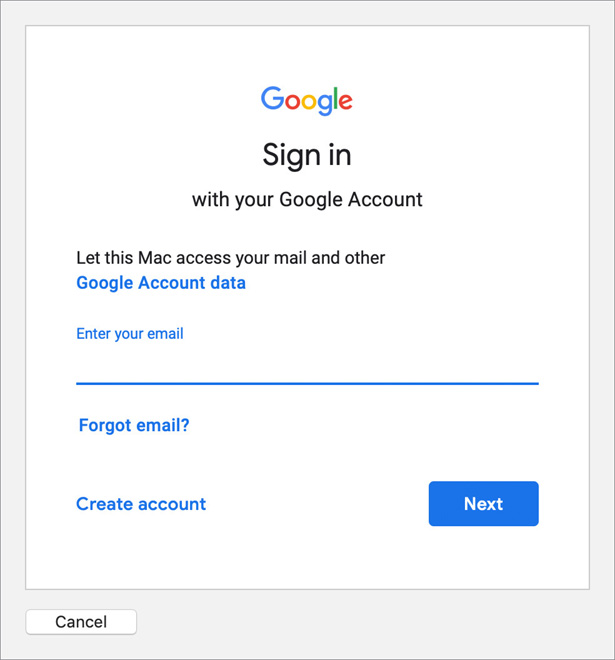
Use Internet Accounts preferences to configure network service accounts. Click an included service provider to sign up. You’ll see a service sign-in dialog. Most services provide their own authentication dialogs.
If you don’t see the Internet Accounts list of services, click the small Add (+) button at the lower-left corner of the preferences pane.
If you sign in to a service that offers multiple features, after you authenticate you can enable those features. You can also return to Internet Accounts preferences to enable or disable a feature. From Internet Accounts, click the Details button to verify or reenter your account information.
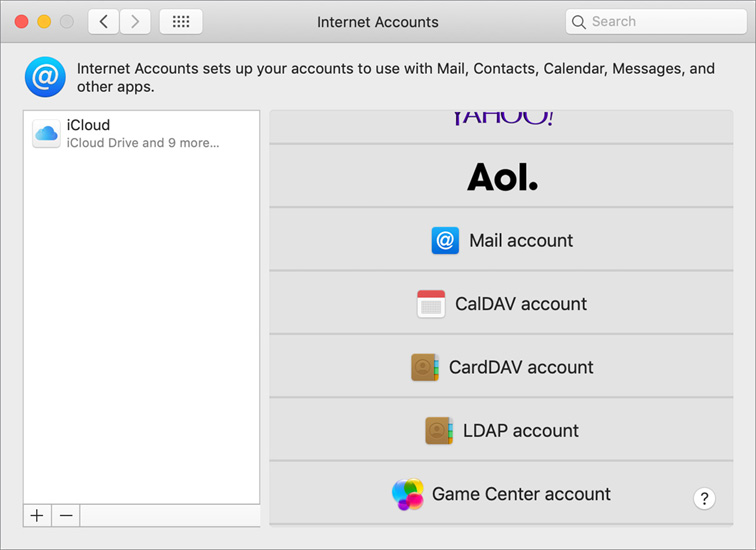
If you need to configure an Internet service that’s not listed in Internet Accounts preferences, or you need to configure a local service provided by your organization, click Add Other Account at the bottom of the services list. You’ll see a dialog that enables you to manually configure services for Mail, Calendar, Contacts, and Game Center. If you add a service this way, you’ll probably have to define additional configuration information. This information should be provided to you by an administrator of the service.
Configure Mail
Mail supports standard email protocols and their encrypted counterparts, along with a variety of authentication standards. Mail also includes support for Microsoft Exchange–based services.
Configure Mail with the Internet Accounts pane of System Preferences. In Mail, choose Mail > Accounts to open the Internet Accounts preferences. Or, you can use a configuration profile to configure Mail.
Mail also includes its own account setup assistant that walks you through configuring mail account settings. The assistant starts automatically if you open Mail but haven’t yet set up an account. Choose Mail > Add Account to start it.
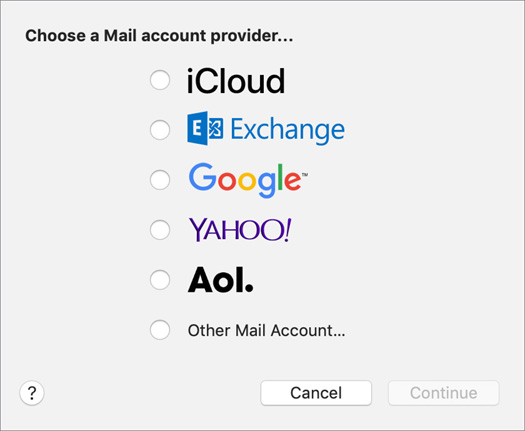
When you select one of these default mail account types, the assistant attempts to automatically determine the appropriate mail protocol, security, and authentication settings. This includes support for the Autodiscovery feature of Microsoft Exchange Server. When you set up a mail account here, macOS attempts to configure Notes, Calendar, Reminders, and Contacts too.
If you need to configure Mail for an account type not listed in the defaults, select the Other Mail Account option. After you enter basic mail account information, the assistant attempts to determine the appropriate mail settings. If your mail service uses a nonstandard configuration or is unreachable, you might have to manually enter the mail service settings here. If necessary, work with the service administrator to obtain the appropriate configuration settings.
If you need to tweak mail service settings, choose Mail > Preferences to access advanced options. When the Mail preferences window opens, click the Accounts button in the toolbar to view and manage Mail accounts.
Mail supports the following email services:
![]() Standard mailbox access protocols—The standard protocol used between mail clients and mail servers for receiving mail is either Post Office Protocol (POP) on TCP port 110 or Internet Message Access Protocol (IMAP) on TCP port 143. Both protocols can be encrypted with a TLS connection. By default, encrypted POP uses TCP port 995 and encrypted IMAP uses TCP port 993. iCloud defaults to secure IMAP.
Standard mailbox access protocols—The standard protocol used between mail clients and mail servers for receiving mail is either Post Office Protocol (POP) on TCP port 110 or Internet Message Access Protocol (IMAP) on TCP port 143. Both protocols can be encrypted with a TLS connection. By default, encrypted POP uses TCP port 995 and encrypted IMAP uses TCP port 993. iCloud defaults to secure IMAP.
![]() Standard mail-sending protocols—The standard protocol used for sending mail from clients to servers and from server to server is Simple Mail Transfer Protocol (SMTP) on TCP port 25. SMTP can be encrypted with a TLS connection on port 25, 465, or 587. The port used for secure SMTP varies by mail server function and administrator preference. iCloud defaults to secure SMTP.
Standard mail-sending protocols—The standard protocol used for sending mail from clients to servers and from server to server is Simple Mail Transfer Protocol (SMTP) on TCP port 25. SMTP can be encrypted with a TLS connection on port 25, 465, or 587. The port used for secure SMTP varies by mail server function and administrator preference. iCloud defaults to secure SMTP.
![]() Exchange-based mail service—Mail communicates using the Exchange Web Services (EWS) protocol. EWS uses the standard ports for web traffic: TCP port 80 for standard transport and TCP port 443 for secure transport.
Exchange-based mail service—Mail communicates using the Exchange Web Services (EWS) protocol. EWS uses the standard ports for web traffic: TCP port 80 for standard transport and TCP port 443 for secure transport.
Configure Notes
When you add your Internet accounts to Notes, you can keep your notes with you no matter which device you’re using.
If you keep notes in iCloud, you can view and edit them there. Plus you can add new notes and lock already-created ones. You can also add people so that you can collaborate with them. Within a note, you can apply paragraph styles, checklists, and most media types (such as tables, scanned documents, photos, video, freehand-drawn scribbles, and map locations).
Configure a New Notes Account
Ideally, you configure Notes with other services through iCloud or Internet Accounts preferences. In Notes, choose Notes > Accounts. macOS will redirect you to Internet Accounts preferences. Internet Accounts preferences enable you to configure Notes without configuring iCloud or Mail.
Configure Calendar and Reminders
Calendar integrates with Mail and Maps to help you plan your day. Although Calendar manages your calendar on your local Mac, it also integrates with network calendar services based on the EWS or CalDAV protocols. CalDAV, or Calendaring Extensions to WebDAV, extends WebDAV (Web Distributed Authoring and Versioning), which is an extension of HTTP.
Ideally, you configure Calendar with Mail through Internet Accounts preferences or a configuration profile. In Calendar, choose Calendar > Accounts. macOS redirects you to Internet Accounts preferences.
Calendar includes an account setup assistant, which walks you through configuring Calendar account settings. This assistant doesn’t start when you open Calendar. Choose Calendar > Add Account to start it.
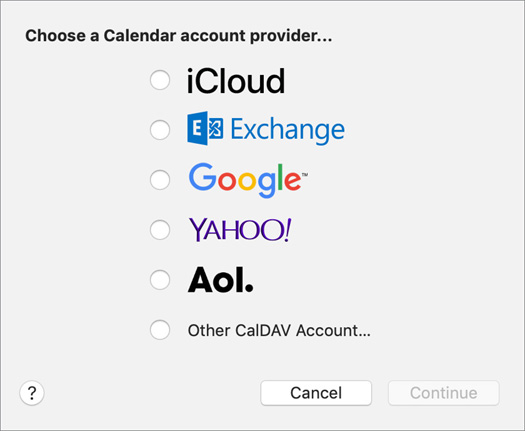
When you select one of the default calendar account types shown in the previous screenshot, the assistant attempts to determine the appropriate calendar service security and authentication settings. Calendar includes support for the Autodiscovery feature of Microsoft Exchange Server. When you set up a calendar account, macOS attempts to configure Mail, Notes, Reminders, and Contacts too.
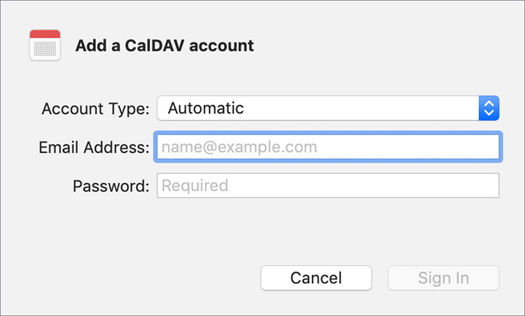
If you must configure Calendar for an account type not listed in the defaults, select the Other CalDAV Account option. After you enter your mail address and account password, the assistant attempts to determine the appropriate CalDAV settings. If your mail service uses a nonstandard configuration or is unreachable, you might have to manually enter the CalDAV service settings here. If necessary, work with the service administrator to obtain the appropriate configuration settings.
If you need to edit Calendar service settings, from the Calendar menu choose Calendar Preferences. When Calendar preferences opens, select the Accounts button in the toolbar to view and manage calendar service accounts.
Reminders helps you to keep a personal to-do list. You can save Reminders to-do lists on all of your Apple devices when you configure Reminders for access to calendar services. This is because Reminders uses EWS or CalDAV network calendar services to save notes. Reminders creates to-do calendar events and manages these events.
Ideally, you configure Reminders with other services through Internet Accounts preferences or with a configuration profile. Use Internet Accounts preferences to configure Reminders. You can configure Reminders without configuring Calendar—but you still need an EWS or CalDAV calendar service from a network service provider.
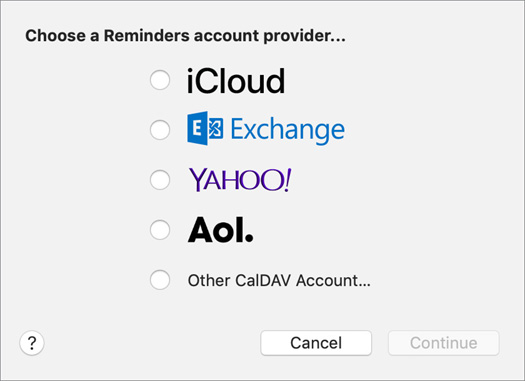
Like Calendar, Reminders includes an account setup assistant, which walks you through configuring Reminders account settings. The assistant doesn’t start when you open Reminders; you have to choose Reminders > Add Account to start it.
Calendar and Reminders support the following network calendar services:
![]() CalDAV collaborative calendaring—Calendar supports the CalDAV network calendar standard. This standard uses WebDAV as a transport mechanism on TCP port 8008 or 8443 for encrypted communication, but CalDAV adds the administrative processes required to facilitate calendar and scheduling collaboration. CalDAV is being developed as an open standard, so any vendor can create software that provides or connects to CalDAV services.
CalDAV collaborative calendaring—Calendar supports the CalDAV network calendar standard. This standard uses WebDAV as a transport mechanism on TCP port 8008 or 8443 for encrypted communication, but CalDAV adds the administrative processes required to facilitate calendar and scheduling collaboration. CalDAV is being developed as an open standard, so any vendor can create software that provides or connects to CalDAV services.
![]() Internet-based calendar services—Calendar and Reminders use Internet-based calendar services, including iCloud, Yahoo, and Google calendar services. These services are based on CalDAV and use the encrypted HTTPS protocol over TCP port 443.
Internet-based calendar services—Calendar and Reminders use Internet-based calendar services, including iCloud, Yahoo, and Google calendar services. These services are based on CalDAV and use the encrypted HTTPS protocol over TCP port 443.
![]() Exchange-based calendaring service—Calendar includes support for this calendar service. The macOS Exchange integration relies on EWS, which uses TCP port 80 for standard transport and TCP port 443 for secure transport.
Exchange-based calendaring service—Calendar includes support for this calendar service. The macOS Exchange integration relies on EWS, which uses TCP port 80 for standard transport and TCP port 443 for secure transport.
![]() Calendar web publishing and subscription—Calendar enables you to share your calendar information by publishing iCalendar files to WebDAV-enabled web servers. Because WebDAV is an extension to the HTTP protocol, it runs over TCP port 80, or TCP port 443 if encrypted. You can subscribe to iCalendar files, identified by the filename extension .ics, hosted on WebDAV servers; just provide Calendar with the URL of the iCalendar file.
Calendar web publishing and subscription—Calendar enables you to share your calendar information by publishing iCalendar files to WebDAV-enabled web servers. Because WebDAV is an extension to the HTTP protocol, it runs over TCP port 80, or TCP port 443 if encrypted. You can subscribe to iCalendar files, identified by the filename extension .ics, hosted on WebDAV servers; just provide Calendar with the URL of the iCalendar file.
![]() Calendar email invitation—Calendar is integrated with Mail to send and receive calendar invitations as iCalendar email attachments. The transport mechanism is whatever your primary mail account is configured to use. Although this method isn’t a calendar standard, most popular mail and calendar clients can use it.
Calendar email invitation—Calendar is integrated with Mail to send and receive calendar invitations as iCalendar email attachments. The transport mechanism is whatever your primary mail account is configured to use. Although this method isn’t a calendar standard, most popular mail and calendar clients can use it.
Configure Contacts
Contacts integrates with network contact services based on EWS, CardDAV (Card Distributed Authoring and Versioning), or LDAP (Lightweight Directory Access Protocol).
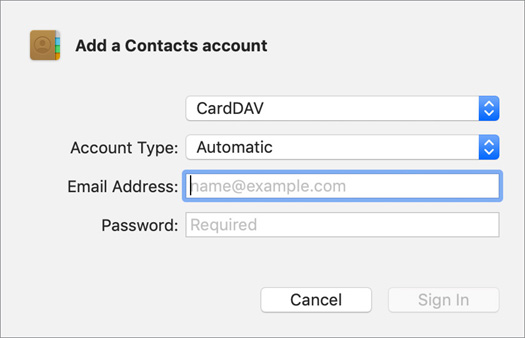
Ideally you configure Contacts through Internet Accounts preferences or a configuration profile. Contacts also features an easy-to-use setup assistant for configuring specific contact or directory network service accounts. Choose Contacts > Add Account to start it.

When you select one of these default contacts account types, the assistant attempts to determine the appropriate account settings. This includes support for the Autodiscovery feature of Microsoft Exchange Server. When you set up a Contacts account here, macOS attempts to configure Mail, Notes, Calendar, and Reminders too.
If you must configure Contacts for an account type not listed in the defaults, select the last option, Other Contacts Account. Contacts also supports CardDAV and LDAP account types. Select the account type from the menu, and then provide the server and authentication information. If necessary, work with the service administrator to obtain the appropriate configuration settings.
If you must make changes to contact service settings, choose Contacts > Preferences. When the Contacts preferences window opens, click the Accounts button in the toolbar to view and manage contact service accounts.
Contacts supports the following network contact services:
![]() CardDAV contacts service—Contacts supports a network contacts service standard known as CardDAV. This standard uses WebDAV as a transport mechanism on TCP port 8800 or 8843 for encrypted communication. CardDAV is being developed as an open standard, so any vendor can create software that provides or connects to CardDAV services.
CardDAV contacts service—Contacts supports a network contacts service standard known as CardDAV. This standard uses WebDAV as a transport mechanism on TCP port 8800 or 8843 for encrypted communication. CardDAV is being developed as an open standard, so any vendor can create software that provides or connects to CardDAV services.
![]() Internet-based contact services—Contacts can use a variety of Internet-based contact services, including iCloud, Google, and Yahoo contact services. All of these services are based on CardDAV and use the encrypted HTTPS protocol over TCP port 443.
Internet-based contact services—Contacts can use a variety of Internet-based contact services, including iCloud, Google, and Yahoo contact services. All of these services are based on CardDAV and use the encrypted HTTPS protocol over TCP port 443.
![]() Exchange-based contact service—Contacts includes support for this contact sharing service. The macOS Exchange integration relies on EWS, which uses TCP port 80 for standard transport and TCP port 443 for secure transport.
Exchange-based contact service—Contacts includes support for this contact sharing service. The macOS Exchange integration relies on EWS, which uses TCP port 80 for standard transport and TCP port 443 for secure transport.
![]() Directory service contacts—Contacts can search contact databases using LDAP, the standard for network directory services, which uses TCP port 389 for standard transport and TCP port 636 for secure transport. You can configure Contacts for LDAP services either from its account setup assistant or through integration with the macOS systemwide directory service, in Users & Groups preferences.
Directory service contacts—Contacts can search contact databases using LDAP, the standard for network directory services, which uses TCP port 389 for standard transport and TCP port 636 for secure transport. You can configure Contacts for LDAP services either from its account setup assistant or through integration with the macOS systemwide directory service, in Users & Groups preferences.
Configure Messages
With Messages, you can text, add images and other files, start a video or audio call, share your screen, and more. Messages requires the push-based messaging service iMessage, which also enables you to communicate with iOS devices.
Ideally Messages is configured for iMessage when you sign in to iCloud. If no account is configured when you open Messages, Messages opens its account setup assistant and walks you through configuring iMessage account settings. You can enter any valid Apple ID to configure iMessage. After you authenticate with your Apple ID, you might be prompted to choose additional iMessage identifiers that can be used to reach you, like other email accounts or mobile numbers.
Messages uses the iMessage service, which is unique to Apple. The iMessage protocol is facilitated by the Apple Push Notification service (APNs), which uses TCP port 5223, and falls back on Wi-Fi only to port 443. APNs is efficient for devices that rely on battery power and might lose network connectivity. This makes the iMessage service ideal for messaging with mobile Mac computers and iOS devices. Messages is limited to a single iMessage account per computer user account.
If you’re signed in to the iMessage service using the same Apple ID on your Mac and an iPhone running iOS 8 or later, you can send and receive Short Message Service (SMS) messages with the iMessage protocol through an iPhone cellular connection. You must manually enable this feature on your iPhone in Settings > Messages before you can use SMS messaging on your Mac. For more information, see Apple Support article HT204681, “Use Continuity to connect your Mac, iPhone, iPad, iPod touch, and Apple Watch.”
To edit Messages settings, choose Messages > Preferences. The General pane opens by default.
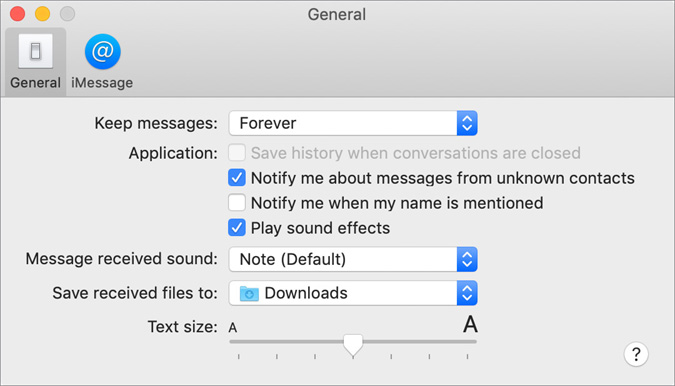
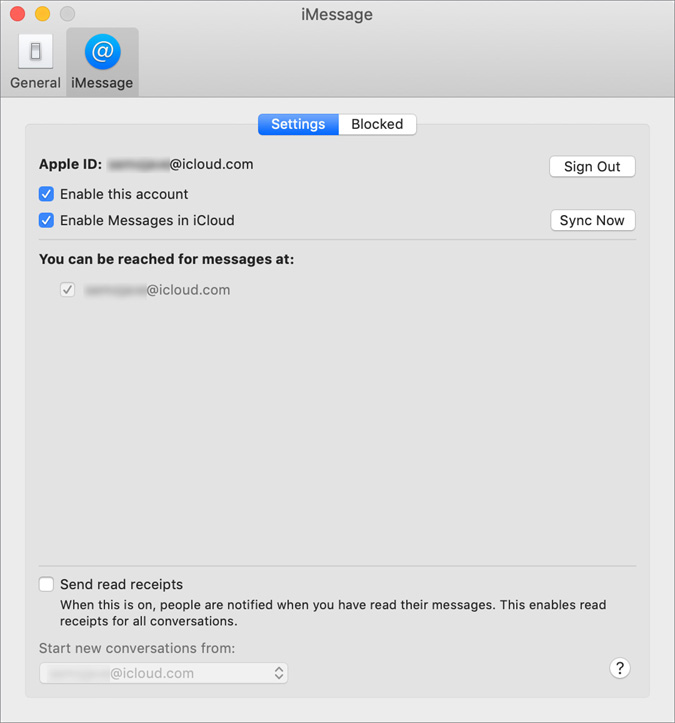
If you need to edit message service settings, click the iMessage button in the Messages preferences toolbar to edit your account settings or blocked numbers. To keep your entire message history updated and available on all your devices, select “Enable Messages in iCloud.” Read Apple Support article HT208532, “Keep all your messages in iCloud,” for more information.
For more information about using Messages, read Apple Support article HT202549, “Use Messages with your Mac.” If you’re having trouble with the iMessage service, verify availability of APNs with Apple Support article HT202078, “If you use FaceTime and iMessage behind a firewall.”
Configure FaceTime
FaceTime provides audio and video-conferencing abilities, including the ability to answer or call standard phone numbers with a compatible iPhone. Similar to the iMessage service, FaceTime is unique to Apple and uses APNs to start audio or video communications.
Ideally, FaceTime is automatically configured if you sign in to iCloud. Otherwise, FaceTime includes an account setup assistant that walks you through configuring FaceTime account settings. This assistant starts if no account is set when you open FaceTime.
Enter any valid Apple ID to configure FaceTime. After authentication, you might be prompted to choose additional FaceTime identifiers that can be used to reach you, like other email accounts or, if you have FaceTime on your iPhone, other mobile numbers. Unlike other network service client apps, you must sign in to use FaceTime and you can only sign in to one account per local user account.
To handle phone calls on your Mac with FaceTime, you must be signed in to FaceTime on your Mac and iPhone with iOS 8 or later. You have to sign in to FaceTime on your iPhone first to enable FaceTime cellular phone calls. Ensure that your iPhone cellular number is enabled in FaceTime preferences on your Mac. Go to FaceTime preferences to do this.
After you sign in to FaceTime, the service is ready to send and receive FaceTime calls, even when you quit FaceTime. To turn off FaceTime calls, choose FaceTime > Turn FaceTime Off or press Command-K. To start receiving FaceTime calls again, use the same keyboard shortcut or choose FaceTime > Turn FaceTime On. Sign out of your account from FaceTime preferences to permanently halt calls to your Mac.
FaceTime uses many standard and non-reserved TCP and UDP ports to facilitate calls. Verify available ports in Apple Support article HT202078, “If you use FaceTime and iMessage behind a firewall.”
Reference 24.3 Connect to File-Sharing Services
The Finder provides two ways to connect to a network file system:
![]() Browse shared resources in the Finder Network folder.
Browse shared resources in the Finder Network folder.
![]() Enter the server address of the server that provides the file service.
Enter the server address of the server that provides the file service.
File-Sharing Services
Many protocols transfer files across networks and the Internet. The most efficient are those that share file systems. Network file servers can make file systems available to your Mac across the network.
Client software built into the Finder can mount a network file service much as it would mount a locally connected storage volume. After a network file service is mounted to your Mac, you can read, write, and manipulate files and folders as if you were accessing a local file system.
Access privileges to network file services are defined by the same ownership and permissions architecture used by local file systems. Details on file systems, ownership, and permissions are covered in Lesson 13, “Manage Permissions and Sharing.”
macOS provides built-in support for these network file service protocols:
![]() Server Message Block version 3 (SMB 3) on TCP ports 139 and 445—This is the default (and preferred) file-sharing protocol for OS X Yosemite 10.10 and later. Historically, the SMB protocol was mainly used by Windows systems, but many other platforms have adopted support for some version of this protocol. The SMB 3 implementation in macOS works with advanced SMB features such as end-to-end encryption (if enabled on the server), per-packet signatures and validation, Distributed File Service (DFS) architecture, resource compounding, large maximum transmission unit (MTU) support, and aggressive performance caching. macOS maintains backward compatibility with older SMB standards.
Server Message Block version 3 (SMB 3) on TCP ports 139 and 445—This is the default (and preferred) file-sharing protocol for OS X Yosemite 10.10 and later. Historically, the SMB protocol was mainly used by Windows systems, but many other platforms have adopted support for some version of this protocol. The SMB 3 implementation in macOS works with advanced SMB features such as end-to-end encryption (if enabled on the server), per-packet signatures and validation, Distributed File Service (DFS) architecture, resource compounding, large maximum transmission unit (MTU) support, and aggressive performance caching. macOS maintains backward compatibility with older SMB standards.
![]() Apple Filing Protocol (AFP) version 3 on TCP port 548 or encrypted over Secure Shell (SSH) on TCP port 22—This is the legacy Apple network file service. The current version of AFP is compatible with the features of the Mac OS Extended file system. Volumes formatted with Apple File System (APFS) can’t be shared over AFP.
Apple Filing Protocol (AFP) version 3 on TCP port 548 or encrypted over Secure Shell (SSH) on TCP port 22—This is the legacy Apple network file service. The current version of AFP is compatible with the features of the Mac OS Extended file system. Volumes formatted with Apple File System (APFS) can’t be shared over AFP.
![]() Network File System (NFS) version 4, which may use many TCP or UDP ports—Used primarily by UNIX systems, NFS supports many advanced file-system features used by macOS.
Network File System (NFS) version 4, which may use many TCP or UDP ports—Used primarily by UNIX systems, NFS supports many advanced file-system features used by macOS.
![]() WebDAV on TCP port 80 (HTTP) or encrypted on TCP port 443 (HTTPS)—This protocol is an extension to the common HTTP service and provides read/write file services.
WebDAV on TCP port 80 (HTTP) or encrypted on TCP port 443 (HTTPS)—This protocol is an extension to the common HTTP service and provides read/write file services.
![]() File Transfer Protocol (FTP) on TCP ports 20 and 21 or encrypted on TCP port 989 and 990 (FTPS)—FTP is supported by nearly every computing platform. The Finder supports read capability for FTP or FTPS shares. FTPS (FTP-SSL) is different than SFTP (SSH File Transfer Protocol). FTPS uses SSL (or TLS) encryption on TCP port 990, and SFTP uses SSH encryption on TCP port 22. The Finder supports SFTP, and you can use Terminal to use FTPS and SFTP.
File Transfer Protocol (FTP) on TCP ports 20 and 21 or encrypted on TCP port 989 and 990 (FTPS)—FTP is supported by nearly every computing platform. The Finder supports read capability for FTP or FTPS shares. FTPS (FTP-SSL) is different than SFTP (SSH File Transfer Protocol). FTPS uses SSL (or TLS) encryption on TCP port 990, and SFTP uses SSH encryption on TCP port 22. The Finder supports SFTP, and you can use Terminal to use FTPS and SFTP.
Browse File-Sharing Services
You can browse for dynamically discovered file services from the Network section in these two locations:
![]() The Finder sidebar
The Finder sidebar
![]() The Open dialog of any app
The Open dialog of any app
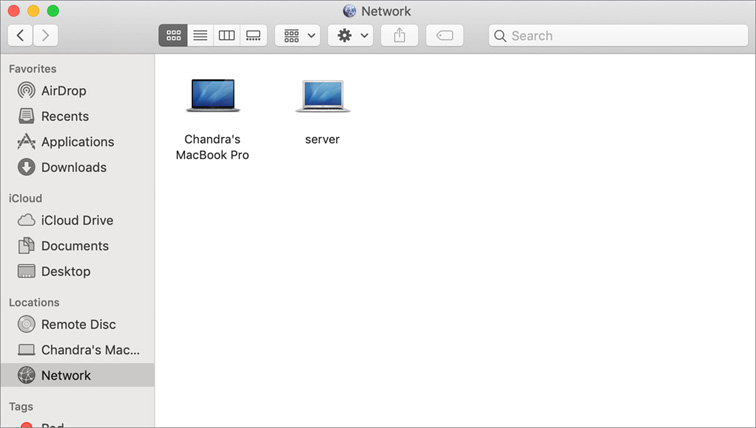
The Finder Network folder displays a collection of dynamically discovered network file services, screen sharing services, and currently mounted file systems, including manually mounted ones. The Network folder constantly changes based on information gathered from the two dynamic network service discovery protocols compatible with macOS—Bonjour and SMB/NetBIOS/WINS. So you can browse screen-sharing services offered by other Mac computers and SMB and AFP file services.
Smaller networks might have only one level of network services. If you have a larger network that features multiple service discovery domains, they appear as subfolders inside the Network folder. Each subfolder is named by the domain it represents. Items inside the domain subfolders represent shared resources configured for that network area.
To browse for and connect to an SMB or AFP file service, select a Mac from the Finder Network folder. You can go to the Network folder in two ways:
![]() Click Network in the Finder sidebar.
Click Network in the Finder sidebar.
![]() Choose Go > Network (or press Shift-Command-K), and then click Browse.
Choose Go > Network (or press Shift-Command-K), and then click Browse.
If you use the Finder to select a server, and the server supports SMB and AFP, macOS defaults to SMB. It uses the most secure version of SMB that the sharing service supports.
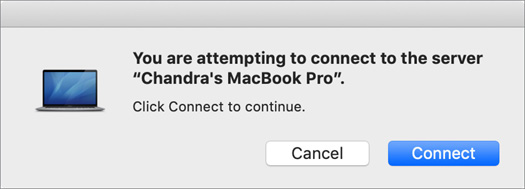
The first time you connect to a file-sharing service, you might see a dialog that asks you to confirm that you are connecting to the server you expect. You might also see this dialog each time you connect.
Automatic File-Sharing Service Authentication
When you select a Mac that provides file-sharing services, your Mac attempts to authenticate using one of three methods:
![]() If you’re using Kerberos single sign-on authentication, your Mac attempts to authenticate to the selected Mac using your Kerberos credentials.
If you’re using Kerberos single sign-on authentication, your Mac attempts to authenticate to the selected Mac using your Kerberos credentials.
![]() If you’re using non-Kerberos authentication but you connected to the selected Mac before and chose to save the authentication information to your keychain, your Mac attempts to use the saved information.
If you’re using non-Kerberos authentication but you connected to the selected Mac before and chose to save the authentication information to your keychain, your Mac attempts to use the saved information.
![]() Your Mac attempts to authenticate as a guest user.
Your Mac attempts to authenticate as a guest user.
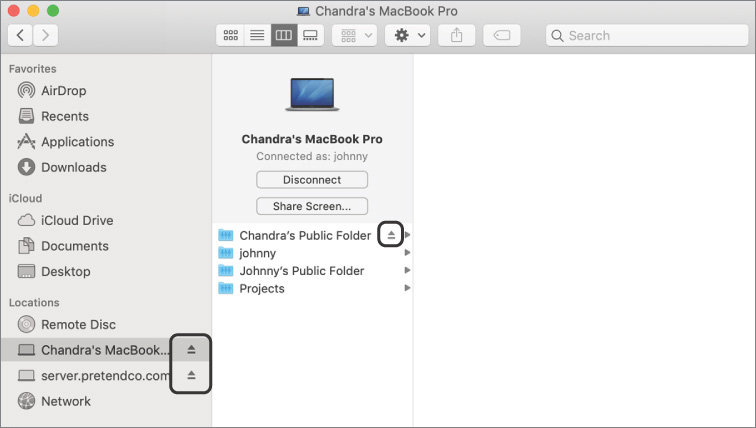
If your Mac authenticates to the selected Mac, the Finder shows you the account name it connected with and lists the shared items available to this account.
If you choose View > as List, View > As Columns, or View > As Gallery, you can choose a shared item to connect to and mount the shared item.
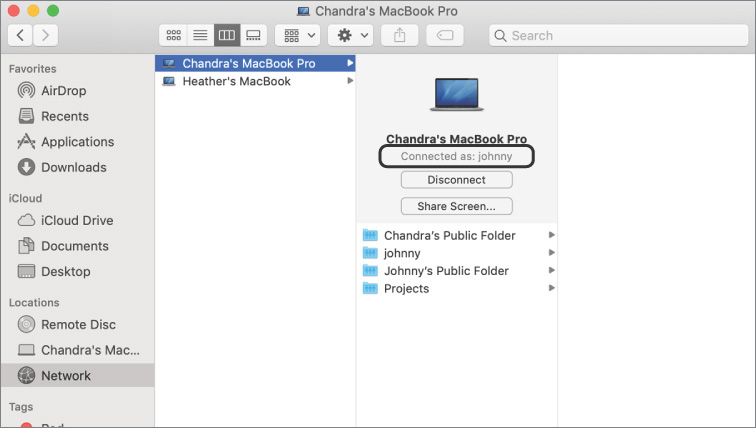
If you choose View > as Icons, double-click a shared item or select a shared item and then choose File > Open to connect to and mount the shared item.
Manual File-Sharing Service Authentication
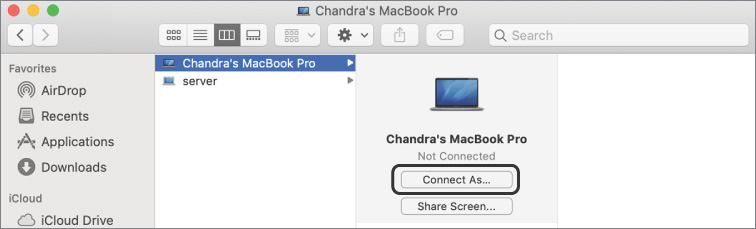
If your Mac was unable to connect to the selected Mac, or if you need to authenticate with a different account, click the Connect As button to open an authentication dialog.
You can authenticate to a sharing service using one of three methods:
![]() If Select Guest is available, select it to connect anonymously to the file service.
If Select Guest is available, select it to connect anonymously to the file service.
![]() Select Registered User to authenticate using a local or network account known by the computer providing the shared items. Optionally, you can select the checkbox that saves this authentication information to your login keychain.
Select Registered User to authenticate using a local or network account known by the computer providing the shared items. Optionally, you can select the checkbox that saves this authentication information to your login keychain.
![]() If “Using an Apple ID” is available, select it to authenticate using an Apple ID. For this option to appear, your Mac and the Mac hosting the share must be running macOS (not Windows), and your local account must be associated with an Apple ID, as covered in Lesson 7, “Manage User Accounts.”
If “Using an Apple ID” is available, select it to authenticate using an Apple ID. For this option to appear, your Mac and the Mac hosting the share must be running macOS (not Windows), and your local account must be associated with an Apple ID, as covered in Lesson 7, “Manage User Accounts.”
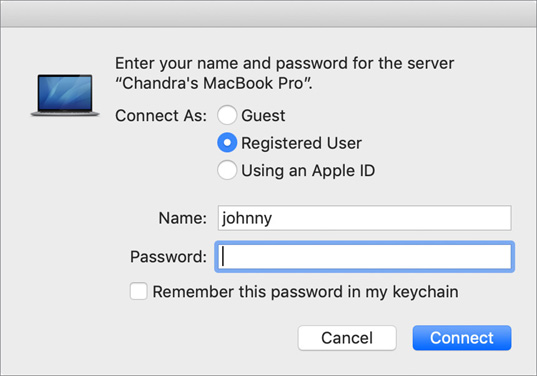
Click the Connect button. Your Mac authenticates and shows you a new list of shared items that are available to the account.
Manually Connect to File-Sharing Services
Instead of browsing, you can specify a network identifier (URL) for a file service. You might also have to enter authentication information and choose or enter the name of a specific shared resource path. When you connect to an NFS, WebDAV (HTTP), or FTP service, you might have to specify the shared items or full path as part of the URL. When you connect to an SMB or AFP service, you don’t have to provide the full path in the URL; you can authenticate and choose a shared item from the list of resources.
Manually Connect to SMB or AFP
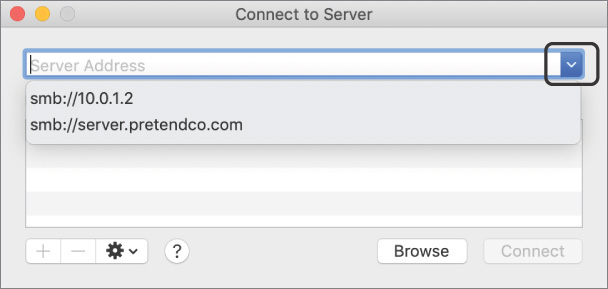
To manually connect to an SMB or AFP file service from the Finder, choose Go > Connect to Server, or press Command-K, to open the Finder “Connect to Server” dialog. In the Server Address field, enter smb:// or afp://, followed by the server IP address, DNS host name, computer name, or Bonjour name.
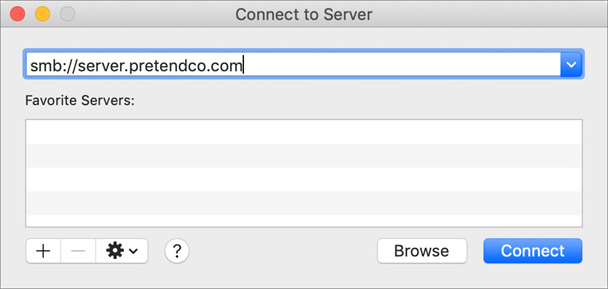
If you don’t specify a protocol prefix, the “Connect to Server” dialog attempts to pick the appropriate file-sharing protocol. The default file-sharing protocol is SMB 3. Optionally, after the server address, you can enter another slash and the name of a shared item. This bypasses the dialog for selecting a file share.
If automatic file service authentication is available, you don’t have to enter authentication information. Otherwise, a dialog appears requiring you to enter authentication information.
After you authenticate to a file service, if you have access to more than one shared folder, macOS displays the list of shared items that your account is allowed to access. Otherwise, the shared folder is automatically mounted.
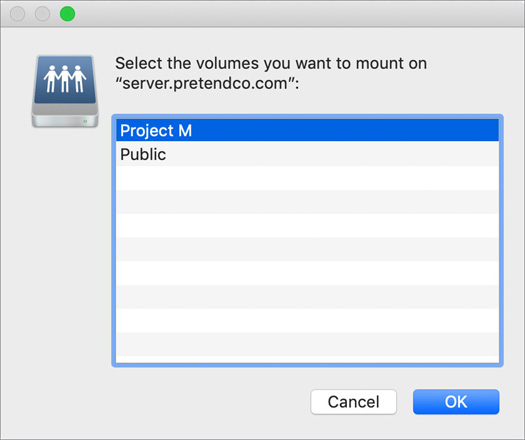
Select the shared item or items you want. Press the Command key to select multiple shared items from the list. Then click OK.
Manually Connect to NFS, WebDAV, or FTP
To manually connect to an NFS, WebDAV, or FTP file service from the Finder, choose Go > Connect to Server, or press Command-K, to open the Finder “Connect to Server” dialog.
In the Server Address field, enter one of the following:
![]() nfs:// followed by the server address, another slash, and then the absolute file path of the shared items.
nfs:// followed by the server address, another slash, and then the absolute file path of the shared items.
![]() http:// for WebDAV (or https:// for WebDAV encrypted with SSL or TLS), followed by the server address. Each WebDAV site has only one mountable share, but you can optionally enter another slash and then specify a folder inside the WebDAV share.
http:// for WebDAV (or https:// for WebDAV encrypted with SSL or TLS), followed by the server address. Each WebDAV site has only one mountable share, but you can optionally enter another slash and then specify a folder inside the WebDAV share.
![]() ftp:// (or ftps:// for FTP encrypted with SSL or TLS), followed by the server address. FTP servers also have only one mountable root share, but you can optionally enter another slash and then specify a folder inside the FTP share.
ftp:// (or ftps:// for FTP encrypted with SSL or TLS), followed by the server address. FTP servers also have only one mountable root share, but you can optionally enter another slash and then specify a folder inside the FTP share.
Depending on the protocol settings, you might see an authentication dialog. NFS connections never display an authentication dialog. The NFS protocol uses the local user that you’re logged in as for authorization purposes or Kerberos single sign-on authentication.
If you are presented with an authentication dialog, enter the appropriate authentication information. You can also select the checkbox that saves the authentication information to your login keychain. When you connect to NFS, WebDAV, or FTP file services, the share mounts immediately after you authenticate.
Mounted Shares
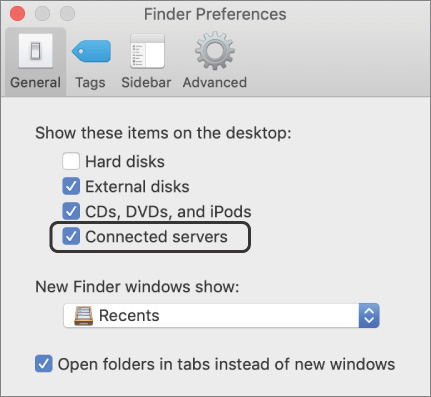
After your Mac mounts the network file share, that share can appear in several locations from the Finder or any app’s Open dialog, including the Computer location, the desktop, and the sidebar Shared list, depending on the configuration. Mounted network volumes appear at the Computer location in the Finder. Choose Go > Computer, or press Shift-Command-C, to view the mounted network volumes. By default, connected network volumes don’t appear on your desktop. You can change this behavior from the General tab of the Finder Preferences dialog.
The dialog maintains a history of your past server connections. Click the menu to the right of the Server Address field to see the history. Click the Action menu (it looks like a gear) and choose Clear Recent Servers to clear the past server connections history. Select a server, then click Add (+) or Remove (–) to establish and maintain a favorite servers list.
Disconnect Mounted Shares
macOS treats mounted network volumes like locally attached volumes. So, you should unmount and eject network volumes when you’re done with them. Unmount and eject mounted network volumes from the Finder using the same techniques you would use on a locally connected volume, as covered in Lesson 11, “Manage File Systems and Storage.”
If a network change or problem disconnects your Mac from a mounted network share, your Mac tries to reconnect to the server hosting the shared items. If after several minutes your Mac can’t reconnect to the server, macOS fully disconnects from the share and shows you a dialog to let you know.
Automatically Connect to File Shares
You can configure automatic connections to network shared items. You can use a configuration profile or add a network share to your login items so that it mounts automatically when you log in. You can read more about managing login items in Reference 7.4, “Configure Login and Fast User Switching.”
You can also create shortcuts to often-used network shares. You can drag network shares, or their enclosed items, to the right side of the Dock to create Dock shortcuts. You can also create aliases on your desktop that link to often-used network shares or specific items inside a network share. Either method automatically connects to the network share when you select an item. Creating aliases is covered in Lesson 14, “Use Hidden Items, Shortcuts, and File Archives.”

You can’t drag items from the Finder sidebar to your login items or to the Dock. Instead, select the network share from the desktop or the Computer location in the Finder. From the Finder, choose Go > Computer to access the Computer location.
Reference 24.4 Troubleshoot Network Services
To troubleshoot a network issue, isolate the issue into one of three categories: local, network, or service. Most issues that involve failure to access network services probably fall under the service category. This means that you should probably focus most of your efforts on troubleshooting the service you’re having issues with.
Before you troubleshoot a network service, check for general network issues. Verify that other network services work. Open Safari and navigate to local and Internet websites to test general network connectivity.
Test other network services, or test connectivity from other computers on the same network. If you experience problems connecting to a file server but you can connect to web servers, your network configuration is probably fine, and you should concentrate on the file server. If you experience problems with one service, you probably don’t have local or network issues. Focus your efforts on troubleshooting just that service.
If other network clients or services aren’t working, your issue is likely related to local or network issues. Use Network preferences and Network Utility to double-check local network settings to ensure proper configuration. If other computers aren’t working, you might have a widespread network issue that goes beyond troubleshooting the client Mac computers. For more information on general network troubleshooting, see Lesson 23, “Troubleshoot Network Issues.”
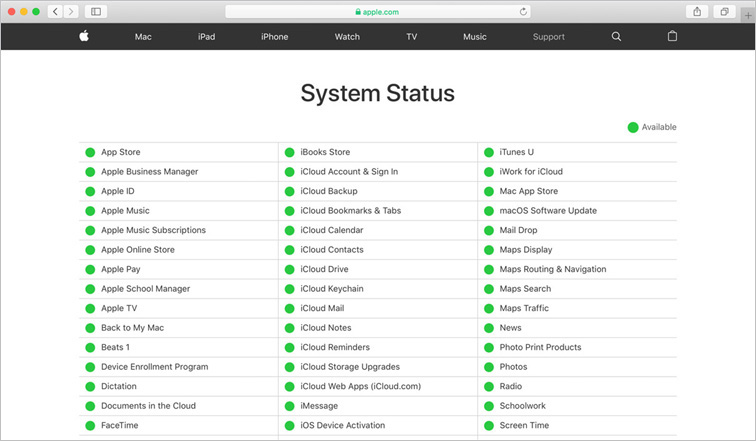
If you experience problems with a service provided by Apple, you can check real-time Apple service status at www.apple.com/support/systemstatus.
Use Network Utility: Port Scan
In Network Utility, use Port Scan to troubleshoot a network service.
Port Scan scans for open ports. If required ports aren’t open, a device isn’t providing the expected service or it’s configured to provide the service in a nonstandard way. Either way, the issue is with the device providing the service, not with your Mac.
To troubleshoot a network service, start with ping to confirm that you can connect to the computer or device that provides the service you’re trying to connect to. Ping is covered in more detail in Reference 23.2, “Use Network Utility to Troubleshoot Network Issues.”
Open Network Utility.
Click Ping to view the Ping pane.
Enter the device network address or host name and click the Ping button.
If the ping is successful, then continue with the port scan.
To scan for a network service:
Open System Utility.
Click Port Scan.
Enter the network address or host name of the device that provides the service. If you’re troubleshooting a specific service, limit the scan to that service’s default ports by selecting the appropriate checkbox and entering a beginning and ending port range.
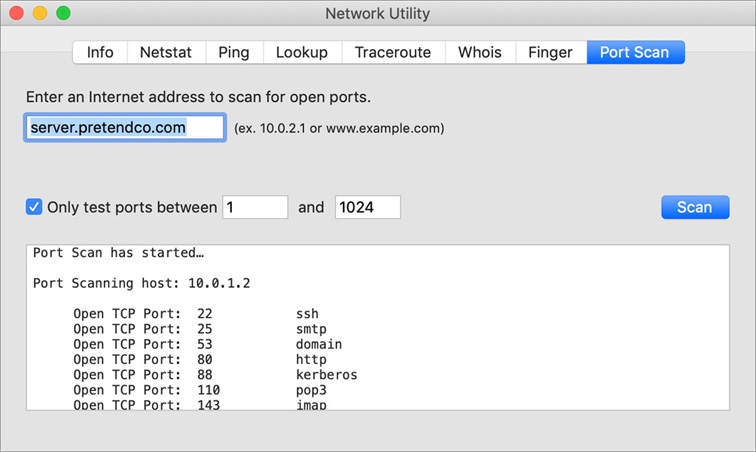
There are many TCP and UDP network ports. Scanning all of them is unnecessary and takes too much time. Even if you don’t know the exact port, number, most common ports are between 0 and 1024. Further, network administrators might view repeated network pings and broad port scans as a threat. Some network devices are configured not to respond to ping requests even when they’re working properly. Avoid excessive network pings and scans (a broad port range) when you test others’ servers.
After you define the port range, click Scan. Depending on the range you choose, the scan might take several minutes. Network Utility lists discovered open ports with their associated network protocol. And it displays each open port with the service name that’s registered by the Internet Assigned Numbers Authority (www.iana.org) for that port number, regardless of the service that uses the port.
Troubleshoot Network Apps
To troubleshoot apps, you can troubleshoot general network services. You can also double-check app-specific configuration and preference settings. Users can inadvertently cause a problem when they change a setting.
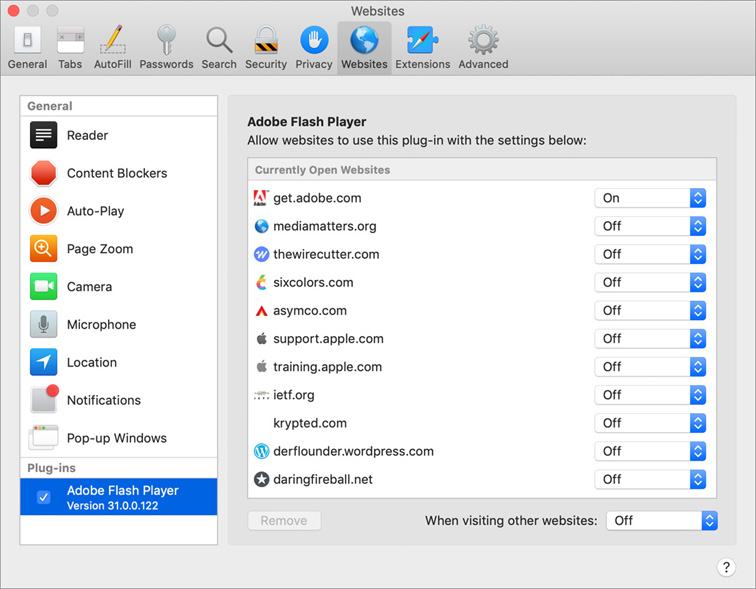
Some website designers might design a website to work with a browser other than Safari. These websites might not render properly in Safari. To provide the most secure web experience, Safari may disable third-party plug-ins. To verify the status of third-party plug-ins, choose Safari > Preferences (or press Command-Comma), click Websites, and then view the Plug-ins section in the left column. For each plug-in, you can specify which websites you allow to use the plug-in; for each website, you can choose among Ask, Off, and On. And each plug-in has the setting “When visiting other websites,” which you can set to Ask, Off, or On.
You might also try a third-party web browser.
To inspect problem webpages, open Safari preferences, click the Advanced button, and then select “Show Develop menu in menu bar.”
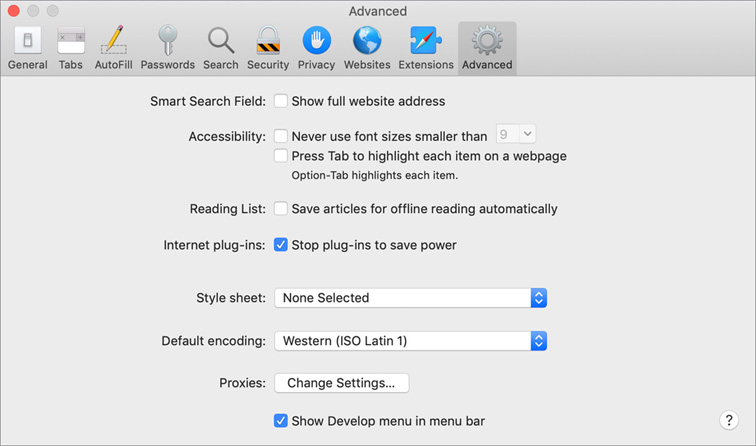
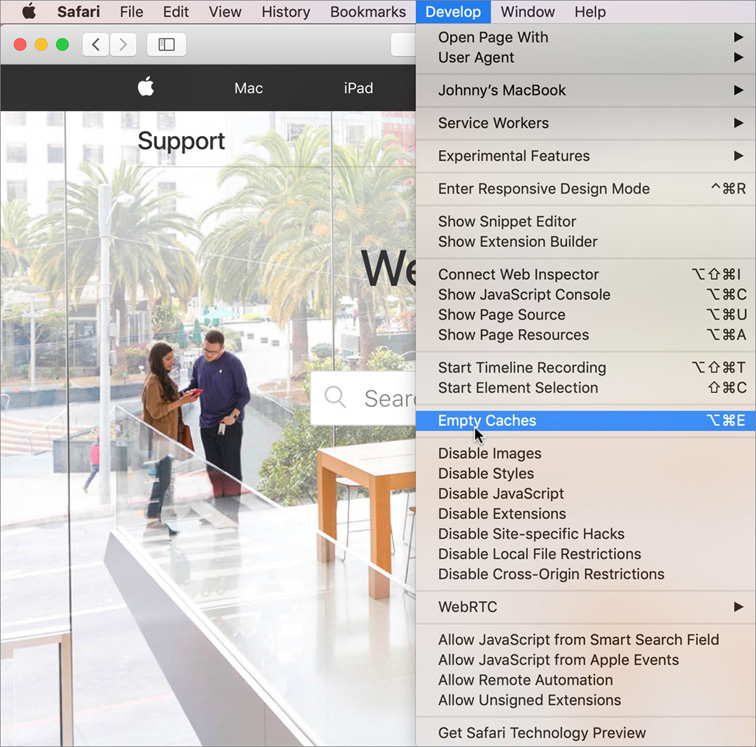
With this menu enabled, inspect the webpage details or try advanced troubleshooting, including emptying Safari caches and requesting the website with a different user agent.
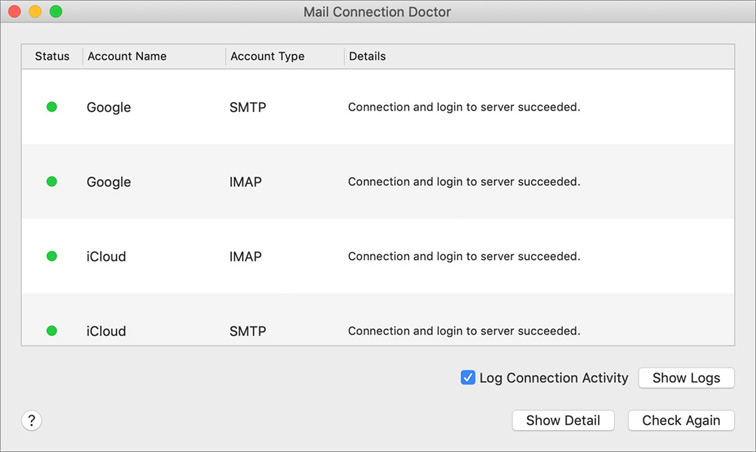
Mail includes a built-in account diagnostic tool, Mail Connection Doctor, that attempts to establish a connection with configured incoming and outgoing mail servers. Open Mail, and choose Window > Connection Doctor. If a problem is found, a suggested resolution is offered, but for a more detailed diagnostic view, click the Show Detail button to reveal the progress log, and click the Check Again button to rerun the tests.
Troubleshoot File-Sharing Services
If you have problems with SMB services, try the steps in Apple Support article HT204021, “If you can’t mount SMB share hosted by a Mac bound to Open Directory.”
As covered in Lesson 16, “Use Metadata, Spotlight, and Siri,” macOS uses separate metadata stores. The NFS and WebDAV file-sharing protocols don’t support metadata of this type. So macOS splits these files into two separate files when writing to a mounted NFS or WebDAV volume. The Finder recognizes these split files and shows you only a single file. Users on other operating systems see two separate files and might have trouble accessing the appropriate one.
Exercise 24.1 Configure a Network Service Account for Mail
![]() Prerequisite
Prerequisite
![]() You must have created the Johnny Appleseed account (Exercise 7.1, “Create a Standard User Account”).
You must have created the Johnny Appleseed account (Exercise 7.1, “Create a Standard User Account”).
The built-in macOS client apps use network services and Internet Accounts preferences to make setting up Internet service accounts easy. You already set up iCloud-based services on your Mac. In this exercise, you configure your Mac to use the mail service provided by the classroom server.
View Your Existing Network Accounts
Log in as Johnny Appleseed.
Open Mail.
Choose Mail > Preferences (Command-Comma) to open Mail preferences.
Click the Accounts button to see the accounts Mail is configured to use.
If you configured iCloud services for the Johnny Appleseed account, you see the iCloud account listed here.
You could use this pane of the Mail preferences window to view and add a new Mail account, but more often you’ll configure Mail accounts in Internet Accounts preferences.
Close the Mail preferences window, and quit Mail.
Open Internet Accounts preferences.
Your iCloud account information is listed on the left side of the window. You can manage iCloud settings here and in iCloud preferences. You might also see a Game Center account.
Select your iCloud account and deselect the Mail service on the right.
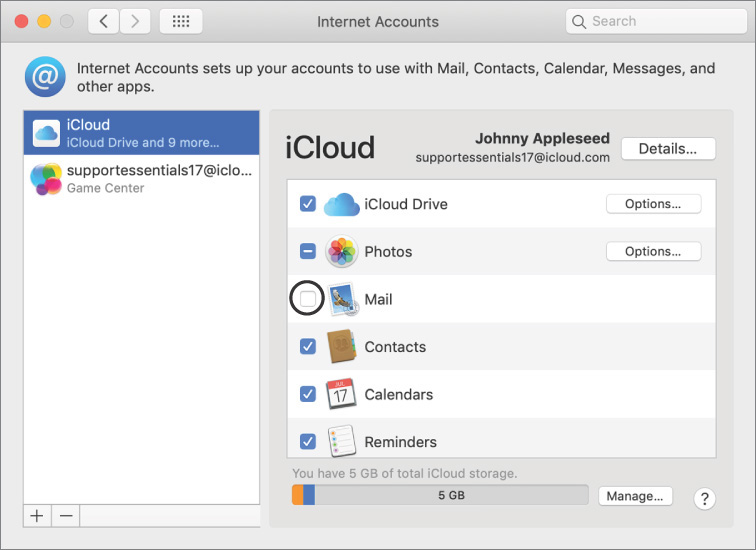
Not having iCloud mail configured makes testing later in the exercise easier.
Set Up a New Network Account for the Mail service
If necessary, navigate to Internet Accounts preferences.
Click the Add (+) button under the account list.
Scroll to the bottom of the list, and click Add Other Account.

More account types appear at the bottom of the list.
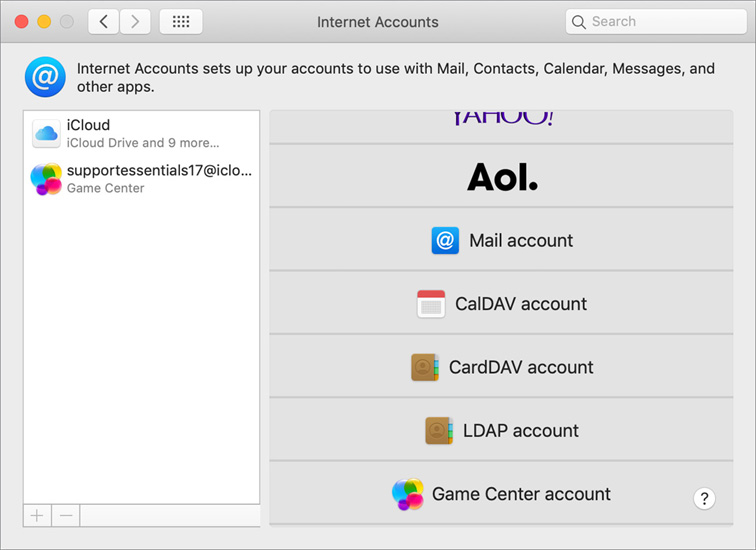
Click “Mail account.”

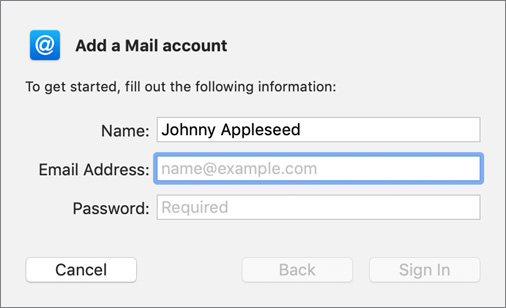
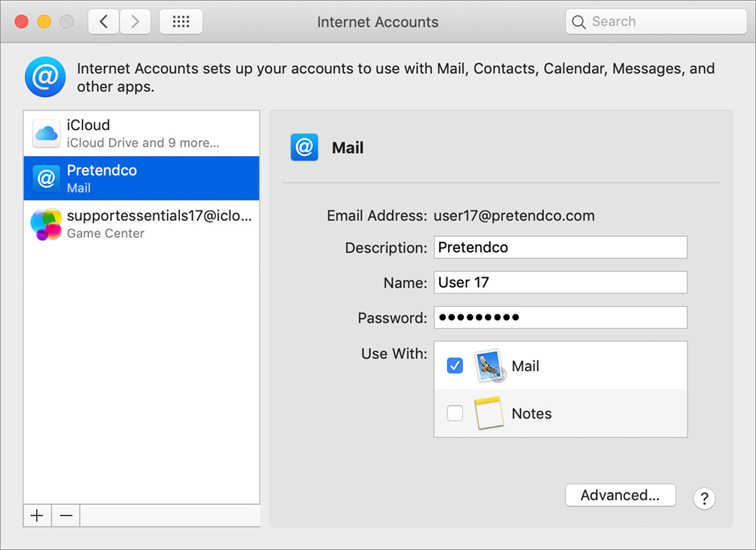
You are prompted for your basic mail account information. Your account name includes your participant number.
Enter the following for your account information:
Name: User nn (where nn is your participant number)
Email Address: usernn@pretendco.com (where nn is your participant number)
Password: Apple321!
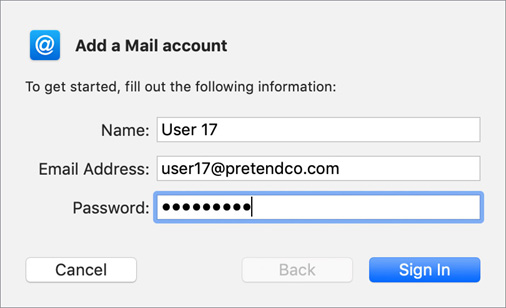
Click “Sign in.”
A dialog appears indicating that Internet Accounts can’t verify the account name or password. The type of mail account that you are configuring doesn’t have presets or auto-discovery capabilities like some other services. So, you’ll enter the name of the incoming (IMAP) and outgoing (SMTP) servers.
In both the Incoming and Outgoing Mail server fields, enter server.pretendco.com.
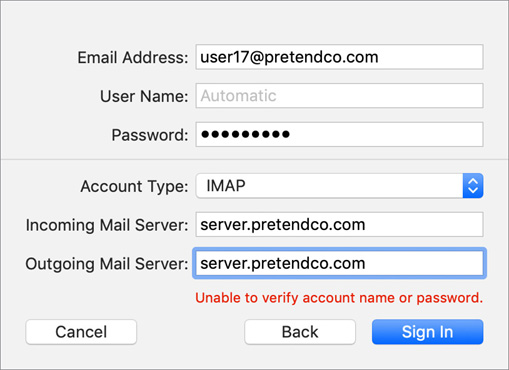
Click Sign In.
Now that you provided the proper Incoming and Outgoing mail servers, Internet Accounts asks you which apps you want to use with this account.
At the prompt, deselect Notes, and click Done.

Notice that a new mail account was added to the Internet accounts list.
Quit System Preferences.
Test Your New Account
Open Mail.
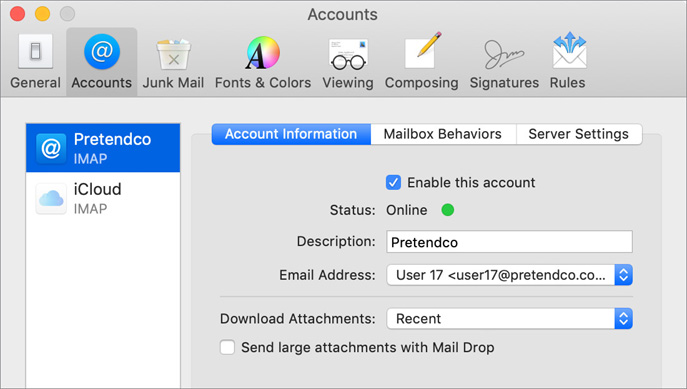
Open Mail preferences.
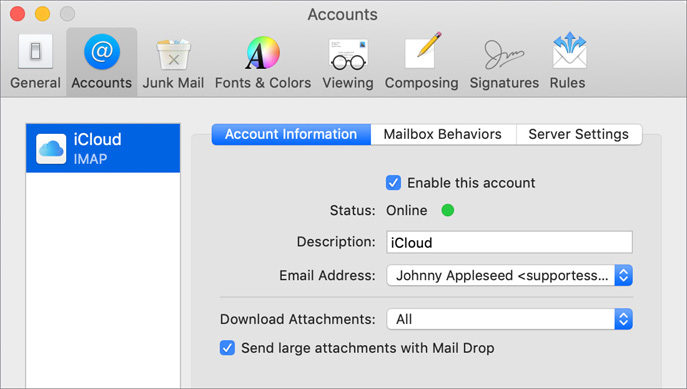
Click the Accounts button, and select the Pretendco account.
In this figure, the Mail account for User 17 was automatically configured by Internet Accounts. Your participant number is on your Mac.
Click Server Settings.
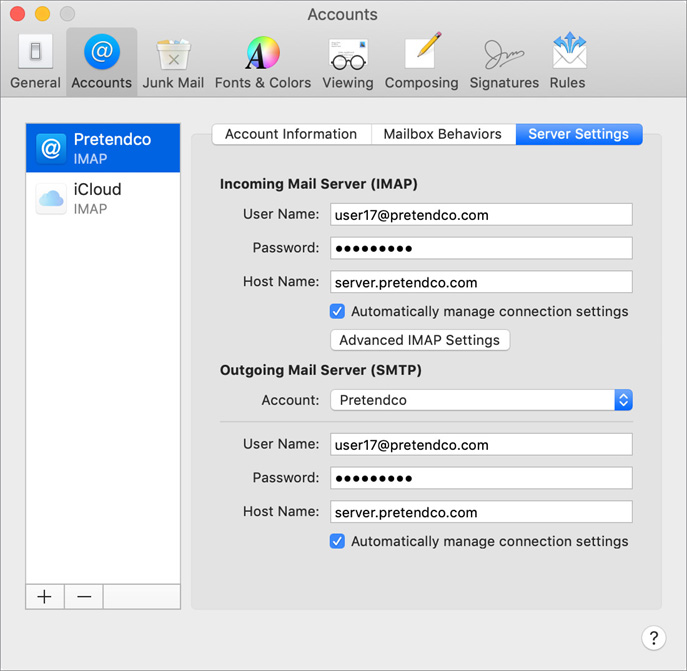
A complex setup was configured automatically by Internet Accounts.
Close the Mail preferences window.
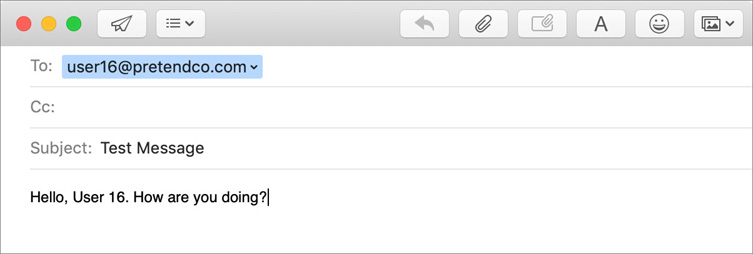
In the main window of the Mail app, click the Compose New Message button in the toolbar.
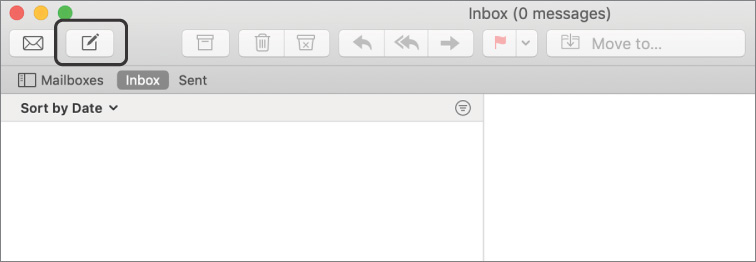
Send a message to a partner of your choice, or one that your facilitator assigns.
To: usernn@pretendco.com (where nn is your partner’s participant number)
Subject: Test Message
Enter some text in the body of the message.
Ask your partner if they have received your message.
After your partner sends you a message, you receive new mail.
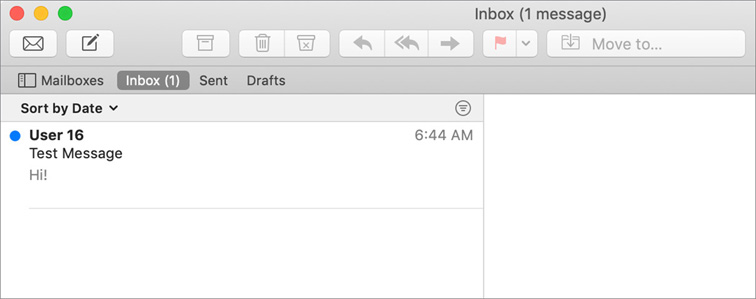
Read the message from your partner.

Quit Mail.
Scan the Server
To prepare for Exercise 24.3, “Troubleshoot Network Services,” you record a baseline of what services the classroom server provides when everything is working.
Open Network Utility (Command-Space bar or Spotlight).
Click the Port Scan button.
The Port Scan tool scans a server or other IP address to see what network ports are accepting connections. This is explored in more detail in Exercise 24.3.
Enter the server address server.local in the IP address field.
Select the “Only test ports between” option, and set the range to 443 through 445.
Click Scan.
Wait for the tool to finish scanning and expand the Network Utility window until all the results are visible.
Your results might not match those shown here. Take a screenshot to record your results. For more about taking screenshots in macOS, see Exercise 8.1, “Restore a Deleted User Account.”
Press Shift-Command-4, release the keys, and then press the Space bar.
The pointer changes to a camera icon, and the region of the screen it’s over is highlighted in blue.
Move the pointer over the Network Utility window, and click to take the screen capture.
The image is saved to your desktop with the name “Screen Shot” followed by the date and time you took it.
Quit Network Utility.
Exercise 24.2 Use File-Sharing Services
![]() Prerequisite
Prerequisite
![]() You must have created the Johnny Appleseed account (Exercise 7.1, “Create a Standard User Account”).
You must have created the Johnny Appleseed account (Exercise 7.1, “Create a Standard User Account”).
Browse to an SMB Share
In these steps you use the Finder sidebar to mount an SMB volume on the desktop.
Log in as Johnny Appleseed.
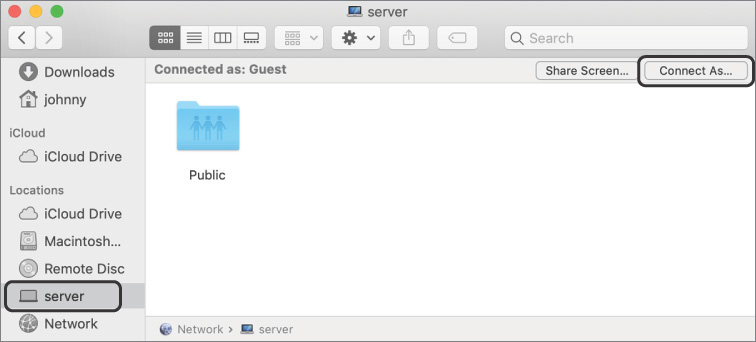
In the Finder, select Server in the Locations section of the sidebar.
If Server isn’t shown, click Network in the sidebar, and double-click Server in the network view.
Your Mac contacts Server and logs in as a guest.
Click the Connect As button.
Click Connect at the “You are attempting to connect to the server ‘server’” dialog.
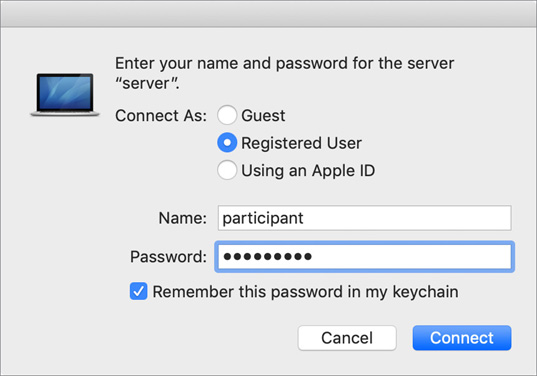
When prompted to authenticate, select Registered User, enter the name participant and the password Apple321!, select “Remember this password in my keychain,” and click Connect.
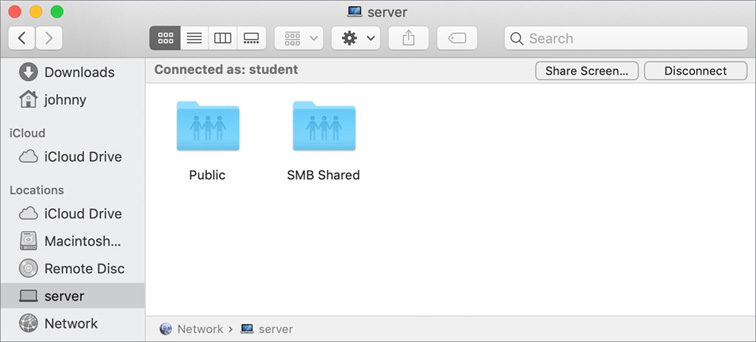
You are connected to Server with the “participant” account. The Finder shows that you have access to more shared folders than you did as a guest. The SMB Shared folder is available only over the SMB protocol, so its appearance here indicates that this is the protocol being used to connect to Server.
Open Finder preferences: choose Finder > Preferences (Command-Comma), click General, and select “Connected servers,” if it isn’t selected.
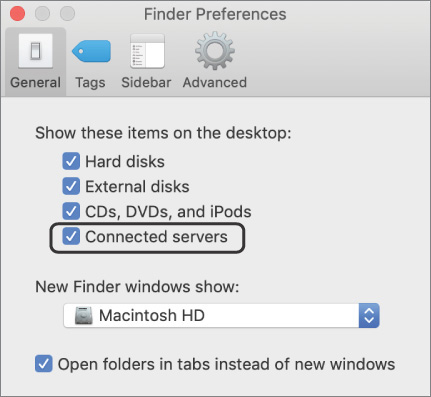
This enables mounted server volumes to be displayed on the desktop. Since you haven’t mounted shared folders yet, nothing new appears on the desktop.
Close the Finder preferences window.
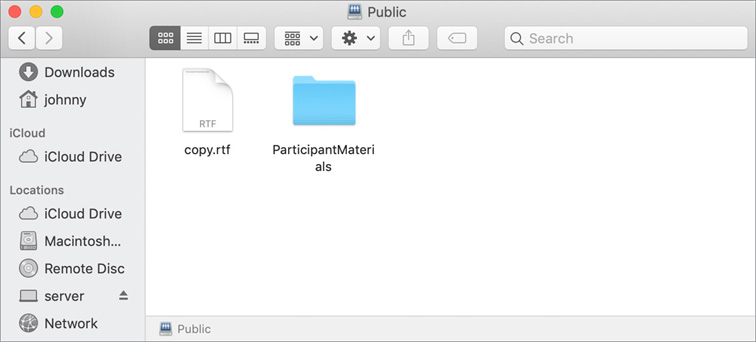
Open the Public shared folder.
The folder displays in the Finder, and a new network volume icon appears on the desktop.
In the Public folder you see a file (copy.rtf) and the ParticipantMaterials folder.
Copy Files to a Network Share
Drag copy.rtf to your desktop. Since you are dragging from one volume to another, this copies the file rather than moving it.
Rename your copy of copy.rtf to Participant nn.rtf (where nn is your participant number if you are in a classroom environment or 1 if you are performing these exercises on your own).
Press Return or click the filename and wait a moment to rename it.
Select Server in the Finder sidebar.
This returns you to the view of available shared folders.
Open the SMB Shared folder.
Its icon appears on your desktop.
Drag the renamed file from your desktop to the SMB Shared folder.
Automatically Mount a Network Share
macOS provides ways for you to enable easy access to shared folders for users. This enables them to be more productive. In this exercise, you configure your user preferences to mount a shared folder whenever you log in.
Open Users & Groups preferences.
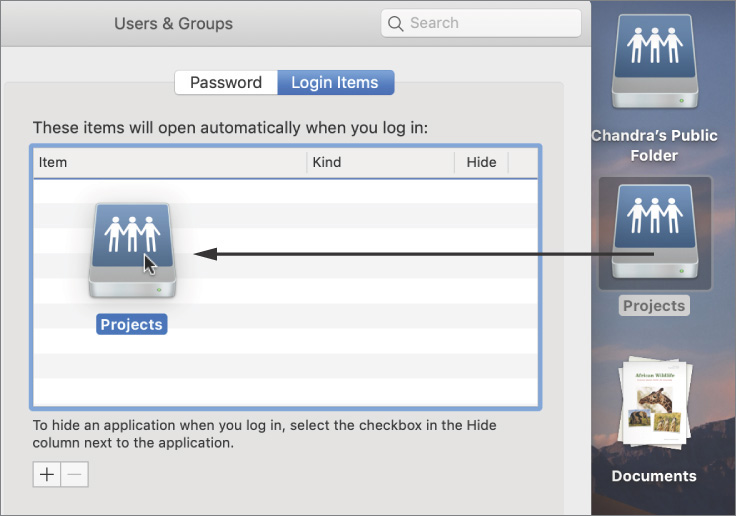
With Johnny Appleseed selected in the user list, click the Login Items tab.
You don’t need to authenticate as an administrator to access your login items. They are a personal preference, so standard users can manage their login items.
Drag the SMB Shared icon from your desktop to the login items list. If SMB Shared doesn’t appear, quit and reopen System Preferences.
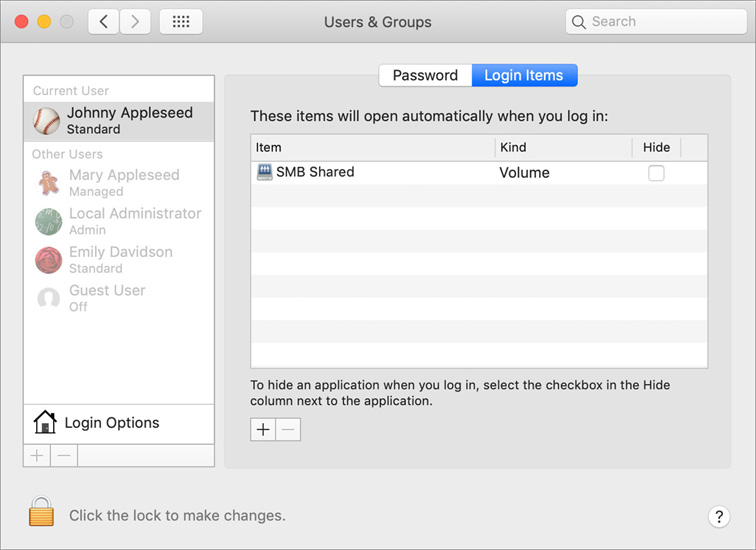
Anything in your login items list is opened every time you log in. It can include apps, documents, and folders. When you add a shared folder, you configured it to mount every time you log in. Since you also saved the server account name and password to your keychain when you connected, the connection should be fully automatic.
Quit System Preferences.
Click the Eject button next to Server in the Finder sidebar to disconnect from Server.

When you disconnect from the server, it automatically unmounts the Public and SMB Shared folders. You can also unmount them individually.
Log out and back in as Johnny Appleseed.
If a connect dialog appears, click Connect to confirm. The password is filled in from your keychain.
The SMB Shared folder is remounted and opened in the Finder.
Reopen Users & Groups preferences.
Click Login Items.
Select SMB Shared from the login items list and click the Remove (–) button under the list to remove it.
Quit System Preferences.
Disconnect from Server again.
Exercise 24.3 Troubleshoot Network Services
![]() Prerequisite
Prerequisite
![]() You must have created the Johnny Appleseed account (Exercise 7.1, “Create a Standard User Account”).
You must have created the Johnny Appleseed account (Exercise 7.1, “Create a Standard User Account”).
In this group of exercises, you learn an alternative way to connect to a share and ways to troubleshoot file sharing.
Wait for the Facilitator to Turn Off File Sharing
Tell your facilitator that you’re ready for the file-sharing service to be turned off, and wait for the facilitator to tell you to proceed.
Manually Connect to an SMB Share
In the Finder, choose Go > Connect to Server (or press Command-K).
In the Server Address field, enter smb://server.pretendco.com to connect using the SMB protocol.
Before you click Connect, click the Add (+) button at the bottom of the Favorite Servers list.
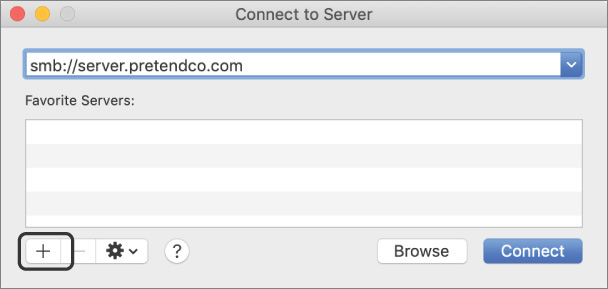
This adds the server URL to your Favorite Servers list. This is another way to allow access to a shared folder.
Click Connect.
After a few seconds, you receive an error message that there was a problem connecting to the server.
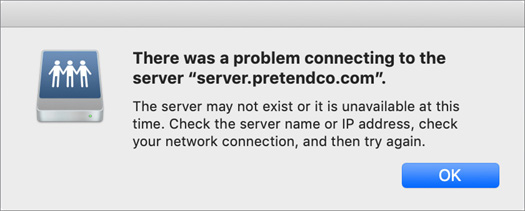
Click OK, and close the “Connect to Server” window.
Troubleshoot with Network Utility
Open Network Utility.
Since you are unable to reach the server via the SMB protocol, make sure the network connections between your Mac and the server are working.
Click Ping at the top of the application window if necessary.
In the “Enter the network address to ping” field, enter server.pretendco.com.
Click the Ping button at the right side of the window.

The ping probes are able to reach the server. This tells you that the network connection between your Mac and the server is working.
Go to the services you are trying to use.
Click the Port Scan button.
The Port Scan tool can scan a server to see what TCP port numbers it has services running on. Usually, you can tell what services are available based on the port numbers.
Note

Many network attacks start with or employ port scans, so this type of troubleshooting might be interpreted as an attack. Before you scan ports on a target Mac, request permission from its owner or a network or server administrator, if possible. As a general rule, scan ports only on Mac computers you have responsibility for. Many environments employ automatic countermeasures. Scanning a server might get your MAC address or IP address blacklisted, preventing you from knowing whether you resolved the problem.
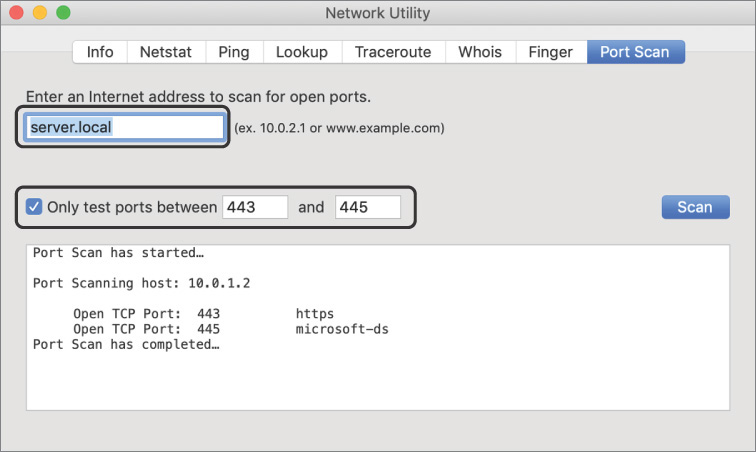
If necessary, enter the server address server.local in the IP address field.
If necessary, select the “Only test ports between” option, and set the range to 443 through 445.
Click Scan.
Watch the scan as it identifies the open ports.

If you had scanned for a larger range, the port scan would list other open ports. In this case, the port scan lists the open ports it finds and the names of the services usually associated with them. These ports are commonly used and facilitate interoperability across different vendor implementations of the same protocols. To test whether a Mac has an HTTP (web) server, run a port scan on it to see if TCP port 80 is open. HTTPS (a TLS-secured web service) normally uses TCP port 443. If HTTPS requests aren’t working, port 443 might be blocked or inactive.
For a list of many ports used by Apple devices, see Apple Support article HT202944, “TCP and UDP ports used by Apple software products.”
Open the screenshot you took in Exercise 24.1 that shows which ports were open when the services were working and compare it with the current scan.
In this exercise, you are trying to troubleshoot the SMB file service, which normally involves TCP port 445 (microsoft-ds). This port is listed in the earlier scan but not in the current scan. This indicates that the server doesn’t offer file services over SMB (which is true here since the service is turned off) or that a firewall is blocking access to the service.
Quit open apps.
Wait for Your Facilitator to Turn On File Sharing
Tell your facilitator that you’re ready for the file-sharing service to be turned on and wait for the facilitator to tell you to proceed.
Repeat the steps in the earlier section “Manually Connect to an SMB Share,” and follow through on mounting the share.
Eject the share when you’re done.