You are probably reading this book because you want to integrate spatial capability into your web application using the ArcGIS JavaScript API and make it even more amazing, or maybe you're hoping to become a web mapping data scientist very soon. Whatever it is, we are with you. But don't you think we need a bit of groundwork before working on the actual projects? This chapter is all about that—laying a strong foundation for the concepts used later in this book. This chapter is by design diverse in its content, covering a lot of ground on the following topics:
- Writing your first mapping application using the API
- Brushing up on coordinate geometry, extents, and spatial reference systems
- Introducing dojo and the AMD pattern of coding
- Understanding ArcGIS Server and the REST API
- Setting up the development environment
This book is a by example book, and we will be explaining the concepts with the applications that we'll develop. So, it's essential that you have the development environment up and running at the onset of this chapter. Most of the environments mentioned in the following sections are just our preferences and may not be mandatory to implement the code samples provided in this book. All the code samples have been targeted at running in a Windows-based OS and an Integrated Development Environment (IDE) named Brackets. If you have a different choice of OS and IDE, we welcome you to develop in the environment you're most comfortable with.
To develop, deploy, and execute any web application, we need the following components:
We have used Google Chrome throughout this book as it provides some great developer tools and HTML inspection tools. We think Mozilla too, is a great browser for development purposes.
Applications developed in this book are hosted using IIS Express. IIS Express is a lightweight webserver mainly used for hosting .NET web applications. Though, all the projects in this book are developed using pure HTML, CSS, and JavaScript, we will be using the Esri .NET resource proxy to access the ArcGIS online secured content and avoid cross domain issues.
Readers can install IIS Express either by installing Web Platform Installer or directly from the Microsoft downloads page, as illustrated in the following steps:
- To install IIS Express using Web Platform Installer visit https://www.microsoft.com/web/downloads/platform.aspx to download Web Platform Installer.
- Once downloaded, search for
IIS Expressin the search text. The search results will display the IIS Express application. Click on the Add button against the IIS Express application name, and then click on the Install button at the bottom of the page as shown in the following screenshot: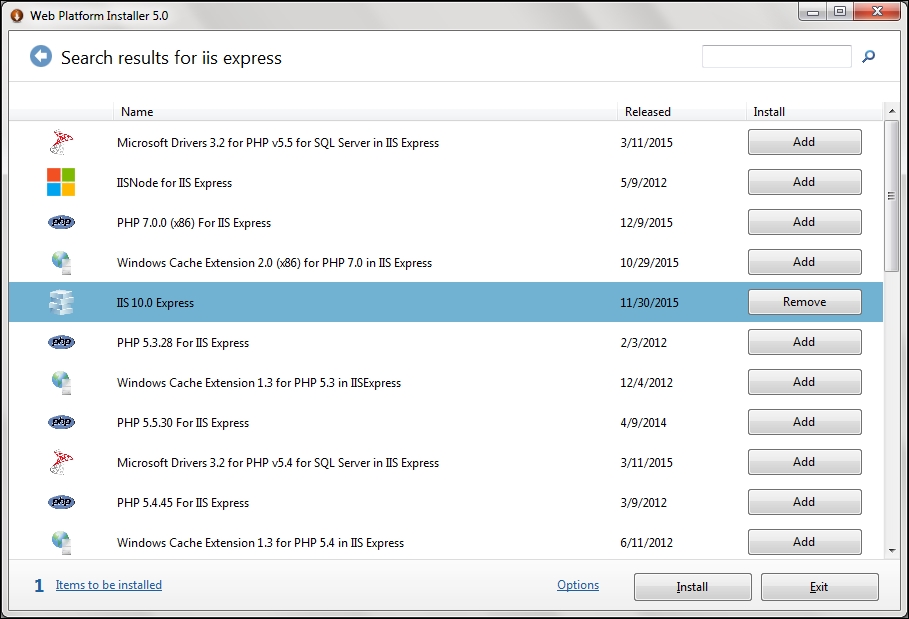
- Installing IIS Express from Web Platform Installer ensures that we can get IIS Express' latest version against the direct download link, which we may not be able to provide the link for the latest version. When this book was written, the latest IIS Express direct download link was found at https://www.microsoft.com/en-us/download/details.aspx?id=34679.
- After installing IIS, you can find the executables in the
IIS Expressfolder inside theProgram Filesfolder. The default location is usuallyC:Program FilesIIS Express. - We will provide an executable batch (
.bat) file within each project that helps to start the web server and host the project at the specified port. - You can find the following line of code in the executable file of each project we have developed for this book:
"C:Program FilesIIS Expressiisexpress.exe" /path:<app location> /port:9098
- The preceding line will host the application at port
9098. So, to access the app, you just need to use the URL—http://localhost:9098/.
For a few exercises in the book, you will require an ArcGIS Developer account. It's also an opportunity for you to explore various capabilities offered by ESRI for the developers. To set up a Developer account, just sign up for free at https://developers.arcgis.com/en/sign-up/.
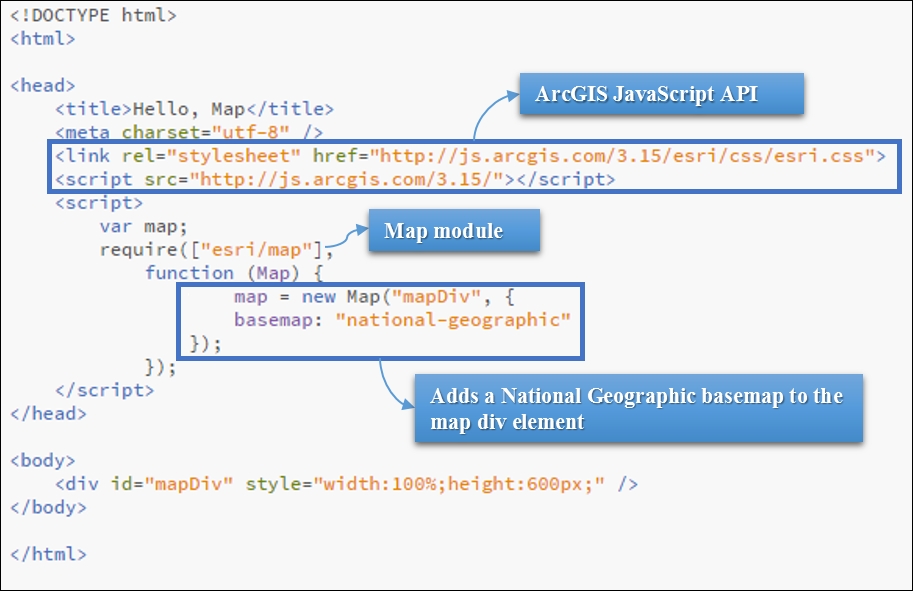
If you're anything like us, you'd probably like to code your way to your first map right away. So here it is. Try adding these lines of code to a new HTML file in your Brackets IDE. You can also download the HTML source code, named B04959_01_CODE01, from the code repository and double-click on the HTML file to run it.
While observing the preceding lines of code, you may have observed these two things:
- We didn't need any licensing, authentication, or key to run this code. In other words, the API is free. You just had to use the CDN link.
- We will be seeing this beautiful cartographic map in our browser as shown in the following screenshot:

- We encourage you to zoom or pan to location you want to see your map. If you haven't figured how to zoom/pan the map, we'll deal with it right away:
Left-click dragging or pressing any arrow key causes a pan and the level of detail doesn't change.
Shift + left-click drag, mouse scroll, a double click, or clicking on the + or - buttons on the map causes a zoom and the level of detail displayed changes.
Let's try to understand the code we just saw. There are three concepts in this code that we'd like to explain. The first one deals with the reference links for the API or the Content Delivery Network (CDN) that we used to download the ArcGIS JavaScript API (v 3.15) and its associated style sheets. The second concept tries to introduce you to the pattern of coding employed, which is known as the Asynchronous Modular Definition (AMD) pattern. This is used by the latest version of dojo (v1.10). The next concept is about what you see in the browser when you ran the code—the map and the parameters we supplied to it.
First things first. We need to reference the API to develop an ArcGIS JavaScript API-based application. Esri is the organization that owns the API, yet the API is free and available for public use. The latest version of the API as of March 2016 was 3.15 and the corresponding dojo toolkit version was version 1.10.
The following libraries are the only ones you may probably need to reference to use ArcGIS JavaScript API's capabilities as well many dojo toolkit packages, such as core dojo, dijit, dgrid, and so on:
<link rel="stylesheet" href="http://js.arcgis.com/3.15/esri/css/esri.css">

<script src="http://js.arcgis.com/3.15/"></script>
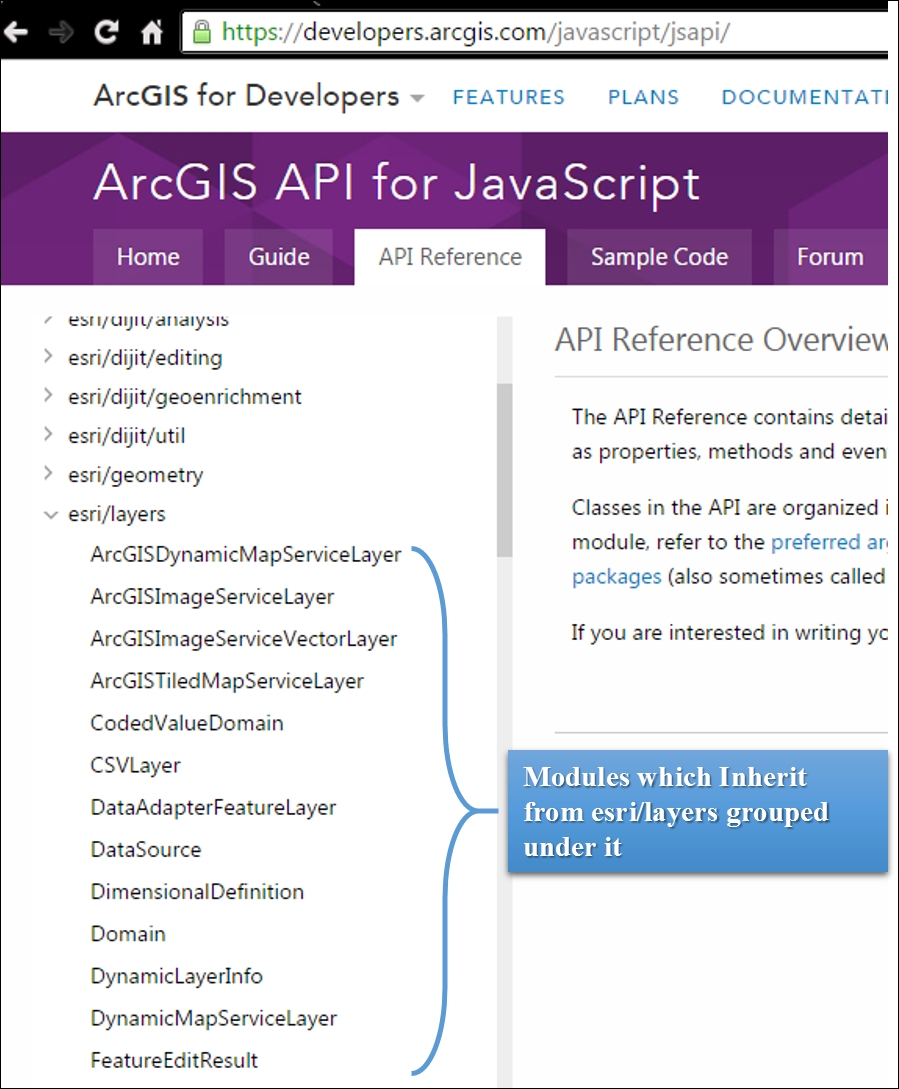
Refer to this link for complete documentation of the ArcGIS JavaScript API—https://developers.arcgis.com/javascript/jsapi/.
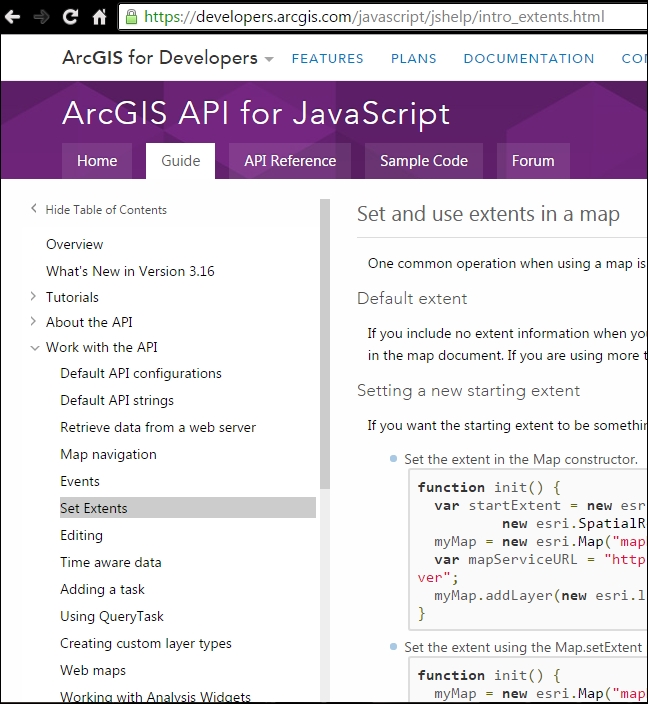
When you visit the preceding URL, you will see a web page providing complete documentation of the API with multiple tabs such as API Reference, Guide, Sample Code, Forum, and Home.
Tip
Downloading the example code
You can download the example code files for this book from your account at http://www.packtpub.com. If you purchased this book elsewhere, you can visit http://www.packtpub.com/support and register to have the files e-mailed directly to you.
You can download the code files by following these steps:
- Log in or register to our website using your e-mail address and password.
- Hover the mouse pointer on the SUPPORT tab at the top.
- Click on Code Downloads & Errata.
- Enter the name of the book in the Search box.
- Select the book for which you're looking to download the code files.
- Choose from the drop-down menu where you purchased this book from.
- Click on Code Download.
You can also download the code files by clicking on the Code Files button on the book's webpage at the Packt Publishing website. This page can be accessed by entering the book's name in the Search box. Please note that you need to be logged in to your Packt account.
Once the file is downloaded, please make sure that you unzip or extract the folder using the latest version of:
- WinRAR / 7-Zip for Windows
- Zipeg / iZip / UnRarX for Mac
- 7-Zip / PeaZip for Linux
The API reference lists all the modules available under the API as details, properties, methods, and events available for each module. The left pane groups most of the modules for easy reference. For example, the grouping named esri/layers has multiple modules that inherit from it. The following screenshot gives a snapshot of how the different modules that inherit from esri/layers are grouped:
The Guide section provides detailed instructions on important topics such as Working with the Query Task, Working with ArcGIS Online Widgets, and Working with symbols and renderers. The following screenshot shows a detailed guide on setting map extents:
The Sample Code tab is yet another useful section with hundreds of sample applications, which are used to demonstrate different concepts in the API. The best part of these sample codes is that they come with a sandbox facility, which you can use to play around with the code by modifying it.
The Forum tab redirects you to the following URL—https://geonet.esri.com/community/developers/web-developers/arcgis-api-for-javascript.
The GeoNet community forum is a great place to ask your questions and share your solutions to questions from developers like you.
Due to its close integration with the dojo framework, a working knowledge of the dojo toolkit is required and the reference documentation for it can be accessed at http://dojotoolkit.org/reference-guide/1.10/.
If you've observed the code structure, it may look as follows:
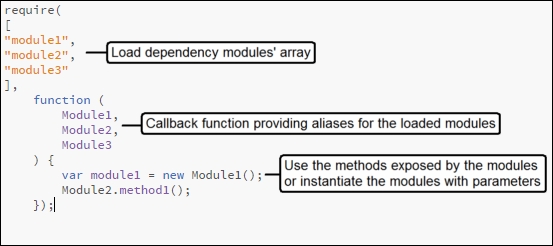
If you aren't familiar with this pattern of JavaScript coding, it is known as the AMD pattern of coding, and the ArcGIS API for JavaScript emphasizes on using this pattern of coding. In the initial chapters we will be introducing a lot about this to get ourselves familiarized with dojo and AMD. From the code structure you might have understood that the code requires certain modules and the function that loads these modules requires that they are in the same order. Some of the modules in our case were Esri modules (esri/..) and dojo modules (dojo/..). If you're wondering whether you could require custom defined modules, the answer is absolutely yes, and this will be a major part of our exercise in this book.
The highlighted line in the code forms the crux of our jumpstart code:
        var map = new Map("mapDiv", {
          basemap: "national-geographic"
        });
The map module accepts two arguments. The first argument is the div container, which will contain the map object. The second argument is an optional object, which accepts a lot of properties that can used to set the map's properties.
In our jumpstart code, the basemap property in the optional object sets one of the Esri's provided basemap code named national-geographic to be displayed as the background map. We implore you to experiment with the other Esri provided basemaps, such as the following:
- satellite
- dark-gray
- light-gray
- hybrid
- topo