Drawing linear things with the AutoCAD drawing commands
Lining up for lines and polylines
Closing up with rectangles and polygons
As you probably remember from your crayon and coloring book days, drawing stuff is fun. CAD imposes a little more discipline, but drawing stuff with AutoCAD is still fun (trust me on this one). In computer-aided drafting, you usually start by drawing geometry — shapes such as lines, circles, rectangles, and so on — that represents the real-world object that you're documenting. This chapter shows you how to draw geometry — linear objects that proceed in a straightforward manner from one point to the next. In Chapter 9, I throw some curves at you.
After you've created some straight or curvy geometry, you'll probably need to add some dimensions, text, and hatching, but those elements come later (in Part III of this book). Your first task is to get the geometry right; then you can worry about labeling things.
Note
Drawing geometry properly in AutoCAD depends on paying attention to object properties and the precision of the points that you specify to create the objects. I cover these matters in Chapters 6 and 7, so if you eagerly jumped to this chapter to get right to the fun stuff, take a moment to review those chapters first.
For descriptive purposes, I'm dividing the drawing commands into three groups:
Table 8-1 offers an overview of the most important commands for drawing 2D linear objects in AutoCAD. It lists each command by name, with the shortcut keys, or alias (when one exists), in parentheses. The table also displays each command's graphical icon, which appears in identical form on all tool buttons and menus. Ribbon buttons are on the Draw panel of the Home tab in the 2D Drafting & Annotation workspace. In the AutoCAD Classic workspace, you find the commands on the Draw toolbar and Draw menu.
Table 8-1. AutoCAD Drawing Commands for Linear Objects
Button | Command | Draw Panel Button | Draw Toolbar Button | Draw Menu |
|---|---|---|---|---|
LINE (L) | Line | Line | Line | |
RAY | Ray (on slideout) | None | Ray | |
XLINE (XL) | Construction line (on slideout) | Construction line | Construction line | |
PLINE (PL) | Polyline | Polyline | Polyline | |
POLYGON (POL) | Polygon | Polygon | Polygon | |
RECTANG (REC) | Rectangle | Rectangle | Rectangle |
Note
If you're coming from an earlier version, AutoCAD 2009's Ribbon is obviously very different from what you're used to. Like many Ribbon panels, the Draw panel has additional tool buttons on a slideout you can use once or pin so it stays open — refer to Chapter 2 for a refresher on Ribbon panels and slideouts. Similarly, many of the choices on the AutoCAD Draw menu open submenus containing several variations on each drawing command.
AutoCAD's drawing commands are highly interactive. You need to read and respond to the prompts at the dynamic tooltip next to the crosshairs or in the command window. You can also access many of the command options that you see in command window prompts by pressing the up- and down-arrow keys to display the options at the dynamic tooltip. You can even right-click and select command options from the context-specific shortcut menu.
Tip
AutoCAD's Dynamic Input system displays a lot of the information that you used to have to look down to the command window to see. To use Dynamic Input, make sure the DYN button on the status bar is turned on (that is, it looks highlighted). Don't turn the command window off just yet though, especially if you're new to AutoCAD. I recommend that you keep the command window open and docked at all times.
So what's the best course: to enter drawing commands from the command line, which you can do in any workspace? Or to choose commands from the Ribbon in the 2D Drafting & Annotation workspace, or the AutoCAD Classic workspace's menus or toolbars? I suggest that you start a drawing command the first few times by clicking its button on the Draw panel (or AutoCAD Classic's Draw toolbar) until you remember its command name. After you click the button, fasten your eyes on the command window so that you see the name of the command and its options. Use the keyboard or the right-click menus to select options. After you're acquainted with a drawing command and decide that you like it enough to use it often, find out how to type its keyboard shortcut.
As I harp on a bunch of times elsewhere in this book, CAD programs are for precision drawing, so you'll spend a lot of your AutoCAD time drawing objects composed of straight-line segments. This rest of the chapter covers these commands:
LINE (L): Draws a series of straight line segments; each segment is a separate object.
PLINE (PL): Draws a polyline — a series of straight and/or curved line segments. (Yes, I'm cheating a bit here — curvy things are covered in the next chapter — but I didn't want you to have to read about one command in two different places!) All the segments remain connected to each other as a single object.
RECTANG (REC): Draws a polyline in the shape of a rectangle.
POLYGON (POL): Draws a polyline in the shape of a regular polygon (that is, a closed shape with all sides equal and all angles equal).
The following additional straight-line drawing commands are also available in AutoCAD:
RAY: Draws a line that starts at a point and just keeps on going; a ray therefore is a line that extends infinitely in one direction.
XLINE (XL): Draws a line that passes through a point and extends infinitely in both directions.
Tip
The RAY and XLINE commands are used to draw construction lines that guide the construction of additional geometry. Drawing construction lines is less common in AutoCAD than in some other CAD programs. AutoCAD's many precision techniques often provide more efficient methods for creating new geometry than adding construction lines to your drawing does.
The LINE command in AutoCAD draws a series of one or more connected line segments. Well, it appears to draw a series of connected segments. In fact, each segment, or piece of a line with endpoints, is a separate object. This construction doesn't seem like a big deal until you try to move or otherwise edit a series of segments that you drew with the LINE command; you must select every piece separately. To avoid such a hassle, use polylines (described later in this chapter), not lines (or lines and arcs), when you want the connected segments to be a single object.
If you're used to drawing lines in other programs, you may find it confusing at first that AutoCAD's LINE command doesn't stop after you draw a single segment. AutoCAD keeps prompting you to specify additional points so that you can draw a series of (apparently) connected segments. When you're finished drawing segments, just press Enter to finish the LINE command.
Unlike a lot of the AutoCAD drawing commands, LINE doesn't offer a bunch of potentially confusing options. It has a Close option to create a closed polygonal shape and an Undo option to remove the most recent segment that you drew.
Note
Like all drawing commands, LINE puts the line segments that it draws on the current layer and uses the current color, linetype, lineweight, and plot style properties. When you're doing real drafting, as opposed to just experimenting, make sure of the following:
Think about setting these properties before you start drawing. Although you can easily change an object's layer or other object properties, it's often more efficient to set properties first. (I recommend that you set color, linetype, lineweight, and, if you're using named plot styles, plot style to ByLayer.) See Chapter 6 for information on setting the current properties with the Properties toolbar.
Make sure that you use one of AutoCAD's precision tools, such as object snaps, typed coordinates, and tracking, to ensure that you specify each object point precisely. Chapter 7 describes these tools.
Follow these steps to draw a series of line segments by using the LINE command:

Click the Line button on the Draw panel of the Ribbon's Home tab, or type L and press Enter. In the AutoCAD Classic workspace, click Line on the classic Draw toolbar, choose Line on the Draw menu, or type L and press Enter.
AutoCAD starts the LINE command and prompts you to select the first point.
Specify the starting point by clicking a point or typing coordinates.
Remember to use one of the precision techniques I describe in Chapters 6 and 7 if you're doing real drafting. For the first point, object snap, snap, and typing coordinates all work well.
AutoCAD prompts you to specify the other endpoint of the first line segment. The command window prompt shows
Specify next point or [Undo]:
You can also see command prompts at the Dynamic Input tooltip beside the crosshairs by pressing the down-arrow key. The arrow icon on the dynamic tooltip is your indicator that there are options available.
Specify additional points by clicking or typing.
Again, use one of the AutoCAD precision techniques if you're doing real drafting. For the second and subsequent points, all the techniques mentioned in the previous step work well, as do ortho, object snap tracking, and direct distance entry.
After you specify the third point, AutoCAD adds the Close option. The command prompt shows
Specify next point or [Close/Undo]:
When you're finished drawing segments, end with one of these steps:
Either press Enter or right-click anywhere in the drawing area and choose Enter from the right-click menu to leave the figure open.
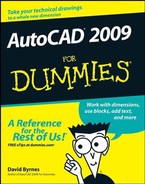
Type C and press Enter or press the down arrow on your keyboard and choose Close from the menu (as shown in Figure 8-1) to close the figure.
In either case, the blank command prompt indicates that the LINE command is finished:
Command:

The LINE command is fine for some drawing tasks, but the PLINE command is a better, more flexible choice in many situations. The PLINE command draws a special kind of object called a polyline. You may hear CAD drafters refer to a polyline as a pline (rhymes with beeline) because of the command name.
The most important differences between the LINE and PLINE commands are these:
The LINE command draws a series of separate line segments. Even though they appear to be connected on the screen, each segment is a separate object. If you move one line segment, the other segments that you drew at the same time don't move with it.
The PLINE command draws a single, connected, multisegment object. If you select any segment for editing, your changes affect the entire polyline. Figure 8-2 shows how the same sketch drawn with the LINE and the PLINE commands responds when you select one of the objects.
Tip
Use PLINE instead of LINE in most cases where you need to draw a series of connected line segments. If you're drawing a series of end-to-end segments, there's a good chance that those segments are logically connected — for example, they might represent the outline of a single object or a continuous pathway. If the segments are connected logically, it makes sense to keep them connected in AutoCAD. The most obvious practical benefit of grouping segments together into a polyline is that many editing operations are more efficient when you use polylines. When you select any segment in a polyline for editing, the entire polyline is affected.
The PLINE command can draw curved segments as well as straight ones. If you want a combination of separate linear and curved segments you must switch back and forth between the LINE and ARC commands (I cover arcs in Chapter 9). Using PLINE you can switch between linear or circular-curve sections by choosing the command options described in the steps that come after this list.
Polylines can have width. Polyline segment width is visually similar to AutoCAD's lineweight object property, except that polyline segment width can be uniform or tapered. The ability to create polyline segments with line widths was more important in the old days, before AutoCAD had lineweight as an object property. People used to draw polylines with a small amount of width to show the segments as just slightly bolder than regular lines, which are always displayed as a single pixel wide. Nowadays, it's easier and more efficient to achieve this effect with object lineweights (as described in Chapter 6) or plot styles (as described in Chapter 16).

After you create a polyline, you can adjust its segments by grip editing any of the vertex points. (The little squares on the vertices in Figure 8-2 are called grips; see Chapter 10 for details on grip editing.) For more complicated polyline editing tasks, you can use the PEDIT command to edit the polyline, or you can convert the polyline to a collection of line and arc segments by using the EXPLODE command — although you lose any width defined for each segment when you explode a polyline. For more information on these two commands, look them up in the index of the online help.
Drawing polylines composed of straight segments is pretty much like drawing with the LINE command, as demonstrated in the following procedure. The PLINE command has lots of options, so watch the prompts! If dynamic input is on, use the down-arrow key to see the options listed at the crosshairs, or right-click to display the PLINE right-click menu, or simply read the command line.
To draw a polyline composed of straight segments, follow these steps:
Set an appropriate layer current, and set other object properties that you want applied to the line segments that you'll draw.

The panels on the Home tab contain the most commonly used commands in AutoCAD.
Click the Polyline button on the Ribbon's Draw panel or the AutoCAD Classic Draw toolbar or Draw menu, or type PL and press Enter.
AutoCAD starts the PLINE command and prompts you to specify a start point.
Specify the starting point by clicking a point or typing coordinates.
AutoCAD displays the current polyline segment line width at the command line and prompts you to specify the other endpoint of the first polyline segment:
Current line-width is 0.0000
Specify next point or
        [Arc/Halfwidth/Length/Undo/Width]:
If the current line width isn't zero, change it to zero by typing W to select the Width option, and then entering 0 as the starting and ending widths as shown in the following command line sequence:
Specify next point or [Arc/Halfwidth/Length/Undo/Width]:WEnter Specify starting width <0.0000>:0Enter Specify ending width <0.0000>:0Enter Specify next point or [Arc/Halfwidth/Length/Undo/Width]:Specify additional points by clicking or typing.
After you specify the second point, AutoCAD adds the Close option to the prompt. The command line shows
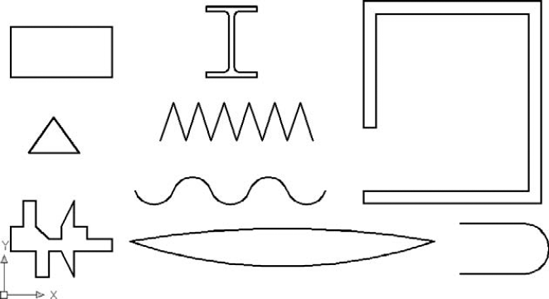
Specify next point or
        [Arc/Close/Halfwidth/Length/Undo/Width]:
In addition, you can view and choose options from the Dynamic Input menu, as shown in Figure 8-3.
After you finish drawing segments, either press Enter (to leave the figure open) or type C and press Enter (to close it).
AutoCAD draws the final segment. The blank command line indicates that the PLINE command is finished.
In the following procedure, I spice things up a bit and give you a preview of coming (curvy) attractions by adding an arc segment to a polyline.
Note
Just so you know, curved segments in polylines are circular arcs — pieces of circles with center points that you can draw with AutoCAD's ARC command. AutoCAD can draw other kinds of curves, including ellipses and splines, but not within the PLINE command.
To draw a polyline that includes curved segments, follow these steps:
Repeat Steps 1 though 6 of the previous procedure.
When you're ready to add one or more arc segments, type A and press Enter to select the Arc option.
The prompt changes to show arc segment options. Most of these options correspond to the many ways of drawing circular arcs in AutoCAD; see the section on arcs in Chapter 9. The command line shows
Specify endpoint of arc or [Angle/CEnter/CLose/
       Direction/Halfwidth/Line/Radius/Second
       pt/Undo/Width]:
Specify the endpoint of the arc by clicking a point or typing coordinates.
AutoCAD draws the curved segment of the polyline. The prompts continue to show arc segment options.
Your options at this point include
In this example, you return to drawing straight-line segments.
Tip
Perhaps the most useful of the alternative arc-drawing methods is Second pt. That gives you more control over the direction of the arc, but at the cost of losing tangency of adjacent segments. Sometimes it's best not to go off on a tangent, anyway.
Type L and press Enter to select the Line option.
Specify endpoint of arc or
        [Angle/CEnter/CLose/Direction/Halfwidth/Line/R
        adius/Second pt/Undo/Width]: L
The prompt changes back to showing straight-line segment options.
Specify next point or
         [Arc/Close/Halfwidth/Length/Undo/Width]:
Specify additional points by clicking or typing.
After you're finished drawing segments, either press Enter or type C and press Enter.
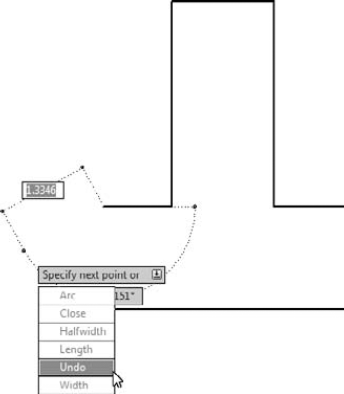
Figure 8-4 shows some of the things that you can draw with the PLINE command by using straight segments, arc segments, or a combination of both.
Tip
The LINE and PLINE commands work well for drawing a series of end-to-end single lines, but what if you want to draw a series of double lines to represent, for example, the edges of a wall or roadway? Here are some options:
Use the AutoCAD MLINE command to draw multilines — series of two or more parallel straight lines. The AutoCAD multiline feature was full of limitations when it debuted way back in 1994 (in the notorious Release 13), and despite some minor tweaks in AutoCAD 2006, it hasn't improved significantly since then. Look up the "MLINE" and "MLSTYLE" commands in AutoCAD's online help system if you'd like to tangle with this feature, but be prepared to spend time experimenting and struggling.
Note
In AutoCAD LT only, use the DLINE (DL), or Double Line, command to draw pairs of parallel line and/or arc segments. AutoCAD LT doesn't include the MLINE command, which, given MLINE's problems, is more of a blessing than a limitation. AutoCAD, on the other hand, doesn't include the DLINE command. (Score one for the little brother!)
Use the PLINE command to draw a single set of connected line and/or arc segments, and then use the OFFSET command to create one or more sets of parallel segments. Chapter 11 covers the OFFSET command.
You can use the PLINE or LINE command to draw a rectangle segment by segment. In most cases, though, you'll find it easier to use the special-purpose RECTANG command. The following procedure demonstrates how:
Set an appropriate layer current, and set other object properties that you want applied to the line segments that you'll draw.

Click the Rectangle button on the Ribbon's Draw panel or the AutoCAD Classic Draw toolbar or Draw menu, or type REC and press Enter.
AutoCAD starts the RECTANG command and prompts you to specify a point for one corner of the rectangle. The command line shows
Specify first corner point or
        [Chamfer/Elevation/Fillet/Thickness/Width]:
Tip
You can add fancy effects with the additional command options. The default options work best for most purposes. Look up "RECTANG command" in the AutoCAD help system if you want to know more about the options.
Specify the first corner by clicking a point or typing coordinates.
AutoCAD prompts you to specify the other corner of the rectangle — the one that's diagonally opposite from the first corner.
Specify other corner point or
        [Area/Dimensions/Rotation]:
Specify the other corner by clicking a point or typing coordinates.
Tip
If you know the size of the rectangle that you want to draw (for example, 100 units long by 75 units high), type relative coordinates to specify the dimensions (for example, @100,75). (Chapter 7 describes how to type coordinates.)
AutoCAD draws the rectangle.
Unlike the neglected MLINE command, the RECTANG command has improved considerably since its debut. You can specify a rotation angle and — very handy for space planners — you can provide one dimension and an area. RECTANG will calculate the length of the other side and draw the rectangle.
Rectangles and other closed polylines are types of polygons, or closed figures with three or more sides. The AutoCAD POLYGON command provides a quick way of drawing regular polygons — polygons in which all sides and angles are equal.
The following procedure demonstrates the POLYGON command:
Set an appropriate layer current, and set other object properties that you want applied to the line segments that you'll draw.

Click the Polygon button on the Ribbon's Draw panel or the AutoCAD Classic Draw toolbar or Draw menu, or type POL and press Enter.
AutoCAD starts the POLYGON command and prompts you to enter the number of sides for the polygon.
Enter number of sides <4>:
Type the number of sides for the polygon that you want to draw and press Enter.
AutoCAD prompts you to specify the center point of the polygon.
Specify center of polygon or [Edge]:
Note
You can use the Edge option to draw a polygon by specifying one side instead of the center and radius of an imaginary inscribed or circumscribed circle. The imaginary circle method is much more common.
Specify the center point by clicking a point or typing coordinates.
AutoCAD prompts you to specify whether the polygon will be inscribed in (that is, the corners touch the circumference of the circle) or circumscribed about (that is, the sides are tangent to the circle) an imaginary circle whose radius you will specify in the following step:
Enter an option [Inscribed in circle/Circumscribed
        about circle] <I>:
Type I or C and press Enter.
The command line prompts you to specify the radius of an imaginary circle.
Specify radius of circle:
Specify the radius by typing a distance or clicking a point.
AutoCAD draws the polygon.
Tip
If you type a distance or you click a point with ortho turned on, the polygon will be aligned orthogonally, as shown in Figure 8-5.
Figure 8-5 shows the results of drawing plenty of polygons — a practice known as polygony, which, as far as I know, is legal nearly everywhere.
