
Creating the Xcode Project
Open Xcode and create a new project with the keyboard shortcut ⌘⇧N. Choose the Single View App template and click Next. For the Product Name, type Walk2Draw; select Storyboard from the User Interface drop-down menu; and deselect the check marks for Use Core Data, Include Unit Tests, and Include UI Tests. Click Next, choose a location in the file system, and click Create.
In Appendix 1, Debugging on the Go, we’ll build a small library to add on-the-go logging to our apps. You can work through the appendix now if you’d like, or you can do it later and use the library I have prepared for you. This library allows us to see what the app is doing under the hood while we’re outside drawing.
You need to add your GitHub account in your Xcode preferences to be able to add the prepared package to the project. If you don’t have a GitHub account, you can download the package from GitHub and use a file URL from your Mac.
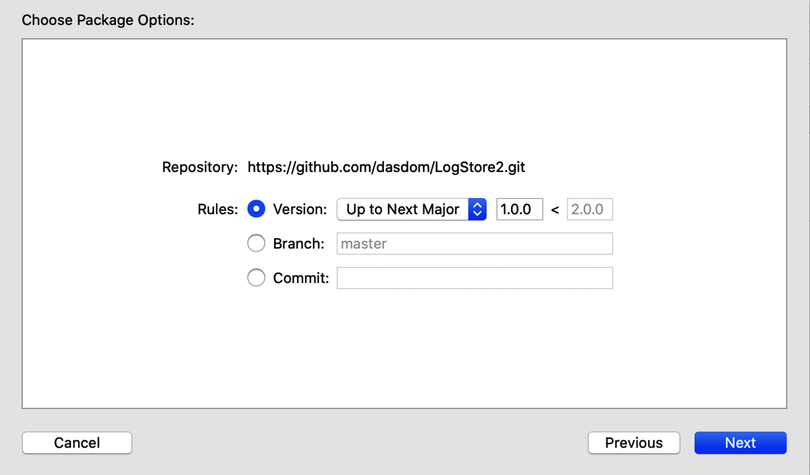
In Xcode, select File > Swift Packages > Add Package Dependency. Xcode presents a pop-up window for the selection of the package. Enter the URL https://github.com/dasdom/LogStore2.git in the search field and hit return. (If you’ve worked through the appendix, you can use the URL of your own Swift package.)
Select the package from the list and click Next. In the next pop-up window, we can select the version we want to use. Depending on how much you worked on the exercises, the version is something like 1.0.x and it’s set to use all versions Up to Next Major. The selection window should look like the image, which shows exactly what the settings should be. Click Next.
A new pop-up window appears, asking us to which target Xcode should add the package. We have only one target, so we don’t have to change anything here. Click Finish to add the package to the project.
Now that you’ve seen how to add Swift packages to projects, let’s look at how to activate the LogStore library. This library displays the log when we knock the left side of our phone against our left palm. To activate this gesture, we need to add a log trigger using the existing window. Open SceneDelegate.swift in Xcode and import LogStore below the existing import statements:
| | import UIKit |
| | import LogStore |
Then add the highlighted lines in the following code to SceneDelegate:
| | class SceneDelegate: UIResponder, UIWindowSceneDelegate { |
| | |
| | var window: UIWindow? |
| » | var trigger: LogTrigger? |
| | |
| | func scene(_ scene: UIScene, |
| | willConnectTo session: UISceneSession, |
| | options connectionOptions: UIScene.ConnectionOptions) { |
| | |
| | guard let _ = (scene as? UIWindowScene) else { return } |
| | |
| » | #if DEBUG |
| » | trigger = LogTrigger(in: window) |
| » | #endif |
| | } |
| | // ... |
| | // other methods |
| | // ... |
| | } |
With this code we add a property for the log trigger and initialize it in scene(_:willConnectTo:options:) with the window property. This is all we have to do to set up the LogStore library.
Note that we put that code between #if DEBUG and #endif statements to make sure that we don’t accidentally ship a version with the debug gesture activated.
With the logging library now set up, we can proceed with our drawing app.