
Presenting the Log On-Screen
Our library can store log entries, but this alone is not really useful. We need a component that will display the log entries on-screen so that when our app isn’t working properly we can figure out why.
The log itself is just an array with short strings, so a UITableView is the perfect component to display that data. Whenever you see information in similar chunks in an app (for example, tweets or Facebook posts), a table view is probably presenting that information. The easiest way to get a table view to display on-screen is to use a table view controller.
Let’s add a UITableViewController to the libraries package.
Select the LogStore folder in the package, add a new file with the shortcut ⌘N, and change the file name to LogViewController.swift. Xcode creates a file with just one statement: import Foundation. The class UITableViewController is defined in UIKit, like all the user interface components in iOS development. Replace import Foundation with import UIKit.
Next, add the minimal code needed to define a table view controller:
| | import UIKit |
| | |
| | public class LogViewController : UITableViewController { |
| | } |
The keyword public tells Xcode that this class should be accessible from other modules. We need this here because we want to create an instance of this class in the app target to test if the package is set up correctly.
Before we can use the library in the host app, we need to import it. Open ViewController.swift in the Xcode editor and import LogStore right below the existing import statement.
| | import UIKit |
| | import LogStore |
Add the following method within the ViewController class:
| | override func viewDidAppear(_ animated: Bool) { |
| | super.viewDidAppear(animated) |
| | |
| | let logViewController = LogViewController() |
| | present(logViewController, animated: true) |
| | } |
With this code, we create an instance of LogViewController and present it modally on the initial view controller. This code is located in viewDidAppear(_:) because the view of the initial view controller needs to appear on-screen before we can present another view controller on top of it. Xcode might show an error that it can’t find LogViewController. This is because we still have to compile the project to make our host app aware of the changes we just introduced into the package.
Pro Tip: Watch the Debug Output | |
|---|---|
|
|
When running your app on a simulator or on your device, always keep an eye on the output of the debug console. Xcode often gives you hints about what’s wrong if something doesn’t work as expected. Try to understand what Xcode prints to the log. The better you are at understanding the console output, the easier it is to find and fix errors. Although Xcode often tells you exactly what’s going on or what needs to be improved, sometimes you still won’t understand what’s wrong or what you need to do. In these cases, you can search for answers on the Internet using keywords from the console output. Someone else has probably had the same problem and gotten answers on sites like StackOverflow.com.
|
Build and run the app on your favorite iOS simulator. After the app has loaded, you’ll see an empty table view on-screen. This means we can access classes that are defined in the package from outside of the package.
Currently, the LogViewController just shows an empty table view. This is the default implementation of UITableViewController. To show the log strings, we first need to register a table view cell. Open LogViewController.swift and add the following code:
| | public override func viewDidLoad() { |
| | super.viewDidLoad() |
| | |
| | tableView.register(UITableViewCell.self, |
| | forCellReuseIdentifier: "Cell") |
| | } |
When a view of a view controller has completely loaded, UIKit calls the view controller method viewDidLoad. In a table view controller, this is the perfect time to register a cell. We register the cell class UITableViewCell by calling register(_:forCellReuseIdentifier:) on the table view. As the information we want to show in this table view consists only of short text strings, a plain UITableViewCell is enough.
UIKit usually registers the cell when the storyboard is loaded. You just have to drag the table view cell into a scene of the storyboard, and the rest is done for you at runtime.
At the time of writing, Swift packages do not support resources. This means we can’t add a storyboard to the package and have to do all the setup in code. Fortunately, as you’ll see shortly, this is quite easy.
Now that the table view cell is registered, let’s use it to show log entries. Add the highlighted property at the beginning of the class LogViewController.
| | public class LogViewController : UITableViewController { |
| | |
| » | let logItems = LogStore.log |
| | |
| | public override func viewDidLoad() { |
| | super.viewDidLoad() |
| | |
| | tableView.register(UITableViewCell.self, |
| | forCellReuseIdentifier: "Cell") |
| | } |
| | } |
Here we assign the log array in the LogStore type to a property of the table view controller. We could have used the LogStore.log directly, but using a property makes the code easier to read.
Pro Tip: Always Optimize Your Code for Reading | |
|---|---|
|
|
Code is written once but read many times, so it should be easy to read and understand. One important characteristic of readable code is a good name. In this example, logItems is easier to understand than LogStore.log. We could even take this a bit further and change the name of the property in LogStore to logItems as well. Think about that yourself. Which name would you choose for the property? There’s much more you can do to make code readable, but writing readable code is beyond the scope of this book. However, there are many books out there on that topic. For example, see The Art of Readable Code [BF12] or Code Complete [McC04]. |
The table view should show as many cells as there are log elements in the log array. To achieve that, add the following method below the viewDidLoad method:
| | public override func tableView(_ tableView: UITableView, |
| | numberOfRowsInSection section: Int) |
| | -> Int { |
| | |
| | return logItems.count |
| | } |
Now we’re ready to fill and return the cell. Add the following method at the end of LogViewController:
| | public override func tableView(_ tableView: UITableView, |
| | cellForRowAt indexPath: IndexPath) |
| | -> UITableViewCell { |
| | |
| | let cell = tableView.dequeueReusableCell(withIdentifier: "Cell", |
| | for: indexPath) |
| | cell.textLabel?.text = logItems[indexPath.row] |
| | |
| | return cell |
| | } |
To improve scroll performance and reduce memory usage, table views put cells that are no longer visible on-screen into a reuse pool. By calling dequeueReusableCell(withIdentifier:for:), we ask the table view to dequeue a suitable cell for that identifier from that pool. This technique works only when a cell for that identifier was registered in a storyboard or in code. If there’s no cell available for dequeuing, the table view creates a new one. Next, we assign the log entry for that row to the text property of the text label in the cell.
Let’s log something and see if the log store works. To add a log entry when the app starts, open ViewController.swift and add the highlighted line in the following code to viewDidLoad:
| | override func viewDidLoad() { |
| | super.viewDidLoad() |
| | |
| » | printLog("viewDidLoad") |
| | } |
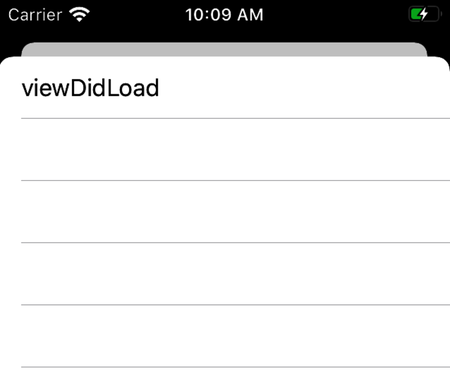
Build and run the app on the simulator. It works!
If you don’t see the table with the log output, as in the following image, make sure you’re using printLog instead of print. If the app still doesn’t work, retrace the steps you just did and compare them with your code.
Next, we need to find a way to present the log to users when they perform a special gesture with the device.