
Implementing the Distance Screen
Add a new Cocoa Touch class to the project, call it DistanceViewController, and make it a subclass of UIViewController.
Open Main.storyboard and drag a view controller from the library (⇧⌘L) to the storyboard. Select the new view controller in the structure area and open the identity inspector using the shortcut ⌥⌘4. Set the class of the view controller to DistanceViewController. Next, open the attributes inspector with the shortcut ⌥⌘5 and select the check box for Is Initial View Controller. With this change, iOS shows an instance of this view controller when the app launches.
We want to show the distance in meters in a label. Drag a UILabel from the library to the scene of the DistanceViewController. Pin the label left and right with a padding of 20 points to the super view, as shown in the following image:
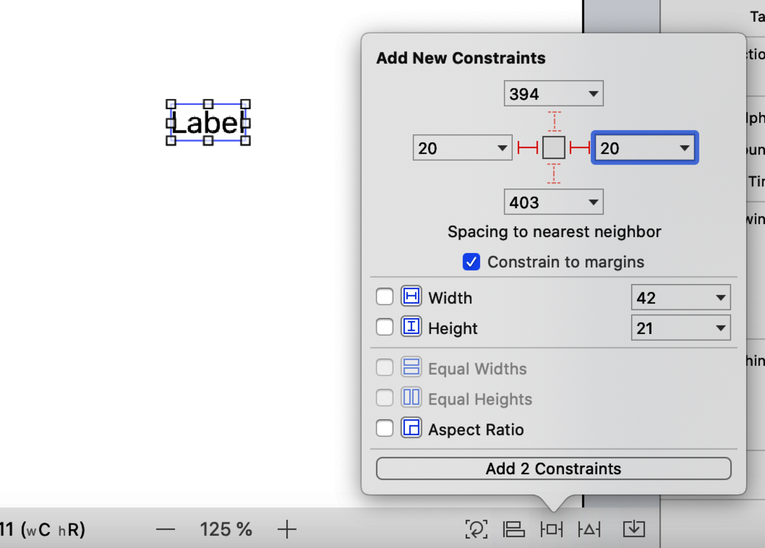
Click the button Add 2 Constraints. Don’t pin the view to the top or the bottom. Next, with the label selected, click the Align button and select the check box for Vertically in Container, as in the following image:
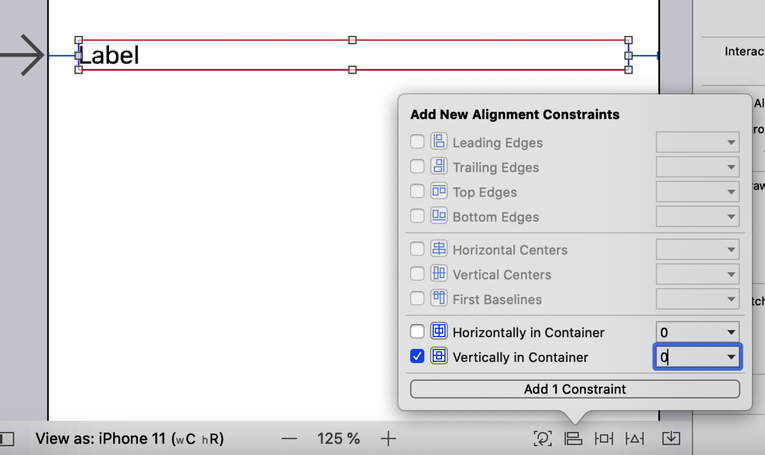
Then click the button Add 1 Constraint. Those three constraints are enough to center the label vertically, spanning from left to right of the view. Now let’s improve the appearance of the label.
Select the label and open the attributes inspector with the shortcut ⌥⌘5. Change the font to System Black 35 and select the symbol for centering from the Alignment options. Finally, set the number in the Lines text field to 0. This sets the supported line number of the label to 0, which means that there’s no limit to the number of lines the label can show. The resulting label should look like the following image:

To be able to show the distance in this label, we need to connect it to the view controller using an IBOutlet. Open the assistant editor with the shortcut ⌃⌥⌘↩. Press and hold the control key while you drag a connection from the label in the storyboard to the beginning of the DistanceViewController class. Type the name distanceLabel, select Strong in the picker at the bottom, make sure Connection is set to Outlet, and click Connect. Xcode adds the following code:
| | @IBOutlet var distanceLabel: UILabel! |
We want to update the user interface when a new location event is delivered to the location provider. To achieve that, the DistanceViewController needs to hold a reference to an instance of LocationProvider:
| | class DistanceViewController: UIViewController { |
| | |
| | @IBOutlet var distanceLabel: UILabel! |
| » | private let locationProvider = LocationProvider() |
| | |
| | override func viewDidLoad() { |
| | super.viewDidLoad() |
| | |
| | } |
| | } |
To start delivering location events to the location provider, add the highlighted line of code to the end of viewDidLoad:
| | override func viewDidLoad() { |
| | super.viewDidLoad() |
| | |
| » | locationProvider.start() |
| | } |
Next, we need to subscribe to updates to the lastLocation property of LocationProvider. Import Combine below the existing import statement. Let’s also add our logging library because we’ll need it later in this section:
| | import UIKit |
| | import Combine |
| | import LogStore |
Then add this property for the subscription below the locationProvider property:
| | private var subscription: AnyCancellable? |
Next, add the highlighted code to viewDidLoad:
| | class DistanceViewController: UIViewController { |
| | |
| | @IBOutlet var distanceLabel: UILabel! |
| | private let locationProvider = LocationProvider() |
| | private var subscription: AnyCancellable? |
| | |
| | override func viewDidLoad() { |
| | super.viewDidLoad() |
| | |
| | locationProvider.start() |
| | |
| » | subscription = locationProvider.$lastLocation |
| » | .sink(receiveValue: updateUI) |
| | } |
| | } |
With this code, we subscribe to updates to lastLocation in the location provider. The changes are processed by a .sink statement, which passes the received values to a closure or a method provided in the parameter. We use a yet-to-be-written method, updateUI. Let’s add this method now.
First, import Core Location into DistanceViewController.swift.
| | import UIKit |
| | import Combine |
| | import LogStore |
| | import CoreLocation |
Then add the following method to DistanceViewController:
| | func updateUI(for location: CLLocation?) { |
| | |
| | guard let location = location else { |
| | return |
| | } |
| | |
| | let coordinate = location.coordinate |
| | distanceLabel.text = String(format: "%.6lf, %.6lf", |
| | coordinate.latitude, |
| | coordinate.longitude) |
| | } |
The lastLocation property in LocationProvider is an optional. As a result, the delivered updates are also optional values. Before we try to update the user interface using the new value, we check if the value is nonoptional. If the value is nil, we do nothing for the moment. Maybe later when we use the app, we’ll get a better idea of what to do in this case.
Next, we use the coordinate of the unwrapped location to populate the distance label with the latitude and longitude of the last registered location. The latitude and longitude are of type CLLocationDegrees, which is a type alias for Double. This means that when we try to print the values, they’ll have many digits after the decimal point. To limit the number of digits printed to the label, we use a formatted string with the format specifier %.6lf. The percent sign tells the compiler that this is the position where the value should be inserted, .6 means that it should print six digits after the decimal point, and lf stands for Double.
Build and run the app on the simulator. In the app menu of the running simulator, select Features > Location > Custom Location.... In the window Xcode presents, change the Latitude to 1 and the Longitude to 2 and click OK.
At this point, the app doesn’t show the distance to some location; it just shows the current coordinate. To show a distance, we need to store a location when the user taps a button. Add the highlighted property below the existing properties:
| | @IBOutlet var distanceLabel: UILabel! |
| | private let locationProvider = LocationProvider() |
| | private var subscription: AnyCancellable? |
| » | private var storedLocation: CLLocation? |
Now let’s add a button to assign this new property.
Open Main.storyboard and drag a button from the library to the bottom of the DistanceViewController scene. Pin the button to the bottom of the screen with a distance of 10 points and align it horizontally in its container. Set the title of the button to Set Anchor. When you’re finished with these changes, the button should look like the following image:

Next, open the assistant editor (if you don’t remember the shortcut, look it up in Xcode). Press and hold the control key and drag a connection from the button below the last method in DistanceViewController. Type in the name setAnchor and change Type to UIButton, make sure Connection is set to Action, and click Connect.
Add the highlighted line of code to the body of the new method setAnchor(_:):
| | @IBAction func setAnchor(_ sender: UIButton) { |
| » | storedLocation = locationProvider.lastLocation |
| | } |
With this code, we assign the current value of the lastLocation property of the location provider to the new property. Next we need to update the code that updates the distance label. Add the highlighted lines to the body of the updateUI(for:) method:
| | func updateUI(for location: CLLocation?) { |
| | |
| | guard let location = location else { |
| | return |
| | } |
| | |
| » | if let storedLocation = storedLocation { |
| » | |
| » | let distance = location.distance(from: storedLocation) |
| » | distanceLabel.text = String(format: "%.2lf m", distance) |
| » | |
| » | } else { |
| | let coordinate = location.coordinate |
| | distanceLabel.text = String(format: "%.6lf, %.6lf", |
| | coordinate.latitude, |
| | coordinate.longitude) |
| » | } |
| | } |
If the stored location is not nil, we calculate its distance to the location passed into updateUI(for:) and use the distance to update the label.
Build and run the app on the simulator and click the Set Anchor button. Next, set the latitude of the custom location to 1.0001. The label changes to show the distance to the stored location. If it doesn’t work, make sure that the button is properly connected and that the location is stored when you tab the button.
Nice—the distance screen works. Before we move on, let’s improve the user experience. When using this screen, the players need to know if they are getting closer to the coordinate of the augmented reality feature. This information is encoded in the distance label—if the distance decreases, the player is getting closer to the coordinate. With a few lines of code, we can make this more obvious.
First, add the following property to DistanceViewController:
| | private var lastDistance: CLLocationDistance = 0 |
Next, add the highlighted code in updateUI(for:):
| | func updateUI(for location: CLLocation?) { |
| | |
| | guard let location = location else { |
| | return |
| | } |
| | |
| | if let storedLocation = storedLocation { |
| | |
| | let distance = location.distance(from: storedLocation) |
| | distanceLabel.text = String(format: "%.2lf m", distance) |
| | |
| » | if lastDistance < distance { |
| » | view.backgroundColor = .red |
| » | } else if lastDistance > distance { |
| » | view.backgroundColor = .green |
| » | } |
| » | |
| » | lastDistance = distance |
| | } else { |
| | let coordinate = location.coordinate |
| | distanceLabel.text = String(format: "%.6lf, %.6lf", |
| | coordinate.latitude, |
| | coordinate.longitude) |
| | } |
| | } |
When the distance increases, we change the background color to red, and when it decreases, we change it to green. Build and run the app on the simulator and simulate a few custom locations in the feature menu item of the simulator. Verify that the background color changes accordingly.
It works, but you might want to use better colors for the background. The default red and green colors in Swift are not very pleasing to the eye.
Right now the stored location is stored only as long as the app is executing. As CLLocation conforms to NSSecureCoding, we can convert an instance of CLLocation to an instance of Data and vice versa. But first we need a file URL where we can write the data to disk.
Create a new Swift file, call it FileManagerExtension.swift, and add the following code to it:
| | extension FileManager { |
| | private static func documentsURL() -> URL { |
| | guard let url = FileManager.default.urls( |
| | for: .documentDirectory, |
| | in: .userDomainMask).first else { |
| | fatalError() |
| | } |
| | return url |
| | } |
| | |
| | static func locationURL() -> URL { |
| | return documentsURL().appendingPathComponent("location") |
| | } |
| | |
| | } |
The method documentsURL returns the file URL of the documents directory. Every iOS app has this directory in its sandbox. The second method uses the first method to create a file URL for the location file.
Next, add the following methods to DistanceViewController:
| | private func write(_ location: CLLocation?) { |
| | |
| | guard let location = location else { |
| | return |
| | } |
| | |
| | do { |
| | let data = try NSKeyedArchiver.archivedData(withRootObject: location, |
| | requiringSecureCoding: true) |
| | try data.write(to: FileManager.locationURL()) |
| | } catch { |
| | printLog("error: (error)") |
| | } |
| | } |
| | |
| | private func loadLocation() -> CLLocation? { |
| | do { |
| | let data = try Data(contentsOf: FileManager.locationURL()) |
| | return try NSKeyedUnarchiver.unarchivedObject( |
| | ofClass: CLLocation.self, from: data) |
| | } catch { |
| | printLog("error: (error)") |
| | } |
| | return nil |
| | } |
This code looks kind of like the code for encoding and decoding objects conforming to Codable. The main difference is that instead of using JSONEncoder and JSONDecoder, we have to use NSKeyedArchiver and NSKeyedUnarchiver, respectively.
You might be wondering why NSKeyedArchiver exists, as we already have JSONEncoder. NSKeyedArchiver is quite an old class, introduced long before Swift even existed. It was the old way to serialize data to disk for later use. On the surface the main difference is that NSKeyedArchiver doesn’t store the data in a human-readable format like JSONEncoder does. We use it here because otherwise we would have to introduce a new type and a punch of code to convert from and to CLLocation.
Now let’s use these new methods. Replace the storedLocation property with the following code:
| | private var storedLocation: CLLocation? { |
| | didSet { |
| | if let location = storedLocation { |
| | write(location) |
| | } |
| | } |
| | } |
Here we added a didSet observer to the storedLocation property. The code in the didSet observer is executed each time a new value is assigned to that property. If the assigned value is not nil, we use the write method to write the location to the documents directory.
We want to load the stored location whenever the distance view appears on-screen. Add the following method to DistanceViewController:
| | override func viewWillAppear(_ animated: Bool) { |
| | super.viewWillAppear(animated) |
| | |
| | storedLocation = loadLocation() |
| | } |
UIKit calls the method viewWillAppear(_:) when the view corresponding to that view controller is going to appear on-screen. This is a good time to load the stored location. Build and run the app on the simulator two times and verify that the location you set on the first run is loaded on the second run. If it doesn’t work, make sure you call the methods to write and load the stored location properly.