
Creating a Swift Package
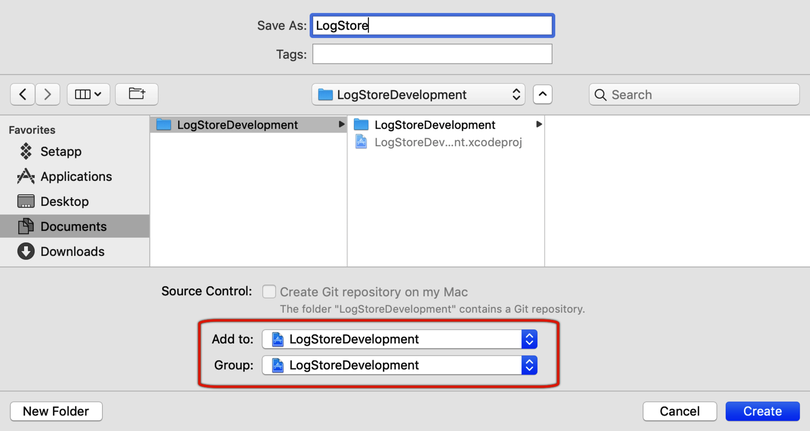
Creating a Swift package is quite easy. In Xcode, select the menu item File > New > Swift Package.... Xcode presents a pop-up window for the initial settings of the package. Type LogStore in the Save As field. At the bottom of the window are two drop-down menus, “Add to” and “Group,” as shown in the following image. Select LogStoreDevelopment from the “Add to” menu to add the package to the project and then select LogStoreDevelopment again from the “Group” menu to add it to the root folder.
With these settings, we’ve added the newly created package to the project we’re currently working on. Click Create. Xcode reloads and shows you the created package.
Let’s have a look at what’s in there. First, you’ll see a file named Package.swift. This is the manifest, which comprises all information needed to build the package. For example, if our package depends on other packages, that information would go here.
As Swift packages are the Swift way to share code between different projects, Xcode creates a README file for you. For decades, README files have been the standard way to let developers know what a library does. Let’s follow this tradition and add a sentence about what this package will do. Click README.md to open it in the Xcode editor. Replace the template text with this:
| | A tiny package to make log output accessible from within an iOS app. |
Make a mental note that we have to update this file once we know how the package is used.
Pro Tip: Always Add a Package Description | |
|---|---|
|
|
You should always take a few minutes to add information about the package. Your future self will thank you. And don’t forget to update the information as the package evolves. |
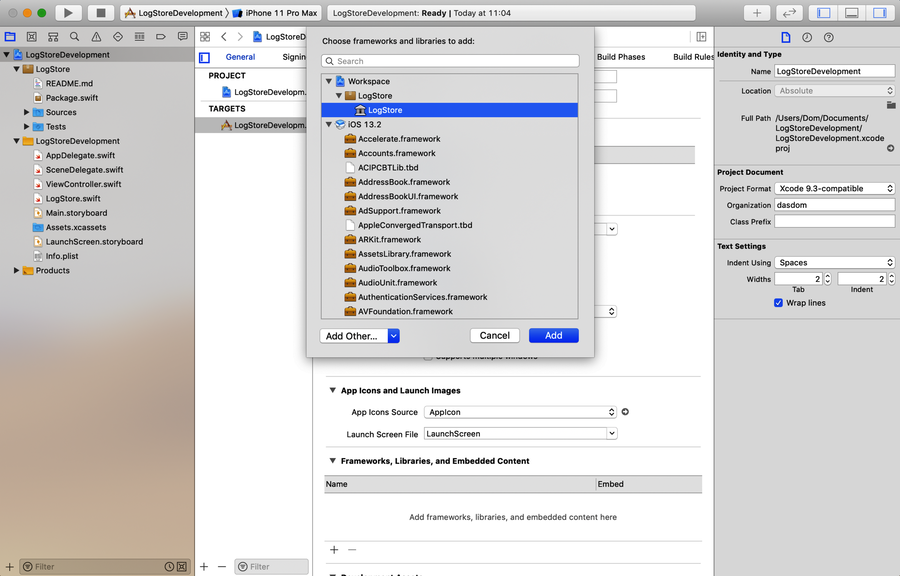
At the moment, the host app has no idea there’s a library it can use. Even though the package is in the project of the host app, we have to add the resulting library to its target in a separate step. Targets are what Xcode uses to manage build products. For example, if you created an app with a Watch app companion, you’d have two or more targets in the same project. Our host app has only one target. Let’s add the library generated by the Swift package to this target.
Open the project navigator and select the topmost element with the blue icon, LogStoreDevelopment. Xcode opens the project settings. To open the target settings, select the target in the TARGETS overview. Make sure the General tab is selected. Scroll down until you see the section Frameworks, Libraries, and Embedded Content. Click the + button to add a new library. In the pop-up window, select the LogStore library and click Add.
The image shows what you should see on your screen.
Done! We can now use the package in the host app. Our Swift package is set up, so now let’s fill it with life.
The library we want to build needs to do two things: first, it needs to store the log somewhere, and second, it needs to provide a way to access the log and display the content within the app. Let’s start with the easy part: storing the log.