
Collecting Motion Data
Apps register for data from the acceleration sensors through an instance of CMMotionManger defined in the framework CoreMotion. Open ViewController.swift and import CoreMotion right below the existing import statement. Then import the LogStore logging library:
| | import UIKit |
| | import CoreMotion |
| | import LogStore |
We need a property for the CMMotionManager instance. Add the highlighted property declaration in the following code at the beginning of ViewController:
| | class ViewController: UIViewController { |
| | |
| » | let motionManager = CMMotionManager() |
| | |
| | override func viewDidLoad() { |
| | super.viewDidLoad() |
| | // Do any additional setup after loading the view. |
| | |
| | } |
| | } |
Next, add the following method to ViewController:
| | func startMotionUpdates() { |
| | |
| | motionManager.deviceMotionUpdateInterval = 1 / 60 |
| | |
| | motionManager.startDeviceMotionUpdates( |
| | using: .xArbitraryZVertical, |
| | to: OperationQueue()) { motion, error in |
| | |
| | guard let motion = motion else { |
| | return |
| | } |
| | printLog("motion: (motion)") |
| | } |
| | } |
In the first line of this method, we set the update interval for the motion events. This tells the motion manager that we’d like to have at most sixty events per second. The actual update interval depends on the capabilities of the iPhone hardware.
Then we have to start the motion updates using the method startDeviceMotionUpdates(using:to:withHandler:) on motionManager. The first parameter tells the motion manager the reference frame it should use for the attitude samples. .xArbitraryZVertical means that the z-axis is vertical and the x-axis points to an arbitrary direction in the horizontal plane, as shown in the following image:

Using an arbitrary direction for the x-axis means the iPhone doesn’t need to calibrate the magnetometer beforehand. As we are interested only in relative movements of the iPhone, we don’t care where north is.
The second parameter is the operation queue UIKit should use to process the data. The documentation states that it’s not recommended to use the main operation queue because the processed events might arrive at a higher rate. That’s why we create a new operation queue with the default configuration for this parameter.
The last parameter is a closure the motion manager calls on the given operation queue when motion updates are available. Because we’ve set the deviceMotionUpdateInterval to 1 / 60, we expect that this closure is called about sixty times per second. This means we should optimize the computation done in that closure for performance. The closure is called with two parameters, an optional CMDeviceMotion and an optional Error. In this example, we just unwrap and print the motion that contains all of the device’s motion information.
To see the motion events in action, add the highlighted line in the following code at the end of viewDidLoad and build and run the app on your iPhone:
| | override func viewDidLoad() { |
| | super.viewDidLoad() |
| | // Do any additional setup after loading the view. |
| | |
| » | startMotionUpdates() |
| | } |
Activate the console with the keyboard shortcut ⇧⌘C. On the bottom right, you should see the motion events pouring in as shown in the following image:
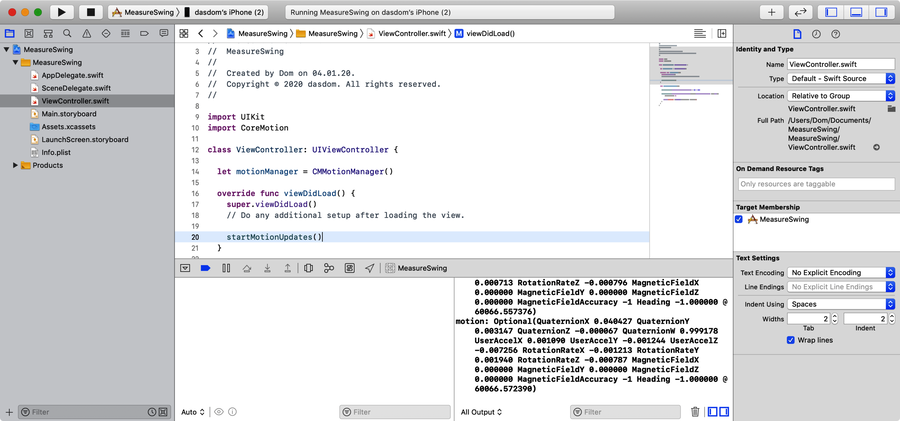
Nice! We’re able to read motion data with just a few lines of code.
If you don’t see any motion events in the console, make sure you call startMotionUpdates in viewDidLoad.
Before we move on, let’s rename the class ViewController to a more fitting name. Double-click the class name in the class declaration line and select the menu item Editor > Refactor > Rename. Wait until Xcode finishes scanning the project for the usage of that name. Change the name to MeasurementViewController. Xcode should look something like the image.
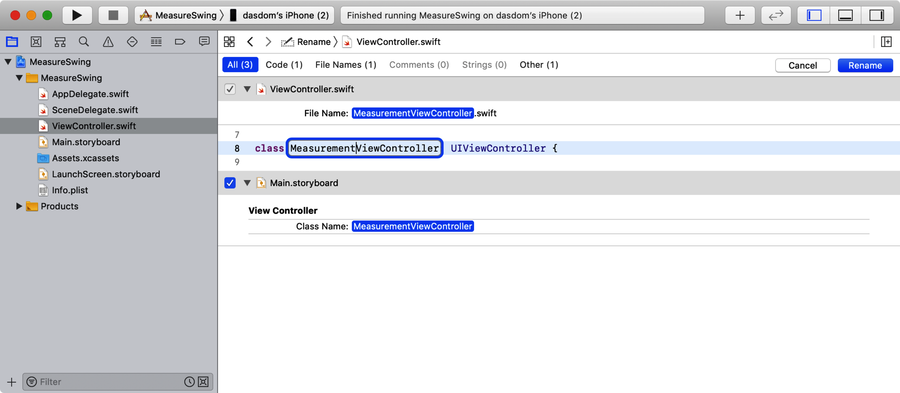
To initiate the renaming, click the Rename button at the upper left.
Pro Tip: If Renaming Fails | |
|---|---|
|
|
Sometimes renaming this way doesn’t work. In this case, Xcode shows the file name in red in the project navigator. To fix this problem, navigate to the location of the file in the file system and rename it manually. Now Xcode shows the file name in black again. |