
Adding Virtual Text to Reality
In the beginning of this chapter, we ran the template of an ARKit app on our iPhone. The template let us add alien emojis at the location of the device in the AR view. In the app we’re building, we want to add the text to a detected horizontal plane—for example, the ground. In ARKit we can achieve this by adding an instance of ARAnchor to the session of the sceneView.
Adding an Anchor
Anchors can have names, which is useful in apps where you plan to add several different anchors to a scene. In our app we have only one kind of anchor, which means technically we don’t need a name for it. Nevertheless, we’ll add a name now just to see how it is done.
Open Scene.swift and add the following global constant at the beginning of the file, outside of the Scene class:
| | let textAnchorName = "textAnchorName" |
Next, change the body of the touchesBegan(_:with:) method such that it looks like following code. The changed lines are highlighted.
| | override func touchesBegan(_ touches: Set<UITouch>, with event: UIEvent?) { |
| | guard let sceneView = self.view as? ARSKView else { |
| | return |
| | } |
| | |
| » | guard let touch = touches.first else { return } |
| » | let point = touch.location(in: sceneView) |
| » | guard let hitTestResult = |
| » | sceneView.hitTest(point, types: .existingPlane).first else { |
| » | return |
| » | } |
| » | |
| » | let anchor = ARAnchor(name: textAnchorName, |
| » | transform: hitTestResult.worldTransform) |
| | sceneView.session.add(anchor: anchor) |
| | } |
In this code, we check whether the view is an instance of ARSKView. The prefix ARSK stands for Augmented Reality SpriteKit. Next, we get the location of the first touch in this AR view and check if the touch hit a detected plane in the view. ARKit can detect vertical or horizontal planes in the AR view. If the touch hit a detected plane, we add an anchor to that point.
Before we use this anchor to add some text to the ground, let’s present the AR view when the user taps the Add Anchor button.
Presenting the AR View
When the user adds an anchor, we need to present the AR view. Right now the view controller managing the AR view is called ViewController. This is a bad name. Let’s change it.
Open ViewController.swift and select the class name. Select the Xcode menu item Editor > Refactor > Rename and change the name to ARViewController.
To be able to instantiate an instance of ARViewController, we need to give it an identifier in the storyboard. Open Main.storyboard, select the ARViewController in the overview, and open the identity inspector with the shortcut ⌥⌘4. Type ARViewController into the Storyboard ID text field.
Pro Tip: Use the Class Name as the StoryboardID | |
|---|---|
|
|
Use the class name as the StoryboardID. This way you don’t need to remember two different names for roughly the same thing. Don’t forget to change the name when the class name changes. |
Now we can instantiate and present an instance of ARViewController. Add the following method to DistanceViewController:
| | func showAR() { |
| | if let next = storyboard?.instantiateViewController( |
| | withIdentifier: "ARViewController") as? ARViewController { |
| | next.modalPresentationStyle = .fullScreen |
| | present(next, animated: true, completion: nil) |
| | } |
| | } |
This code instantiates an instance of ARViewController from the storyboard and presents it full-screen to the user. Add the call of this new method at the end of setAnchor(_:):
| | @IBAction func setAnchor(_ sender: UIButton) { |
| | storedLocation = locationProvider.lastLocation |
| | |
| » | showAR() |
| | } |
Detecting Planes
The changes we made in touchesBegan(_:with:) expect that our ARSession can detect horizontal planes. It doesn’t do that by default because doing so requires a lot of CPU and drains the battery. But it’s very easy to switch on this behavior. Open ARViewController.swift and add the highlighted line of code in viewWillAppear(_:) right below the initialization of the ARWorldTrackingConfiguration:
| | override func viewWillAppear(_ animated: Bool) { |
| | super.viewWillAppear(animated) |
| | |
| | // Create a session configuration |
| | let configuration = ARWorldTrackingConfiguration() |
| » | configuration.planeDetection = .horizontal |
| | |
| | // Run the view's session |
| | sceneView.session.run(configuration) |
| | } |
Now build and run the app on your iPhone, add an anchor, and move your iPhone around to scan the floor. Then tap the floor on the screen. With our changes, the emoji gets added to the floor.
The World Mapping Status
During the scanning process, the user needs to move the device. This is because ARKit needs to record features on the ground to create a world map. Depending on the movement of the device, the mapping passes through different mapping stages: limited, extending, and mapped.
Let’s add a label that shows the current mapping status in the user interface. In the exercises you’ll change the status to something that is more appropriate for the user.
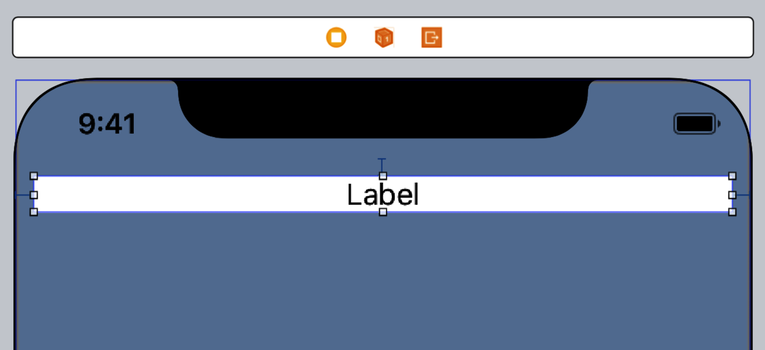
Open Main.storyboard and drag a label from the library to the top of the scene of the ARViewController. Pin it to the top, right, and left edges of the ARSKView using a padding of 10. Change the alignment to Center and change the background color to white. When you are done, the result should look like the image.
With the label selected, open the assistant editor. Press and hold the control key while you drag a connection from the label into ARViewController below the existing outlet. Type in the name statusLabel, select Strong in the last picker, make sure Connection is set to Outlet, and click Connect. Xcode adds the following code:
| | @IBOutlet var statusLabel: UILabel! |
The ARSession informs its delegate about the mapping status. The delegate needs to conform to the ARSessionDelegate protocol, so we add that protocol to ARViewController.
| | class ARViewController: UIViewController, |
| | ARSKViewDelegate, ARSessionDelegate { |
Now we can set the delegate of the AR session. Add the highlighted code in viewDidLoad:
| | override func viewDidLoad() { |
| | super.viewDidLoad() |
| | |
| | // Set the view's delegate |
| | sceneView.delegate = self |
| » | sceneView.session.delegate = self |
| | |
| | // Show statistics such as fps and node count |
| | sceneView.showsFPS = true |
| | sceneView.showsNodeCount = true |
| | |
| | // Load the SKScene from 'Scene.sks' |
| | if let scene = SKScene(fileNamed: "Scene") { |
| | sceneView.presentScene(scene) |
| | } |
| | } |
Then add the following delegate method to ARViewController:
| | func session(_ session: ARSession, didUpdate frame: ARFrame) { |
| | |
| | |
| | switch frame.worldMappingStatus { |
| | case .limited: |
| | statusLabel.text = "Limited" |
| | case .extending: |
| | statusLabel.text = "Extending" |
| | case .mapped: |
| | statusLabel.text = "Mapped" |
| | default: |
| | statusLabel.text = "Not available" |
| | } |
| | } |
In this method, we just set the status to the status label. Build and run the app on your iPhone, select the Set Anchor tab, and scan a horizontal plane. Verify that the status label updates when the status changes.
Place Some Virtual Text
Now let’s change the code that adds the label node to the ARSKView. We want to add some text to the AR view. Replace the method view(_:nodeFor:) with the following code:
| | func view(_ view: ARSKView, nodeFor anchor: ARAnchor) -> SKNode? { |
| | |
| | if anchor.name == textAnchorName { |
| | let labelNode = SKLabelNode(text: "Hi!") |
| | labelNode.fontName = "AvenirNext-Bold" |
| | labelNode.fontSize = 50 |
| | labelNode.fontColor = .red |
| | labelNode.horizontalAlignmentMode = .center |
| | labelNode.verticalAlignmentMode = .center |
| | |
| | for i in 5...15 { |
| | let circleNode = SKShapeNode(circleOfRadius: CGFloat(20*i)) |
| | circleNode.strokeColor = .yellow |
| | labelNode.addChild(circleNode) |
| | } |
| | return labelNode |
| | } else { |
| | return nil |
| | } |
| | } |
We added the if clause to check the name of the anchor. As mentioned before, this check isn’t needed here because we have only one type of anchor. I added it in this example to show you how it can be done. In addition, we changed the font to AvenirNext-Bold and changed the size and the font color. In the for loop, we add circles to make the text easier to find. Build and run the app on your iPhone and verify that you can now add text to a horizontal plane.
It works! Now we can draw text on the ground using ARKit. In the next section we’ll store the world map to the file system to reload it later.