
We will now proceed to copy the Slv1 image to the other slave SD cards (see the following screenshot). Re-insert each of the remaining slave SD card into the SD slot on the main PC (the author is now using device drive L as the slave drive), and select, using the folder icon, the Slv1 file image now located on the D drive (the file does not appear in the window, so you must write in the name). Click the open button and then click the Write button as depicted in the following screenshot. The Slv1
image file is now being written to a remaining slave card.
The write process takes several minutes. Note that the author used two separate SD card drives, one was used as the source (device N) from which to copy the Slv1 image, and the other was the target (device L) for copying the Slv1 image from drive D. There is no rhyme nor reason for using different drives, you can use the same drive, it's just that device L accept the micro SD card, while device N accepted the SD card adapter:
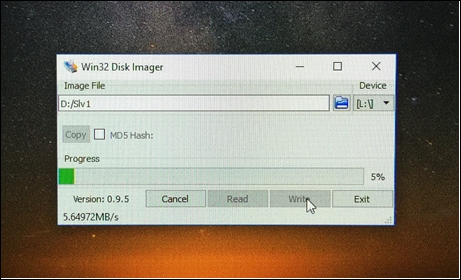
Win32 Disk Imager write
After the Slv1 file image has been written to all the remaining slave SD cards, reinsert each of them into their respective Pi node. Go ahead now and successively power on all the Pi2 or Pi3 nodes by inserting, one at a time, the Pis USB connector into the power brick. This will allow the Pis and the switch to learn the MAC and IP addresses of the remaining slave nodes. Next, return to the Pi monitor and update the slaves Hostname as per Chapter 3, Preparing the Initial Two Nodes. Ascertain (via ifconfig), and record the IP and MAC addresses of each remaining slave Pis. After acquiring this information go ahead and update the records (as you did earlier) in the hosts file for each slave Pi. You can update the hosts file either from the Pi monitor, or more conveniently, from the main PC (the author suggests the latter).
Go ahead now and reboot to the Ubuntu/Linux environment. ssh successively into the master, and slave nodes, and update their records in the hosts file, as depicted in the following screenshot. Note the new IP addresses of the remaining slave nodes just as the author predicted earlier:
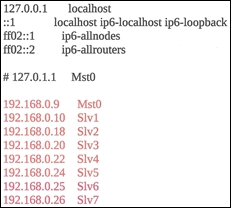
Next, update the network interfaces file for all the six or fourteen slaves; that is, repeat the procedure outlined in Chapter 4, Static IP Address and Hosts File Setup. Also, update the switch's MAC and IP data to reflect the highlighted data depicted in the preceding screenshot; that is, repeat the procedure outlined in Chapter 4, Static IP Address and Hosts File Setup. You are now nearing the end of your arduous digital pilgrimage.