Now that we have a strong framework in place, we can begin to turn those empty functions into fully implemented methods, after which C-Quence will be a fully functioning watchOS app.
You will probably be delighted to discover just how easy this is, having reached a point at which we have already decided both how the app is structured at a high level and roughly which methods we need our two classes to provide. The basic app may look only half finished, but it is, in fact, much further than that.
Take a deep breath, we don't run the code for a while!
We will start with our InterfaceController class. This is where the user's engagement with the app begins, and this is where we will begin to endow the classes with life.
When the app launches, it automatically loads the view that is designated as the Main Entry Point, identified in Interface Builder by the Main arrow, as shown in the following figure:
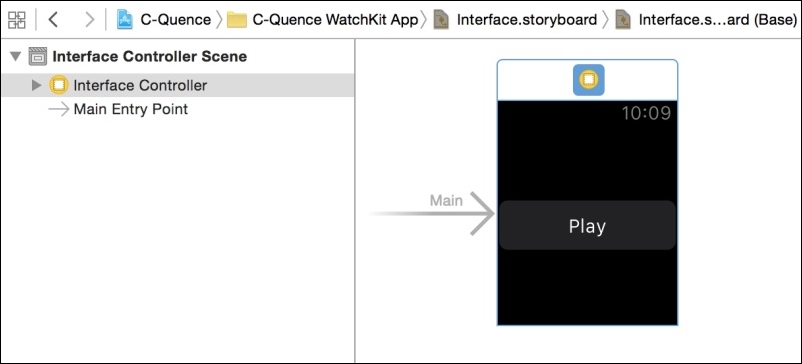
In our case, this main entry point is the InterfaceController class.
In addition to performing duties of its own, InterfaceController creates two objects on which it must call. Firstly, an instance of our GameLogic class and secondly, an instance of NSTimer with which we will control the timing of the flashing colors.
In contrast to some languages, in Swift we can both declare these properties and instantiate them at the same time. Add the following code to the InterfaceController class below the IBOutlet declaration:
    @IBOutlet var greenGroup: WKInterfaceGroup!

    var gameLogic: GameLogic = GameLogic()
    var timer: NSTimer = NSTimer()

    override func awakeWithContext(context: AnyObject?) {
Often, we do not need to override a class's init method, if, as in this case, all the class's properties are initialized at declaration. We are effectively saying in one line of code 'This class has a property X and its initial value must be set to Y'. This is a pretty neat and simple way to write initialization code!
When the class has finished loading, our next chance to interact with the app comes when it calls the awakeWithContext method from the WKInterfaceController class (comparable with UIKit's viewDidLoad method from the UIViewController class), which it does without any help from us. This is our chance to set up any properties of the view to a suitable initial state.
The initial state we will set here is the value of the button border colors opacity property or alpha value. But before we do that we will create some constant alpha values.
We achieve the flashing effect on screen by changing the brightness of the color groups background color; by changing its transparency, which is to say its alpha value, it will appear to increase its intensity. This way of flashing the colors means we will be referring in the code to two levels of transparency, or two alpha values, and it is a good idea to define these as constant values (using the let keyword) that we can then use in our code (instead of repeatedly writing 0.5, and having to change all those occurrences later, if we decide on a different value).
Add the following code directly beneath the import statements:
import WatchKit
import Foundation

let fadedColorAlpha: CGFloat    = 0.4
let flashColorAlpha: CGFloat    = 1.0
If, later, you should choose some other value for the fadedColorAlpha value, this is the only place you'll need to do it.
Now we can use these constants in the awakeWithContext method, adding the following code:
    override func awakeWithContext(context: AnyObject?) {
        super.awakeWithContext(context)
        for group in [redGroup, yellowGroup, blueGroup, greenGroup]{
            group.setAlpha(fadedColorAlpha)
        }
}
All we are doing here is creating an impromptu Array of the four color groups and then enumerating through that array, setting each group's alpha property to the fadedColorAlpha we defined previously. Thus, each button 'border' looks dulled down against the black background of the Upper and Lower Row Groups.
Our view is finished and ready for play. An excellent reason, you'll no doubt agree, to implement the code that gets called when the player taps the Play button.
As we saw earlier, it is a good idea to keep IBAction methods really slim. This one simply needs to call another method—startNewGame—that will, well, start the game.
Add the following call to playButtonTapped.
@IBAction func playButtonTapped() {
        startNewGame()
    }
The player having indicated that he is ready to play the game, we can hide the Play button, unhide the gameboard itself, and make a call to the playSequence method:
    func startNewGame() {
        gameboardGroup.setHidden(false)
        playButton.setHidden(true)
        playSequence()
}Since the InterfaceController duties include the flashing of the buttons, we need to make some decisions around the speed and the duration of the flashes. We will actually define two flash durations, but the use of the shorter one will become apparent later. One second seems to be a suitable time between the start of each flash.
Add these constants to the alpha values we defined earlier beneath the import statements:
let fadedColorAlpha: CGFloat    = 0.4
let flashColorAlpha: CGFloat    = 1.0
let longFlashDuration: Double   = 0.8
let shortFlashDuration: Double  = 0.3
let timerInterval: Double       = 1.0
While the sequence is flashing, we want to prevent any actions being triggered by the user tapping the buttons, so we'll add a Bool variable, or flag, to keep track of whether the buttons should call some method.
We also need to keep track of where we are in the sequence while it is being flashed, so we define an Int variable to store this information.
These var are added to the variable declarations below the IBOutlet declarations:
    var gameLogic: GameLogic = GameLogic()
    var userInputEnabled = false
    var indexOfNextColorToFlash = 0
    var timer = NSTimer()
Now we can flesh out the
playSequence method by adding the following code:
    func playSequence(){
        userInputEnabled = false//1
        indexOfNextColorToFlash = 0//2
        gameLogic.extendSequence() //3
        timer = NSTimer.scheduledTimerWithTimeInterval( //4
            timerInterval,
            target: self,
            selector: "timerFired",
            userInfo: nil, //5
            repeats: true)    }
Here is a detailed look at what we have added (see the comments, //1…etc. in the code above):
- Before the sequence starts playing, we set
userInputEnabledtofalse. - We want the sequence to play from the beginning, so
indexOfNextColorToFlashis set to0. - We make the call to
extendSequencemethod from thegamelogicclass to add a random color to the sequence. - We start
timerwith thescheduledTimerWithTimeIntervalcall. We set thetimerIntervalargument to be thetimerIntervalconstant we defined earlier, set theInterfaceControllerinstance to be thetarget, using theselfkeyword, so that the timer knows from which instance it should call the selector, the selector here beingtimerFired. - We do not need to make use of the
userInfodictionary, but we do need to setrepeatstotrue.
Finally, we get to flash something on the screen! Add the following code to our timerFired method:
    func timerFired() {
        let colorToFlash =
        gameLogic.sequence[indexOfNextColorToFlash] //1
        flashColor(colorToFlash, duration: longFlashDuration) //2
        if indexOfNextColorToFlash < gameLogic.sequence.count - 1//3
        {
            indexOfNextColorToFlash++
        } else {
            timer.invalidate() //4
            userInputEnabled = true
        }
    }
The comments in the code are as follows:
- We read the color from the current index of the sequence array.
- We pass this
Colorto theflashColormethod for it to begin its animation that produces the flashing effect along with our previously definedlongFlashDurationconstant, which you may wish to experiment with later. - If we have not reached the end of the sequence, we increment the index of the sequence array to be accessed the next time the
timerFiredmethod is triggered (which will happen automatically, since we have set itsrepeatsproperty totrue). - Otherwise we kill the timer by calling its
invalidatemethod, and set theuserInputEnabledflag totrue, in anticipation of the player's input.
Here is the code for the flashColor method:
    func flashColor(color: Color, duration: Double) {
        let group: WKInterfaceGroup
        switch color { //1
        case .Red:
            group = redGroup
        case .Yellow:
            group = yellowGroup
        case .Blue:
            group = blueGroup
        case .Green:
            group = greenGroup
        }
         group.setAlpha(flashColorAlpha) //2
         animateWithDuration(duration) { //3
            group.setAlpha(fadedColorAlpha)
        }
}
The comments in the code are as follows:
- We select the color group appropriate to whichever
colorargument was passed to the method. - We set the
alphavalue of that group to our constant valueflashColorAlpha, making it seem brighter and thus appear to light up. - We use
animatemethod from theWKInterfaceControllerclass to have thealphavalue fade back to its original value, with a duration set to thedurationargument that was passed to the method.
Once the color sequence is done flashing, the app just waits. It will do nothing until the user taps one of the buttons.
True to form, each IBAction here only contains a single method call (to colorButtonTapped) passing an appropriate color value as its only argument.
Add the following code to the four IBAction methods to which we have already connected the buttons of the user interface:
    @IBAction func redButtonTapped() {
        colorButtonTapped(.Red)
    }
    @IBAction func yellowButtonTapped() {
        colorButtonTapped(.Yellow)
    }
    @IBAction func blueButtonTapped() {
        colorButtonTapped(.Blue)
    }
    @IBAction func greenButtonTapped() {
        colorButtonTapped(.Green)
}Add the following code to the colorButtonTapped method:
    func colorButtonTapped(color: Color) {
        if userInputEnabled { //1
            flashColor(color, duration: shortFlashDuration) //2
            let guessResult = gameLogic.evaluateColor(color) //3
            switch guessResult {
            case .GuessCorrect: //4
               break
            case .GuessWrong: //5
                endGame(gameLogic.sequence.count - 1)
            case .GuessComplete: //6
                playSequence()
            }
        }
}
The comments in the code are as follows:
- We check to see if the
userInputEnabledflag is set totrue. If it is not, then we are not currently accepting input from the player, and the method does nothing. - If the flag is
true, we call theflashColormethod, passing along thecolorargument that was passed into this method call. We also pass the constantshortFlashDurationas the second argument; this shorter duration is to acknowledge the player's button tap. The game seems somewhat snappier with the shorter duration. - We pass the
colortapped by the player as the argument toevaluateColormethod fromgameLogicclass, which returns aGuessResultvalue. - If the guess is correct, but the sequence is not yet complete, we do nothing. We wait for the player's next guessed color.
- If the guess is incorrect, then the game is over. The length of the sequence at the player's last successful completion was one less than it is on this unsuccessful completion. This
Intis passed as theresultargument of theendgamemethod.
Add the following code to the endgame method:
func endGame(result: Int) {
        gameboardGroup.setHidden(true) //1
        resultLabel.setHidden(false) //2
        resultLabel.setText("Not bad! You scored (result)")
        playButton.setHidden(false) //3
        playButton.setTitle("Play Again")
        gameLogic.clearGame()
}
The comments in the code are as follows:
- Now that this round is over, we want to hide the
gameboard. - We show the
resultLabel, with its text reflecting theresultargument. At the moment, the Not bad… message is a little static, but this we will improve later. - Show the Play button to the player. While we're at it, we may as well update the
Titleproperty of the button to reflect the fact that this is not the first round. - Tell
gameLogicto clear the game, which we shall implement next.
Now it's time to implement the GameLogic
class.
When the InterfaceController method creates an instance of the GameLogic class, we first need to create a container for the sequence of colors that will be generated as the game progresses. We declare an Array of type [Color] and initiate it to be empty with the following code, which belongs at the beginning of the GameLogic class definition:
class GameLogic {

    var sequence: [Color] = []

func extendSequence() {The first of the methods we will implement in this class will add a randomly generated Color to the sequence array.
    func extendSequence() {
        let randomInt = Int(arc4random_uniform(4)) //1
        let nextColor: Color =
        [.Red, .Yellow, .Blue, .Green][randomInt] //2
        sequence += [nextColor]
    }
The comments in the code are as follows:
- We generate a random integer between
0and3using the standard library's elegantly namedarc4random_uniformfunction. - We use this integer to select a color from a
Dictionaryof the four valid values ofColorand add it to thesequencearray.
When we evaluate whether the user's last guess is correct, we need to have kept track of which position in the sequence it is that's being guessed. This Int property will be declared when the instance of GameLogic is initialized, with its initial value set to 0.
Add the following code to the class's var declarations:
    var sequence: [Color] = []
    var nextAnswerIndex: Int = 0
Now that we have done that, we are ready to fill in the evaluateColor method with the following code:
    func evaluateColor(color: Color) -> GuessResult {
        if color != sequence[nextAnswerIndex] { //1
            return .GuessWrong
        } else {
            if nextAnswerIndex < sequence.count - 1 { //2
                nextAnswerIndex++
                return .GuessCorrect
            } else {
                nextAnswerIndex = 0//3
                return .GuessComplete
            }
        }
    }
The comments in the code are as follows:
- If the guess does not match the color at the appropriate position of the sequence array, we return
.GuessWrong. - If the guess is correct, we test whether it was the last in the sequence. If it is not, we increment the index of the array with which the next guess will be compared, and return a value of
.GuessCorrect. - If the correct guess was the last in the sequence as it currently stands, we will return a value of
.GuessComplete, but before that we need to reset thenextAnswerIndexvariable to0in preparation for the next round.