
Now the SessionManager class is ready to test. To do this, we simply need to create the sharedInstance in the InterfaceController class which we will now implement.
In the project navigator, select InterfaceController.swift, and add the following code to the InterfaceController class's awakeWithContext method:
    override func awakeWithContext(context: AnyObject?) {
        super.awakeWithContext(context)
        requestWeatherData()
    }
The compiler will complain about not knowing any such method, so we'll fix that now.
Add the following function to the InterfaceController class:
    func requestWeatherData() { //1
        WeatherSessionManager.sharedInstance.fetchWeatherData() { //2
            (data: NSData?, response: NSURLResponse?, taskError: NSError?) -> Void in
            if taskError == nil { //3
                do {
                    let jsonData = try NSJSONSerialization.JSONObjectWithData(
                        data!,
                        options:
                        .AllowFragments) as! jsonDict
                    print(jsonData) //4
                }
                catch let jsonErrorasNSError {
                    print(jsonError.localizedDescription)
                }
            }
        }
    }
The comments in the code are as follows:
- We call the
fetchWeatherData method of the SessionManager classmethod. Because we are passing a closure as the argument, we may place all of it, including curly braces, after the closing brackets between which arguments are usually placed. Without the details of the closure, the code looks like:WeatherSessionManager.sharedInstance.fetchWeatherData(){ ... } - This closure will be called by the
NSURLSessionclass'sdataTaskWithURLmethod (inside thefetchWeatherDatamethod) once it is finished, returning either thedataandresponse, or thetaskErroras non-nil optional values. - If there is no error, we try to use the
NSJSONSerializationclass'sJSONObjectWithDatamethod to convert theNSDatato a SwiftDictionaryobject that we can manipulate according to our needs. We wrap this in Swift'sdo-catchpattern: If something goes wrong, say, the data is not correctly formatted, then thecatchblock will be executed. - Assuming there are no problems, we print the
jsonDataobject to the console.
To test the console, we must perform the following steps:
- Make sure that your device or the watchOS Simulator is connected to a network (we will get no warnings if not, and the app will seem to have done nothing).
- Select the Weather Watch WatchKit App scheme.
- Hit Run.
The app will launch, and after a brief pause, the jsonData object will be printed to the console, where you can see the wealth of data that it contains. Later on, you may wish to take a longer look at the data and possibly add more of its contents to the app.
We now need to complete the InterfaceController class. We will write the code first, and then prepare the UI in Interface Builder.
You can delete the requestWeatherData method call from the awakeWithContext method, remember it was used in this case only for testing purposes and we don't need it any more.
Add the following code to the class:
class InterfaceController: WKInterfaceController {

    @IBOutlet var getWeatherButton: WKInterfaceButton!

    @IBAction func getWeatherButtonTapped() {
        requestWeatherData()
    }

...
Here we are simply preparing the connections to the interface that we will create with Interface Builder.
Next add the following function to the class:
    func showWeather(data: jsonDict) { //1
        pushControllerWithName("WeatherTableInterfaceController", context: data)
    }

    func updateUIForNetworkActivity(isActive: Bool) { //2
        if isActive {
            getWeatherButton.setTitle("Fetching Data")
            getWeatherButton.setEnabled(false)
        } else {
            getWeatherButton.setTitle("Show Me the Weather")
            getWeatherButton.setEnabled(true)
        }
}- The
showWeathermethod pushes aWeatherTableInterfaceControlleronto the screen. - Here we either disable the UI's only button while data is being fetched, and change the title to inform the user what is happening, or we re-enable it and change its title back to the original.
- Finally, we must add a few more lines of code to our
requestWeatherDatamethod:func requestWeatherData() { updateUI ForNetworkActivity(true) //3 WeatherSessionManager.sharedInstance.fetchWeatherData(){ (data: NSData?, response: NSURLResponse?, taskError: NSError?) in //4 self.updateUIForNetworkActivity(false) //5 if taskError == nil { do { let data = try NSJSONSerialization.JSONObjectWithData(data!, options: .AllowFragments) as! jsonDict print(data) self.showWeather(data) //6 } catch let jsonError as NSError { print(jsonError.localizedDescription) } } else { //7 let action = WKAlertAction(title: "OK", style: .Default, handler: {}) let alertText = taskError!.localizedDescription self.presentAlertControllerWithTitle( alertText, message: "", preferredStyle: .ActionSheet, actions: [action]) } } } - We let the user see that the request has started
- We make the call to the
WeatherSessionManagerclass'sfetchWeatherDatamethod, passing in the closure that will be called byfetchWeatherDatawhen it is finished. - Once
fetchWeatherDatais finished, we either get back an error or some data. Either way, we need to return the UI to its previous state of readiness. - If we get no error, then we try to convert the data to a
jsonDictobject. If that succeeds we call ourshowWeathermethod passing it thejsonDict. - If we get a non-nil
taskErrorback, we inform the user of what went wrong with an alert sheet, presenting theNSErrorclass'slocalizedDescriptionproperty to populate the alert with localized human readable text.
As promised, this is a really basic interface. You just need to follow the given steps:
- In the project navigator, select Weather Watch WatchKit App | Interface.storyboard.
- Drag a Button object onto the interface, and set both of its Alignment properties to Center.
- Set the button's title to something appropriate, like "
Show Me The Weather." Feel free to let your imagination run wild here. - Make sure the assistant editor is open (Command-Option-Return), and Control-drag from the button to
@IBOutlet var getWeatherButton: WKInterfaceButton!in the source code. - Control-drag from the button to the
@IBAction func getWeatherButtonTapped()in the source code.
And that's it, the UI is done.
Once the data is obtained and formatted as a Dictionary, it is passed to a new instance of WeatherTableInterfaceController. This class will then parse the data for whichever information it needs, and display it in a WKInterfaceTable.
Using tables in watchOS is a lot simpler than in iOS, and although some of the concepts involved may be familiar, the fact is that WKInterfaceTable offers a much more restricted feature set, and is accordingly much simpler to handle.
Each row of the table is an instance of an NSObject subclass, which we will create. Any formatting of the row is done in the row object's init code (although in this app, we will not need to do anything here).
To populate the table with data, we simply override the WKInterfaceController class's table(WKInterfaceTable, didSelectRowAtIndex: Int) method.
Note
There are no sections as we have in iOS's UITableView, there is no re-ordering of rows, there are no data source declarations, there is no need to declare a delegate. The considerable flexibility and power of iOS table views would not make a lot of sense on the small watch screen, and so we are dealing here with a much leaner creature.
It's all very simple. If you have implemented a UITableView before, you'll find this child's play.
Let's start with the table row class, as follows:
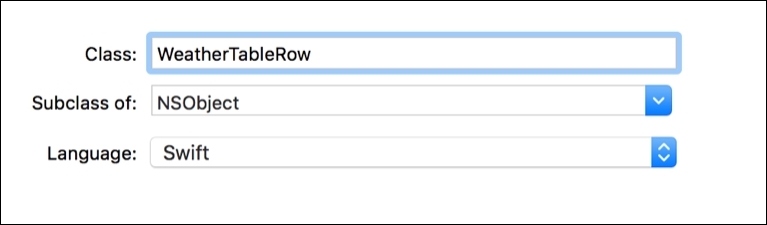
- Create a new file, selecting the watchOS | Source | WatchKit Class template, and hit Next.
- Name it WeatherTableRow, make it a subclass of NSObject, and be sure to select Swift as the language. The settings should look like this:
- Save the file, making sure that just the Weather Watch WatchKit Extension target is selected (there is no need to leave the phone app target selected, it won't be using this class).
- Add the following code to the
WeatherTableRowclass:import WatchKit class WeatherTableRow: NSObject { @IBOutlet var upperLabel: WKInterfaceLabel! @IBOutlet var lowerLabel: WKInterfaceLabel! }
In the case of our table row, we do no more than add outlets for connection to the interface that we create in Interface Builder.
Now to the InterfaceController class itself:
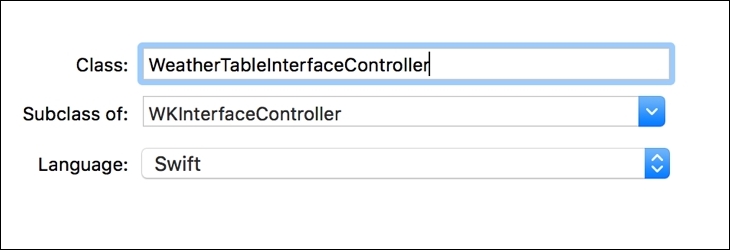
- Create a new file, selecting the watchOS | Source | WatchKit Class template, and hit Next.
- Name it WeatherTableInterfaceController, make it a subclass of WKInterfaceController, and select Swift as the language. The settings should look like this:
We will start by adding the code necessary to populate the table with data provided in the form of our WeatherData typealias, which, you will recall, is an array of WeatherSummary objects.
Add the following code to the WeatherTableInterfaceController class:
class WeatherTableInterfaceController: WKInterfaceController {

    @IBOutlet var weatherTable: WKInterfaceTable! //1
    var weatherDataArray: jsonArray = [] //2

    override func awakeWithContext(context: AnyObject?) {
        super.awakeWithContext(context)
    }

    func loadTableData(data: WeatherData) { //3
        weatherTable.setNumberOfRows(data.count, withRowType: "TableRowControllerID") //4
        for (index, summary) in data.enumerate() { //5
            if let row = weatherTable.rowControllerAtIndex(index) as? WeatherTableRow {
                row.upperLabel.setText(summary.cityName)
                row.lowerLabel.setText(summary.summary)
            }
        }
    }

    override func table(table: WKInterfaceTable, didSelectRowAtIndexrowIndex: Int) { //6
        self.pushControllerWithName("DetailsInterface", context: weatherDataArray[rowIndex])
    }
}
The comments in the code are as follows:
- We will connect the Table object in Interface Builder to this
IBOutlet. - The
weatherDataArraywill store the data that is passed to theWeatherTableInterfaceControllerclass'scontextargument. - Once the data is ready for display (see below) we will call this method to load the table.
- We set the number of rows to the number of
WeatherSummaryobjects contained in thedataargument. - We enumerate through the
dataarray, and for eachWeatherSummaryobject, we set the Label text properties of the row at the appropriate index. - When the user selects one of the rows presenting the summary for a particular city, the table calls this method (which it will do with no code from us). We initiate an instance of the
DetailsInterface(which we will code shortly), passing to it the data associated with that particular city.
So let's now turn our attention to extracting the information we need from a Dictionary object (remember, we defined a typealias, jsonDict, to refer to objects of type [String: AnyObject]).
In order to do this, in this and in other projects that request JSON data from the internet, you will print the data to the console (as we have been doing already) in order to see how the data is structured - once you have decided which data you want, and where it is in the hierarchy of dictionaries, arrays, and objects, you can get coding.
Add the following code to the WeatherTableInterfaceController class:
    func extractBasicWeatherData(data: jsonArray) -> WeatherData {
        var tableDataArray: WeatherData = [] //1
        for entry in data {
            if let //2
                name = entry["name"] as? String, //3
                weather = entry["weather"] as? jsonArray,//4
                summary = weather[0]["main"] as? String { //5
                    let basicEntry = WeatherSummary(
                        cityName: name, summary: summary) //6
                    tableDataArray += [basicEntry]
            }
        }
        return tableDataArray //7
    }
The comments in the code are as follows:
- We initialize an empty
WeatherDataarray, to which we can addWeatherSummaryobjects as we parse out their data. - For each object in the
dataargument, we use what is called multiple optional binding; anif letstatement and a comma-separated list of optional bindings that could potentially returnnil: - We check if a
Stringwith the key"name"exists. - We check whether there is a
jsonArraynamed"weather". - We check whether the first object in that
jsonArray, i.e.weather[0], contains aStringobject with the key"main". - If all three conditions are met, meaning that none of these optional values are
nil, we can construct a newWeatherSummaryobject and add it totableDataArraywe created above. - We return the array that contains the
WeatherSummaryobjects we extracted from thedataargument.
The last thing we need to do here is to add code to the awakeWithContext method, calling the methods we have implemented above.
Add the following code to the awakeWithContext method:
    override func awakeWithContext(context: AnyObject?) {
        super.awakeWithContext(context)

        guard let data = context as? jsonDict else { print("Data is not json dictionary"); return } //8
        guard let list = data["list"] as? jsonArray //9
else { print("No list data found"); return }

    weatherDataArray = list //10
    let basicWeatherData =  extractBasicWeatherData(list)
    loadTableData(basicWeatherData)
}- Using Swift's
guardkeyword, we check first that thecontextargument is of typejsonDict(since the argument is specified to be of typeAnyObject, it could be anything at all). If it is not, we log an error to the console and return from the function. - Similarly, we check whether that
jsonDictcontains ajsonArraywith the key"list".If not, we log the error and return from the function. - If the list object is not nil, we copy it to the
weatherDataArrayproperty, for passing to theDetailsInterfacewhen the user selects a city from the table.
The interface for the WeatherTableInterfaceController is nearly as simple as the one we built for InterfaceController:
- Drag an
InterfaceControllerobject into the storyboard window, placing it to the right of theInterfaceControllerwe have already finished. - In the Attributes Inspector (Command-Option-4), set the new
InterfaceControllerIdentifier toWeatherTableInterfaceController. - In the Identity Inspector (Command-Option-3), set the new
InterfaceControllerClass toWeatherTableInterfaceController. - Now drag a Table object onto the
WeatherTableinterface. With the Assistant Editor visible, Control-drag to@IBOutlet var weatherTable: WKInterfaceTable! in the source code, as illustrated here: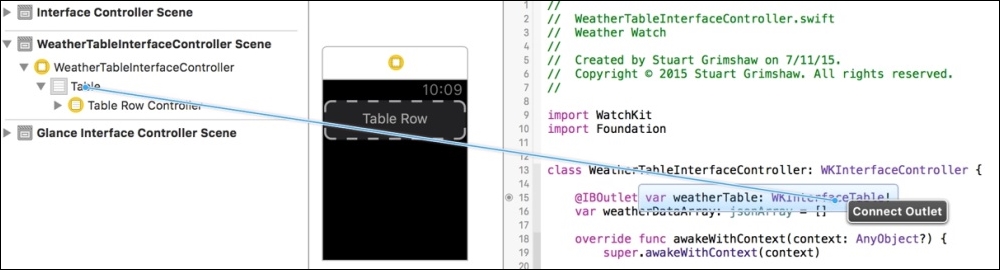
- Set the Table Row Controller Class to WeatherTableRow in the Identity Inspector, as illustrated here:
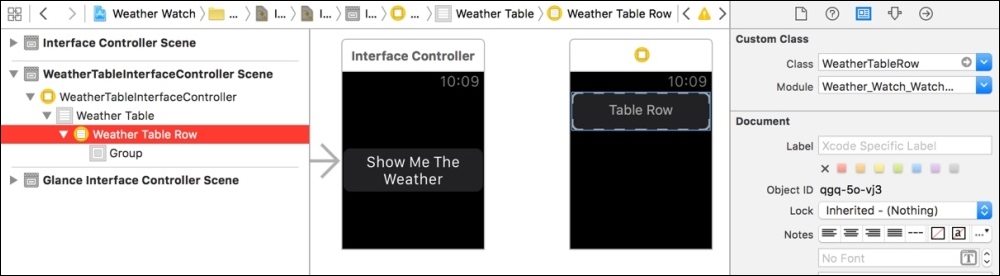
- In the Attributes Inspector, set Weather Table Row's Identifier to TableRowControllerID.
- Select the Group that is contained in Weather Table Row.
- Set its Layout property to Vertical, and its Height property to Size To Fit Content.
- Drag two Label objects onto the group. With
WeatherTableRow.swiftvisible in the Assistant Editor, Control-drag from the Label objects to the twoIBOutletin the code, as illustrated here:
At this point, if you run the app, you should be able to load the data, and see it displayed in the WeatherTable. This is surely one of the most satisfying parts of developing a web-connected app, watching the world's data pour into the device and being presented for your delectation!
Selecting a city in the table won't get you anywhere yet, however, because we have not yet created the DetailsInterfaceController with ID DetailsInterface that the code calls. So we'll take care of that next.
Here, we want to display to the user a more detailed version of the weather data, and a look at the Dictionary that we created from the JSON data will reveal which data is available.
Most of the implementation here is familiar territory, though we will pause to have a closer look at what it takes (which is not much, you'll be pleased to know) to get an image from the web and display it along with the text.
- Create a new file, selecting the watchOS |Source |WatchKit Class template, and hit Next.
- Name it
DetailsInterfaceController, make it a subclass ofWKInterfaceController, and select Swift as the language. - Add the following code to the
DetailsInterfaceControllerclass:@IBOutlet var detailsLabel: WKInterfaceLabel! @IBOutlet var image: WKInterfaceImage! let imageBaseUrl = "http://openweathermap.org/img/w/" override func awakeWithContext(context: AnyObject?) { super.awakeWithContext(context) if let data = context as? jsonDict { displayData(data) } } - There is nothing here that you have not seen before. The compiler will complain that it doesn't know any
displayDatamethod, so we'll fix that next. - Add the following function to the
DetailsInterfaceControllerclass:func displayData(data: jsonDict) { var detailsText = "" if let cityName = data["name"] as? String{ detailsText += cityName + " " } if let main = data["main"] as? jsonDict { if let humidity = main["humidity"] as? Int { //1 detailsText += "Humidity: (humidity) " } if let temp = main["temp"] as? Int { detailsText += "Temp: (temp) " } } if let wind = data["wind"] as? jsonDict, speed = wind["speed"] as? Double { detailsText += "Windspeed: (speed) Km/h" } if let weather = data["weather"] as? jsonArray { if let icon = weather[0]["icon"] as? String { fetchIcon(icon) } if let descriptionStr = weather[0]["description"] as? String { detailsText += "Weather: " + descriptionStr + " " } } detailsLabel.setText(detailsText) }
Although this is all stuff we've seen previously, do take the time to read carefully through it—parsing JSON data is a critical part of iOS development (and by extension, therefore, watchOS development), and Swift's type-safe way of handling it needs to become something you can do in your sleep.
The comments in the code are as follows:
- Note that we're handling a few
IntandDoubleobjects here—as we saw above, JSON isn't all strings and dictionaries. - We extract the name of the icon image that the server includes in the JSON data, and pass it to the
fetchIconmethod, which we will implement next. - Add the following function to the
DetailsInterfaceControllerclass:func fetchIcon(iconStr: String) { let imageUrlStr = imageBaseUrl + iconStr + ".png" if let imageUrl = (NSURL(string: imageUrlStr)) { let sessionConfig= NSURLSessionConfiguration.defaultSessionConfiguration() sessionConfig.requestCachePolicy= .ReturnCacheDataElseLoad let session = NSURLSession(configuration: sessionConfig) let task = session.dataTaskWithURL(imageUrl){ //1 ( data: NSData?, response: NSURLResponse?, error: NSError?) in if let unwrappeData = data { //2 self.image.setImage(UIImage( //3 data: unwrappeData)) } } task.resume() //4 } }
The comments in the code are as follows:
- Once again, we use the
dataTaskWithURLmethod from theNSURLSessionclass to obtain the data we need, but this time instead of JSON data, we are getting image data returned to us. - We check that data was returned by the request to the server.
- We pass this
NSDatatoUIImageinit(data:)convenienceinitializermethod. - Remember, nothing happens until we call the
resumemethod ofdataTaskclass
For this screen we need only add an Image object and a Label object to the DetailsInterface Scene. To do this, perform the following steps:
- In the project navigator, select
Interface.storyboard. - Drag an InterfaceController object into the Interface Builder window, and in the Identity Inspector, set its Custom Class to
DetailsInterfaceController. - In the Attributes Inspector, set the Identifier to DetailsInterface. (Make sure you hit Return to enter the new name before navigating away from it—this one bites me every time!)
- Drag an Image object onto the
InterfaceController, and connect it to@IBOutlet var image: WKInterfaceImage!in the source code. - Set its Image Mode property to Aspect Fit.
- Set its Width property to Relative To Container, with a value of
0.5, and its Height to Relative To Container with a value of 0.2. - Set its Horizontal Alignment property to Center.
- Drag a Label object onto the InterfaceController, and connect it to
@IBOutlet var detailsLabel: WKInterfaceLabel!in the source code. - Set its number of Lines property to
0, so that it will display as many lines of text as necessary. - Set its Horizontal Alignment property to Center.
- Set its Width property to Relative To Container.
The main app is now complete, and when you run it, you should have access to not only the weather summaries of a number of cities, but also the detailed weather data of the cities you select from the table.
You could, of course, try experimenting with the presentation of detailed information, adding perhaps more of the data that is available in the JSON returned from the server.