
With the PBLocationManager in place, we have done the heavy lifting of the app. The interface controllers are very slim in design and simple in implementation.
Select the InterfaceController.swift file that was created as part of the Xcode template and replace all of the code in it (including the import statement) with the following:
Import WatchKit

class InterfaceController: WKInterfaceController, PBLocationManagerDelegate {

    var locationManager: PBLocationManager! //1

    override func awakeWithContext(context: AnyObject?) {
        super.awakeWithContext(context)
        locationManager = PBLocationManager(delegate: self) //2
        locationManager.requestLocation() //3
    }

    func handleNewLocation(newLocation: CLLocation) { //3
        print(newLocation)
    }

    func handleLocationFailure(error: NSError) { //4
        print(error)
    }

}
What we are doing here is writing the bare minimum code necessary to test the PBLocationManager class. Some of this code we will remove once we are satisfied that the Core Location data is successfully being obtained.
The comments in the code are as follows:
- We declare a property,
locationManager, that is an instance of ourPBLocationManagerclass. By using the exclamation mark, we are creating an implicitly unwrapped optional, which basically means that instead of creating an optional value and testing that it is not an empty optional when we need to use it, we promise the compiler that it will exist by the time we call it. - How can we promise this? We initialize an instance in the
awakeWithContextmethod, by which we can be sure thatlocationManagernever equalsnil. If it did, the app would crash. - We fire off a call to the
locationManagerto request the current location. - If the
locationManagerreceives its data, it will call this method on its delegate. For the moment we just print the results to the console for debugging
Have a good look through this little snippet of code; it's something you'll be doing quite often as a developer. It is much better to ensure that the code is working as you expect it to now, in isolation, rather than later when there is a ton of other code that could also be responsible for things not working out as they should.
Okay, we're nearly ready to run a test, but first we need to select the right Scheme to the right of the Run button in Xcode; we need the Plot Buddy WatchKit Extension Scheme.
Now hit Run.
Your Watch Simulator or your device should now ask you for permission to access your location data, as pictured here:

Whether or not you press Dismiss doesn't really matter, what counts is that you allow access on your iPhone or Simulator, as illustrated below:
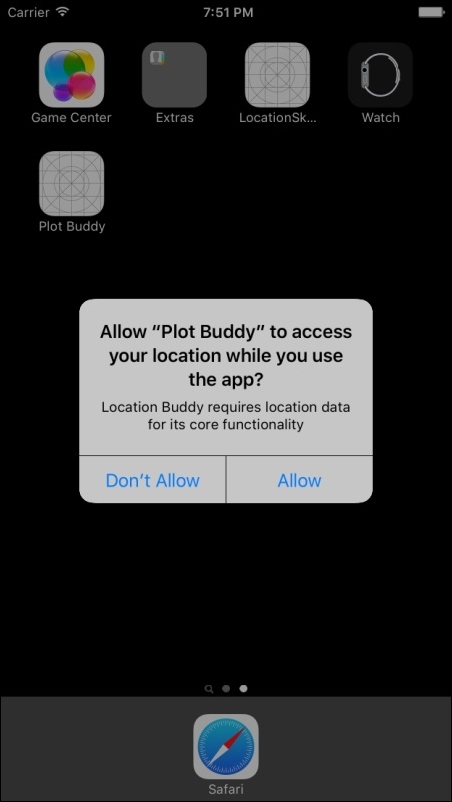
It will come as no surprise to you that you should select Allow.
When you do so, the dialog box will also disappear from the watch screen. But nothing more will happen yet—the call to requestLocation came and went long before you tapped on Allow.
So let's run it again. This time, the request for data is made. After a few seconds, the response that you've logged to the console (nothing will appear on the watch screen yet) may or may not look something like this:
<+37.33233141,-122.03121860> +/- 5.00m (speed 0.00 mps / course -1.00) @ 11/23/15, 8:16:54 PM New Zealand Daylight Time
If it does, congratulations! You have successfully harvested a bunch of location data from watchOS. If the response you get is this:
Error Domain=kCLErrorDomain Code=0 "(null)"
then you are probably using the Watch Simulator and you'll need to let it know where you would like the Simulator to pretend to be: Go to Watch Simulator, select Debug | Location and choose Apple from the list of location data that the simulator can fake for you. Run the app again.
At the time of writing, Xcode is still displaying some growing pains when it comes to the Watch Simulator. It may take several attempts to get it to accept the new location you select, so you may have to alternate between Apple and None a couple of times before the dreaded null response stops plaguing you.
When testing the location code you may also come across cached responses, which will show an incorrect time stamp, though the location is correct. Don't let this bother you, on the device it all works fine.
Okay, now that we have PBLocationManager doing what it should, we can dispense with the test code and start to implement InterfaceController for real.
We start off with some string constants that will specify button titles and label text. Add the following code after the import statement, but before the InterfaceController class definition:
Let kStartPlotting = "Start
Plotting"
Let kStopPlotting = "Stop
Plotting"
Let kStoreCoordinates = "Add Current
Coordinates"
Let kFetching = "Fetching Location..."
Let kLocationFailed = "Location Failed"
The implementation of the class contains very little that you have not seen before. Replace the entire InterfaceController class code with the following:
Class InterfaceController: WKInterfaceController, PBLocationManagerDelegate {

    var locationManager: PBLocationManager!
    var isRecording = false

    @IBOutlet var startStopGroup: WKInterfaceGroup!
    @IBOutlet var addPlotGroup: WKInterfaceGroup!
    @IBOutlet var showPlotsGroup: WKInterfaceGroup!
    @IBOutlet var showPlotsButton: WKInterfaceButton!
    @IBOutlet var infoLable: WKInterfaceLabel!
    @IBOutlet var startStopButton: WKInterfaceButton!
    @IBOutlet var addPlotButton: WKInterfaceButton!

    Override func awakeWithContext(context: AnyObject?) {
        super.awakeWithContext(context)
        locationManager = PBLocationManager(delegate: self)
        updateUI(running: false)
    }

    @IBAction func startStopButtonPressed() {
        toggleRecording()
    }
    @IBAction func addPlotButtonPressed() {
        fetchLocation()
    }

    @IBAction func showPlotsButtonTapped() {
        pushControllerWithName("PlotsScene", context: locationManager.currentLocations)
    }

    @IBAction func sendPlotsButtonTapped() {
WatchConnectivityManager.sharedManager.sendDataToWatch(locationManager.currentLocations)
    }

    func toggleRecording() {
        isRecording = !isRecording
        if isRecording {
            locationManager.clearLocations()
        }
        updateUI(running: isRecording)
    }

    func fetchLocation() {
        updateUI(fetching: true)
        locationManager.requestLocation()
    }

    func handleNewLocation(newLocation: CLLocation) {
        addPlotButton.setTitle(kStoreCoordinates)
        infoLable.setText("Lat:
" + "(newLocation.coordinate.latitude)" + "
Long:
" + "(newLocation.coordinate.longitude)")
updateUI(fetching: false)
    }

    func handleLocationFailure(error: NSError) {
        infoLable.setText(kLocationFailed)
        updateUI(fetching: false)
    }

    func updateUI(running running: Bool) {

        infoLable.setText("")
        infoLable.setHidden(!running)
        startStopButton.setTitle(isRecording ? kStopPlotting : kStartPlotting)

        showPlotsGroup.setHidden(running)
        showPlotsButton.setEnabled(locationManager.currentLocations.count>0)
showPlotsGroup.setBackgroundColor(locationManager.currentLocations.count>0 ? UIColor.blueColor() : UIColor.clearColor())

        addPlotGroup.setHidden(!isRecording)
    }

    func updateUI(fetching fetching: Bool) {
        infoLable.setHidden(fetching)

        startStopButton.setEnabled(!fetching)
        startStopGroup.setBackgroundColor(fetching ? UIColor.clearColor() : UIColor.blueColor())

        addPlotButton.setEnabled(!fetching)
        addPlotGroup.setBackgroundColor(fetching ? UIColor.clearColor() : UIColor.blueColor())
        addPlotButton.setTitle(fetching ? kFetching : kStoreCoordinates)
    }
}
Don't worry about the compiler error, this is happening because we have not yet added the WatchConnectivityManager class.
This class implements the methods we specified in our PBLocationManagerDelegate protocol definition.
func handleNewLocation(newLocation: CLLocation)
func handleLocationFailure(error: NSError)
This is the promise we make when we declare this class to conform to the protocol.
It's worth pointing out the method signatures of the last two methods. Why is the argument name written twice?
func updateUI(fetching fetching: Bool)
This forces the code that calls the method to explicitly name the argument being passed in this form:
updateUI(fetching: false)
This is much clearer, and makes understanding the code (when you return to it a year from now) very much easier, and is more elegant than including the name of the argument in the actual name of the method updateUIForFetching(false).
Apart from this, the InterfaceController class is familiar territory, and does nothing more than pass method calls and data to and from the PBLocationManager class, and is thus a good illustration of the separation of concerns. The controller knows nothing about where the data comes from or how it is formatted; it only needs to be supplied with the right string data. However, you should read through it carefully, making sure that you understand what is going on.
Now we must return to Interface Builder to create the user interface.
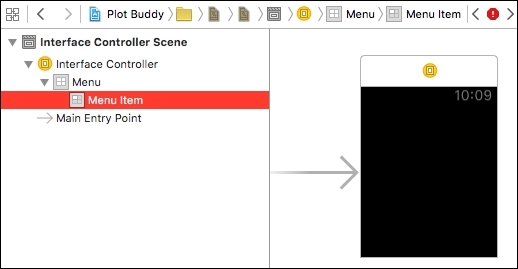
- In the project navigator, select the
Interface.storyboardfile, and ensure that the Assistant Editor is open (Command-Option-Return). - Drag a Menu object onto the interface and select the single Item in the Organizer, as illustrated here:
- In the Attributes Inspector, change the Title to Send Plots and the Image to Share.
- Connect the Send Plots menu item to
@IBAction func sendPlotsButtonTapped()in the source code in the Assistant Editor.
Now we must add the Group objects to the interface, given as follows.
- Drag a Group onto the interface and connect to the
@IBOutletvar startStopGroupin the source code. - Set the Insets to Custom, with a value of 2 for each one.
- Set the Radius to Custom, with a value of 8.
- Select the Blue background color from the color picker (which is the same blue as returned by
UIColor.blueColor()in code), as shown here: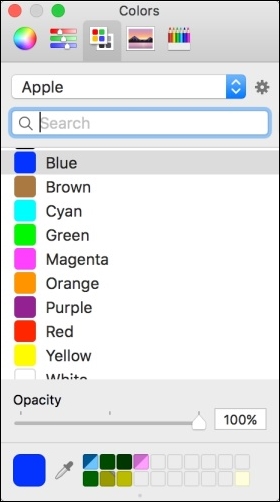
- Copy and paste the Start Stop Group in the Organizer, and connect the new Group to
@IBOutlet var addPlotGroupin the code. - Set the newly named Add Plots Group's Vertical Alignment to Bottom.
- Copy and paste the Add Plots Group, and connect this new pasted group to
@IBOutlet var showPlotsGroupin the code. - Add a Button object to the Start Stop Group, connect it to
@IBOutlet var startStopButtonin the code, change its Title to Start Plotting, and its background color to Black. - Add another connection to
@IBAction func startStopButtonPressedin the code. - Add a Button object to the Add Plot Group with the same property values, except for the Title, which should be set to Add Current Coordinates, and connect it to to
@IBOutletvaraddPlotButtonin the code. - Add another connection to
@IBAction func addPlotButtonPressedin the code. - Add a Button object to the Show Plots Group, with the same property values, except for the Title, which we change to Show Plots, and connect it to
@IBOutlet var showPlotsButtonin the code. - Add another connection to
@IBAction func showPlotsButtonPressedin the code. - Drag a Label object onto the interface, set its Vertical Alignment to Center, its number of Lines to 0, and its Font property to Footnote.
- Connect the label to
@IBOutlet var infoLablein the code.
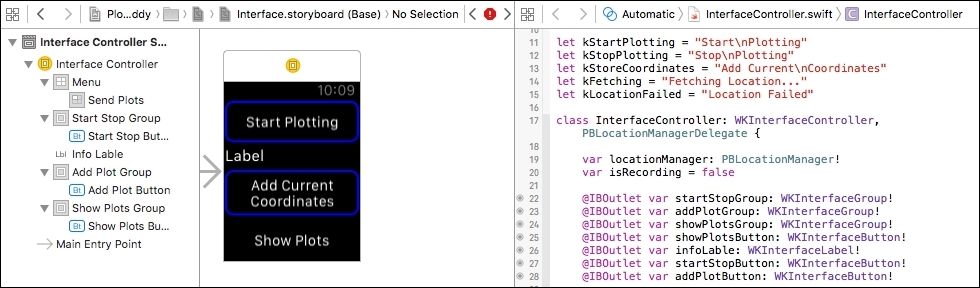
Your Interface Builder window should now look like this:
To run the code we simply need to comment out the sendPlotsButtonTapped implementation by enclosing it between /* and */, like so:
    @IBAction func sendPlotsButtonTapped() {
/*    WatchConnectivityManager.sharedManager.sendDataToWatch(locationManager.currentLocations)
*/
    }
Now the code will compile, since we no longer have a reference to the WatchConnectivityManager that we haven't coded yet.
Hit Run, and when your app has launched, tap the Start Plotting button. Add a location by tapping Add Current Coordinates and your screen will, after a few seconds, look like the illustration here:
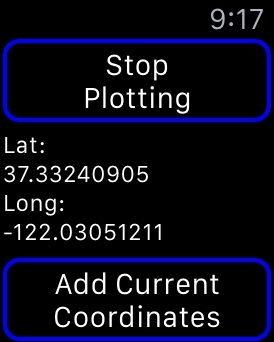
If you tap Stop Plotting, the Show Plots button will become visible, but tapping it will do nothing until we have added the PlotScene controller.
We will do this next.
The PlotSceneInterfaceController that we are about to create will be responsible for accepting a list of CLLocation objects, that is, the LocationSet type, and presenting it in a WKInterfaceTable. The code here is very straightforward and will present no new challenges.
Create a new Swift file and name it PlotsSceneInterfaceController.swift. Replace the import statement with the following code:
Import WatchKit

Class TableRowController: NSObject {
    @IBOutlet var label: WKInterfaceLabel!
}

Class PlotsSceneInterfaceController: WKInterfaceController {
}
We have chosen to define the TableRowController class that we will need for out table in the same file as the PlotsSceneInterfaceController. We would probably create a dedicated file for this class if its logic were more complex, but in this case we only need to define a single IBOutlet property and so we include it here.
Now to add the code for the PlotsSceneInterfaceController class.
Add the following code to the class:
Class PlotsSceneInterfaceController: WKInterfaceController {

    @IBOutlet var plotsTable: WKInterfaceTable!

    Override func awakeWithContext(context: AnyObject?) {
        super.awakeWithContext(context)
        if let data = context as? LocationSet{ //1
            loadTable(data)
        }
    }
    func loadTable(data: LocationSet) {
        plotsTable.setNumberOfRows(data.count, withRowType: "TableRowControllerID")
        for (index, location) in data.enumerate() {
            if let row = plotsTable.rowControllerAtIndex(index) as? TableRowController {
                row.label.setText( //2
                    "Location (index + 1)
" + //3
                    "Lat: (location.coordinate.latitude)
" + //4
                    "Lon: (location.coordinate.longitude)"
                )
            }
        }
    }
}
The comments in the code are as follows:
- We check that the
contextdata is of the correct type and, if it is, we pass it directly to ourloadTablemethod. - The only thing in this code that we have not seen before is the way the text of
row.labelis spread over several lines for readability. Swift will not allow a single String to be defined across more than one line, so it is necessary to use the + operator to concatenate the individual strings. However, there is nothing to stop you writing the entire string within one set of quotation marks. - We display to the user the number (i.e.
index) of the location in the row, but since most people start counting at 1, we add 1 to the index. There are some interesting articles on the web that argue that children should be taught to start counting at zero. Totally beyond our scope, but worth a search. And if it catches on, we'll come back and update the app! - In this case, we choose only to use the
latandlonproperties of theCLLocationobject. You may like to investigate adding others once this chapter is complete.
Possibly the most error-prone part of using WKInterfaceTable objects is hooking them up to the UI in Interface Builder, so, although we're doing nothing new here, we will go through it step by step:
- Drag an InterfaceController object into the Interface Builder window and, in the Identity Inspector, set its Class to be PlotsSceneInterfaceController.
- In the Attributes Inspector, set the Identifier to PlotsScene. If you check back in the
InterfaceControllerclass code, this is the identifier used in theshowPlotsButtonTappedmethod. - Drag a Table object onto the PlotsScene interface and connect it to
@IBOut let var plotsTablein thePlotsSceneInterfaceControllerclass's source code. - Select Table Row Controller in the Organizer pane and set its Class to TableRowController in the Identity Inspector.
- In the Attributes Inspector, set Identifier to TableRowControllerID. You might like to copy and paste this from the
PlotsSceneInterfaceControllerclass'sloadTablemethod. - Select the table row controller's Group object and set its Height property to Size To Fit Content.
- Drag a Label object into the table row controller's Group object and connect it to
@IBOutlet var labelin theTableRowControllerclass's source code. - Set the label's Font property to Caption 2, its Min Scale property to 0.6, its number of Lines to 0, and its Width property to Relative To Container.
Sometimes it can seem a little confusing having to hook up all these Identifier and Class values in Interface Builder, but, like most things, the trick is to take it slowly at first, double checking that you're setting the right IB property with the right name.