
The app that we have coded is in some senses completely autonomous—the iPhone companion app does nothing except install the watchOS app, after which the player never needs to engage with the phone. Which is kind of a shame given that the phone offers us some benefits that most apps are likely to be able to make use of. These include:
- Much greater storage capacity for resources
- Much greater processing power (and the battery life to do it)
- A much larger screen
While we will have little use in C-Quence for the first two of these, we will make use of the ease with which our users can give us information using the larger screen, information that we will only collect once, or at least not often.
As mentioned in Chapter 1, Exploring The New Platform, the Apple Watch is at one and the same time an independent device, and an extension of the iPhone, but we can also turn this relationship around and use the iPhone to augment the capabilities of the Watch.
To get input from the user, we will leverage the larger screen of the iPhone. And to do that, we'll need to get the phone and the watch talking to each other.
We will add a little of the personal touch to our app by having it address the user by his name, one that he will enter into the iPhone (we won't expect anyone to enter text directly into the Watch), which will be transferred automatically to the watch.
There are several methods available to us to facilitate the transfer of data in both directions between the iPhone and its paired Apple Watch using methods supplied by Apple's WatchConnectivity framework. In this chapter, we will use some of its Application Context methods, which are possibly the simplest to implement, as well as being best suited to our requirements. We will sketch out these requirements first.
An extension to our app necessitates an extension to our user story.
The player will be given the opportunity of entering her name into the app from the view presented on the iPhone at launch.
The iOS app will then send the entered name to the watchOS app, which will store it in a form that makes it accessible after the app has terminated and re-launched.
Since communication between the watch app and phone app is neither a part of the game logic, nor a part of interfacing with the user, we will create new, dedicated classes on both the iPhone and the Watch, which will take care of all aspects of inter-app data transfer using WatchConnectivity.
In addition to methods from WatchConnectivity, we will also add a custom method, sendNameToWatch, to the iPhone app.
Using ApplicationContext methods from the WatchConnectivity class involves populating and sending a Dictionary object, the same type of object that you will probably have used in iOS apps already. These Dictionary objects must be in the form [String :AnyObject], which is specified by the ApplicationContext methods we will be using. Since both the watch app and the phone app will need to be using exactly the same keys (so in this case, the String) to access the values of the Dictionary, it is advisable to create a file of predefined constant String objects, which will save us the trouble caused by typing mistakes, meaning that one app sends, for example, ["Color" : RedObject], while the other looks for ["color" : RedObject] (note the capitalization), an easy mistake to make, and one that will cause your code to fail.
To do this, we must create a file that is accessible to both apps, which means ensuring it is available to both the C-Quence and the C-QuenceWatchKit Extension targets:
Before we define the constants, we must create a Swift file for this purpose, with the following steps:
- Type command-N to create a new file, using one of the Xcode templates
- Choose iOS | Source | Swift File.
- Hit Next.
- In the following dialog box, name the file
Constants.swift - Select the Group C-Quence, and tick both the C-Quence and C-QuenceWatchKit Extension targets, as shown below:

- Select the location for the file, at the top level of your project, since this file will be used by more than one target, and hit Create.
We must now turn our attention to the iPhone app.
The first thing we will do is create the class that will take care of all matters pertaining to data transfer between the two apps, which we will call
PhoneConnectivityManager. There will only ever be one instance of this class (what would we do with two?), so we will make it a singleton object, by adding a sharedManager method that will always return this single instance, no matter when, or from where in the code, it is called. First, we will create the file, as below:
Before we define the PhoneConnectivityManager class, we must import the WatchConnectivity framework. Add the following code to the import statement:
import Foundation
import WatchConnectivity
We can now define the class, adding to it both the NSObject and WCSessionDelegate protocols, which we need to access all the really cool and useful stuff we will use from Apple's frameworks:
class PhoneConnectivityManager: NSObject, WCSessionDelegate {

}
Inside this class, add the sharedManager method, as we discussed above:
class PhoneConnectivityManager: NSObject, WCSessionDelegate {
    static let sharedManager = PhoneConnectivityManager()

}
Directly after the sharedManager method, add the following init code:
    private override init() { //1
        super.init() //2
        if WCSession.isSupported(){ //3
            let session = WCSession.defaultSession() //4
            session.delegate = self //5
            session.activateSession() //6
        }
    }
Let's take a look at what we're doing here:
- We mark the
initmethodprivate, so that the only way to create an instance of the class is through thesharedManagermethod, thus ensuring that the single shared instance is returned every time. - The
NSObjectprotocol requires us to call the superclass'sinitmethod, the details of which need not concern us here (they're interesting but way out of scope). - We check if the device that the app is running on supports
WatchConnectivity; an iPad will returnfalsewhenisSupportedis called. - If we are on an iPhone, we initiate an instance of
defaultSession. - This session will send messages to its
delegate(this is why we added theWCSessionDelegateprotocol), so we assignselfto be that delegate. - We have completed preparation of the session and we can now activate it.
With the WatchConnectivity session set up, we now need to create a method, to be called from other parts of the app that will actually send the player's name to the watch.
After the init method, add the following code:
    func sendNameToWatch(playerName: String) {
        if !WCSession.defaultSession().paired { //1
            print("No paired watch")
            return
        }
        if !WCSession.defaultSession().watchAppInstalled { //2
             print("Watch app not installed")
             return
        }
        do { //3
            let context = [kPlayerName: playerName] //4
            print("Sent (playerName) in ApplicationContext")
            try WCSession.defaultSession().updateApplicationContext(context) //5
        } catch {
            print("applicationContext update failed")
        }
    }
Once again, let's break this down to understand exactly what we are doing:
- We check if the phone is paired with a watch. If not, our job is done and we
returnearly, logging this case to the console for possible debugging. - Similarly, we check if our app has been installed on the watch (the user can choose not to) and
returnif not, again logging to the console. - We will wrap the call to send the message in a
do catchblock and prepend it with thetrykeyword, which is Swift's error handling pattern. In thecatchblock we can handle any errors that the method returns. - We package
playerName(the single argument to this method) into a Dictionary, using our constantkPlayerNameas the key, with which the name will be retrieved by the recipient of the message. - We send the Dictionary with the call to
updateApplicationContextmethod of theWCSessionclass, and log to the console any errors that occur.
We want to make the first call to PhoneConnectivityManager.sharedManager (which is the call that will actually instantiate the shared instance of that class) early in the app's lifecycle, and the earliest place we can do that is when the AppDelegate class (created for us by Xcode's template) is itself instantiated. Add the following line of code to the AppDelegate class in the AppDelegate.swift file:
@UIApplicationMain
class AppDelegate: UIResponder, UIApplicationDelegate {

    var window: UIWindow?
    let connectivityManager = PhoneConnectivityManager.sharedManager

...Now that we can send the player's name to the watch, all we need to do is get it from the player. We will simply add a TextField object (to input the name) and a Button object to the iPhone app's view (to trigger the send methods), and hook them up to some simple code in the ViewController class, which we shall write first.
Select ViewController.swift in the project navigator and add the following IBOutlet to the ViewController class:
@IBOutlet weak var playerNameTextFile: UITextField!
Then add the following methods to the class:
    @IBAction func saveNameButtonTapped(sender: AnyObject) {
        savePlayerName()//1
    }

    func savePlayerName() {
        if playerNameTextField.text != "" { //2
PhoneConnectivityManager.sharedManager.sendNameToWatch(playerNameTextField.text!) //3
        }
        “playerNameTextField.resignFirstResponder ()//4
}- The
saveNameButtonTappedmethod, to which we will connect the button, is kept as slim as possible, with a single call to thesavePlayerNamemethod. - If the text input field is empty, we do nothing.
- If a name has been entered, we call the
sendNameToWatchmethod of thePhoneConnectivityManagerclass, which will take care of the rest of the message sending process. - To dismiss the keyboard that appeared when the user tapped on the
TextFieldobject, we call itsresignFirstRespondermethod.
In the Main.storyboard file, drag a Button object onto the interface, placing it in the center of the view using Interface Builder's layout guidelines.
Change its Title from Button to something more informative, such as Send Name To Watch.
We must now add Layout Constraints to the button, so that it will position itself correctly whatever the orientation and size of the view in which it appears. We can do this directly in Interface Builder:
Control-drag from the button onto the containing view at an angle of roughly 45 degrees, and release the mouse. You will be presented with the following contextual menu:
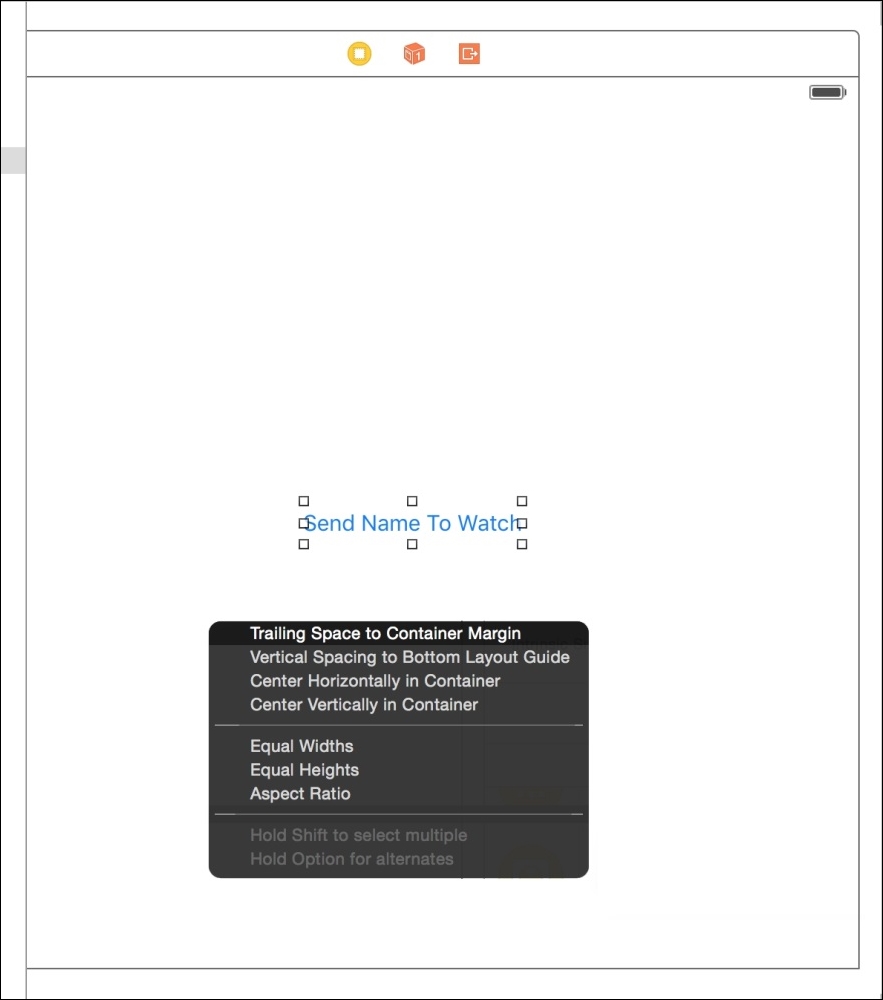
Follow these steps:
- Select Center Horizontally In Container, and then control-drag again to repeat the process, this time selecting Center Vertically In Container.
- Now drag a TextField object onto the view, and place it above the button, at a suitable distance (Xcode will help you once again with the layout guidelines).
- Drag the left and right edges of the text field to align with those of the button.
- Set its Placeholder text property to Player Name.
- Add a constraint as we did just now with the button, selecting Center Horizontally In Container.
- Control-drag from the center of the text field to the center of the button, and select Vertical Spacing from the contextual menu, to ensure that the text field will align itself at the same distance from the button regardless of the size and orientation of the view.
- The last constraint we will add will set the width of the text field. Control-drag from inside the text field to another point inside the text field, and select Width from the contextual menu.
Using the same control-drag methods as earlier in Chapter 3, C-Quence – A Memory Game connect the TextField object in the Document Outline to the @IBOutlet weak varplayerNameTextField: UITextField!in the ViewControllerclass.
Connect the Button object to the savePlayerName method of the ViewController class.
We must now return to the watch, where we will create a class, WatchConnectivityManager, that will use, to a large extent, the same code that we wrote for the PhoneConnectivityManager class.
- Select the
C-QuenceWatchKitExtension folder in the project navigator, and then create a new Swift File (using command-N). - Name it
WatchConnectivity.swift, and make sure the C-QuenceWatchKit ExtensionTargetis selected. - Save it.
- Import the
WatchConnectivityframework and add theWatchConnectivityManagerclass to this file:import Foundation import WatchConnectivity class WatchConnectivityManager: NSObject, WCSessionDelegate { }
Just as we did with the PhoneConnectivityManager class, we will create a sharedManager method and declare the init method private, to ensure that only one instance of this class is created:
class WatchConnectivityManager: NSObject, WCSessionDelegate {

    static let sharedManager = WatchConnectivityManager()

    private override init() {
        super.init()
        if WCSession.isSupported(){
            let session = WCSession.defaultSession()
            session.delegate = self
            session.activateSession()
        }
    }

...
Because we have made self the delegate of the WCSession, we can provide a didReceiveApplicationContext method that will be called when the app receives, well, an ApplicationContext message. The method takes one argument, namely the Dictionary object we sent from the iPhone app:
    func session(session: WCSession, didReceiveApplicationContextapplicationContext: [String : AnyObject]) {
        if let playerName = applicationContext[kPlayerName] as! String? { //1
            print("received (playerName) message") //2
               NSUserDefaults.standardUserDefaults().setObject(playerName, forKey: kPlayerName) //3
        }
}- We check if the
Dictionarycontains an entry with the keykPlayerName(you start to get why we made these constants?), and whether that entry is a String object (the method argumentTypeisAnyObject; other methods may be using this channel of communication). - If it is a
String, we'll celebrate the fact by logging it to the console. You can probably remove this log later, once you're sure that everything is being called and behaving as it should. - We save the
Stringto persistent storage, for use in the future, usingsetObjectmethod of theNSUserDefaults. We save it here re-using the keykPlayerName(although any other key would do, so long as we know what it is when we need to retrieve the value from storage).
On the watch side of things, it is even more important to create the shared instance of the WatchConnectivityManager class early in the app's lifecycle, since there may be messages waiting that were sent while the app was not running, so add the following code to the ExtensionDelegate class that was created by the Xcode template:
class ExtensionDelegate: NSObject, WKExtensionDelegate {

    let watchConnectivityManager = WatchConnectivityManager.sharedManager

...We are very close to being finished!
All we need to do now is add a method that retrieves the stored player name from NSUserDefaults. When the resultLabel method of the InterfaceController displays the player's score, it must first call this new method to find out what text to display.
Add the following method to the InterfaceController class:
    func textForResult(result: Int) -> String {
        if let playerName = NSUserDefaults.standardUserDefaults().objectForKey(kPlayerName) as! String? {
           return "Hey (playerName), you scored (result)"
        } else {
           return "Not bad! You scored (result)"
        }
}Once again, we use kPlayerName as a reliable way to check whether the NSUserDefaults contains a String with that key. We don't really need to check here if it is a String, because if it exists, it can't be anything else, but this check costs nothing, and may prevent trouble later on due to programmer mistakes.
Finally, we change the
endGame method to call textForResult before setting the text of the resultLabel:
    func endGame(result: Int){
        gameboardGroup.setHidden(true)
        resultLabel.setHidden(false)

        let resultText = textForResult(result)
        resultLabel.setText(resultText)

        playButton.setHidden(false)
        playButton.setTitle("Play Again")
        gameLogic.clearGame()
}Make sure that you have selected the WatchKit App Scheme and the correct iOS Simulator hardware:

Now hit Run. When you play the game, you will see no difference, because you have not yet set a player name.
So do this now. The watch app is running in Watch Simulator in the foreground, but that is not the case for the phone app:
In iOS Simulator, launch the C-Quence app. From here you can alter the player name and then lose a game on the watch, to see the personalized message appear in the result label.
Congratulations. The app is complete!