
Way back in Chapter 2, Hello Watch, we used some simple animation to change the background color of the WKInterfaceGroup, which, if you remember, involved calling a method available in WKInterfaceController which takes two arguments, the duration of the animation and a block of code that contains the changes in appearance that should be animated. We saw that even the subtlest of animations can add a sense of "something happening" on the screen, with only a tiny amount of code. Plenty of bang for the buck there.
We are, however, faced with certain limitations of the methods that WatchKit provides us with, one of which is that all the animated changes take place concurrently; it's all at once or not at all. Yet we can easily imagine that even the most modest of animations (we're really not talking Pixar here) might require a series of discrete steps in a particular order. We might want to animate a change in the position of the WKInterfaceGroup and then have it change its background color, for example. Or we may wish to set up a chain of small views that appear and disappear sequentially to create an activity indicator.
In order to achieve effects such as these, we will need to write our own method, extending those provided by watchOS, and then call this method to realize our sequential animations.
What we need to do, then, is create a method similar to WKInterfaceController class's animateWithDuration method that takes an additional argument, which will be a block of code that will be called once the animation is finished. That code could be anything at all, including a further call to animateWithDuration. Thus, we would now have two separate animations chained together.
To do this, first create a new watchOS project, as we have done previously. For the sake of simplicity, deselect the Notification and Glance scenes when setting up the project. Give the project any name you like, as we will not be producing a complete app here; we are more concerned with extending our development skills in an area applicable to just about any app we create.
Let's rename the InterfaceController class:
- Select the
InterfaceController.swiftfile in the project navigator. In the code, change the name of theInterfaceControllerclass to something a little more specific,AnimationInterfaceController, as shown here:import WatchKit import Foundation class AnimationInterfaceController: WKInterfaceController { ... - With the
Interface.storyboardfile selected, select theInterfaceControllerobject and use the Identity Inspector to change its class toAnimationInterfaceController.
We will now add an extension to our AnimationInterfaceController class. Replace the code in the file with the following (you'll notice some code that we do not need from the template has been removed, though leaving it there would have no negative effects):
import WatchKit

class AnimationInterfaceController: WKInterfaceController {

    override func awakeWithContext(context: AnyObject?) {
        super.awakeWithContext(context)
    }
}

extension AnimationInterfaceController //1
{
    func animateWithDuration( //2
        duration: NSTimeInterval,
        animations: () -> Void,
        completion: () -> Void) //
    {

        self.animateWithDuration(duration, animations: //3 animations)

        let delay = Int64(duration) //4
        let time = //5
        dispatch_time(DISPATCH_TIME_NOW, delay * Int64(NSEC_PER_SEC))

        dispatch_after( //6
            time,
            dispatch_get_main_queue(),
            completion)
    }
}
The comments in the code are as follows:
- This extension will apply to the
AnimationInterfaceControllerclass (and any of its subclasses, should we need to create any). We could have extended theWKInterfaceControlleritself, sinceAnimationInterfaceControlleris declared to be a subclass of that, but we're assuming that onlyAnimationInterfaceControllerinstances need the new animation functionality. - We declare a method that takes three arguments: the animation's duration, a block of code that will comprise the animation itself, and a further block of code that is to run once the animation is complete.
- When the method is called, we first run the animation block supplied in the second argument by passing it to
WKInterfaceControllerclass's ownanimateWithDurationmethod. - That animation will now begin on a separate thread, while our code continues to execute. What we do now is convert the
durationargument into anInt64(nameddelay) which is the type we'll need to create a delay in code execution. - We use that delay to create a
dispatch_timewhich is basically the time at which we want ourcompletioncode to be executed. - We use the operating system's threading framework (often referred to as Grand Central Dispatch) to run the
completioncode on itsmain_queueaftertimehas elapsed. Think of this as a way to create a countdown to the execution of a block of code.Note
The finer points of threads and concurrent code execution are complicated and beyond the scope of this book. Don't worry if this stuff looks intimidating, it's an advanced topic and the best thing to do here is simply accept the code as is and look forward to some future date when it will all seem very simple.
There's not much that scares developers more than concurrent programming, so you're not alone.
We will now have this method at our disposal in all instances of our AnimationInterfaceController class. The completion block of code will start at the same moment that the animation block finishes.
Add the following outlets to the AnimationInterfaceController class:
classAnimationInterfaceController: WKInterfaceController {

    @IBOutlet var label: WKInterfaceLabel!
    @IBOutlet var outerGroup: WKInterfaceGroup!
    @IBOutlet var buttonAGroup: WKInterfaceGroup!
    @IBOutlet var buttonBGroup: WKInterfaceGroup!
    @IBOutlet var buttonA: WKInterfaceButton!
    @IBOutlet var buttonB: WKInterfaceButton!

    @IBAction func buttonATapped() {
    }
    @IBAction func buttonBTapped() {
    }

...
We will then be able to hook up our UI elements from Interface Builder
We will take a slightly different approach to creating the user interface, which this time will involve doing much less of the layout work in Interface Builder and instead do it in code.
How the layout of an interface is divided between Interface Builder and runtime code is partly a matter of which is more suitable, but also a question of a developer's personal preference. Some developers are more comfortable doing as much as possible graphically, using Interface Builder, and the advantages here are clear enough—you get to see immediately the results of changes you make.
Note
In the case of WatchKit, there are also considerable limitations as to how much you can do in code: you cannot, for example, add UI elements dynamically at run time, it all needs to be created in advance. There are also some object properties that cannot be set in code, for example the WKInterfaceLabel number of lines property.
However, when it comes to laying out the UI, many developers prefer to do as much as possible in code (disclosure: this author is one of them) and, if you prefer to picture the appearance of the screen in your head and then translate that into code, you'll find that there are many benefits to doing so. One of these is that you can work at the code level uninterrupted by frequently referring back to Interface Builder, instead much of the layout takes place in code early on in the view's lifecycle (we will use the awakeWithContext method) and provides a clear overview of the values of UI element properties when a view launches.
Since the essence of our animation code will be changing these properties over time, we will find it simpler to follow what's going on if we do as much of the layout as possible in code.
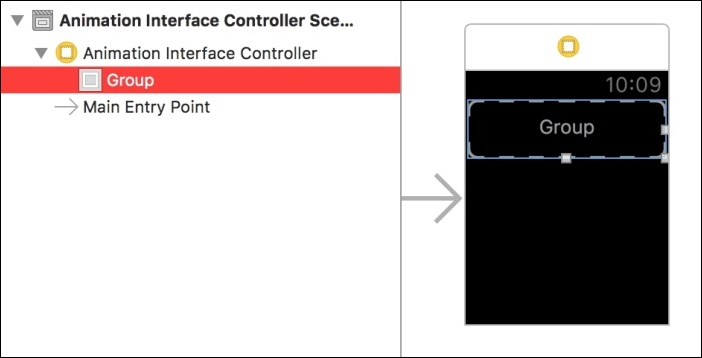
All we need to do in Interface Builder is drag the various UI elements we need onto the Animation Interface Controller or, even easier, drag them directly onto the document Outline.
Follow these steps to add the UI objects we will configure in code later:
- Start by adding a Group object:
- Complete the hierarchy of Group and Button objects as illustrated here:

- Hook up each of the objects to the appropriately named
IBOutletandIBActioncode in the source file, so that the objects in the document outline are assigned the appropriate names, as shown below: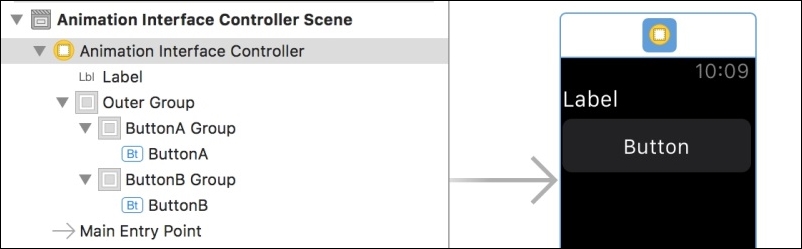
And that's it for our work in Interface Builder. No need to set any properties of the individual objects, which will all be done in code.
Now we must complete the code of our AnimationInterfaceController class. We will declare a few UIColor constants, lay out the UI, and finally add the animation code using the new functionality added by the extension to the class.
After the import statement (but outside of the class's code), add the following declarations:
import WatchKit

let color1 = UIColor.lightGrayColor()
let color2 = UIColor.blueColor()
let color3 = UIColor.redColor()

class AnimationInterfaceController: WKInterfaceController {

...
This will make our code tidier, allowing us to refer to the colors that we want instead of repeatedly writing the code we use to obtain them. In a large project, with many of these constants, we would likely place them in a file of their own, thus separating further the use of our colors from their implementation.
These are very good habits to get into. Really.
Now we add a function that will do everything we need to set out the layout and behaviors of the UI objects we created in Interface Builder. You will notice that all of this code is equivalent to setting the properties in IB.
Add the following code to the AnimationInterfaceController class:
    func layoutUI()
    {
        label.setText("Choose One")
        label.setAlpha(0.0)
        label.setHorizontalAlignment(.Center)
        label.setVerticalAlignment(.Center)

        outerGroup.setHorizontalAlignment(.Center)
        outerGroup.setVerticalAlignment(.Top)
        outerGroup.setWidth(80)
        outerGroup.setHeight(20)

    func setUpButtonGroup(group: WKInterfaceGroup) {
        group.setBackgroundColor(color1)
        group.setCornerRadius(8)
        group.setRelativeWidth(0.1, withAdjustment: 0)
        group.setRelativeHeight(1.0, withAdjustment: 0)
        group.setContentInset(
            UIEdgeInsets(top: 4, left: 2.0, bottom: 4, right: 2.0)
)
    }

        setUpButtonGroup(buttonAGroup)
        setUpButtonGroup(buttonBGroup)
        buttonAGroup.setHorizontalAlignment(.Left)
        buttonBGroup.setHorizontalAlignment(.Right)

        buttonA.setTitle("")
        buttonB.setTitle("")
        buttonA.setBackgroundColor(UIColor.blackColor())
        buttonB.setBackgroundColor(UIColor.blackColor())
        buttonA.setVerticalAlignment(.Center)
        buttonB.setVerticalAlignment(.Center)
        buttonA.setHorizontalAlignment(.Center)
        buttonB.setHorizontalAlignment(.Center)

    }
You might be surprised to see a function defined inside another function, as is the case with the setUpButtonGroup method.
The idea here is that both of the buttonGroup objects will have most properties set to the same values and, rather than write the code once for each button, it is more succinct to pass each buttonGroup into a method that sets the properties. However, that method has no use outside the layoutUI function and so we place its definition inside the method that uses it.
Let's see if this has all worked out the way we want it to. Add the following line of code to the awakeWithContext method:
override func awakeWithContext(context: AnyObject?) {
super.awakeWithContext(context)
layoutUI()
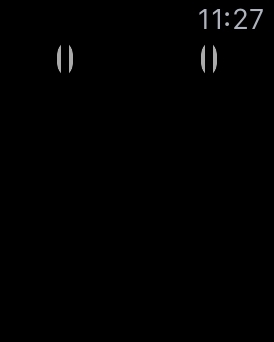
}Now when we hit Run, we should see the app launch and present us with the following screen:
You may be tempted to tweak a few of the property values that we have set in the layoutUI method. Go ahead, it's your app, after all.
Play around with it and try to work out which properties are contributing what to the appearance of the UI as it stands. That should provide a few hours worth of geeky entertainment, if nothing else.
Add the following two method declarations to the AnimationInterfaceController class:
    func startAnimations(){
    }

    func startSecondaryAnimation(){
    }
The first of these methods, startAnimations, will use our extension of AnimationInterfaceController to run its own animations and, on completion, call startSecondaryAnimation, which will, naturally enough, contain the continuance of our sequential animation.
We will call startAnimations from the WKInterfaceController class's awakeWithContext method, so add the following line of code to that:
    override func awakeWithContext(context: AnyObject?) {
        super.awakeWithContext(context)
        layoutUI()
        startAnimations()
    }
Next, we'll add the code for the first animation to the startAnimations method:
    func startAnimations(){
        outerGroup.setAlpha(0) //1

        animateWithDuration(3.0, //2
            animations: {
                self.outerGroup.setAlpha(1.0) //3
            },
            completion: startSecondaryAnimation) //4
    }
The comments in the code are as follows:
- We make the label invisible, before we start to fade it in.
- We call the method with which we extended
AnimationInterfaceController, setting a duration of3.0seconds. - The property that we want animated is the
labelclass'salphaproperty, which gets increased to a value of1.0, which represents full opacity. - We pass in the
completionblock of code as the third argument. This time, instead of the argument being in the form of a closure, that is{//some code here}, we pass it a complete method,startSecondaryAnimation.
If you run the code now, you will see the gray lines fade in over a duration of 3.0 seconds.
Now we add the code for the startSecondaryAnimation method:
    func startSecondaryAnimation(){

        animateWithDuration(5.0, //1
            animations: { //2
                self.outerGroup.setVerticalAlignment(.Bottom)
                self.outerGroup.setRelativeWidth(
                    1.0, withAdjustment: 0)
                self.outerGroup.setHeight(40)

                self.buttonAGroup.setBackgroundColor(color2)
                self.buttonBGroup.setBackgroundColor(color3)
                self.buttonAGroup.setRelativeWidth(
                    0.45, withAdjustment: 0)
                self.buttonBGroup.setRelativeWidth
                    (0.45, withAdjustment: 0)
            },
            completion: {
                self.animateWithDuration(2.0, //3
                    animations: {
                        self.label.setAlpha(1.0)
                    },
                    completion: {
                        self.buttonA.setTitle("blue")
                        self.buttonB.setTitle("red")
                })
            }
        )
    }
The comments in the code are as follows:
- Once again, we use the method we defined in the extension to
AnimationInterfaceController. - The
animationsargument is passed as a closure, although we could have have implemented this code in a separate function and passed that function as the argument, as we did instartAnimations, above. Because we are passing a closure, we need to prepend the references to the UI objects withself. - The code in the completion closure calls, you guessed it, our extension method. Nesting like this means that we could continue chaining a sequence of animations of any length we like. This closure first fades in the
labeland then thecompletionblock sets theTitleproperties of the buttons from the empty string to blue and red.
You can probably tell from reading the code that the outerGroup element is going to change size and position and that the buttonGroup objects are going to change color and size.
Give it a go. When you hit Run, you should see the gray lines fade in for 3 seconds, then move downwards and outwards while taking on a blue or red color and starting to look more like the outlines of buttons that they actually are. Finally, after 5 seconds, the titles of the buttons are shown and the user is invited to choose one of them.
Well, we already have the buttons connected to IBAction, so all there is left to do for this example is to add some code to them.
If the user chooses blue, she is choosing not to enter The Game (for the time being in a metaphorical sense).
Add the following code to the buttonATapped method:
    @IBAction func buttonATapped() {
        startFinalAnimation()
    }
Then add the startFinalAnimation method to the AnimationInterfaceController class:
    func startFinalAnimation()
    {
        self.buttonA.setTitle("")
        self.buttonB.setTitle("")

        animateWithDuration(5.0,
            animations: {
                self.outerGroup.setAlpha(0)
                self.label.setAlpha(0)
            },
            completion: {
                self.label.setText("Your Choice")
                self.animateWithDuration(1.0,
                    animations: {
                        self.label.setAlpha(1.0)
                    }
                )
        })
    }
For one final time, we call our extension method, which, as you can probably tell, fades out the buttons (that are in the outerGroup) and the label and then fades the label in with a new text.
If the user chooses red, well, I'll leave it up to you to extend the rewards of the red button beyond this:
    @IBAction func buttonBTapped() {
        print("Entering the Matrix?")
}Please forgive the sermon, but go easy on animations (unless you are developing a game, or an app in which animations are a core functionality). If you know anybody with gray hair and a taste for 80's pop music, ask them how much they enjoyed flashing HTML in the early days of the internet.
Used with taste, animations can add some real value to your app, but overdo it and your users may quickly become tired of having to wait for a button to do a lap of honor around your interface before they can continue using the app.
Here ends the sermon.