
Chapter 4
Developing a Game Plan
IN THIS CHAPTER
![]() Breaking your work into manageable pieces
Breaking your work into manageable pieces
![]() Creating a work breakdown structure
Creating a work breakdown structure
![]() Dealing with unknown circumstances
Dealing with unknown circumstances
![]() Keeping project information in a work breakdown structure dictionary
Keeping project information in a work breakdown structure dictionary
The keys to successful project planning and performance are completeness and continuity. You want to identify all important information in your project plan and address every aspect of your project while it’s in progress.
Describing in detail all the tasks required to complete your project helps you accomplish them. Your description of project work provides the basis for scheduling, planning resources, defining roles and responsibilities, assigning work to team members, capturing key project performance data, and reporting on completed project work. This chapter helps you break down your project work into manageable pieces.
Breaking Your Project into Manageable Chunks
Two major concerns when starting a new project are remembering to plan for all important pieces of work and accurately estimating the time and resources required to perform that work. To address both issues, you should develop a logical framework to define all work that’s necessary to complete the project.
Suppose you’re asked to design and present a training program. You and a colleague work intensely for a couple of months developing the content and materials, arranging for the facilities, and inviting the participants. A week before the session, you ask your colleague whether he’s made arrangements to print the training manuals. He says that he thought you were dealing with it, and you say that you thought he was dealing with it. Unfortunately, neither of you arranged to have the manuals printed because you each thought the other person was handling it. Now you have a training session in a week, and you don’t have the time or money to print the needed training notebooks.
How can you avoid a situation like this one? By using a structured approach in the organizing and preparing stage of your project to identify all required project work. The following sections explain how to accomplish this task by subdividing your project’s intermediate and final products into finer levels of detail and specifying the work required to produce them.
Thinking in detail
The most important guideline to remember when identifying and describing project work is this: Think in detail! People consistently underestimate the time and resources they need for their project work because they just don’t recognize everything they have to do to complete it.
Suppose you have to prepare a report of your team’s most recent meeting. Based on your past experience with preparing many similar reports, you quickly figure you’ll need a few days to do this one. But how confident are you that this estimate is correct? Are you sure you’ve considered all the work that writing this particular report will entail? Will the differences between this report and others you’ve worked on mean more time and work for you? How can you tell?
The best way to determine how long and how much work a project will take to complete is to break down the required project work into its component deliverables, a process called decomposition. (A deliverable is an intermediate or final product, service, and/or result your project will produce. See Chapter 3 in this minibook for more information on project deliverables, or objectives, as they’re often called.)
The greater the detail in which you decompose a project, the less likely you are to overlook anything significant. For example, creating the report in the preceding example actually entails producing three separate deliverables: a draft, reviews of the draft, and the final version. Completing the final version of the report, in turn, entails producing two deliverables: the initial version and the edited version. By decomposing the project into the deliverables necessary to generate the final report, you’re more likely to identify all the work you need to do to complete the project.
 Follow these two guidelines when decomposing your project:
- Allow no gaps. Identify all components of the deliverable you’re decomposing. In the example of creating a meeting report, if you have allowed no gaps, you’ll have the desired final product in hand after you’ve produced the draft, the reviews of the draft, and the final version. However, if you feel that you’ll have to do additional work to transform these three subproducts into a final product, you need to define the subproduct(s) that this additional work will produce.
- Allow no overlaps. Don’t include the same subproduct in your decomposition of two or more different deliverables. For example, don’t include completed reviews of the draft by your boss and the vice president of your department as parts of the draft (the first deliverable) if you’ve already included them with all other reviews under reviews of the draft (the second deliverable).
Using these guidelines as you specify the parts and subparts of your project decreases the chance that you’ll overlook something significant, which, in turn, helps you develop more accurate estimates of the time and resources needed to do the project.
Identifying necessary project work with a work breakdown structure
Thinking in detail is critical when you’re planning your project, but you also need to consider the big picture. If you fail to identify a major part of your project’s work, you won’t have the chance to detail it! Thus, you must be both comprehensive and specific.
Figure 4-1 shows how you can depict necessary project work in a work breakdown structure (WBS), a deliverable-oriented decomposition of the work required to produce the necessary project products and achieve the project’s objectives. The different levels in a WBS have had many different names. The top element is typically called a project and the lowest level of detail is typically called a work package. However, the levels in between have been called phases, subprojects, work assignments, tasks, subtasks, and deliverables. In this minibook, the top-level box (the Level 1 component) is a project, the lowest level of detail is a work package, and the elements in between are Level 2 components, Level 3 components, and so forth. A work package is comprised of activities that must be performed to produce the deliverable it represents.

FIGURE 4-1: Developing a work breakdown structure.
Specifically, Figure 4-1 shows that you can subdivide the entire project, represented as a Level 1 component, into Level 2 components and then subdivide some or all Level 2 components into Level 3 components. You can continue to subdivide all the components you create in the same manner until you reach a point at which you think the components you defined are sufficiently detailed for planning and management purposes. These Level n components, where n is the number of the lowest-level component in a particular WBS branch, are called work packages.
Suppose you’re responsible for a project titled Training Program Creation and Presentation that entails creating and presenting a new training program for your organization. To get started, you develop a WBS for this project as follows:
-
Determine the major deliverables or products to be produced.
Ask yourself, “What major intermediate or final products or deliverables must be produced to achieve the project’s objectives?”
You may identify the following items:
- Training program needs statement
- Training program design
- Participant notebooks
- Trained instructor
- Program testing
- Training program presentation
 Creating the WBS with deliverables rather than activities is important because
 - It reinforces that in almost all instances, you achieve project success by producing desired outcomes, not by performing certain activities.
- It creates a link between the scope statement and the WBS, which helps ensure that you identify and perform all required work (and only work that is, in fact, required).
-
Divide each major deliverable from Step 1 into its component deliverables.
If you start with Training program needs statement, ask, “What intermediate deliverables must I have so I can create the needs statement?”
You may determine that you require the following:
- Interviews of potential participants
- A review of materials discussing the needs for the program
- A report summarizing the needs this program will address
-
Divide each intermediate deliverable from Step 2 into its component parts.
If you start with Interviews of potential participants, ask, “What deliverables must I have to complete these interviews?”
You may decide that you have to produce the following deliverables:
- Selected interviewees
- Interview questionnaire
- Interview schedule
- Completed interviews
- Report of interview findings
But why stop here? You can break each of these five items into its component parts and then break those pieces into even more parts. How far should you go? The following sections can help you answer that question.
Asking four key questions
Determining how much detail you need isn’t a trivial task. You want to describe your work in sufficient detail to support accurate planning and meaningful tracking. But the benefits of this detail must justify the additional time you spend developing and maintaining your plans and reporting your progress.
Asking the following four questions about each WBS component can help you decide whether you’ve defined it in enough detail:
- Do you require two or more intermediate deliverables to produce this deliverable?
- Can you estimate the resources you need to perform the work to produce this deliverable? (Resources include personnel, equipment, raw materials, money, facilities, and information.)
- Can you accurately estimate how long producing this deliverable will take?
- If you have to assign the work to produce this deliverable to someone else, are you confident that person will understand exactly what to do?
If you answer yes to the first question or no to any one of the other three, break down the deliverable into the components necessary to produce it.
Your answers to these questions depend on how familiar you are with the work, how critical the activity is to the success of your project, what happens if something goes wrong, whom you may assign to perform the activity, how well you know that person, and so on. In other words, the correct level of detail for your WBS depends on your judgment.
If you’re a little uneasy about answering these four questions, try this even simpler test: Subdivide your WBS component into additional deliverables if you think either of the following situations applies:
- The component will take much longer than two calendar weeks to complete.
- The component will require much more than 80 person-hours to complete.
Remember that these estimates are just guidelines. For example, if you estimate that it will take two weeks and two days to prepare a report, you’ve probably provided sufficient detail. But if you think it will take two to three months to finalize requirements for your new product, you need to break the deliverable finalized requirements into more detail because
- Experience has shown that there can be so many different interpretations of what is supposed to occur during these two to three months that you can’t be sure your time and resource estimates are correct, and you can’t confidently assign the task to someone to perform.
- You don’t want to wait two or three months to confirm that work is on schedule by verifying that a desired product has been produced on time.
Making assumptions to clarify planned work
Sometimes you want to break down a particular WBS component further, but certain unknowns stop you from doing so. How do you resolve this dilemma? You make assumptions regarding the unknowns. If, during the course of your project, you find that any of your assumptions are wrong, you can change your plan to reflect the correct information.
Regarding the Training Program Creation and Presentation project example presented previously in this section — suppose you decide that the Completed interviews deliverable from Step 3 needs more detail so you can estimate its required time and resources. However, you don’t know how to break it down further because you don’t know how many people you’ll interview or how many separate sets of interviews you’ll conduct. If you assume you’ll interview five groups of seven people each, you can then develop specific plans for arranging and conducting each of these sessions. In most situations, it’s best to consider a guess in the middle of the possible range. To determine how sensitive your results are to the different values, you may want to analyze for several different assumptions.
Be sure to write down your assumption so you remember to change your plan if you conduct more or less than five interview sessions. See the discussion in Chapter 3 of this minibook for more information about detailing assumptions.
Focusing on results when naming deliverables
Whenever possible, name a deliverable based on the result you need to achieve rather than the activity you need to perform to achieve that result. For example, you might title a deliverable that signifies completion of a needs assessment survey you have to conduct in one of two ways:
- Survey completed
- Needs assessment finished
Both options state that something has been finished. However, although the deliverable Survey completed indicates that a survey was performed, it doesn’t explain what type of information the survey was supposed to obtain or whether it successfully obtained that information. On the other hand, Needs assessment finished confirms that the information from the completed survey successfully fulfilled the purpose for which it was intended.
Using action verbs to title activities
Use action verbs in the titles of activities that make up a work package to clarify the nature of the work the activities entail. Action verbs can improve your time and resource estimates, your work assignments to team members, and your tracking and reporting because they provide a clear picture of the work included in the activities and, thereby, the work packages of which they are a part.
Consider the assignment to prepare a report after a team meeting. Suppose you choose Draft report to be one of its work packages. If you don’t break down Draft report further, you haven’t indicated clearly whether it includes any or all of the following actions:
- Collecting information for the draft
- Determining length and format expectations and restrictions
- Writing the draft
- Reviewing the draft yourself before officially circulating it to others
But if you simply break down the work package into two activities that are titled “Design the draft report” and “Write the draft report,” your scope of work is instantly clearer. A few well-chosen words at this level go a long way.
Developing a WBS for large and small projects
You need to develop a WBS for very large projects, very small projects, and everything in between. Building a skyscraper, designing a new airplane, researching and developing a new drug, and revamping your organization’s information systems all need a WBS. So, too, do writing a report, scheduling and conducting a meeting, coordinating your organization’s annual blood drive, and moving into your new office. The size of the WBS may vary immensely depending on the project, but the hierarchical scheme used to develop each one is the same.
Occasionally, your detailed WBS may seem to make your project more complex than it really is. Seeing 100 tasks (not to mention 10,000) on paper can be a little unnerving! However, the WBS doesn’t create a project’s complexity; it just displays that complexity. In fact, by clearly portraying all aspects of your project work, the WBS simplifies your project.
Check out the sidebar “Conducting a survey using a WBS” for an illustration of how a work breakdown structure helps you develop a more accurate estimate of the time you need to complete your work.
Understanding a project’s deliverable/activity hierarchy
Figure 4-2 shows a portion of the deliverable/activity hierarchy for the project of surveying people to determine the characteristics a new product your organization may develop should have (refer to the nearby sidebar “Conducting a survey using a WBS” for details on this example). As illustrated in the figure, a project’s deliverable/activity hierarchy is comprised of three types of components:
- Deliverables: Intermediate or final products created during the performance of the project (see Chapter 3 of this minibook)
- Work packages: Deliverables at the lowest point in each branch of the hierarchy that can be further subdivided into activities
- Activities: Work that’s performed to produce a deliverable

FIGURE 4-2: The hierarchy of deliverables and activities for surveying people.
The WBS is the portion of the hierarchy that contains the deliverables (from the topmost level down to and including all work packages) that will be produced during the project. The activities that make up the work packages are recorded in a comprehensive activity list. While not considered to be part of the WBS, each activity is a component of a work package, so you need to identify it as such. (For convenience, you should include activities in the WBS dictionary under the work package to which they relate; see the later section “Documenting Your Planned Project Work” for details on the WBS dictionary.)
Dealing with special situations
With a little thought, you can break down most WBS elements into components. However, in some situations, like the ones described in the following sections, you have to get creative.
Representing conditionally repeating work
Suppose your project contains a deliverable (such as an approved report) that requires an unknown number of repetitive cycles (such as reviewing and revising the latest version of the draft report) to produce, each of which generates at least one intermediate deliverable. In reality, you write the report and submit it for review and approval. If the reviewers approve the report, you obtain your deliverable of an approved report and proceed to the next phase of your project (such as a distributed report). But if the reviewers don’t approve the report, you have to revise it to incorporate their comments and then resubmit it for a second review and approval. If they approve the second draft, you obtain your deliverable of an approved report and proceed to the next phase of your project. But if they still don’t approve your report, you have to repeat the process (or try to catch them in a better mood).
Revising the draft is conditional work; it will be completed only if a certain condition (in this case, not receiving the reviewers’ approval) comes to pass. Unfortunately, a WBS doesn’t include conditional work; you plan to perform every piece of work you detail in your WBS. However, you can indirectly represent conditional work in the following two ways:
- You can define a single deliverable as an Approved report and assign it a duration. In effect, you’re saying that you can create as many Reviewed but not approved versions of the report as necessary (each of which is an intermediate deliverable) to obtain the final reviewed and approved version within the established time period.
- You can assume that you’ll need a certain number of revisions and include the intermediate deliverable created after each one (a different Reviewed but not approved version of the report) in your WBS. This approach allows more meaningful tracking.
Whichever approach you choose, be sure to document it in your project plan.
Assuming that your project needs three reviews and two revisions doesn’t guarantee that your draft will be good to go after only the third review. If your draft is approved after the first review, congratulations! You can move on to the next piece of work immediately — that is, you don’t perform two revisions just because the plan assumed you would have to!
However, if you still haven’t received approval after the third review, you continue to revise it and submit it for further review until you do get the seal of approval you need. Of course, then you have to reexamine your plan to determine the effect of the additional reviews and revisions on the schedule and budget of future project activities.
A plan isn’t a guarantee of the future; it’s your statement of what you will work to achieve. If you’re unable to accomplish any part of your plan, you must revise it accordingly (and promptly).
Handling work with no obvious break points
Sometimes you can’t see how to break a piece of work into two-week intervals. Other times that amount of detail just doesn’t seem necessary. Even in these situations, however, you want to divide the work into smaller chunks to remind yourself to periodically verify that your current schedule and resource estimates are still valid.
In these instances, arbitrarily define intermediate milestones to occur every two weeks that are defined as “progress confirmed as being on schedule” or “expenditures confirmed as being on budget.” Check out the sidebar “Keeping a close eye on your project” for an illustration of why it’s important to have frequent milestones to support project tracking and how to deal with WBS components that have no obvious break points.
Planning a long-term project
A long-term project presents a different challenge. Often the work you perform a year or more in the future depends on the results of the work you do between now and then. Even if you can accurately predict the work you’ll perform later, the further into the future you plan, the more likely it is that something will change and require you to modify your plans.
When developing a WBS for a long-term project, use a rolling-wave approach, in which you continually refine your plans throughout the life of your project as you discover more about the project and its environment. This approach acknowledges that uncertainties may limit your plan’s initial detail and accuracy, and it encourages you to reflect more accurate information in your plans as soon as you discover it. Apply the rolling-wave approach to your long-term project by taking the following steps:
- Break down the first three months’ work into components that take two weeks or less to complete.
- Plan the remainder of the project in less detail, perhaps describing the work in packages you estimate to take between one and two months to complete.
- Revise your initial plan at the end of the first three months to detail your work for the next three months in components that take two weeks or less to complete.
- Modify any future work as necessary, based on the results of your first three months’ work.
- Continue revising your plan in this way throughout the project.
No matter how carefully you plan, something unanticipated can always occur. The sooner you find out about such an occurrence, the more time you have to minimize any negative effect on your project.
Issuing a contract for services you will receive
Generally speaking, you use a WBS that you include in a contract for services to be provided to you by another person or organization differently from the way you use one to guide project work that you or your organization performs itself. When you perform the project yourself, the WBS provides the basis for developing detailed project schedules, estimating personnel and other resource requirements, detailing the project roles and responsibilities of project team members, and assessing all aspects of the ongoing work. However, when you manage a contract with an external organization that’s performing the project for you, you use the WBS to
- Support responsive progress assessment to help ensure that the overall project is on track to finish on time and within budget.
- Provide the contractor with a framework for tracking and reporting periodic assessments of project schedule achievement and resource expenditures.
- Confirm that product, schedule, and resource performance is sufficient to justify the making of scheduled progress payments.
In addition, you don’t want the WBS to unduly restrict the contractor’s ability to use his experience, skills, and professional judgment to achieve the results detailed in the contract. Typically, developing the WBS to two or three levels of detail is sufficient to meet the preceding needs without creating unnecessary restrictions.
Creating and Displaying a WBS
You can use several schemes to develop and display your project’s WBS; each one can be effective under different circumstances. This section looks at a few of the most common schemes and provides some examples and advice on how and when to apply them.
Considering different schemes
The following five schemes (and their examples) can help you subdivide project work into WBS components:
- Product components: Floor plan, training manuals, or screen design
- Functions: Design, launch, review, or test
- Project phases: Initiation, design, or construction
- Geographical areas: Region 1 or the northwest
- Organizational units: Marketing, operations, or facilities
Project phases, product components, and functions are the most often used.
When you choose a scheme to organize the sub-elements of a WBS component, continue to use that same scheme for all the sub-elements under that component to prevent possible overlap in categories. For example, consider that you want to develop finer detail for the WBS component titled Report. You may choose to break out the detail according to function, such as Draft report, Reviews of draft report, and Final report. Or you may choose to break it out by product component, such as Section 1, Section 2, and Section 3.
 Don’t define a WBS component’s sub-elements by using some items from two different schemes. For instance, for the component Report, don’t use the sub-elements Section 1, Section 2, Reviews of draft report, and Final report. Combining schemes in this way increases the chances of either including work twice or overlooking it completely. For example, the work to prepare the final version of Section 2 could be included in either of two sub-elements: Section 2 or Final report.
Consider the following questions when choosing a scheme:
- What higher-level milestones will be most meaningful when reporting progress? For example, is it more helpful to report that Section 1 is completed or that the entire Draft report is done?
- How will you assign responsibility? For example, is one person responsible for the draft, reviews, and final report of Section 1, or is one person responsible for the drafts of Sections 1, 2, and 3?
- How will you and your team members actually do the work? For example, is the drafting, reviewing, and finalizing of Section 1 separate from the same activities for Section 2, or are all chapters drafted together, reviewed together, and finalized together?
Developing your WBS
How you develop your WBS depends on how familiar you and your team are with your project, whether similar projects have been successfully performed in the past, and how many new methods and approaches you’ll use. Choose one of the following two approaches for developing your WBS based on your project’s characteristics:
-
Top-down: Start at the top level in the hierarchy and systematically break WBS elements into their component parts.
This approach is useful when you have a good idea of the project work involved before the actual work begins. The top-down approach ensures that you thoroughly consider each category at each level, and it reduces the chances that you overlook work in any of your categories.
-
Brainstorming: Generate all possible work and deliverables for this project and then group them into categories.
Brainstorming is helpful when you don’t have a clear sense of a project’s required work at the outset. This approach encourages you to generate any and all possible pieces of work that may have to be performed, without worrying about how to organize them in the final WBS. After you decide that a proposed piece of work is a necessary part of the project, you can identify any related work that is also required.
Whichever approach you decide to use, consider using stick-on notes to support your WBS development. As you identify pieces of work, write them on the notes and put them on the wall. Add, remove, and regroup the notes as you continue to think through your work. This approach encourages open sharing of ideas and helps all people appreciate — in detail — the nature of the work that needs to be done.
The top-down approach
Use the following top-down approach for projects that you or others are familiar with:
- Specify all Level 2 components for the entire project.
- Determine all necessary Level 3 components for each Level 2 component.
- Specify the Level 4 components for each Level 3 component as necessary.
-
Continue in this way until you’ve completely detailed all project intermediate and final deliverables.
The lowest-level components in each WBS chain are your project’s work packages.
The brainstorming approach
Use the following brainstorming approach for projects involving untested methods or for projects you and your team members aren’t familiar with:
-
Identify all the intermediate and final deliverables that you think your project will produce.
Don’t worry about overlap or level of detail.
Don’t discuss wording or other details of the work items.
Don’t make any judgments about the appropriateness of the work.
-
Group these items into a few major categories with common characteristics and eliminate any deliverables that aren’t required.
These groups are your Level 2 categories.
-
Divide the deliverables under each Level 2 category into groups with common characteristics.
These groups are your Level 3 categories.
- Use the top-down method to identify any additional deliverables that you overlooked in the categories you created.
-
Continue in this manner until you’ve completely described all project deliverables and work components.
The lowest-level components in each WBS chain are your project’s work packages.
Categorizing your project’s work
Although you eventually want to use only one WBS for your project, early in the development of your WBS, you can look at two or more different hierarchical schemes. Considering your project from two or more perspectives helps you identify work you may have overlooked.
Suppose a local community wants to open a halfway house for substance abusers. Figures 4-3 and 4-4 depict two different schemes to categorize the work for this community-based treatment facility. The first scheme classifies the work by product component, and the second classifies the work by function:
- Figure 4-3 defines the following components as Level 2 categories: staff, facility, residents (people who’ll be living at the facility and receiving services), and community training.
- Figure 4-4 defines the following functions as Level 2 categories: planning, recruiting, buying, and training.
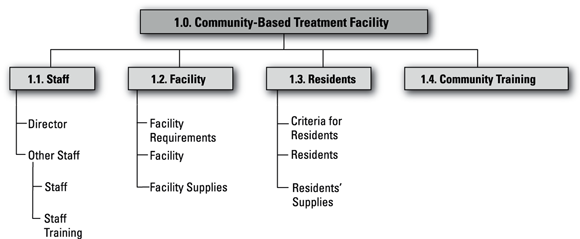
FIGURE 4-3: A product component scheme for a WBS.
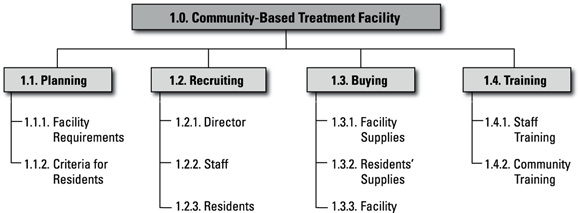
FIGURE 4-4: A functional scheme for a WBS.
Both WBSs contain the same lowest-level components or work packages.
When you think about your project in terms of major functions (rather than final product components), you realize that you forgot the following work:
- Planning for staff recruiting
- Buying staff supplies
- Planning for your community training
After you identify the work components you overlooked, you can include them in either of the two WBSs.
Be sure you choose only one WBS before you leave your project’s planning phase. Nothing confuses people faster than trying to use two or more different WBSs to describe the same project.
Labeling your WBS entries
As the size of a project grows, its WBS becomes increasingly complex. Losing sight of how a particular piece of work relates to other parts of the project is easy to do. Unfortunately, this problem can lead to poor coordination between related work efforts and a lack of urgency on the part of people who must perform the work.
Figure 4-5 illustrates a scheme for labeling your WBS components so you can easily see their relationships with each other and their relative positions in the overall project WBS:
- The first digit (1), the Level 1 identifier, indicates the project in which the item is located.
- The second digit (5) indicates the Level 2 component of the project in which the item is located.
- The third digit (7) refers to the Level 3 component under the Level 2 component 1.5. in which the item is located.
- The fourth and last digit (3) is a unique identifier assigned to distinguish this item from the other Level 4 components under the Level 3 component 1.5.7. If 1.5.7.3. Materials Ordered isn’t subdivided further, it’s a work package.

FIGURE 4-5: Identifying your WBS components.
When you’re ready to label the activities that fall under a given work package, use a combination of the WBS code of the work package and a unique code that specifically refers to each activity. For example, suppose an activity under the work package 1.5.7.3. is Prepare list of items to order. You may give this activity the identifier code depicted in Figure 4-6. In this instance, the first four digits of the activity code are the WBS code for the work package of which this activity is a part. The fifth digit distinguishes this activity from the others in work package 1.5.7.3.
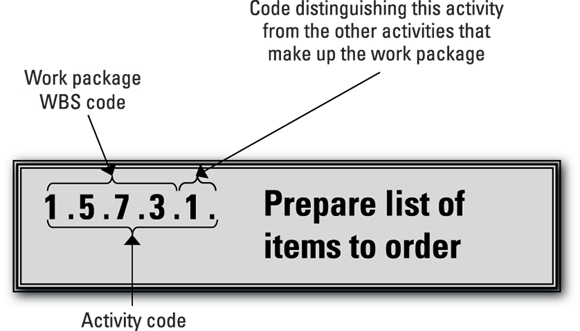
FIGURE 4-6: The components of an activity code.
Displaying your WBS in different formats
You can display your WBS in several different formats. This section looks at three of the most common ones.
The organization-chart format
Figure 4-7 shows a WBS in the organization-chart format (also referred to as a hierarchy diagram or a graphical view). This format effectively portrays an overview of your project and the hierarchical relationships of different WBS components at the highest levels. However, because this format generally requires a lot of space, it’s less effective for displaying large WBSs.

FIGURE 4-7: Your WBS in the organization-chart format.
The indented-outline format
The indented-outline format in Figure 4-8 is another way to display your WBS. This format allows you to read and understand a complex WBS with many components. However, you can easily get lost in the details of a large project with this format and forget how the pieces all fit together.
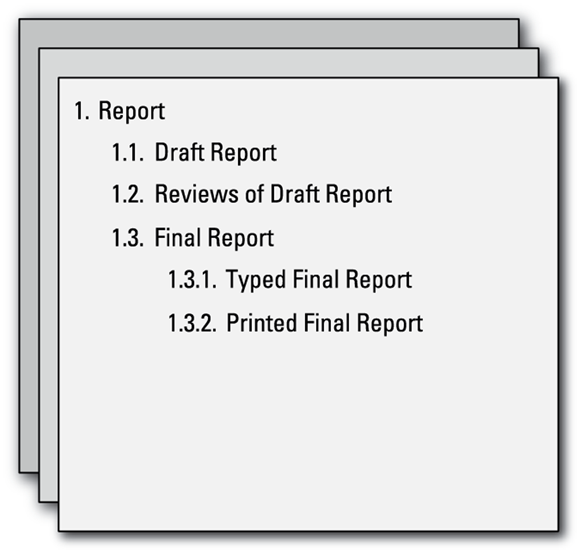
FIGURE 4-8: Your WBS in the indented-outline format.
Both the organization-chart format and the indented-outline format can be helpful for displaying the WBS for a small project. For a large project, however, consider using a combination of the organization-chart and the indented-outline formats to explain your WBS. You can display the Level 1 and Level 2 components in the organization-chart format and portray the detailed breakout for each Level 2 component in the indented-outline format.
The bubble-chart format
The bubble-chart format in Figure 4-9 is particularly effective for displaying the results of the brainstorming approach to develop your WBS for both small and large projects (see the earlier section “The brainstorming approach”). You interpret the bubble-chart format as follows:
- The bubble in the center represents your entire project (in this case, Report).
- Lines from the center bubble lead to Level 2 breakouts (in this case, Draft Report, Reviews of Draft, and Final Report).
- Lines from each Level 2 component lead to Level 3 components related to the Level 2 component. (In this case, the Level 2 component Final Report consists of the two Level 3 components Typed Final Report and Printed Final Report.)
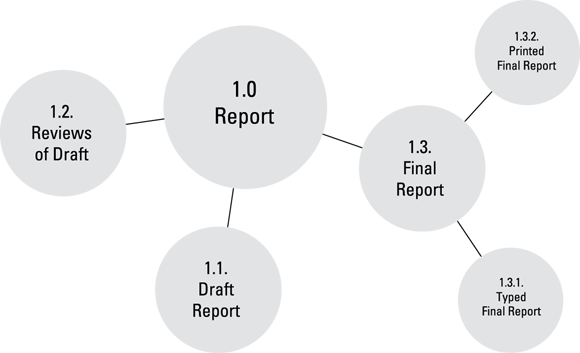
FIGURE 4-9: Your WBS in the bubble-chart format.
The freeform nature of the bubble-chart format allows you to easily record thoughts generated during a brainstorming session. You can also easily rearrange components as you proceed with your analysis.
The bubble-chart format isn’t effective for displaying your WBS to audiences who aren’t familiar with your project. Use this format to develop your WBS with your team, but transpose it into an organization-chart or indented-outline format when you present it to people outside your team.
Improving the quality of your WBS
You increase the chances for project success when your WBS is accurate and complete and when people who will be performing the work understand and agree with it. The following guidelines suggest some ways to improve your WBS’s accuracy and acceptance:
- Involve the people who’ll be doing the work. When possible, involve them during the initial development of the WBS. If they join the project after the initial planning, have them review and critique the WBS before they begin work.
- Review and include information from WBSs from similar projects. Review plans and consult people who’ve worked on projects similar to yours that were successful. Incorporate your findings into your WBS.
- Keep your WBS current. When you add, delete, or change WBS elements during your project, be sure to reflect these changes in your WBS. (See the “Documenting Your Planned Project Work” section, later in this chapter, for more about sharing the updated WBS with the team.)
- Make assumptions regarding uncertain activities. If you’re not sure whether you’ll do a particular activity, make an assumption and prepare your WBS based on that assumption. Be sure to document that assumption. If your assumption proves to be wrong during the project, change your plan to reflect the true situation. (See the earlier sections “Making assumptions to clarify planned work” and “Representing conditionally repeating work” for more about assumptions.)
-
Remember that your WBS identifies only your project’s deliverables; it doesn’t depict their chronological order. Nothing is wrong with listing deliverables from left to right or top to bottom in the approximate order that you’ll create them. In complex projects, however, you may have difficulty showing detailed interrelationships among intermediate and final deliverables in the WBS format. The purpose of the WBS is to ensure that you identify all project deliverables.
Using templates
A WBS template is an existing WBS that contains deliverables typical for a particular type of project. This template reflects people’s cumulative experience from performing many similar projects. As people perform more projects, they add deliverables to the template that were overlooked and remove deliverables that weren’t needed. Using templates can save you time and improve your accuracy.
Don’t inhibit people’s active involvement in the development of the WBS by using a template that’s too polished. Lack of people’s involvement can lead to missed activities and lack of commitment to project success.
This section looks at how you can develop a WBS template and improve its accuracy and completeness.
Drawing on previous experience
By drawing on previous experience, you can prepare your WBS in less time than it takes to develop a new WBS and be more confident that you’ve included all essential pieces of work.
Suppose you prepare your department’s quarterly budget. After doing a number of these budgets, you know most of the work you have to perform. Each time you finish another budget, you revise your WBS template to include new information you gleaned from the recently completed project.
The next time you start to plan a quarterly budget, begin with the WBS template you’ve developed from your past projects. Then add and subtract elements as appropriate for this particular budget preparation.
Improving your WBS templates
The more accurate and complete your WBS templates are, the more time they can save on future projects. This section offers several suggestions for continually improving the quality of your WBS templates.
When using templates, keep in mind the following guidelines:
- Develop templates for frequently performed tasks as well as for entire projects. Templates for the annual organization blood drive or the submission of a newly developed drug to the Food and Drug Administration are valuable. So are templates for individual tasks that are part of these projects, such as awarding a competitive contract or having a document printed. You can always incorporate templates for individual pieces of work into a larger WBS for an entire project.
- Develop and modify your WBS template from previous projects that worked, not from initial plans that looked good. Often you develop a detailed WBS at the start of your project, but you may forget to add intermediate or final deliverables that you overlooked in your initial planning. If you update your template from a WBS that you prepared at the start of your project, it won’t reflect what you discovered during the performance of the project.
- Use templates as starting points, not ending points. Clarify to your team members and others involved in the project that the template is only the start for your WBS, not the final version. Every project differs in some ways from similar ones performed in the past. If you don’t critically examine the template, you may miss work that wasn’t done in previous projects but that needs to be done in this one.
- Continually update your templates to reflect your experiences from different projects. The post-project evaluation is a great opportunity to review and critique your original WBS. At the end of your project, take a moment to revise your WBS template to reflect what you found.
Identifying Risks While Detailing Your Work
In addition to helping you identify work you need to complete, a WBS helps you identify unknowns that may cause problems when you attempt to perform that work. As you think through the work you have to do to complete your project, you often identify considerations that may affect how or whether you can perform particular project activities. Sometimes you have the information you need to assess and address a consideration and sometimes you don’t. Identifying and dealing effectively with information you need but don’t have can dramatically increase your chances for project success.
Unknown information falls into one of two categories:
- Known unknown: Information you know you need that someone else has
- Unknown unknown: Information you know you need that neither you nor anyone else has because it doesn’t exist yet
You deal with known unknowns by finding out who has the information you need and then getting it. You deal with unknown unknowns by using one or more of the following strategies:
- Buying insurance to minimize damage that occurs if something doesn’t turn out the way you expected
- Developing contingency plans to follow if something doesn’t turn out the way you expected
- Trying to influence what the information eventually turns out to be
In the project Conducting a survey discussed in the “Conducting a survey using a WBS” sidebar, presented previously in this chapter, you figure you’ll need a week to select a sample of clients to survey if the sales department has a current customer relationship manager (CRM) program listing all the company’s clients. At this point, whether the listing exists is a known unknown — it’s unknown to you, but if it exists, someone else knows about it. You deal with this unknown by calling people to find someone who knows whether such a listing does or doesn’t exist.
You experience a different situation when you become aware that the person who managed the CRM program has left the job. As part of your Conducting a survey project, you need to have the new person work with the list and you’re concerned that he doesn’t know that it’s part of his job.
Whether or not the operator knows it’s his job is an unknown unknown when you prepare the WBS for your project plan. You can’t determine beforehand that the first person would leave the company and the new one wouldn’t be properly trained because it’s an unintended, unplanned act (at least you hope so).
Because you can’t find out for certain whether or not this occurrence will happen, you consider taking one or more of the following approaches to address this risk:
- Develop a contingency plan. For example, in addition to developing a scheme for the computerized selection of names directly from the original database, have the statistician who guides the selection of the sample develop a scheme for selecting names randomly by hand from the database.
- Take steps to reduce the likelihood that only one person knows what is going on with the CRM. For example, check with the department head to see whether another employees can be trained to run the CRM program.
Of course, if you feel the chance that only one operator will know how to run the program is sufficiently small, you can always choose to do nothing beforehand and just deal with the situation if and when it actually occurs.
Developing the WBS helps you identify a situation that may compromise your project’s success. You then must decide how to deal with that situation.
Documenting Your Planned Project Work
After preparing your project WBS, take some time to gather essential information about all your work packages (lowest-level WBS components), and keep it in the WBS dictionary that’s available to all project team members. You and your team will use this information to develop the remaining parts of your plan, as well as to support the tracking, controlling, and replanning of activities during the project. The project manager (or her designee) should approve all changes to information in this dictionary.
The WBS dictionary can contain but isn’t limited to the following information for all WBS components:
- WBS component title and WBS identification code: Descriptors that uniquely identify the WBS component
- Activities included: List of all the activities that must be performed to create the deliverable identified in the work package
- Work detail: Narrative description of work processes and procedures
- Schedule milestones: Significant events in the component’s schedule
- Quality requirements: Desired characteristics of the deliverables produced in the WBS component
- Acceptance criteria: Criteria that must be met before project deliverables are accepted
- Required resources: People, funds, equipment, facilities, raw materials, information, and so on that these activities need
For larger projects, you maintain the entire WBS — including all its components from Level 1 down to and including the work packages —in the same hierarchical representation, and you keep all the activities that make up the work packages in an activity list or in the WBS dictionary or in both. Separating the WBS components in this way helps you more easily see and understand the important interrelationships and aspects of the project deliverables and work.
On smaller projects, however, you may combine the deliverable-oriented WBS components and the activities in each work package in the same hierarchical display.