
Chapter 5
Finding Employees
IN THIS CHAPTER
![]() Posting a job listing
Posting a job listing
![]() Screening any potential applicants using LinkedIn
Screening any potential applicants using LinkedIn
![]() Finding active or passive job seekers
Finding active or passive job seekers
When you have a handle on the key elements of improving your LinkedIn profile and experience, it’s time to look outward toward the LinkedIn network and talk about some of the benefits you can reap from a professional network of tens of millions of people.
Whether you’re an entrepreneur looking for your first employee, a growing start-up needing to add a knowledgeable staffer, or a part of a Fortune 500 company filling a recent opening, LinkedIn can provide a rich and powerful pool of potential applicants and job candidates, including the perfectly skilled person who isn’t even looking for a job!
When it comes to looking for an employee, one of the benefits of LinkedIn is that you aren’t limited to an applicant’s one- or two-page resume and cover letter. Instead, you get the full picture of the applicant’s professional history, coupled with recommendations and his or her knowledge and willingness to share information. Even if you find your candidate outside LinkedIn, you can use the site to perform reference checks and get more information about the person. This information can augment what you learn from the candidate during the hiring process and from the references he or she provides. LinkedIn cannot replace your hiring process, but it can help you along the way.
In this chapter, we cover the basics of using LinkedIn to find an employee for your company or start-up. We begin with the basics of how you can post your job listing on LinkedIn and review applicants. We then move on to using LinkedIn to screen potential candidates, and finish the chapter with search strategies you should employ to find the right person.
Managing Your Job Listings
LinkedIn offers a Talent Solutions page for companies to manage their job listings. Click the Work icon on the top navigation bar on the home page, and select Talent Solutions from the drop-down list that appears. The Talent Solutions home page appears, as shown in Figure 5-1. This is where you can start the process of creating a job listing, reviewing the applicants you get, and paying LinkedIn to post the listing. You can also post a job without using Talent Solutions, but if you’re managing a company account that will need more than the occasional job posting, you may want to investigate Talent Solutions further.

FIGURE 5-1: LinkedIn offers a Talent Solutions page for managing your job listings.
You set the cost for each job listing with a daily budget, and are charged only when potential job candidates click your job listing. You can cancel the job listing at any time, so you don’t have to run the listing for a long time if you get enough candidates quickly. You can pay for your job listing with PayPal or a major credit card such as Visa, MasterCard, American Express, or Discover.
 If you know you’re going to need multiple or ongoing job postings on LinkedIn, consider LinkedIn Recruiter to get discounts on job postings and InMail. You can get more information by completing a request for a demo at
 https://business.linkedin.com/talent-solutions/recruiter.
You can choose to renew your listing at the end of the 30-day window. Your date posted (the date you set up the job listing) is updated with the renewal date instead of the original posting date, so the listing appears at the top of search results. Renewing a job listing costs the same as the initial job posting.
 You can advertise only one open position per job listing. If you solicit applications for more than one position in a single job listing, LinkedIn will remove your listing.
Posting a job listing
To post your job opening, follow these steps:
-
Click the Work icon on the top navigation bar, and select Post a Job from the drop-down list that appears.
The screen shown in Figure 5-2 should appear, although some users will need to set the company, location, and job title first before tackling the other details.
-
Using the text boxes and lists provided, enter the required information about your company and the job you’re offering.
LinkedIn asks for your company name, the job title, and the job location. As you fill in those fields, LinkedIn will try to fill in options for skills under the Job Function box and the industry your company represents. You should also add job function skills and industries that pertain to your job posting, as well as the employment type and seniority level.
Next, compose your job description in the text box provided (refer to Figure 5-2) or copy the description from another source and paste it into the box. If you paste the text, make sure the formatting (spacing, bullet points, font size, and so on) is correct.
-
Scroll down and fill in the Choose How You Want People to Apply section, as shown in Figure 5-3.
You can receive applications at one of the email addresses you have listed in your profile or at another email address. Or supply a direct URL for applicants to use.
-
Click the Continue button to proceed to the budget phase.
LinkedIn analyzes your job listing, provides a suggested budget you can spend per day to keep your listing active, and predicts the number of applications you’ll receive in 30 days based on your budget.
- Enter the daily budget for the job listing you just created, as shown in Figure 5-4.
-
Click the Continue button to proceed.
After LinkedIn has gathered your daily budget limit, it needs your billing information, as shown in Figure 5-5.
-
Review your order, provide payment information, and click the blue Post Job button.
Look over the details of your order, and then scroll down and make sure you have a major credit card or a PayPal account on file to pay for the job listing.
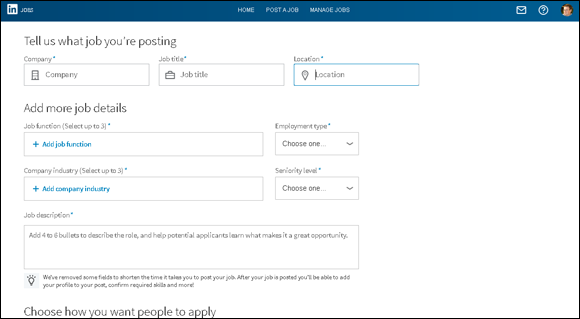
FIGURE 5-2: Start composing your job posting here.
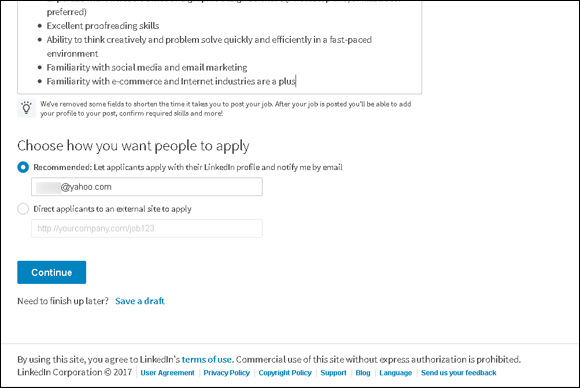
FIGURE 5-3: Enter candidate routing information here.
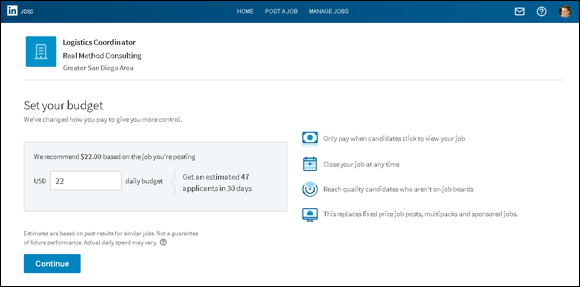
FIGURE 5-4: Decide on the daily PPC budget you want to set.
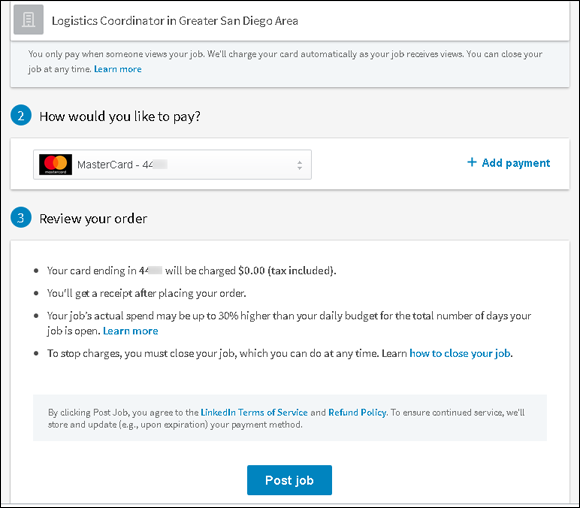
FIGURE 5-5: Confirm the details for your job listing.
That’s it! You have completed the all-important first step: posting your job listing. You receive a job posting confirmation, as shown in Figure 5-6. The listing is available by clicking the Jobs link (in the top navigation bar) and looking in the Your Jobs box along the right side of your Jobs home page.
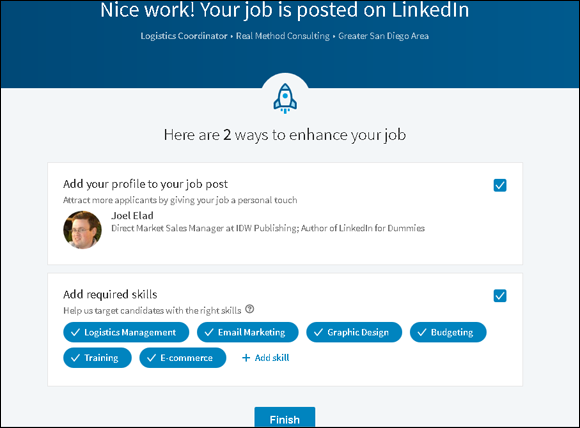
FIGURE 5-6: Make some final touches on your LinkedIn job listing.
You have two options for improving your job posting right after creating the post. You can decide whether you want your profile summary to appear with the job listing by leaving the appropriate check box selected (refer to Figure 5-6), and you can add required skills to the job listing by clicking the Add Skill link and adding the particular skills you want in your applicants. Click the blue Finish button to complete your choices.
Advertising your job listing to your network
Traditionally, when someone posted a job opening on the Internet using one of those ubiquitous job search sites, that person would hope the extensive pool of job seekers would find the posting and the appropriate parties would submit resumes and cover letters. When you use LinkedIn to fill a job, however, you still benefit from the pool of job seekers who search LinkedIn’s Jobs page, but you have a distinct advantage: your own network. You’re connected to people you know and trust, people you have worked with before so you know their capabilities, and most importantly, people who know you and (you hope) have a better idea than the average person as to what kind of person you would hire.
LinkedIn enables you to share your job listing using social networking sites Facebook and Twitter, and you can also send all or some of the people in your network a message, letting them know about your job opening and asking them if they, or anyone they know, might be interested in the job. When you’re ready to advertise your job listing, follow these steps:
-
Click the Me icon (your profile photo), on the top navigation bar, and select Job Postings (under the Manage header) from the drop-down list that appears.
After you’ve posted your job, the position is listed in the Jobs window, which automatically loads any active job postings.
-
Click the three dots to the right of the job listing, and then click Share Job from the drop-down list that appears (see Figure 5-7).
Next, you’ll select one or more networks in turn for sharing the job listing.
- To share the job listing on LinkedIn:
- Click the LinkedIn icon. A Share box appears that you can send to your LinkedIn network in a variety of ways (see Figure 5-8).
- To generate an automatic network update, leave the Share an Update check box selected.
- To change the privacy settings for this update, select whom you want to share with by using the appropriate drop-down box to select an audience.
- To send the listing to individual connections:
- Select the Send to Individuals check box.
- Start typing name of a first-degree connection in the To box.
- When the name you want appears in the list below the To box, click the name, which then moves to the To box.
-
Continue to type additional names, up to a recommended maximum of ten people.
When you’re sending the listing to individual connections, feel free to edit the text in the message box to make it sound as if it’s coming from you, or leave the default message in place.
-
Look over the text in the window again, making sure you have the right people selected, and then click the Share button (see Figure 5-9).
Your LinkedIn connections will receive a message in their LinkedIn inboxes and, depending on their notification settings, an email with this message as well. They can click a link from the message to see the job listing and either apply themselves or forward it to their contacts for consideration.
- To generate a message for Twitter or Facebook:
- Click the Twitter or Facebook icon.
- Enter your login information for the network. A window appears that interfaces directly with Twitter or Facebook.
- Draft an update or a tweet and click to send it directly to your network.
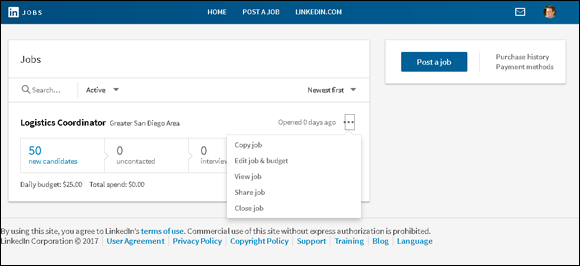
FIGURE 5-7: See key information about your new job listing.
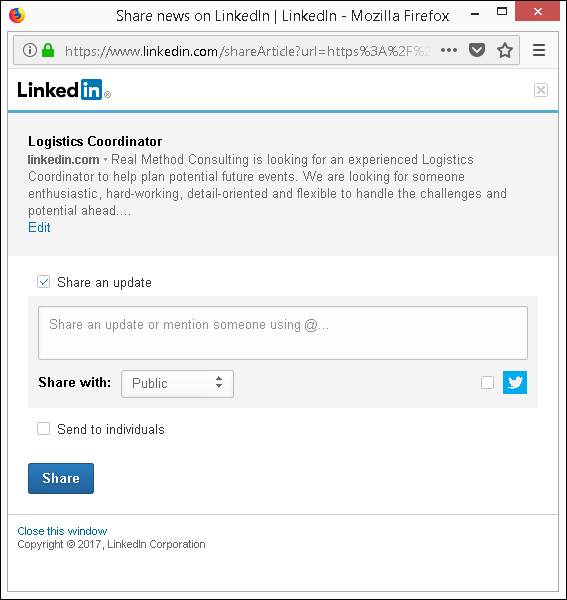
FIGURE 5-8: LinkedIn lets you ask your network for help.
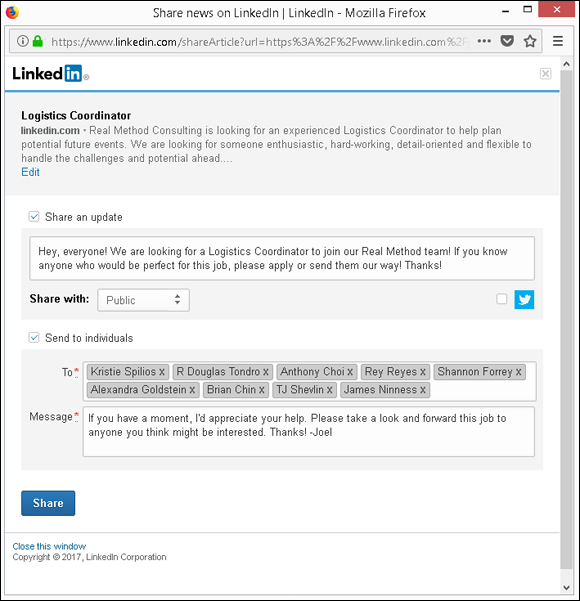
FIGURE 5-9: Proofread your message and then send it!
Reviewing applicants
After you’ve posted your job listing on LinkedIn, you should expect to get some applicants for the position. Every time someone applies for that job, you receive an email from LinkedIn notifying you of the application. In addition, LinkedIn records the application in the Applicants number of the Active Jobs window. (Refer to Figure 5-7.)
When you’re ready to review the applicants for your job, follow these steps:
-
Click the Me icon, and then select Job Postings (under the Manage header) from the drop-down list that appears.
You should be taken to the Active Jobs screen, as shown in Figure 5-7 in the previous section. Click the job title of the job listing you want to review, which brings you to the Overview screen, as shown in Figure 5-10.
-
Click an applicant’s name to see his LinkedIn profile and read up on his experience.
 You should review all the potential applicants first, labeling them Good Fit or Not a Fit (see the next step), before moving onto the next phase, where you start contacting and interviewing potential matches.
 - Click the check box to the right of an applicant’s name, to display the options shown at the top of Figure 5-11, and then take one or more of the following actions:
- Not a Fit: Label the person as Not a Fit. The applicant’s name will be archived.
- Good Fit: Label the applicant as a Good Fit. The person’s name will be moved from the Review Applicants screen to the Manage Candidates screen.
- Contact: Send the applicant a message.
- Share Profile: Share the person’s application with other people, such as other members of a hiring committee.
- Add Note: Add your own notes about a particular applicant, which can be seen only by you.
- More: Display a menu to Save to PDF (the person’s LinkedIn profile, that is) or Download Resume, if at least one person attached a resume to his or her job application.
-
To automatically send a potential candidate a message that you’re interested, click the Interested button.
The candidate will be moved to the Manage Candidates screen.
Be careful about clicking the Interested button, because the message is sent to the potential candidate automatically and you can’t customize the message. -
To archive the person’s name and remove that individual from active consideration, click the Not Interested button.
This has the same effect of clicking the Not a Fit button for that person.
-
After you’ve reviewed the potential applicants, scroll to the top of the screen and click the Manage Candidates header.
The Manage Candidates screen appears, as shown in Figure 5-12, where you can keep track of which applicants you have contacted with messages, conducted phone screens, and conducted in-person interviews.
In addition, the following buttons appear (some of which are the same as the ones in the review applicants phase; refer to Step 3):
-
Move To: Assign the candidate’s name to the different phases in the applicant timeline, such as Contacted, Replied, Phone Screen, Interview, Offer, or Hire.
You can access the Move To functions also by clicking the Move To button at the bottom right of the candidate’s information. - Contact: Send the candidate a message.
- Share Profile: Share the candidate’s profile with other people.
- Add a Note: Include a note next to the candidate’s name.
- Archive: Archive the applicant’s information; it will no longer be visible on your Manage Candidates screen.
- More: Display a menu to Save to PDF (the person’s LinkedIn profile, that is) or Download Resume, if at least one person attached a resume to his or her job application.
-
-
Click the name of an applicant.
The person’s profile appears so you can review his or her qualifications further.
-
If you think the applicant is worth pursuing, contact the person to set up the next part of your application process.
You can contact the person by clicking the Message button on his or her profile page, or by clicking the Contact button or the Message button on the Manage Candidates page (refer to Step 6). The screen shown in Figure 5-13 appears, with a preprogrammed message that you can edit or replace.
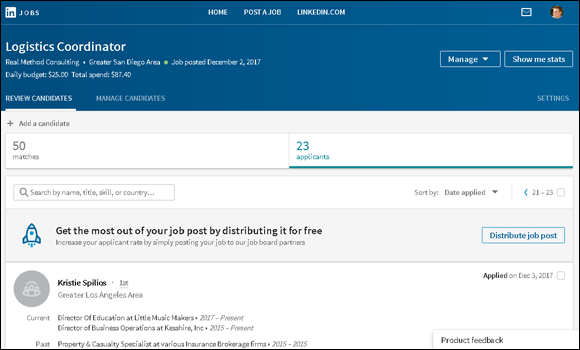
FIGURE 5-10: Review your open job listings to see who has applied.
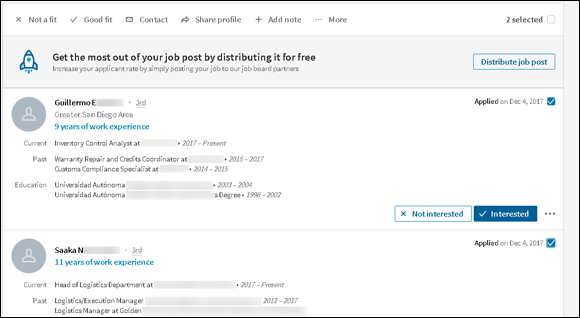
FIGURE 5-11: Go through the applicants to decide on good fits for your company.
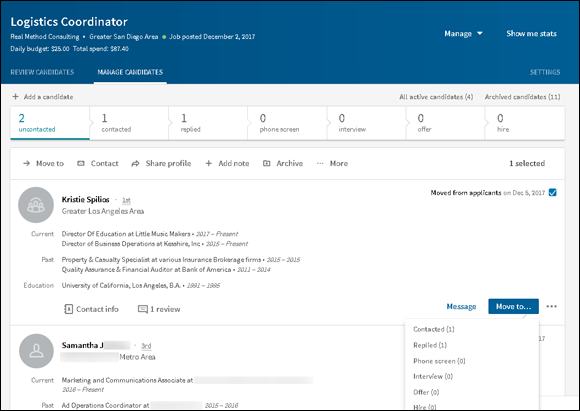
FIGURE 5-12: Review potential applicants whom you want to interview.
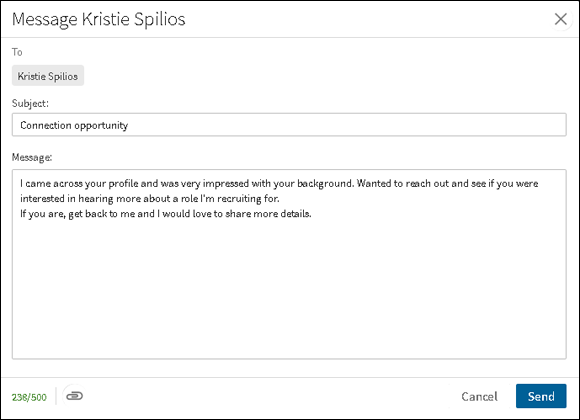
FIGURE 5-13: Send a potential applicant a message.
Screening Candidates with LinkedIn
After you use LinkedIn to post a job request, you can continue to use LinkedIn to assist you in the screening part of your hiring process. In addition to asking for references from the applicant or possibly ordering a background check from an independent background check agency, you can use LinkedIn to verify information in your applicant’s resume and application at any stage of the process, without paying a dime!
Here are some strategies to keep in mind:
- Start by thoroughly reviewing the applicant’s profile. When you review an applicant’s profile, compare it with her resume, cover letter, and application. Is she consistent in how she presents her experience?
- Read through the applicant’s recommendations and follow up. If your candidate has received recommendations, go through them, noting the date the recommendation was written, and see whether any are applicable toward your open position. Pay particular attention to recommendations from former bosses or co-workers. If necessary, ask your candidate whether you can contact the recommender through InMail and use that person as a reference.
- See whether you’re connected to your candidate. When you pull up your candidate’s profile, you see whether she is a second- or third-degree network member, which would mean one or two people connect you with the candidate. If so, contact that person (or ask for an introduction to reach the correct party) and ask for more information about the candidate. Chances are good that you’ll get a more honest assessment from someone you know rather than the recommendations provided by the candidate. Understand, however, that although the two people may be connected, they may not know each other that well, or their connection may be outside the professional expertise you’re looking to learn about from this job candidate.
-
Evaluate the candidate’s total picture. If your candidate mentions any websites, blogs, or other online presence in her profile, look at the listed interests and group affiliations and see whether they add to (or detract from) your picture of the job candidate.
Because most LinkedIn users have already defined each position they’ve held, the companies where they’ve worked, and the years of employment, you can get a sense of their abilities, what they’ve handled in the past, and depending on the completeness of their profile, examples of their past accomplishments.
As helpful as LinkedIn can be when reviewing a candidate, don’t be afraid to use other Internet websites and searches to gain a well-rounded view of the candidate in question.
Using Strategies to Find Active or Passive Job Seekers
One of the powers of LinkedIn is its ability to find not only the active job seeker but also the passive job seeker or someone who doesn’t even realize he or she wants a new job! You can tap an extensive network of professionals who have already identified their past experiences, skill sets, interests, educational backgrounds, and group affiliations.
The best piece of advice for this type of search comes from Harvey Mackay and the book he wrote back in 1999, Dig Your Well Before You’re Thirsty (Currency Books): You should be building a healthy network and keeping your eye on potential candidates before you have a job opening to fill. The earlier you start, and the more consistent you are with the time you spend weekly or monthly expanding your network, the easier it is to identify and then recruit a potential candidate to fill your opening.
You should take specific steps to make your strategy a reality. Whether you start this process in advance or just need to fill a position as soon as possible, here are some tactics to consider:
- Perform detailed advanced searches. If you want the perfect candidate, search for that candidate. Put multiple keywords in the Advanced Search form, look for a big skill set, narrow your search to a specific industry, and maybe even limit your range to people who already live close to you. If you come up with zero results, remove the least necessary keyword and repeat the search. Keep doing that until you come up with potential candidates.
- Focus on your industry. If you know that you’re probably going to need software developers, start getting to know potential candidates on the LinkedIn site and stay in touch with them. Look for people to connect with, whether or not they share a group affiliation with you, and actively network with these people. Even if they say no to a future job opportunity, chances are good that someone in their networks will be more responsive than the average connection.
- Start some conversations in the Groups section. After you’ve found some LinkedIn groups full of like-minded or interesting professionals, start exchanging information! Pose a question or start a group discussion that you would ask in an interview to potential candidates, and see who responds. Better yet, you’ll see how the people respond and be able to decide from their answers whom to focus on for a follow-up. You can then review their public profiles and send them a message.