
Chapter 3
Growing Your Network
IN THIS CHAPTER
![]() Discovering the keys to a meaningful network
Discovering the keys to a meaningful network
![]() Using the best strategies for expanding your network
Using the best strategies for expanding your network
![]() Sending connection requests
Sending connection requests
![]() Weeding out connections
Weeding out connections
![]() Dealing with invitations
Dealing with invitations
Maybe by now, you’ve signed on to LinkedIn, created your profile, searched through the network, and started inviting people to connect to you — and you’re wondering, what’s next? You certainly shouldn’t be sitting around on your hands, waiting for responses to your invitations. LinkedIn is designed to open doors to opportunities using the professional relationships you already have (and, with luck, by creating new ones). The best use of it, therefore, is to capture as much of your professional network as possible in the form of first-degree connections to your LinkedIn network so that you can discover inside leads as well as friends of friends who can help you.
In this chapter, we discuss how you can grow your LinkedIn network and offer guidelines to keep in mind when growing your network. We also cover various search tools for you to use to stay on top of LinkedIn’s growing membership and how others may relate to you.
To expand your network, you need to know how to send invitations as well as how to attract LinkedIn members and contacts who haven’t yet taken the plunge into LinkedIn membership. All that is covered here, too. And finally, this chapter helps you deal with the etiquette of accepting or declining invitations that you receive, and shows you how to remove connections that you no longer want to keep in your network.
 An invitation is when you invite a colleague or a friend to join LinkedIn and stay connected to you as part of your network. An introduction is when you ask a first-degree connection to introduce you to one of his or her connections so you can get to know that person better.
Building a Meaningful Network
When you build a house, you start with a set of blueprints. When you start an organization, you usually have some sort of mission statement or guiding principles. Likewise, when you begin to build your LinkedIn network, you should keep in mind some of the keys to having and growing a professional network. These guiding principles help you decide whom to invite to your network, whom to search for and introduce yourself to, and how much time to spend on LinkedIn.
LinkedIn is different from the Facebook and Twitter sites because it focuses on business networking in a professional manner rather than encouraging users to post pictures of their latest beach party or tweet their latest status update. The best use of LinkedIn involves maintaining a professional network of connections, not sending someone an event invitation or a game request.
That said, you’ll find variety in the types of networks that people maintain on LinkedIn. Much of that has to do with each person’s definition of a meaningful network:
-
Quality versus quantity: As mentioned in Book 5, Chapter 1, some people use LinkedIn with the goal of gaining the highest number of connections possible, thereby emphasizing quantity over quality. Those people are typically referred to as LinkedIn open networkers (LIONs). At the other end of the spectrum are people who use LinkedIn only to keep together their closest, most tightly knit connections without striving to enlarge their network. Most people fall somewhere in between these two aims.
The question of whether you’re after quality or quantity is something to keep in mind every time you think of inviting someone to join your network. LinkedIn strongly recommends connecting only with people you know, so its advice is to stick to quality connections. Here are some questions to ask yourself to help you figure out your purpose:
- Do you want to manage a network of only people you personally know?
- Do you want to manage a network of people you know or who might help you find new opportunities in a specific industry?
- Do you want to promote your business or expand your professional opportunities?
- Do you want to maximize your chances of being able to reach someone with a new opportunity or job offering, regardless of personal interaction?
-
Depth versus breadth: Some people want to focus on building a network of only the most relevant or new connections — people from their current job or industry who could play a role in their professional development in that industry. Other people like to include a diversity of connections that include anyone they have ever professionally interacted with, whether through work, education, or any kind of group or association, in hopes that anyone who knows them at all can potentially lead to future opportunities. For these LinkedIn users, it doesn’t matter that most of the people in their network don’t know 99 percent of their other connections. Most people fall somewhere in between these two poles but lean toward including more people in their network.
Here are some questions to keep in mind regarding whether you want to focus on depth or breadth in your network:
- Do you want to build or maintain a specific in-depth network of thought leaders regarding one topic, job, or industry?
- Do you want to build a broad network of connections who can help you with different aspects of your career or professional life?
- Do you want to add only people who may offer an immediate benefit to some aspect of your professional life?
- Do you want to add a professional contact now and figure out later how that person might fit with your long-term goals?
-
Strong versus weak link: We’re not referring to the game show The Weakest Link, but rather to the strength of your connection with someone. Beyond the issue of quality versus quantity, you’ll want to keep differing levels of quality in mind. Some people invite someone after meeting him once at a cocktail party, hoping to strengthen the link as time goes on. Others work to create strong links first and then invite those people to connect on LinkedIn afterward.
This issue comes down to how much you want LinkedIn itself to play a role in your business network’s development. Do you see your LinkedIn network as a work in progress or as a virtual room in which to gather only your closest allies? Here are some questions to keep in mind:
- What level of interaction needs to have occurred for you to feel comfortable asking someone to connect with you on LinkedIn? A face-to-face meeting? Phone conversations only? A stream of emails?
- What length of time do you need to know someone before you feel that you can connect with that person? Or, does time matter less if you have had a high-quality interaction just once?
- Does membership in a specific group or association count as a good enough reference for you to add someone to your network? (For example, say you met someone briefly only once, but she is a school alum: Does that tie serve as a sufficient reference?)
-
Specific versus general goals: Some people like to maintain a strong network of people mainly to talk about work and job-related issues. Other people like to discuss all matters relating to their network, whether it’s professional, personal, or social. Most people fall somewhere in between, and herein lies what we mean by the “purpose” of your network. Do you want to simply catalog your entire network, regardless of industry, because LinkedIn will act as your complete contact management system and because you can use LinkedIn to reach different parts of your network at varying times? Or do you want to focus your LinkedIn network on a specific goal, using your profile to attract and retain the right kind of contact that furthers that goal?
Here are some more questions to ask yourself:
- Do you have any requirements in mind for someone before you add him to your network? That is, are you looking to invite only people with certain qualities or experience?
- Does the way you know or met someone influence your decision to connect to that person on LinkedIn?
- What information do you need to know about someone before you want to add him to your network?
By the way, this isn’t a quiz — there is no one right answer to any of these questions. You decide what you want to accomplish through your network, and how you want to go from there. Also remember that although you might start LinkedIn with one goal in mind, your usage and experience might shift you to a different way of using the site. If that happens, just go with it, as long as it fits with your current goals.
After you establish why you want to link to other people, you can start looking for and reaching out to those people. In the next section, we point you to a number of linking strategies that can help you reach your goals for your network. When you start on LinkedIn, completing your profile helps you get your first round of connections, and you’re prompted to enter whatever names you can remember to offer an invitation for them to connect with you. Now you’re ready to generate your next round of connections, and to get into the habit of making this a continual process as you use the site.
Importing Contacts into LinkedIn
One of the most popular (and necessary) activities people use the Internet for is email. Your email account contains a record of the email addresses of everyone you regularly communicate with via email. And from your established base of communications, LinkedIn offers a way for you to ramp up your network by importing a list of contacts from your email program.
Importing your email contacts into LinkedIn eliminates the drudgery of going through your address book and copying addresses into LinkedIn.
Importing a contacts list from your email system
This section shows you how to use the LinkedIn function to import your email contacts into LinkedIn. To do so, follow these steps:
- Click the My Network icon on the top navigation bar to display your network page.
-
Click the More options link below the Your Contact Import Is Ready section on the left side of the screen.
The Sync Contacts screen appears, as shown in Figure 3-1. Your email address on file is already entered in the email address text box in the middle of the screen.
Below your email address is a row of buttons representing Gmail, Yahoo! Mail, Outlook, and AOL, an email message icon (for inputting a list of email addresses manually), and an upload icon (for uploading a file of email addresses).
-
Click Continue to use the prefilled address, replace the email address by typing a new email address and then click Continue, or click one of the buttons to select an email system from which to import your contacts.
The Sign In window appears for your email account, as shown in Figure 3-2.
-
Follow the prompts to connect your email account with LinkedIn.
At the end of the prompts, you’ll be asked to allow LinkedIn to access your email contacts, as shown in Figure 3-3.
-
Click the Allow button.
LinkedIn spends some time accessing the account and checking to see whether any of your contacts are already on LinkedIn. Then the screen shown in Figure 3-4 appears, with a list of people from your email account who have LinkedIn accounts but are not currently connected to you.
-
Choose whom you want to invite to be your LinkedIn connections:
- Add Connections: Add everyone as a connection. Each of them will receive an automated invitation to connect with you. Because you can’t tailor the messages to these people, this option isn’t recommended. You must go to each person’s profile page, and click Connect to send a customized invitation.
- Deselect All: Deselect every check box. You can then go through the list and selectively select the connections you want to add today. You can’t add customized invitation text to these connection requests. Connect from each person’s profile page to customize the invitation text.
- Skip: Skip this screen and move on with the process.
A new screen appears, as shown in Figure 3-5, with the names of people imported from your email account who don’t have a LinkedIn account.
-
Decide whom you want to invite to LinkedIn and add as a first-degree connection.
You see slightly different buttons than in Step 6. Click Add to network to add everyone, click Deselect All and manually choose people you want to invite to LinkedIn and add as a connection, or click the Skip button to move to the next step.
 If you decide to skip Step 6 or 7, you’ll be able to review LinkedIn’s imported list of people at a later date by clicking the email system button, as you did in Step 3.
 -
To sync additional email accounts with LinkedIn, repeat Steps 2 to 7.
In this way, you can look for new contacts whom you can invite to your network. LinkedIn should be able to interface with any email account that can be accessed over the Internet from your computer. Some work email systems may be inaccessible depending on security levels set by your employer.
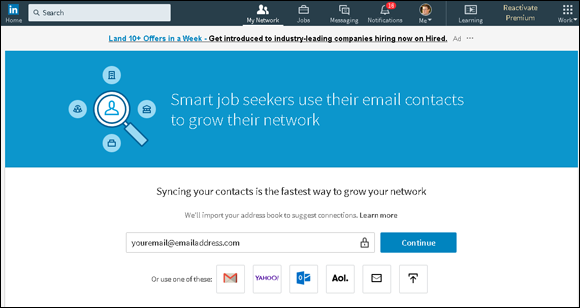
FIGURE 3-1: Sync your email contacts with LinkedIn.
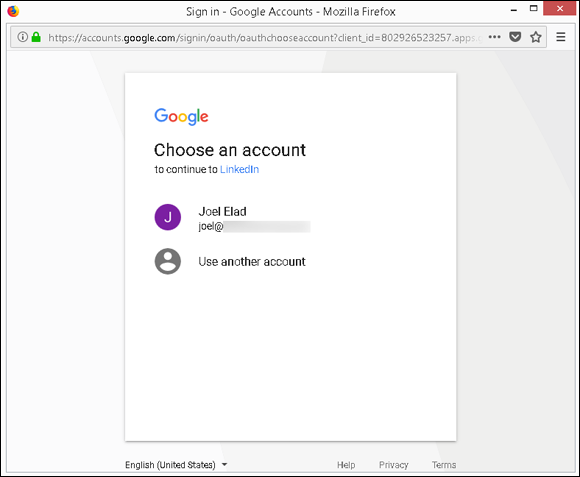
FIGURE 3-2: Select the email address account to sync.
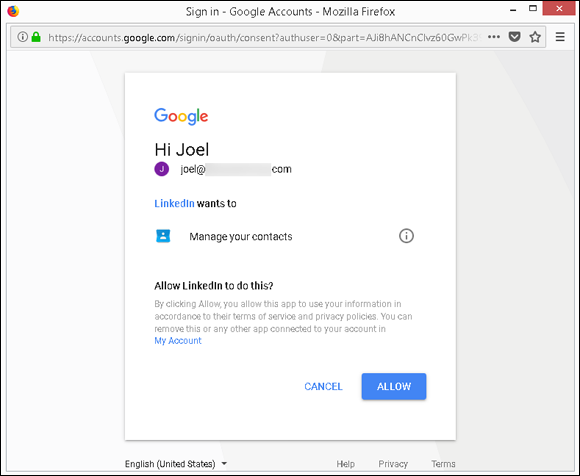
FIGURE 3-3: Let LinkedIn access your email account.
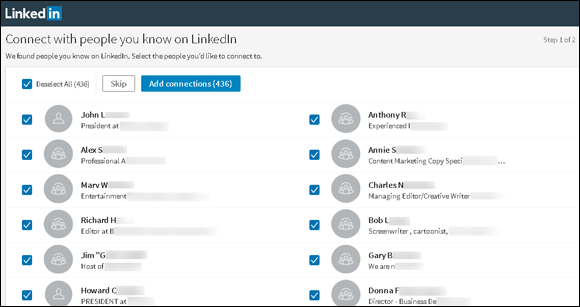
FIGURE 3-4: Choose which LinkedIn contacts from your email whom you want to invite to your network.
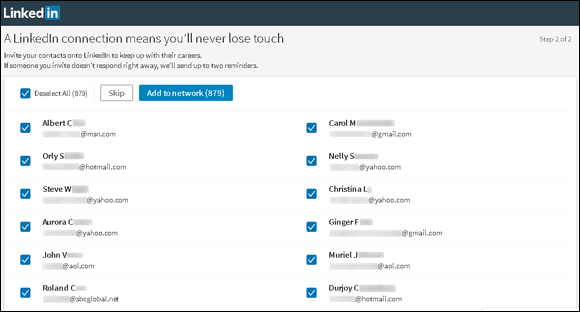
FIGURE 3-5: Choose which email contacts you want to invite to use LinkedIn and join your network.
Checking for members
When you fill out your LinkedIn profile, you create an opportunity to check for colleagues and classmates as well as import potential contacts and invite them to connect with you and stay in touch using LinkedIn. However, that search happens only after you define your profile (and when you update or add to your profile). After that, it’s up to you to routinely check the LinkedIn network to look for new members on the site who might want to connect with you or with whom you might want to connect. Fortunately, LinkedIn provides a few tools that help you quickly scan the system to see whether a recently joined member is a past colleague or a classmate. In addition, it never hurts to use your friends to check for new members, as we discuss in a little bit.
Finding classmates
Through LinkedIn, you can reconnect with former classmates and maintain that tie through your network, no matter where anyone moves. For you to find them to begin with, of course, your former classmates have to properly list their dates of education. And, just as with the search for former colleagues, it’s important to do an occasional search to see which classmates joined LinkedIn.
To search for classmates — and add them to your network, if you want — follow these steps:
-
While logged in to your LinkedIn account, go to
www.linkedin.com/alumni.If you’ve prefilled in at least one educational institution, the Alumni window for your most recent Education entry appears, as shown in Figure 3-6. If the screen is blank, you haven’t yet added any education entries to your profile.
-
Filter the results for a better list.
Click any of the classifications, such as Where They Live or Where They Work, to add filters and get a more precise list. You can also change the years of attendance in the boxes provided to see a different set of candidates, and to search by a specific graduation date.
-
Look over the list of potential classmates and connect with anyone you recognize.
You can always click the name of the classmate to see his or her profile first, or just click the Connect link below the name to send an invitation to connect. If you have any shared connections, you can hover your cursor over the connection symbol and number next to the person’s picture to see what connections you have in common.
Before you invite people, click their name to read their profiles and see what they’ve been doing. Why ask them about their recent accomplishments or activities when you can read it for yourself? By doing your homework first, your invitation will sound more natural and be more likely to be accepted. -
Repeat the process for other schools by clicking the Change University button, as shown in Figure 3-7, and selecting another school from your educational history.
When you select a new school, you see the same screen as shown in Figure 3-6 but for the newly selected school. You can filter those results and invite whomever you recognize.

FIGURE 3-6: The schools you identified in your profile appear in the Alumni window.
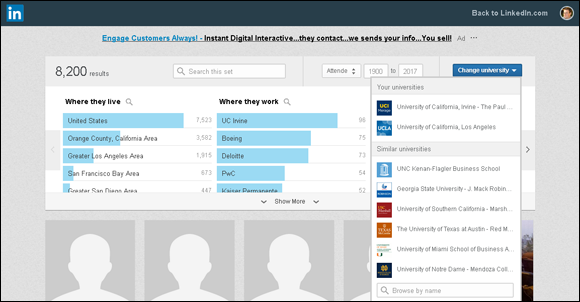
FIGURE 3-7: Check for classmates from other schools you attended.
For more about sending invitations, see the “Sending Connection Requests” section, later in this chapter.
Using the People You May Know feature
One of the most common ways for you to increase your network is by using LinkedIn’s suggestion system that it calls People You May Know. Given all the data that LinkedIn imports and the global network it maintains, it can use people’s profile data, email imports, common experience, education, and LinkedIn activity or other commonalities to predict who may be in the same network with you.
You can access the People You May Know feature in several places. Occasionally, a section of your home page news feed as well as the middle section of your My Network page, as shown in Figure 3-8, are dedicated to this feature.
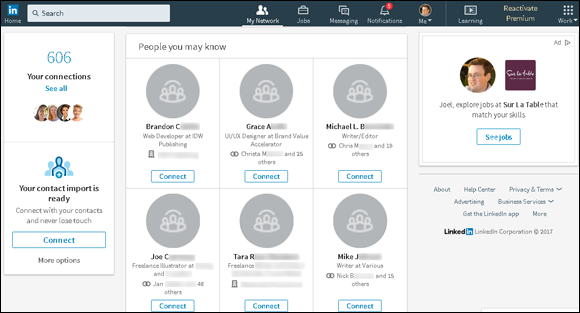
FIGURE 3-8: LinkedIn asks whether you know people to add to your network.
When you click Connect for someone, that spot is updated with a new potential connection for you to consider. As you scroll down, the page is updated with rows of people to whom you can send a connection request.
Here are some things to keep in mind as you review this section:
- Study the connections you have in common. A little symbol and a number at the bottom left corner of someone’s picture indicates that you and this person have shared first-degree connections. You can hover your mouse over that number to see a pop-up window of those connections. LinkedIn will automatically sort people with more shared connections to the top of the page, assuming that if you have a lot of shared connections, perhaps that person belongs in your network.
- Some people have an Invite button. If you see an email address and the Invite button instead of the Connect button, the person is a contact whom you imported to your LinkedIn account who isn’t currently on LinkedIn. If you click the Invite button, LinkedIn will send that person an invitation to join LinkedIn, similar to the invitation you sent as an example in Book 5, Chapter 2.
- Don’t spend a lot of time reviewing your connections. Instead, visit this page every once in a while to see whom you may want to connect with.
-
Visit a person’s profile first before clicking Connect. We can’t stress this enough. When you click Connect from the People You May Know page, LinkedIn sends that person a generic invitation. If you click the person’s name instead and then click Connect, a screen appears where you can write a customized message. (This topic is covered in detail in “Sending Connection Requests,” later in this chapter.)
Browsing your connections’ networks
Although it’s helpful for LinkedIn to help you search the network, sometimes nothing gives as good results as good old-fashioned investigation. From time to time, browse the network of a first-degree connection to see whether he or she has a contact that should be a part of your network. Don’t spend a lot of your time this way, but doing spot check by choosing a few friends at random can yield nice results.
Why is this type of research effective? Lots of reasons, including these:
- You travel in the same circles. If someone is a part of your network, you know that person from a past experience, whether you worked together, learned together, spoke at a conference together, or lived next door to each other. Whatever the experience, you and this contact spent time with other people, so chances are you have shared connections — or, better yet, you’ll find people in that person’s network whom you want to be a part of your network.
-
You might find someone newly connected. Say that you’ve already searched your undergraduate alumni contacts and added as many people as you could find. As time passes, someone new may connect to one of your friends.
One effective way to keep updated about the people whom your connections have recently added is to review your notifications. LinkedIn may create a section of the news feed to show you this information. - You might recognize someone whose name you didn’t fully remember. Many of us have a contact whom we feel we know well, have fun talking to, and consider more than just an acquaintance, but we can’t remember that person’s last name. Then, when you search a common contact’s network and see the temporarily forgotten name and job title, you suddenly remember. Now you can invite that person to join your network. Another common experience is seeing the name and job title of a contact whose last name changed after marriage.
- You might see someone you’ve wanted to get to know better. Have you ever watched a friend talking to someone whom you wanted to add to your network? Maybe your friend already introduced you, so the other person knows your name, but you consider this person a casual acquaintance at best. When you see that person’s name listed in your friend’s network, you can take the opportunity to deepen that connection. Having a friend in common who can recommend you can help smooth the way.
 Looking through your friend’s contacts list can be a cumbersome process if he or she has hundreds of contacts, so allow some time if you choose this technique.
To browse the network of one of your connections, follow these steps:
- Click the My Network icon in the top navigation bar to bring up your network page.
- Under the Your Connections header, click the See All link.
-
Click the name of a first-degree connection.
Alternatively, search for the name by using the Search box on the home page. Then, select the name in the search results list.
When perusing the person’s profile, look for a See All X Connections link in the top-right corner, above the name and the Contact and Personal Info section. If you don’t see this link, you can’t proceed with this process because the person has chosen to make his or her connection list private. If that’s the case, you need to select a different first-degree connection.
-
Click the Connections link of the first-degree connection.
The connection’s connection list appears (see Figure 3-9).
- Look through the list and find someone to whom you’d like to send an invitation. Click the person’s name to display his or her profile, as shown in Figure 3-10.
-
Click the blue Connect button.
LinkedIn prompts you with an option to customize the invitation, as shown in Figure 3-11.
-
To customize the invitation, click in the text box and write a message (up to 300 characters) to describe your connection to this person.
Remind the person you want to connect with exactly how you know him or her. Perhaps you simply have to indicate that you are a colleague, classmate, business partner, or friend, or have another association with this person.
-
Click the blue Send Invitation button.
Presto! You’re finished.
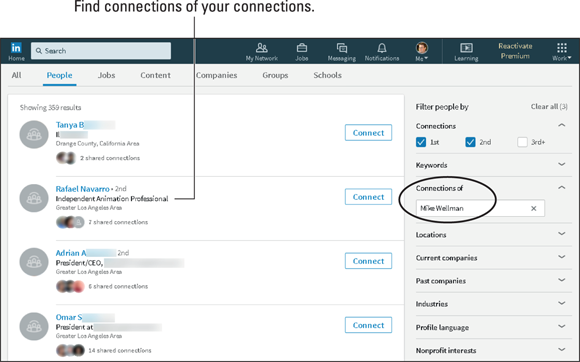
FIGURE 3-9: You can look through your friend’s network.
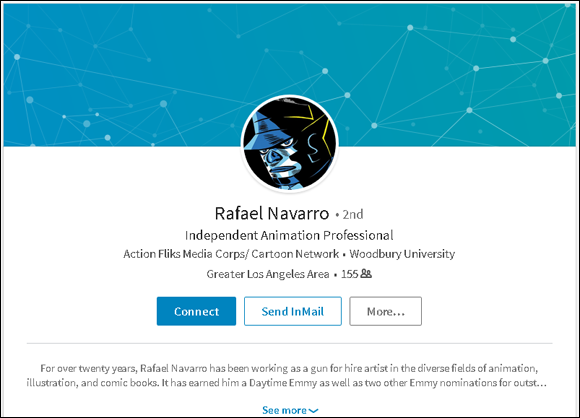
FIGURE 3-10: Pull up the person’s profile to add the person to your network.

FIGURE 3-11: Send a custom invitation to your new contact.
Sending Connection Requests
You can check out previous sections of this chapter to find out how to search the entire user network and find people you want to invite to join your network. In this section, we focus on sending out the invitation, including how to go about inviting people who haven’t yet joined LinkedIn.
Sending requests to existing members
When you’re on a LinkedIn page and spot the name of a member whom you want to invite to your network, follow these steps to send that person a connection request:
-
Click the person’s name to go to his or her profile page.
You might find people to invite by using one of the methods described in “Checking for members,” earlier in this chapter. You might also find them while doing an advanced people search 4. Figure 3-12 shows a member’s profile page.
-
Click the blue Connect button to start the connection request.
The Invitation page appears.
- If requested, provide the person’s email address to help prove that you know the person (see Figure 3-13).
-
(Optional but recommended) Click the Add a Note button and enter your invitation text in the Add a Note field.
We highly recommend that you compose a custom invitation rather than use the standard “I’d like to add you to my professional network on LinkedIn” text. In the example in Figure 3-14, we remind the person how we recently met, acknowledge one of his achievements, and ask him to connect.
-
Click the blue Send Invitation button.
When the other party accepts your connection request, you’re notified by email.

FIGURE 3-12: Add a person to your network from that person’s profile page.

FIGURE 3-13: For some members, you must know their email address.

FIGURE 3-14: Customize your invitation text.
Understanding why you shouldn’t use canned invitations
If you’re having a rough or busy day, you might be tempted to send the canned invitation that LinkedIn displays when you go to the invitation request page. We all have things to do and goals to accomplish, so stopping to write a note for each invitation can grow tedious. However, it’s important to replace that text with something that speaks to the recipient, for the following reasons:
- The other person might not remember you. Quite simply, your recipient can take one look at your name, see no additional information in the note that accompanied it, and think, “Who is this person?” A few might click your name to read your profile and try to figure it out, but most people are busy and won’t take the time to investigate. They are likely to ignore your request. Not good.
- The other person could report you as someone he doesn’t know. Having someone ignore your request isn’t the worst possibility, though. Nope, the worst is being declined as unknown. Recipients of your invitation see an I Don’t Know This Person button. If several people click this button from an invitation you sent, LinkedIn will eventually consider you a spammer and will suspend you — and possibly even remove your profile and account from the site!
- You offer no motivation for a mutually beneficial relationship. When people get an invitation request, they understand pretty clearly that you want something from them, whether it’s access to them or to their network. If you’ve sent a canned invitation, they can’t answer the question, “What’s in it for me?” A canned invitation gives no motivation for or potential benefit of being connected to you. A custom note explaining that you’d like to swap resources or introduce that person to others is usually enough to encourage an acceptance.
- A canned invitation implies that you don’t care. Some people will look at your canned invitation request and think, “This person doesn’t have 30 to 60 seconds to write a quick note introducing herself? She must not think much of me.” Worse, they may think, “This person just wants to increase her number of contacts to look more popular or to exploit my network.” Either impression will quickly kill your chances of getting more connections.
Sending requests to nonmembers
Only members of LinkedIn can be part of anyone’s network. Therefore, if you want to send a connection request to someone who hasn’t yet joined LinkedIn, you must invite that person to create a LinkedIn account first. To do so, you can either send your invitee an email directly, asking him or her to join, or you can use a LinkedIn function that generates the email invitation that includes a link to join LinkedIn.
Either way, you need to have the nonmember’s email address, and you’ll probably have to provide your invitee with some incentive by offering reasons to take advantage of LinkedIn and create an account. (You get some tips for doing that in the next section.)
When you’re ready to send your request using LinkedIn, follow these steps:
-
Click the My Network icon in the top navigation bar, and then click the More Options link on the My Network page that appears.
The More Options link is below the Your Contact Import Is Ready section. The Add Connections window appears.
-
Click the Email Message button along the bottom middle of the page.
The screen shown in Figure 3-15 appears.
- In the box provided, fill in the email addresses of the people you want to invite to LinkedIn.
-
To personalize the invitation request to nonmembers a bit, select from a list of preprogrammed phrases or reasons to join LinkedIn, which will be included in the invitation.
Simply select the radio button next to the phrase you want included. As an extra step, you may want to contact those people via email or phone first to let them know that this request is coming and encourage them to consider joining LinkedIn.
-
Click the blue Continue button.
A confirmation message pops up.
-
To return to the Sync Contacts page, click the Go Back link in the top left.
You can repeat the process at any time to invite additional people to join LinkedIn and be added to your network.

FIGURE 3-15: Fill in the email addresses of anyone you want to invite to join LinkedIn.
Communicating the value of joining LinkedIn
So you want to add some people to your network, but they haven’t yet signed on to LinkedIn. If you want them to accept your request by setting up their account, you might need to tout the value of LinkedIn. After all, utilizing your existing and growing network is one of the most powerful sales tools, which is why all types of businesses — from e-commerce stores and retail businesses to service directories and social networking websites — use LinkedIn. Offering to help them build their profile or use LinkedIn effectively wouldn’t hurt either.
As of this writing, LinkedIn does not allow you to personalize your invitation to nonmembers (beyond choosing a canned phrase as detailed in the previous section), so you’ll need to make this pitch either via email or directly with the person you are recruiting.
So, how do you make your pitch? If you send a thesis on the merits of LinkedIn, it’ll most likely be ignored. Sending a simple “C’mon! You know you wanna …” request may or may not work. (You know your friends better than we.) You could buy them a copy of this book, but that could get expensive. (But we would be thrilled! C’mon! You know you wanna …) The simplest way is to mention some of the benefits they could enjoy from joining the site:
- LinkedIn members always stay in touch with their connections. If people you know move, change their email addresses, or change jobs, you still have a live link to them via LinkedIn. You’ll always be able to see their new email addresses if you’re connected (assuming that they provide it, of course).
- LinkedIn members can tap into their friends’ networks for jobs or opportunities, now or later. Although someone might not need a job now, he or she may eventually need help, so why not access thousands or even millions of potential leads? LinkedIn has hundreds of millions of members in all sorts of industries, and people have obtained consulting leads, contract jobs, new careers, and even start-up venture capital or funding for a new film. After all, it’s all about “who you know.”
- LinkedIn can help you build your own brand. LinkedIn members get a free profile page to build their online presence, and can link to up to three of their own websites, such as a blog, personal website, social media page, or e-commerce store. The search engines love LinkedIn pages, which have high page rankings — and this can only boost your online identity.
- LinkedIn can help you do all sorts of research. You might need to know more about a company before an interview, or you’re looking for a certain person to help your business, or you’re curious what people’s opinions would be regarding an idea you have. LinkedIn is a great resource in all these situations. You can use LinkedIn to get free advice and information, all from the comfort of your own computer.
- Employers are using LinkedIn every day. Many employers now use LinkedIn to do due diligence on a job seeker by reviewing his or her LinkedIn profile before an interview. If you’re not on LinkedIn, an employer may see this as a red flag and it could affect your chances of getting the job.
- A basic LinkedIn account is free, and joining LinkedIn is easy. People have a lot of misconceptions about monthly fees or spending a lot of time updating their LinkedIn profiles. Simply remind people that joining is free, and that after they set up their profiles, LinkedIn is designed to take up little of their time keeping an active profile and benefitting from having an account.
Removing people from your network
The day might come when you feel you need to remove someone from your network. Perhaps you added the person in haste, or he repeatedly asks you for favors or introduction requests, or sends messages that you don’t want to respond to. Not to worry — you’re not doomed to suffer forever; simply remove the connection. When you do so, that person can no longer view your network or send you messages, unless he pays to send you an InMail message.
To remove a connection from your network, just follow these steps:
- While logged in to your LinkedIn account, click the My Network icon, on the top navigation bar.
-
Under the Your Connections header, click See All.
Your list of connections appears, as shown in Figure 3-16.
- Scroll through the list to find the connection to remove.
-
To the far right of the person’s name, click the three dots next to the Message button, and then select Remove Connection from the drop-down list that appears, as shown in Figure 3-17.
A pop-up box appears, warning you of what abilities you’ll lose with this removal and asking you to confirm you want to remove the connection.
-
To remove the person from your network, click the Remove button, as shown in Figure 3-18.
Your removed connection won’t be notified of the removal.
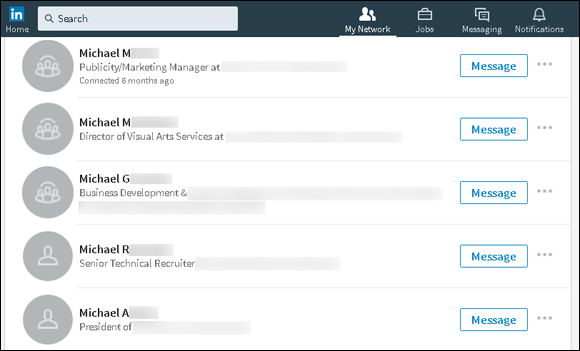
FIGURE 3-16: Find the connection you want to remove.
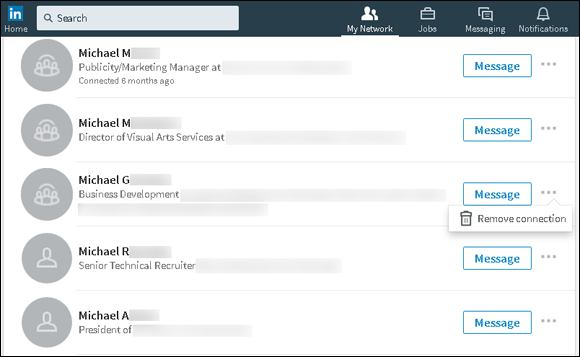
FIGURE 3-17: Remove your connection to this person.

FIGURE 3-18: Make sure you understand what you’ll lose by removing this connection.
Accepting (or Gracefully Declining) Invitations
In this chapter, we talk a lot about how and why you might send invitations and add people to your network, and even cover what to do when you need to remove someone from your network. But what about the flip side of that coin — that is, being the invitee? In this section, we offer some guidance on what to do when you have to decide whether to happily accept or gracefully decline an invitation.
When you receive an invitation to join someone’s network of connections and you’re not sure whether to accept or decline the invitation, ask yourself these questions:
- How well do you know this person? With any luck, the inviter has included a custom message clueing you in to who he or she is, in case you don’t remember. You can, of course, click the name to read that person’s profile, which usually helps trigger your memory. If you don’t know or remember this person, you probably don’t want to add him to your network just yet. If you do know the person, you need to consider whether he or she is worth adding to your network.
- Does this person fit with the goals of your network? As mentioned early in this chapter, it’s easier to put together a network when you’ve established a sense of the purpose you want it to serve. When you’re looking at this invitation, simply ask yourself, “Does accepting this invitation help further my goals?”
- Is this someone with whom you want to communicate and include in your network? If you don’t like someone or don’t want to do business with him or her, you should certainly not feel obligated to accept the invitation. Keep in mind that these people will have access to your network and can hit you up with introduction messages and recommendation requests.
If you’re thinking of declining an invitation, you can simply ignore the invitation message or click the X button on the screen to ignore the invitation. Optionally, you can respond to the person who sent you the invitation. Some people prefer to respond to be professional or polite, for example. If you decide to send a response message, instead of just ignoring the invite, here are some tips to help you do so gracefully:
- Respond quickly. If you wait to respond to the invitation and then decide to go ahead and decline the invite, the other person might be even more offended and confused. Respond quickly so that this issue isn’t hanging over anyone’s head.
- If necessary, ask for more information. If you feel uncomfortable because you don’t know the person well but want to consider the invitation before you decline, respond with a request for more information, such as, “I appreciate your interest, but I am having trouble placing our previous meetings. What is your specific interest in connecting with me on LinkedIn? Please let me know how we know each other and what your goals are for LinkedIn. Thanks again.”
- Respond politely but with a firm no. You can simply write something along the lines of, “Thank you for your interest; I appreciate your eagerness. Unfortunately, because I’m not familiar with you, I’m not interested in connecting with you on LinkedIn just yet.” Then, if you want, you can spell out the terms in which you might be interested in connecting, such as if the opportunity ever arises to get to know the person better or if he or she is referred to you by a friend.