Router Interfaces
Interface configuration is one of the most important router configurations because without interfaces, a router is pretty much a completely useless object. Plus, interface configurations must be totally precise to enable communication with other devices. Network layer addresses, media type, bandwidth, and other administrator commands are all used to configure an interface.
Different routers use different methods to choose the interfaces used on them. For instance, the following command shows a Cisco router with 10 serial interfaces, labeled 0 through 9:
Router(config)#int serial ?
 <0-9> Serial interface number
Now it's time to choose the interface you want to configure. Once you do that, you will be in interface configuration for that specific interface. The following command would be used to choose serial port 5, for example:
Router(config)#int serial 5
Router(config)-if)#
The old 2522 router I am using in this example has one Ethernet 10BaseT port, and typing interface ethernet 0 can configure that interface, as shown here:
Router(config)#int ethernet ?
 <0-0> Ethernet interface number
Router(config)#int ethernet 0
Router(config-if)#
As I showed you earlier, the 2500 router is a fixed-configuration router. This means that when you bought that model, you were stuck with that physical configuration—a huge reason why I don't use them much. I certainly never would use them in a production setting anymore, but for studying for your exam, they can be used quite effectively at a very low cost.
To configure an interface, you always used the interface type number sequence, but with the 2600 and 2800 series routers (actually, any ISR router for that matter), there's a physical slot in the router, and there's a port number on the module plugged into that slot. So, on a modular router, the configuration would be interface type slot/port, as shown here:
Router(config)#int fastethernet ?
 <0-1> FastEthernet interface number
Router(config)#int fastethernet 0
% Incomplete command.
Router(config)#int fastethernet 0?
/
Router(config)#int fastethernet 0/?
 <0-1> FastEthernet interface number
Make note of the fact that you can't just type int fastethernet 0. You must type the full command: type slot/port or int fastethernet 0/0 (or int fa 0/0).
For the ISR series, it's basically the same, only you get even more options. For example, the built-in Fast Ethernet interfaces work with the same configuration you used with the 2600 series.
Todd(config)#int fastEthernet 0/?
  <0-1>  FastEthernet interface number
Todd(config)#int fastEthernet 0/0
Todd(config-if)#
But the rest of the modules are different—they use three numbers instead of two. The first 0 is the router itself, and then you choose the slot and then the port. Here's an example of a serial interface on my 2811:
Todd(config)#interface serial ?
  <0-2> Serial interface number
Todd(config)#interface serial 0/0/?
  <0-1> Serial interface number
Todd(config)#interface serial 0/0/0
Todd(config-if)#
This can look a little dicey, I know, but I promise it's really not that hard! It helps to remember that you should always view a running-config output first so you know what interfaces you have to deal with. Here's my 2801 output:
Todd(config-if)#do show run
Building configuration…
[output cut]
!
interface FastEthernet0/0
 no ip address
 shutdown
 duplex auto
 speed auto
!
interface FastEthernet0/1
 no ip address
 shutdown
 duplex auto
 speed auto
!
interface Serial0/0/0
 no ip address
 shutdown
 no fair-queue
!
interface Serial0/0/1
 no ip address
 shutdown
!
interface Serial0/1/0
 no ip address
 shutdown
!
interface Serial0/2/0
 no ip address
 shutdown
 clock rate 2000000
!
 [output cut]
For the sake of brevity, I didn't include my complete running-config, but I've displayed all you need. You can see the two built-in Fast Ethernet interfaces, the two serial interfaces in slot 0 (%/0 and %/1), the serial interface in slot 1 (0/1/0), and the serial interface in slot 2 (0/2/0). Once you see the interfaces like this, it makes it a lot easier for you to understand how the modules are inserted into the router.
Just understand that if you type interface e0 on a 2500, interface fastethernet 0/0 on a 2600, or interface serial 0/1/0 on a 2800, all you're doing is choosing an interface to configure, and basically, they're all configured the same way after that.
I'm going to continue with our router interface discussion in the next sections, and I'll include how to bring up the interface and set an IP address on it.
Bringing Up an Interface
You can disable an interface with the interface command shutdown and enable it with the no shutdown command.
If an interface is shut down, it'll display administratively down when you use the show interfaces command (sh int for short).
Todd#sh int f0/1
FastEthernet0/1 is administratively down, line protocol is down
[output cut]
Another way to check an interface's status is via the show running-config command. All interfaces are shut down by default. You can bring up the interface with the no shutdown command (no shut for short).
Todd#config t
Todd(config)#int f0/1
Todd(config-if)#no shutdown
Todd(config-if)#
*Feb 28 22:45:08.455: %LINK-3-UPDOWN: Interface FastEthernet0/1,
     changed state to up
Todd(config-if)#do show int f0/1
FastEthernet0/1 is up, line protocol is up
[output cut]
Configuring an IP Address on an Interface
Even though you don't have to use IP on your routers, it's most often what people actually do use. To configure IP addresses on an interface, use the ip address command from interface configuration mode.
Todd(config)#int f0/1
Todd(config-if)#ip address 172.16.10.2 255.255.255.0
Don't forget to enable the interface with the no shutdown command. Remember to look at the command show interface int to see whether the interface is administratively shut down or not. show running-config will also give you this information.
 The ip address address mask command starts the IP processing on the interface.
If you want to add a second subnet address to an interface, you have to use the secondary parameter. If you type another IP address and press Enter, it will replace the existing primary IP address and mask. This is definitely a most excellent feature of the Cisco IOS.
So, let's try it. To add a secondary IP address, just use the secondary parameter.
Todd(config-if)#ip address 172.16.20.2 255.255.255.0 ?
  secondary Make this IP address a secondary address
  <cr>
Todd(config-if)#ip address 172.16.20.2 255.255.255.0 secondary
Todd(config-if)#^Z
Todd(config-if)#do sh run
Building configuration…
[output cut]

interface FastEthernet0/1
 ip address 172.16.20.2 255.255.255.0 secondary
 ip address 172.16.10.2 255.255.255.0
 duplex auto
 speed auto
!
I really don't recommend having multiple IP addresses on an interface because it's ugly and inefficient, but I showed you anyway just in case you someday find yourself dealing with an IT manager who's in love with really bad network design and makes you administer it! And who knows? Maybe someone will ask you about it someday and you'll get to seem really smart because you know this.
Using the Pipe
No, not that pipe. I mean the output modifier. (Although with some of the router configurations I've seen in my career, sometimes I wonder!) This pipe ( | ) allows you to wade through all the configurations or other long outputs and get straight to your goods fast. Here's an example:
Todd#sh run | ?
  append    Append redirected output to URL (URLs supporting append operation
            only)
  begin     Begin with the line that matches
  exclude   Exclude lines that match
  include   Include lines that match
  redirect  Redirect output to URL
  section   Filter a section of output
  tee       Copy output to URL

Todd#sh run | begin interface
interface FastEthernet0/0
 description Sales VLAN
 ip address 10.10.10.1 255.255.255.248
 duplex auto
 speed auto
!
interface FastEthernet0/1
 ip address 172.16.20.2 255.255.255.0 secondary
 ip address 172.16.10.2 255.255.255.0
 duplex auto
 speed auto
!
interface Serial0/0/0
 description Wan to SF circuit number 6fdda 12345678
 no ip address
!
Basically, the pipe symbol (output modifier) is what you need to help you get where you want to go light years faster than mucking around in a router's entire configuration. I use it a lot when I am looking at a large routing table to find out whether a certain route is in the routing table. Here's an example:
Todd#sh ip route | include 192.168.3.32
R       192.168.3.32 [120/2] via 10.10.10.8, 00:00:25, FastEthernet0/0
Todd#
First, you need to know that this routing table had more than 100 entries, so without my trusty pipe, I'd probably still be looking through that output! It's a powerfully efficient tool that saves you major time and effort by quickly finding a line in a configuration—or as the preceding example shows, a single route in a huge routing table.
Give yourself a little time to play around with the pipe command; get the hang of it, and you'll be seriously high on your newfound ability to quickly parse through router output.
Serial Interface Commands
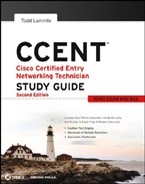
Wait! Before you just jump in and configure a serial interface, you need some key information—like knowing that the interface will usually be attached to a CSU/DSU type of device that provides clocking for the line to the router, as I've shown in Figure 4.4.
FIGURE 4.4 A typical WAN connection
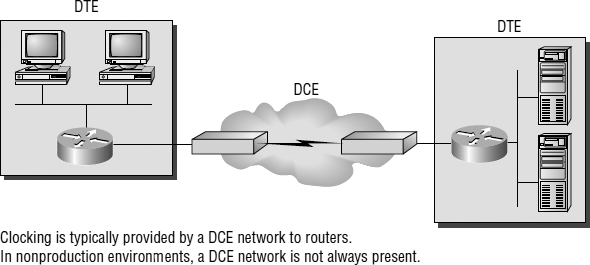
Here you can see that the serial interface is used to connect to a DCE network via a CSU/DSU that provides the clocking to the router interface. But if you have a back-to-back configuration (for example, one that's used in a lab environment like I've shown you in Figure 4.5), one end—the data communication equipment (DCE) end of the cable—must provide clocking!
By default, Cisco routers' serial interfaces are all data terminal equipment (DTE) devices, which means that you must configure an interface to provide clocking if you need it to act like a DCE device. Again, you would not provide clocking on a production T1 connection, for example, because you would have a CSU/DSU connected to your serial interface, as Figure 4.4 shows.
FIGURE 4.5 Providing clocking on a nonproduction network
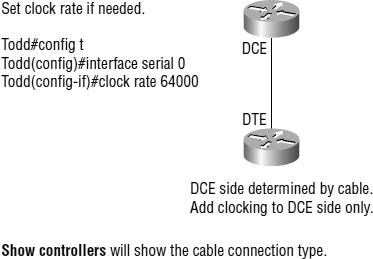
You configure a DCE serial interface with the clock rate command.
Todd#config t
Enter configuration commands, one per line. End with CNTL/Z.
Todd(config)#int s0/0/0
Todd(config-if)#clock rate ?
        Speed (bits per second)
  1200
  2400
  4800
  9600
  14400
  19200
  28800
  32000
  38400
  48000
  56000
  57600
  64000
  72000
  115200
  125000
  128000
  148000
  192000
  250000
  256000
  384000
  500000
  512000
  768000
  800000
  1000000
  2000000
  4000000
  5300000
  8000000


  <300-8000000>    Choose clockrate from list above


Todd(config-if)#clock rate 1000000
The clock rate command is set in bits per second. Besides looking at the cable end to check for a label of DCE or DTE, you can see whether a router's serial interface has a DCE cable connected with the show controllers int command.
Todd#sh controllers s0/0/0
Interface Serial0/0/0
Hardware is GT96K
DTE V.35idb at 0×4342FCB0, driver data structure at 0×434373D4
Here is an example of an output that shows a DCE connection:
Todd#sh controllers s0/2/0
Interface Serial0/2/0
Hardware is GT96K
DCE V.35, clock rate 1000000
The next command you need to get acquainted with is the bandwidth command. Every Cisco router ships with a default serial link bandwidth of T1 (1.544Mbps). But this has nothing to do with how data is transferred over a link. The bandwidth value that is configured on the serial interface is used by routing protocols such as EIGRP and OSPF to calculate the best cost (path) to a remote network. So, if you're using RIP routing, the bandwidth setting of a serial link is irrelevant since RIP uses only hop count to determine that.
If you're rereading this part thinking, “Huh—what? Routing protocols? Metrics?”—don't freak! I'm going over all that soon in Chapter 6, “IP Routing.”
Here's an example of using the bandwidth command:
Todd#config t
Todd(config)#int s0/0/0
Todd(config-if)#bandwidth ?
  <1-10000000>  Bandwidth in kilobits
  inherit       Specify that bandwidth is inherited
  receive       Specify receive-side bandwidth
Todd(config-if)#bandwidth 1000
Did you notice that, unlike the clock rate command, the bandwidth command is configured in kilobits per second?
After going through all these configuration examples regarding the clock rate command, understand that the new ISR routers automatically detect DCE connections and set the clock rate to 2000000. However, you still need to understand the clock rate command for the Cisco objectives, even though the new routers set it for you automatically!