
Hands-on Labs
In the following hands-on labs, you will configure a network with three routers. These exercises assume all the same setup requirements as the labs found in earlier chapters.
This chapter includes the following labs:
Lab 6.1: Creating Static Routes
Lab 6.2: Configuring RIP Routing
The internetwork shown in the following graphic will be used to configure all routers.

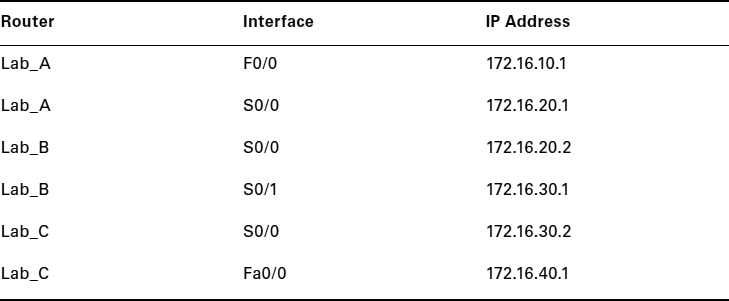
Table 6.4 shows the IP addresses for each router (each interface uses a /24 mask).
TABLE 6.4 IP addresses
These labs were written without using the LAN interface on the Lab_B router. You can choose to add that LAN into the labs if necessary.
Hands-on Lab 6.1: Creating Static Routes
In this lab, you will create a static route in all three routers so that the routers see all networks. Verify with the Ping program when complete.
- The Lab_A router is connected to two networks, 172.16.10.0 and 172.16.20.0. You need to add routes to networks 172.16.30.0 and 172.16.40.0. Use the following commands to add the static routes:
Lab_A#config t
Lab_A(config)#ip route 172.16.30.0 255.255.255.0
  172.16.20.2
Lab_A(config)#ip route 172.16.40.0 255.255.255.0
  172.16.20.2
- Save the current configuration for the Lab_A router by going to the privileged mode, typing copy run start, and pressing Enter.
- On the Lab_B router, you have direct connections to networks 172.16.20.0 and 172.16.30.0. You need to add routes to networks 172.16.10.0 and 172.16.40.0. Use the following commands to add the static routes:
Lab_B#config t
Lab_B(config)#ip route 172.16.10.0 255.255.255.0
  172.16.20.1
Lab_B(config)#ip route 172.16.40.0 255.255.255.0
  172.16.30.2
- Save the current configuration for router Lab_B by going to the enabled mode, typing copy run start, and pressing Enter.
- On router Lab_C, create a static route to networks 172.16.10.0 and 172.16.20.0, which are not directly connected. Create static routes so that router Lab_C can see all networks, using the commands shown here:
Lab_C#config t
Lab_C(config)#ip route 172.16.10.0 255.255.255.0
  172.16.30.1
Lab_C(config)#ip route 172.16.20.0 255.255.255.0
  172.16.30.1
- Save the current configuration for router Lab_C by going to the enable mode, typing copy run start, and pressing Enter.
- Check your routing tables to make sure all four networks show up by executing the show ip route command.
- Now ping from each router to your hosts and from each router to each router. If it is set up correctly, it will work.
Hands-on Lab 6.2: Configuring RIP Routing
In this lab, you will use the dynamic routing protocol RIP instead of static routing.
- Remove any static routes or default routes configured on your routers by using the no ip route command. For example, here is how you would remove the static routes on the Lab_A router:
Lab_A#config t
Lab_A(config)#no ip route 172.16.30.0 255.255.255.0
  172.16.20.2
Lab_A(config)#no ip route 172.16.40.0 255.255.255.0
  172.16.20.2
Do the same thing for routers Lab_B and Lab_C. Verify that only your directly connected networks are in the routing tables.
- After your static and default routes are clear, go into configuration mode on router Lab_A by typing config t.
- Tell your router to use RIP routing by typing router rip and pressing Enter, as shown here:
config t
router rip
- Add the network number for the networks you want to advertise.
Since router Lab_A has two interfaces that are in two different networks, you must enter a network statement using the network ID of the network in which each interface resides. Alternately, you could use a summarization of these networks and use a single statement, minimizing the size of the routing table. Since the two networks are 172.16.10.0/24 and 172.16.20.0/24, the network summarization 172.16.0.0 would include both subnets. Do this by typing network 172.16.0.0 and pressing Enter.
- Press Ctrl+Z to get out of configuration mode.
- The interfaces on Lab_B and Lab_C are in the 172.16.20.0/24 and 172.16.30.0/24 networks; therefore, the same summarized network statement will work there as well. Type the same commands, as shown here:
Config t
Router rip
network 172.16.0.0
- Verify that RIP is running at each router by typing the following commands at each router:
show ip protocolsThis should indicate to you that RIP is present on the router.
show ip route(This should have routes present with an R to the left of them.)
show running-config or show run(This should indicate that RIP is present and the networks are being advertised.)
- Save your configurations by typing copy run start or copy running-config startup-config and pressing Enter at each router.
- Verify the network by pinging all remote networks and hosts.