Backing Up and Restoring the Cisco IOS
Before you upgrade or restore a Cisco IOS, you really should copy the existing file to a TFTP host as a backup just in case the new image crashes and burns.
And you can use any TFTP host to accomplish this. By default, the flash memory in a router is used to store the Cisco IOS. In the following sections, I'll describe how to check the amount of flash memory, how to copy the Cisco IOS from flash memory to a TFTP host, and how to copy the IOS from a TFTP host to flash memory.
 You'll learn how to use the Cisco IFS to manage your IOS files after first learning how to manage them with a TFTP host.
But before you back up an IOS image to a network server on your intranet, you have to do these three things:
- Make sure you can access the network server.
- Ensure that the network server has adequate space for the code image.
- Verify the filenaming and path requirement.
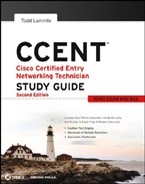
And if you have a laptop or workstation's Ethernet port directly connected to a router's Ethernet interface, as shown in Figure 5.1, you need to verify the following before attempting to copy the image to or from the router:
- TFTP server software must be running on the administrator's workstation.
- The Ethernet connection between the router and the workstation must be made with a crossover cable.
- The workstation must be on the same subnet as the router's Ethernet interface.
- The copy flash tftp command must be supplied with the IP address of the workstation if you are copying from the router flash.
- And if you're copying “into” flash, you need to verify that there's enough room in flash memory to accommodate the file to be copied.
FIGURE 5.1 Copying an IOS from a workstation to a router

Verifying Flash Memory
Before you attempt to upgrade the Cisco IOS on your router with a new IOS file, it's a good idea to verify that your flash memory has enough room to hold the new image. You verify the amount of flash memory and the file or files being stored in flash memory by using the show flash command (sh flash for short).
Router#sh flash
-#- -length- ---date/time--- path
1     21710744 Jan 2 2007 22:41:14 +00:00 c2800nm-advsecurityk9-mz.124-12.bin
[output cut]
32989184 bytes available (31027200 bytes used)
The previous router output shows there is 32MB of RAM, and roughly 22MB of the memory is in use.
 The show flash command will display the amount of memory consumed by the current IOS image as well as tell you if there's enough room available to hold both current and new images. You should know that if there's not enough room for both the old and new images you want to load, the old image will be erased!
You can also see the amount of flash by using the show version command on routers.
Router#show version
[output cut]
Cisco 2811 (revision 49.46) with 249856K/12288K bytes of memory.
Processor board ID FTX1049A1AB
2 FastEthernet interfaces
4 Serial(sync/async) interfaces
1 Virtual Private Network (VPN) Module
DRAM configuration is 64 bits wide with parity enabled.
239K bytes of non-volatile configuration memory.
62720K bytes of ATA CompactFlash (Read/Write)
The top line provides you with the amount of RAM the router has, and by averaging the two numbers, you'll get around 256MB of RAM. You can see that the amount of flash shows up on the last line of the previous output. By rounding up, you get the amount of flash to 64MB.
Backing Up the Cisco IOS
To back up the Cisco IOS to a TFTP server, you use the copy flash tftp command. It's a straightforward command that requires only the source filename and the IP address of the TFTP server.
The key to success in this backup routine is to make sure you have good, solid connectivity to the TFTP server. Check this by pinging the TFTP device from the router console prompt like this:
Router#ping 1.1.1.2
Type escape sequence to abort.
Sending 5, 100-byte ICMP Echos to 1.1.1.2, timeout
  is 2 seconds:
!!!!!
Success rate is 100 percent (5/5), round-trip min/avg/max
  = 4/4/8 ms
The Packet Internet Groper (Ping) utility is used to test network connectivity, and I use it in some of the examples in this chapter. I'll be talking about it in more detail in the section “Checking and Troubleshooting Network Connectivity” later in the chapter.
After you ping the TFTP server to make sure that IP is working, you can use the copy flash tftp command to copy the IOS to the TFTP server, as shown next:
Router#copy flash tftp
Source filename []?c2800nm-advsecurityk9-mz.124-12.bin
Address or name of remote host []?1.1.1.2
Destination filename [c2800nm-advsecurityk9-mz.124-12.bin]?[enter]
!!!!!!!!!!!!!!!!!!!!!!!!!!!!!!!!!!!!!!!!!!!!!!!!!!!!!!!!!!!!!!!!!!!!!!!!!!!!!!!!!
!!!!!
21710744 bytes copied in 60.724 secs (357532 bytes/sec)
Router#
Just copy the IOS filename from either the show flash or show version command and then paste it when prompted for the source filename.
In the preceding example, the contents of flash memory were copied successfully to the TFTP server. The address of the remote host is the IP address of the TFTP host, and the source filename is the file in flash memory.
The copy flash tftp command won't prompt you for the location of any file or ask you where to put the file. TFTP is just a “grab it and place it” program in this situation. This means that the TFTP server must have a default directory specified or it won't work!
Restoring or Upgrading the Cisco Router IOS
What happens if you need to restore the Cisco IOS to flash memory to replace an original file that has been damaged or if you want to upgrade the IOS? You can download the file from a TFTP server to flash memory by using the copy tftp flash command. This command requires the IP address of the TFTP host and the name of the file you want to download.
But before you begin, make sure the file you want to place in flash memory is in the default TFTP directory on your host. When you issue the command, TFTP won't ask you where the file is, so if the file you want to use isn't in the default directory of the TFTP host, this just won't work.
Router#copy tftp flash
Address or name of remote host []?1.1.1.2
Source filename []?c2800nm-advsecurityk9-mz.124-12.bin
Destination filename [c2800nm-advsecurityk9-mz.124-12.bin]? [enter]
%Warning: There is a file already existing with this name Do you want to over
write? [confirm][enter]
Accessing tftp://1.1.1.2/c2800nm-advsecurityk9-mz.124-12.bin…
Loading c2800nm-advsecurityk9-mz.124-12.bin from 1.1.1.2 (via
   FastEthernet0/0): !!!!!!!!!!!!!!!!!!!!!!!!!!!!!!!!!!!!!!!!!!!!!!!!!!!!!!!!!!!!
!!!!!!!!!!!!!
[OK - 21710744 bytes]


21710744 bytes copied in 82.880 secs (261954 bytes/sec)
Router#
In the preceding example, I copied the same file into flash memory, so it asked me if I wanted to overwrite it. Remember that you are “playing” with files in flash memory. If I had just corrupted my file by overwriting it, I won't know until I reboot the router. Be careful with this command! If the file is corrupted, you'll need to do an IOS restore from ROM monitor mode.
If you are loading a new file and you don't have enough room in flash memory to store both the new and existing copies, the router will ask to erase the contents of flash memory before writing the new file into flash memory.
A Cisco router can become a TFTP server for another router by using an image that's stored in flash memory. The global configuration command is tftp-server flash:ios_name.
Using the Cisco IOS File System (Cisco IFS)
Cisco has created a file system called Cisco IFS that allows you to work with files and directories just as you would from a Windows DOS prompt. The commands you use are dir, copy, more, delete, erase or format, cd and pwd, and mkdir and rmdir.
Working with IFS gives you the ability to view all files—even those on remote servers. And you definitely want to find out if an image on one of your remote servers is valid before you copy it, right? You also need to know how big it is—size matters here! It's also a really good idea to take a look at the remote server's configuration and make sure it's all good before loading that file on your router.
It's very cool that IFS makes the file system user interface universal—it's not platform specific anymore. You now get to use the same syntax for all your commands on all of your routers, no matter the platform!
Sound too good to be true? Well, it kind of is because you'll find out that support for all commands on each file system and platform just isn't there. But it's really no big deal since various file systems differ in the actions they perform; the commands that aren't relevant to a particular file system are the very ones that aren't supported. Be assured that any file system or platform will fully support all the commands you need to manage it.
Another cool IFS feature is that it cuts down on all those obligatory prompts for a lot of the commands. If you want to enter a command, all you have to do is type all the necessary info straight into the command line—no more jumping through hoops of prompts! So, if you want to copy a file to an FTP server, all you'd do is first indicate where the desired source file is on your router, pinpoint where the destination file is to be on the FTP server, determine the username and password you're going to use when you want to connect to that server, and type it all in on one line—sleek! And for those of you resistant to change, you can still have the router prompt for all the information it needs and enjoy entering a more elegantly minimized version of the command than you did before.
But even in spite of all this, your router might still prompt you—even if you did everything right in your command line. It comes down to how you have the file prompt command configured and which command you're trying to use. But no worries—if that happens, the default value will be entered right there in the command, and all you have to do is hit Enter to verify the correct values.
IFS also lets you explore various directories and inventory files in any directory you want. Plus, you can make subdirectories in flash memory or on a card, but you get to do that only if you're working on one of the more recent platforms.
And get this—the new file system interface uses URLs to determine the whereabouts of a file. So, just as they pinpoint places on the Web, URLs now indicate where files are on your Cisco router or even on a remote file server! You just type URLs right into your commands to identify where the file or directory is. It's really that easy—to copy a file from one place to another, you simply enter the copy source-url destination-url command—sweet! IFS URLs are a tad different from what you're used to, though, and there's an array of formats to use that vary depending on where, exactly, the file is that you're after.
You're going to use Cisco IFS commands pretty much the same way that you used the copy command in the IOS section earlier:
- For backing up the IOS
- For upgrading the IOS
- For viewing text files
With all that down, let's take a look at the common IFS commands available to you for managing the IOS. I'll get into configuration files soon, but for now I'll get you started with going over the basics used to manage the new Cisco IOS.
dir Same as with Windows, this command lets you view files in a directory. Type dir, hit Enter, and by default you get the contents of the flash:/ directory output.
copy This is one popular command, often used to upgrade, restore, or back up an IOS. But as I said, when you use it, it's really important to focus on the details—what you're copying, where it's coming from, and where it's going to land.
more Same as with Unix, this will take a text file and let you look at it on a card. You can use it to check out your configuration file or your backup configuration file. I'll go over it more when I get into actual configuration.
show file This command will give you the skinny on a specified file or file system, but it's kind of obscure because people don't use it a lot.
delete Three guesses—yep, it deletes stuff. But with some types of routers, it doesn't work as well as you'd think. That's because even though it whacks the file, it doesn't always free up the space it was using. To actually get the space back, you have to use something called the squeeze command, too.
erase/format Use these with care—make sure that when you're copying files, you say no to the dialog that asks you if you want to erase the file system! The type of memory you're using determines whether you can nix the flash drive.
cd/pwd Same as with Unix and DOS, cd is the command you use to change directories. Use the pwd command to print (show) the working directory.
mkdir/rmdir Use these commands on certain routers and switches to create and delete directories—the mkdir command for creation and the rmdir command for deletion. Use the cd and pwd commands to change into these directories.
Using the Cisco IFS to Upgrade an IOS
Let's take a look at some of these Cisco IFS commands on my ISR router (1841 series) with a hostname of R1.
I'll start with the pwd command to verify my default directory and then use the dir command to verify the contents of the default directory (flash:/).
R1#pwd
flash:
R1#dir
Directory of flash:/
    1   -rw-   13937472  Dec 20 2006 19:58:18 +00:00  c1841-ipbase-
   mz.124-1c.bin
    2   -rw-       1821  Dec 20 2006 20:11:24 +00:00  sdmconfig-18xx.cfg
    3   -rw-    4734464  Dec 20 2006 20:12:00 +00:00  sdm.tar
    4   -rw-     833024  Dec 20 2006 20:12:24 +00:00  es.tar
    5   -rw-    1052160  Dec 20 2006 20:12:50 +00:00  common.tar
    6   -rw-       1038  Dec 20 2006 20:13:10 +00:00  home.shtml
    7   -rw-     102400  Dec 20 2006 20:13:30 +00:00  home.tar
    8   -rw-     491213  Dec 20 2006 20:13:56 +00:00  128MB.sdf
    9   -rw-    1684577  Dec 20 2006 20:14:34 +00:00  securedesktop-
   ios-3.1.1.27-k9.pkg
   10   -rw-    398305   Dec 20 2006 20:15:04 +00:00  sslclient-win-
   1.1.0.154.pkg

32071680 bytes total (8818688 bytes free)
What you can see here is that I have the basic IP IOS (c1841-ipbase-mz.124-1c.bin). Looks like I need to upgrade my 1841. You've just got to love how Cisco puts the IOS type in the filename now! You can see the size of the IOS is about 14MB from the previous output, but you can also check the size of the file that's in flash with the show file command (show flash would also work).
R1#show file info flash:c1841-ipbase-mz.124-1c.bin
flash:c1841-ipbase-mz.124-1c.bin:
  type is image (elf) []
  file size is 13937472 bytes, run size is 14103140 bytes
  Runnable image, entry point 0x8000F000, run from ram
With a file that size, the existing IOS will have to be erased before you can add the new IOS file (c1841-advipservicesk9-mz.124-12.bin), which exceeds 21MB. You'll use the delete command, but remember, you can play with any file in flash memory and nothing serious will happen until you reboot—that is, if you made a mistake. So, obviously, and as I pointed out earlier, you need to be majorly careful here!
R1#delete flash:c1841-ipbase-mz.124-1c.bin
Delete filename [c1841-ipbase-mz.124-1c.bin]?[enter]
Delete f1ash:c1841-ipbase-mz.124-1c.bin? [confirm] [enter]
R1#sh flash
-#- -length-  ---date/time---  path
1          1821 Dec 20 2006 20:11:24 +00:00 sdmconfig-18xx.cfg
2       4734464 Dec 20 2006 20:12:00 +00:00 sdm.tar
3        833024 Dec 20 2006 20:12:24 +00:00 es.tar
4       1052160 Dec 20 2006 20:12:50 +00:00 common.tar
5          1038 Dec 20 2006 20:13:10 +00:00 home.shtml
6        102400 Dec 20 2006 20:13:30 +00:00 home.tar
7        491213 Dec 20 2006 20:13:56 +00:00 128MB.sdf
8       1684577 Dec 20 2006 20:14:34 +00:00 securedesktop-ios-3.1.1.27-k9.pkg
9        398305 Dec 20 2006 20:15:04 +00:00 sslclient-win-1.1.0.154.pkg
22757376 bytes available (9314304 bytes used)
R1#sh file info flash:c1841-ipbase-mz.124-1c.bin
%Error opening f1ash:c1841-ipbase-mz.124-1c.bin (File not found)
R1#
So, with the preceding commands, I deleted the existing file and then verified the deletion by using both the show flash and show file commands. Let's add the new file with the copy command.
R1#copy tftp://1.1.1.2//c1841-advipservicesk9-mz.124-12.bin/ flash:/
    c1841-advipservicesk9-mz.124-12.bin
Source filename [/c1841-advipservicesk9-mz.124-12.bin/]?[enter]
Destination filename [c1841-advipservicesk9-mz.124-12.bin]?[enter]
Loading /c1841-advipservicesk9-mz.124-12.bin/ from 1.1.1.2 (via
    FastEthernet0/0): !!!!!!!!!!!!!!!!!!!!!!!!!!!!!!!!!!!!!!!!
[output cut]
!!!!!!!!!!!!!!!!!!!!!!!!!!!!!!!!!!!!!!!!!!!!!!!!!!!!!!!
[OK - 22103052 bytes]
22103052 bytes copied in 72.008 secs (306953 bytes/sec)
R1#sh flash
-#- -length- ---date/time--- path
1         1821 Dec 20 2006 20:11:24 +00:00 sdmconfig-18xx.cfg
2      4734464 Dec 20 2006 20:12:00 +00:00 sdm.tar
3       833024 Dec 20 2006 20:12:24 +00:00 es.tar
4      1052160 Dec 20 2006 20:12:50 +00:00 common.tar
5         1038 Dec 20 2006 20:13:10 +00:00 home.shtml
6       102400 Dec 20 2006 20:13:30 +00:00 home.tar
7       491213 Dec 20 2006 20:13:56 +00:00 128MB.sdf
8      1684577 Dec 20 2006 20:14:34 +00:00 securedesktop-ios-3.1.1.27-k9.pkg
9       398305 Dec 20 2006 20:15:04 +00:00 sslclient-win-1.1.0.154.pkg
10    22103052 Mar 10 2007 19:40:50 +00:00 c1841-advipservicesk9-mz.124-12.bin
651264 bytes available (31420416 bytes used)
R1#
You can check the file information as well with the show file command.
R1#sh file information flash:c1841-advipservicesk9-mz.124-12.bin
f1ash:c1841-advipservicesk9-mz.124-12.bin:
  type is image (elf) []
  file size is 22103052 bytes, run size is 22268736 bytes
  Runnable image, entry point 0x8000F000, run from ram
Remember that the IOS is expanded into RAM when the router boots, so the new IOS will not run until you reload the router. So, now let's take a look at how to use the Cisco SDM to upgrade a router's IOS.
I really recommend you play with the Cisco IFS commands on a router just to get a good feel for them because, as I've said, they can definitely give you some grief at first!
I mention “safer methods” a lot in this chapter. Clearly, I've caused myself some serious pain not being careful enough when working in flash memory! I cannot tell you enough–pay attention when messing around with flash memory!
One of the brilliant features of the ISR routers is that they use the physical flash cards that are accessible from the front or back of any router. You can pull these flash cards out, put them in an appropriate slot in your PC, and the card will show up as a drive. You can then add, change, and delete files. Just put the flash card back in your router and power up—instant upgrade. Nice!