
CHAPTER 18
Utilize Basic Digital Forensics Techniques
In this chapter you will learn:
• How digital forensics is related to incident response
• Basic techniques for conducting forensic analyses
• Familiarity with a variety of forensic utilities
• How to assemble a forensics toolkit
Condemnation without investigation is the height of ignorance.
—Albert Einstein
Digital forensics is the process of collecting and analyzing data to determine whether and how an incident occurred. The word forensics can be defined as an argumentative exercise, so it makes sense that a digital forensic analyst’s job is to build compelling, facts-based arguments that explain an incident. The digital forensic analyst answers the questions what, where, when, and how, but not who or why. These last two questions are answered by the rest of the investigative process, of which digital forensics is only a part.
The investigation of a security incident need not end up in a courtroom, but it is almost impossible to predict whether a criminal charge is appropriate in the event of a breach. To ensure that we can bring a case to court if necessary, we should treat every digital forensic investigation as if it will ultimately be held to the level of scrutiny of a criminal case. We all know, however, that this is not always possible when we’re trying to bring critical business processes back online or simply based on our required workload. Still, the closer we stay to the principles of legal admissibility in court, the better off we’ll be in the end.
The National Institute of Justice identifies the following three principles that should guide every investigation:
• Actions taken to secure and collect digital evidence should not affect the integrity of that evidence.
• Persons conducting an examination of digital evidence should be trained for that purpose.
• Activity relating to the seizure, examination, storage, or transfer of digital evidence should be documented, preserved, and available for review.
Phases of an Investigation
Forensic investigations, like many other standardized processes, can be conducted in phases. In this case, we normally recognize four: seizure, acquisition, analysis, and reporting. Seizure is the process of controlling the crime scene and the state of potential evidentiary items. Acquisition is the preservation of evidence in a legally admissible manner. The analysis takes place in a controlled environment and without unduly tainting the evidence. Finally, the goal in reporting is to produce a report that is complete, accurate, and unbiased.

EXAM TIP We break down digital forensics into four phases—seizure, acquisition, analysis, and reporting—though many organizations have reduced this to three phases by combining seizure and acquisition. The CySA+ exam will not cover the phases of an investigation but will focus on the techniques and technologies used throughout the process.
Seizure
The goal of seizure is to ensure that neither the perpetrators nor the investigators make any changes to the evidence. An overly simplistic, but illustrative, example of protecting evidence is putting up yellow “Crime Scene” tape and posting guards around the area where a murder took place, so guilty parties can’t return to the scene and pick up shell casings with their fingerprints on them. Obviously, the digital crime scene is different from a physical scene, in that the invisible perpetrator may continue to make changes even as the investigators are trying to gather evidence.
After you have secured and documented the environment, you can prepare to begin acquiring data. This may involve collecting evidence at the scene or, in some cases, unplugging electronic devices and removing them for transport to a forensics lab. It’s often a good idea to photograph the scene and individual elements before you touch or move anything. It is also important that you properly tag, label, and inventory everything you seize to avoid questions later on about evidence tampering or other issues. You’ll need access to disassembly and removal tools, such as antistatic bands, pliers, and screwdrivers, with appropriate packaging such as antistatic bags and evidence bags. And keep in mind that weather conditions (for example, extreme temperatures, snow, or rain) may impose additional requirements on your packaging and transportation arrangements.
Chain of Custody
A chain of custody is a documented history that shows how evidence was handled, collected, transported, and preserved at every stage of the process. Because digital evidence can be easily modified, a clearly defined chain of custody demonstrates that the evidence has not been tampered with and is trustworthy. It is important to follow very strict and organized procedures when collecting and tagging evidence in every single case. Furthermore, the chain of custody process should follow evidence through its entire lifecycle, beginning with identification and ending with its destruction, permanent archiving, or return to the owner. Figure 18-1 shows a sample form that could be used for this purpose.

Figure 18-1 A sample chain of custody form
Data Acquisition
Forensic acquisition is the process of extracting digital content from seized evidence so that it may be analyzed. This is commonly known as “taking a forensic image of a hard drive” (or any other storage media), but it actually involves more than just that. The main reason you extract the data is to conduct your analysis on a copy of the data evidence and not on the original; this protects the original content from changes, to ensure that it can be used later as evidence. Throughout the process, preserving the integrity of the original evidence is paramount. To acquire the original digital evidence in a manner that protects and preserves it, the following steps are generally considered best practices:
1. Prepare the destination media/medium. Secure any media on which you will store the digital content of your seized evidence. This destination medium may be a removable hard drive or a storage area network (SAN). You must ensure that the destination is free of any content that may taint the evidence. The best way to do this securely is to wipe the media by overwriting it with a fixed pattern of 1’s and/or 0’s.
2. Prevent changes to the original. The simple act of attaching a device to a computer or duplicator will normally cause its contents to change in small but potentially significant ways. To prevent any changes at all, you must use write-protection mechanisms such as hardware write blockers (described in the section “Write Blockers and Drive Adaptors” later in this chapter). Some forensic acquisition software products enable software-based write protection, but it is almost always better to use hardware mechanisms, since a physical barrier or separation could guarantee that no changes could ever be made.
3. Hash the original evidence. Before you copy anything, you should take a cryptographic hash of the original evidence. Most products support MD5 and SHA-1 (Secure Hash Algorithm 1) hashes. Though these protocols have been shown to be susceptible to collision attacks and are no longer recommended for general use, we have seen no pushback from the courts on their admissibility with evidence in criminal trials.
4. Copy the evidence. You can use a variety of applications to make a forensic copy of digital media, including the venerable dd utility in Linux systems. All these applications perform complete binary copies of the entire source medium. Merely copying the files is insufficient, because you may not acquire relevant data in deleted or unallocated spaces.
5. Verify the acquisition. After the copy is complete, compare the cryptographic hash of the copy against the original. If they match, you can perform analyses of the copy and be assured that it is perfectly identical to the original.
6. Safeguard the original evidence. Because you now have a perfect copy of the evidence, you must store the original in a safe place and ensure that no one can gain access to it.
Analysis
Analysis is the process of interpreting the extracted data to determine its significance to the case. Though the specific applications and commands you use for analysis may vary depending on the operating or file systems involved, the key issues are the same.
Examples of the types of analysis that may be performed include the following:
• Timeframe What happened and when?
• Data hiding What has been intentionally concealed?
• Applications and files Which applications accessed which files?
• Ownership and possession Which user accounts accessed which applications and files?
One of the most important tools to a forensic analyst is the timeframe, or timeline, which establishes a basis for comparing the state of the system at different points in time. For example, you may suspect that a user copied sensitive files to a thumb drive last Friday, but you don’t see that drive registered on the system until Monday. Without evidence of the user tampering with the data and time on the system, you can conclude that the exfiltration mechanism was not that particular thumb drive. The timeframe provides a chronologically ordered list of actions taken on the system, which can be categorized as read, write, modify, and delete operations on an item of interest.
Many investigators we know keep track of timelines in a simple spreadsheet with the following columns:
• Data and time
• Time zone
• Source (for example, Windows registry or syslog)
• Item name (for example, registry key name or filename)
• Item location (full path)
• Description
EXAM TIP You should always regard system timestamps with a healthy dose of skepticism. Threat actors are known to modify the system clock to hide the true sequence of their actions. This practice is known as timestomping. Keep an eye out for inconsistencies in timestamps during the CySA+ exam incident simulations, as they may be evidence of tampering.
At every step of the process, you should take copious notes on each specific action you take, down to the command and parameters you use. If you use a forensic analysis suite such as EnCase or Forensic Toolkit (FTK), the tool will record your actions for you. Even so, it is a best practice to keep notes on your own throughout the investigation.
Reporting
If you have been taking notes, you have been writing parts of your report as you conduct the investigation. Once you arrive at sound conclusions based on the available evidence, you can put together narrative statements in a report that present your arguments and conclusions in a readable fashion. As with any form of communication, knowing your audience is crucial. If the report is geared toward executive leaders, for example, the document would be different from one that would be presented in a court of law. If you need help creating a report, all major commercial forensic analysis suites have a feature that will generate a draft report you can customize for your own purposes.
Network
Before you begin to analyze network data for its usefulness in an incident or investigation, it must be collected as completely as possible. Broadly speaking, there are two approaches to capturing packets on a network: header captures and full packet captures. The difference, as the terms imply, is whether you capture only the IP headers or the entire packets, which would include payloads. Although it may be tempting for you to jump on the full-packet bandwagon, you should keep in mind that this approach comes with significant data management, as well as potential legal and privacy issues associated with collecting network traffic. It’s important that any collection activity which might involve capturing employee or customer data be brought to the attention of your legal and privacy team. Capturing very large sets of packet data is useful only if you can gain actionable information from them. You may choose to keep the data for reference in case a major incident occurs, but this doesn’t do away with the need to be able to handle all this data at collection time.
Many solutions are available for storing and retrieving very large data stores—the point is not that it shouldn’t be done, but rather that it should be carefully engineered.
Network Tap
A common option for packet capture is the network tap. Using tap hardware, you may be able to capture traffic between various points on the network for follow-on analysis. Like a phone tap, network taps can be used for diagnostic or monitoring operations. There are two types of network taps: passive and active.
A passive tap requires no additional power. A passive tap on copper cable will form a direct connection to wires in the cable and split the signal going across the line; power is still flowing to the destination, but enough is diverted to the tap to be used by the packet sniffer. Similarly, passive optical taps attempt to split the light beam passing though the fiber and divert a portion to a sensor. Although these taps require additional hardware, the original signal is not likely to be impacted greatly should the device fail. There are some disadvantages with this tap method, particularly on Gigabit-speed lines. Gigabit Ethernet connections are much more sensitive to power fluctuations and may experience high error rates, distortion, or failure should a passive tap be installed. For this reason, on Gigabit lines, an active tap (or active relay) must be used. Active taps completely terminate the signal in the tap device, sending a copy of the signal to a local interface and moving the original signal to a forwarder. That forwarder then amplifies the original signal, if necessary, and passes it to its original destination. This method works well for Gigabit lines, but at the expensive of adding another electrical device in the chain. Should the active tap fail, the entire circuit may remain open, alerting the administrator that something is amiss.

CAUTION Tapping a network using these methods has the potential to change the transmission characteristics of the line.
Hub
An alternate method of collection is to capture the traffic directly from the intermediary device, or hub. Because hubs share traffic coming in and out of all interfaces equally, they rely on the connected hosts to be honest and listen in on only what’s addressed to them. On some networks, it may be possible to place a hub at a network chokepoint and collect traffic traversing that location. Hubs are increasingly rare, even in home use, and have been replaced with the more discerning switch.
Switches
In a switched environment, data units called frames are forwarded only to destinations they are meant for. As each frame enters the switch, the switch compares the incoming frame’s destination Media Access Control (MAC) address with its existing list of addresses and their matching physical ports on the switch. When it finds a match, the switch forwards the data to the appropriate interface and then on to the destination device. Because a device’s MAC address is meant to be immutable, collecting from switches requires additional setup steps. Some switches have built-in functionality, called port mirroring, that directly supports packet capturing. With port mirroring enabled, the switch sends a copy of all the packets it sees to a monitored port. In some devices, this is referred to as the switched port analyzer (SPAN) port.
Wireshark/TShark
Wireshark and its command-line version, TShark, are network protocol analyzers, or packet analyzers. Wireshark is an indispensable tool for network engineers, security analysts, and attackers. Available for macOS, Linux, and Windows, this open source software provides a graphical representation of packet types and advanced filtering. Wireshark can interact directly with some wired and wireless network cards, enabling the user to place the device in promiscuous mode for more complete network capture. For work after the capture is complete, Wireshark provides statistical analysis summary and graphing functionality.
Wireshark is probably the most widely used GUI-based packet analyzer. Despite the many advantages of using Wireshark’s graphical front end, you may sometimes find it useful to use TShark if you can’t get to a GUI (for example, when connecting over Secure Shell [SSH]) or you want to script a packet capture. Whether you capture the traffic through the GUI or CLI, you can save it and view it on GUI later. You can similarly view captures from other tools (such as tcpdump) provided they were saved in the packet capture (PCAP) file format. Figure 18-2 shows a typical capture, whereas Figure 18-3 shows how you can drill into a specific packet to get a detailed view that includes the payload.
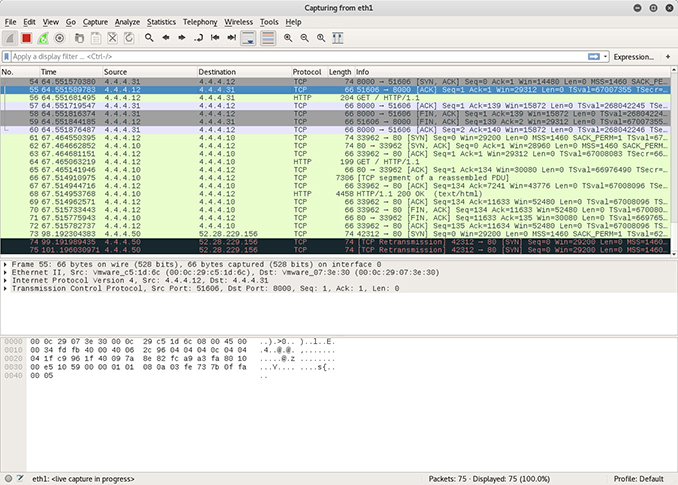
Figure 18-2 Typical Wireshark packet capture

Figure 18-3 Wireshark capture showing packet details
tcpdump
The tcpdump command-line tool comes standard in many distributions of the Berkeley Software Distribution (BSD), Linux, and macOS, which means you typically don’t have to worry about installing it on the platform from which you’d like to capture traffic. As long as you can SSH into a host and run as a privileged user (such as root), you can capture packets on most non-Windows systems. As shown in Figure 18-4, the display is not as easy to read as Wireshark’s, but the information captured can be the same. A Windows version, WinDump, is typically not installed by default. Unless you were planning to use a Windows computer for the capture in the scenario, tcpdump would be a good choice, particularly if you couple it with a more robust analysis engine.

Figure 18-4 Typical tcpdump packet capture
Endpoints
One of the most important steps you can take during a forensic investigation is to not power off anything you don’t have to. The one universal exception to this rule is if you are pretty sure that there is a running process that is deliberately destroying evidence. There are many reasons for keeping the devices running, but a key one is that memory forensics (that is, digital forensics on the primary storage units of computing devices) has dramatically evolved over the past few years. Although it is possible for a threat actor to install rootkits that hide processes, connections, or files, it is almost impossible to hide tracks in running memory. Furthermore, an increasing number of malware never touches the file system directly and lives entirely in memory. Shutting down a device without first acquiring the contents of memory could make it impossible to piece together the incident accurately.

NOTE To acquire volatile memory, you will likely have to make some changes to the computer, which typically include connecting an external device and executing a program. As long as you document everything you do, this should not render the evidence inadmissible in court.
Another important, if seemingly mundane, step is to document the entire physical environment around a device. An easy way to do this is to take lots of photos of the scene. Regardless of whether you take pictures, you should certainly take notes describing not only the environment but also each action your team takes to seize the evidence. Specific photos you typically want to take are listed here:
• Computer desktop showing running programs (if the device is unlocked)
• Peripherals connected to the device (for example, thumb drives and external drives)
• Immediate surroundings of the device (for example, physical desktop)
• Proximate surroundings of the device (for example, the room or cubicle)
Servers
Conducting a forensic analysis of a server requires addressing additional issues compared to workstations. For starters, it may not be possible to take the server offline and remove it to a safe analysis room. Instead, you may have no choice but to conduct an abbreviated analysis onsite. Live forensics (or live response) is the process of conducting digital forensics on a device that remains operational throughout the investigation. We already touched on a related issue earlier when we described the importance of capturing the contents of volatile memory before shutting off a device. If you cannot remove the server from a production environment, the next best thing is to capture its memory contents and files of interest (for example, log files).
Another consideration when dealing with servers is that they typically have significantly more storage capacity (both primary and secondary) than workstations. This is guaranteed to make the analysis process take more time, and it may also require special tools. For example, if your server uses a redundant array of inexpensive disks (RAID), you will likely need specialized tools to deal with those disks. Apart from the hardware differences, you will also have to consider the particular architectures of the software running on servers. Microsoft Exchange Server, for example, has a large number of features that help a forensic investigator, but that person will have to know his or her way around Exchange’s complex architecture. This point also holds for database management systems (DBMS) and in-house web applications.
OS and Process Analysis
We know that an operating system manages and controls all interactions with a computer. Though there are clearly a variety of operating systems in use today, they all perform the same three basic functions:
• Manage all computer resources such as memory, CPU, and disks
• Provide a user interface
• Provide services for running applications
The first of these is of particular interest to a forensic analyst, because every action that occurs on a computer system is mediated by its OS.
If you are investigating a Microsoft Windows system, two of the most important sources of information are the registry and the event log. The registry is the principal data store where Windows stores most system-wide settings. Though all major analysis suites include viewers for this database, you can also examine it directly on any Windows computer by launching the Registry Editor application. You can find literally hundreds of interesting artifacts in the registry, including the following:
• Autorun locations This is where programs tell Windows that they should be launched during the boot process. Malware oftentimes uses this for persistence (for example, HKLMSoftwareMicrosoftWindowsCurrentVersionRun).
• Most Recently Used lists Often referred to as MRUs, this is where you’ll find the most recently launched applications, recently used or modified documents, and recently changed registry keys. For example, if you want to see recently used Word documents, you would look in HKEY_CURRENT_USERSoftwareMicrosoftOffice12.0CommonOpen Find.
• Wireless networks Every time a computer connects to a wireless network, this is recorded in the registry, which you can then examine an as investigator in HKLMSOFTWAREMicrosoftWindows NTCurrentVersionNetworkListProfile.
Another useful source of information is the event logs, which you can access by launching the Event Viewer application in any Windows computer. There is actually a collection of logs, the number of which depends on the specific system. All Windows computers, however, will have an application log in which applications report usage, errors, and other information. The OS also maintains in a security log security-related events such as unsuccessful login attempts. Finally, every Windows system has a system log in which the OS records system-wide events.
Although Linux doesn’t have the convenience of a centralized registry like Windows, it has its own rich set of sources of artifacts for a forensic investigator. For starters, a lot of relevant data can be found in plaintext files, which (unlike Windows) makes it easy to search for strings. Linux also typically includes a number of useful utilities such as dd, sha1sum, and ps, which can help you acquire evidence, hash it, and get a list of running processes (and resources associated with them), respectively. You can do all this in Windows, but you’ll need to install additional tools first.
The Linux file system starts in the root directory, which is denoted by a slash. As an analyst, you need to be familiar with certain directories. We highlight a few of these, but you should build up your own list from this start:
• /etc This primary system configuration directory contains a subdirectory for most installed applications.
• /var/log All well-behaved Linux applications will keep their log files in plaintext files in this directory, making it a gold mine for analysts.
• /home/$USER Here, $USER is a variable name that you should replace with the name of a given user. All user data and configuration data are kept here.
Log Viewers
Every major OS provides the means to view the contents of its log files. The reason you may need a dedicated log viewer is that the built-in tools are meant for cursory examination and not for detailed analysis, particularly when the logs number in the thousands. Like most other features described so far, this functionality is oftentimes found in the forensic analysis suites. If you need a dedicated log viewer, there is no shortage of options, including many free ones.
A scenario in which a standalone log viewer would make sense is when you are trying to aggregate the various logs from multiple computers to develop a holistic timeline of events. You would want a tool that enables you to bring in multiple files (or live systems) and filter their contents in a variety of ways. Some tools that help you do this include Splunk, SolarWinds Event Log Consolidator/Manager, and Ipswitch’s WhatsUp.
Mobile Device Forensics
These days, it is uncommon for criminal investigations not to include mobile device forensics. Though this is somewhat less true in the corporate world, you should still be aware of the unique challenges that mobile devices present. Chief among these is that the device will continue to communicate with the network unless you power it off (which we already said may not be a good idea). This means that a perpetrator can remotely wipe the device or otherwise tamper with it. A solution to this problem is to place the device into a Faraday container that prevents it from communicating over radio waves. Faraday bags have special properties that absorb radiofrequency (RF) energy and redistribute it, preventing communication between devices in the container and those outside. Obviously, you will also need a larger Faraday facility in which to analyze the device after you seize it.
Although you can do some amount of forensic analysis on a live Windows or Linux system, mobile devices require dedicated forensic tools. The exceptions to this rule are jailbroken iPhones or iPads and rooted Android devices, because both of these expose an OS that is very similar to Linux and includes some of the same tools and locations. To make things a bit more interesting, many phones require special cables, although the migration toward USB-C in recent years is simplifying this as more devices adopt this interface.
Among the challenges involved in mobile forensics is simply getting access to the data. The mobile OS is not designed to support acquisition, which means that the forensic analyst must first get the device to load an alternate OS. This usually requires a custom bootloader, which is an almost-essential feature of any mobile forensics toolkit. Another peculiarity of mobile devices is that much of their data is stored in miniature DBMSs such as SQLite. These systems require special tools to view their data properly. Their advantage, however, is that the systems almost never delete data when the user asks them to. Instead, they mark the rows in the database table as deleted and keep their entire contents intact until new data overwrites them. Even then, the underlying file system may allow recovery of this deleted information. As with the bootloader, any common analysis suite will include the means to analyze this data.
Virtualization and the Cloud
All forensic efforts require that investigators follow specific procedures to collect evidence in a careful, verifiable, and repeatable manner. By following these procedures, if the evidence needs to be admissible in a court of law, you can be confident that you did the work to protect its integrity. Performing forensics on virtual environments has some significant benefits because the entire OS, memory contents, and in some cases networking and other infrastructure are all stored as files on a disk. When you combine this with the fact that virtualization technologies enable you to take a snapshot of the state of the OS, you can see how this could speed up a forensics analyst’s workflow as it related to acquiring the data.
VMware’s vSphere Hypervisor, for example, uses virtual devices such as network cards, memory, and certain peripherals. When creating a virtual machine, the hypervisor will create several important files. Among the most useful are the machine’s configuration in a VMX file, virtual hard drive in a VMDK file, BIOS state in a NVRAM file, and main memory in a VMEM file. While the vSphere Hypervisor may be useful if the security team has control of the hypervisor and supporting hardware, the challenge increases in a cloud environment. In preparing for forensics analysis, it’s critical that the identification of cloud computing occur as early as possible, because this may significantly affect the resources required to acquire that data, depending on its location.
Even with the rapid adoption of new distributed technologies, traditional forensics concepts are still generally applicable to cloud storage. As in traditional environments, cloud storage contains everything from the network and system configurations to files and user information. What gets particularly tricky is identifying and tracking data associated with virtualized devices and functionality. Because this is not normally exposed to the end user, and is often volatile and ephemeral, it will take more effort to track down and verify. Another aspect of cloud computing that complications the forensics model is the actual location of the data in question. The physical location of data in the cloud environment may pose a challenge, particularly if the investigation extends beyond the security team and involves legal and law enforcement efforts.
Given the existing strong auditing policies that are in place at many cloud service providers, you may have opportunities to take advantage of those offerings to support your forensics efforts. You may recall from our discussion of cloud technologies in Chapter 6 that many providers use the shared responsibility model when providing services to customers. Depending on your organization’s agreement with the provider, both in terms of which model is used as well as outlined by any service level agreements (SLAs), your security team may be entitled to a great deal of access to the underlying hardware, or you may have none at all. Additionally, it’s worth noting that in highly virtualized environments, it may be trivial to recover full snapshots of a system before, during, and after an attack. This can be incredibly useful in piecing together what occurred. It may also be the case that the same challenges that exist for auditors will exist for you, in that artifacts may sometimes not be traceable or available because of the distributed nature and rapid turnover of compute and storage resources.
Procedures
Among the core principles of forensics is maintaining the integrity of data regardless of whether it will be presented in a courtroom or kept in the security team’s archives. Security analysts, therefore, must take extra steps to document the process as completely as possible. Checklists and standard operating procedures ensure that the entire team is prepared to conduct at least a baseline level of forensics if needed.
Building Your Forensic Kit
There is no one-size-fits-all answer for what you should include in your forensic kit. It really depends on your environment and workflow processes. Still, there are some general tool types that almost everyone should have available if their work includes forensic analyses.
The jump bag is a prepackaged set of tools that is always ready to go. This is your first line of help when you are asked to drop everything you’re doing and respond to an incident that may involve a forensic examination. Because you want to ensure that the bag is always ready, you’ll probably want to develop a packing list that you can use to inventory the bag after each use to ensure that it is ready for the next run. You’ll probably want to include each of the following items in the jump bag.
Live Response Tools
Some live response tools enable responders to collect live volatile data quickly from a system using a USB stick, optical discs, or external drive. This is a useful solution for data that may be lost forever if the system is powered down.
Write Blockers and Drive Adapters
Hardware write blockers come in many flavors and price points, but they all do essentially the same thing: they prevent modifications to a storage device while you acquire its contents. Your most important consideration is the type of interfaces they support. You should consult your asset inventory to see how many different types of storage interfaces are in use in your environment. Some tools support SCSI and ATA, but not SATA, and others may not support USB devices. As long as you have an adapter and cable for each type of storage device interface in your organization, you should be in good shape.
Cables
A good part of your jump bag will be devoted to cables of various types. A good rule of thumb is that if you’ve ever needed a particular cable for one investigation, you should probably keep it in your jump bag forever. Here are some ideas for cables to include:
• Ethernet cables (crossover, straight-through, one-way)
• Serial cables (various flavors of USB and RS-232)
• Power cables
• Common proprietary cables (Lightning, Thunderbolt)
Wiped Removable Media
You may not have a few hours to wipe a hard drive before you must respond to an incident, so it pays to keep a few packed and ready. The type of interface doesn’t much matter (as long as it is supported by your write blocker), but the capacity does. In general, look into your asset inventory and find the largest workstation or external drive in your organization, and pack at least twice that amount of storage in your bag. Servers tend to have significantly larger drives than workstations, so if that is a concern, you may have to invest in a portable RAID solution such as Forensic Data Monster by Forensic Computers. Solutions like these are portable and designed to facilitate the acquisition of evidence.
A common approach in organizations that deal with fairly frequent investigations is to set up a network-attached storage (NAS) solution specifically for forensic images. As long as you have a fast network connection, you’ll be able to image any workstation or server with ease. An added advantage is that the NAS can serve as an archival mechanism for past investigations that may still be pending in court. In these cases, it is important to abide by your organization’s data-retention policies.
Camera
A camera is an often-overlooked but critical item in your jump bag. It is important to photograph the crime or incident site, and pretty much any digital camera with a flash will do. A useful addition to your camera is a small ruler that you can include in shots whenever you need to capture a sense of distance or scale. Ideally, the ruler should have a matte surface to minimize glare.
Crime Scene Tape
This may sound like overkill, but having some means of notifying others in the area that they should not enter is critical to the seizure process. Crime scene (or other restricted area–labeled) tape does the job nicely and inexpensively.
Tamper-Proof Seals
When the amount of evidence you collect, or the distance you have to transport it, requires the assistance of others (for example, drivers), you probably want to seal the evidence containers with a tamper-resistant seal. In a pinch, you can use tape and sign your name across it. However, if you can afford them, dedicated lockable containers will be best.
Documentation and Forms
Digital forms and other documents may be required by your organization during an investigation. It is a good idea to print hard copies and keep them in your jump bag, because you never know whether you’ll be able to access your corporate data store in the middle of an incident response. Following are some items most of us would keep in our bags.
Chain of Custody Form Earlier in the chapter, Figure 18-1 showed an example chain of custody form, but you should tailor this to your own organization’s requirements if you don’t already have your own form. The important aspect is to ensure that there are enough copies to match with each seized piece of evidence. Ideally, your evidence transport containers have a waterproof pouch on the outside into which you can slide a form for the container (individual items in it may still need their own forms).
Incident Response Plan It is not unusual for an incident response to start off as one thing and turn into something else. Particularly when it comes to issues that may have legal implications (for example, forensic investigations), it is a good idea to have a copy of the incident response plan in your jump bag. This way, even if you are disconnected from your network, you will know what you are expected or required to do in any situation you encounter.
Incident Log Every good investigator takes notes. When you’re performing a complex investigation, as most digital forensics investigations are, it is important that you document every action you take and every hypothesis you are considering. The most important reason for this level of thoroughness is that your conclusions are only as valid as your processes are repeatable. In other words, any qualified individual with access to the same evidence you have should be able to follow your notes and get the same results that you did. Keeping a notebook and pen in your jump bag ensures that you are always ready to write down exactly what you do.
Call/Escalation List If the conditions on the ground are not what you thought they’d be when you started your investigation, you may have to call someone to notify him or her of an important development or request authorization to perform some action. Though the call/escalation list should really be part of your incident response plan, it bears singling it out as an important item to carry in your jump bag.
Cryptography Tools
It is often the case that you must ensure the confidentiality of an investigation and its evidence. To accomplish this, you can turn to a variety of cryptography tools that are available for multiple platforms. Perhaps the simplest approach to encrypting files is to use the compression utilities available in most operating systems, but you must ensure that they are password protected. The advantage is that these applications are ubiquitous, and the files are mostly usable across platforms.
If you need something a little more robust, you can try any number of available encryption tools. One of the most popular and recommended open source solutions is VeraCrypt, which is based on the now defunct TrueCrypt. This tool is free and available for Windows, macOS, and Linux systems. VeraCrypt supports multiple cryptosystems, including AES, Twofish, and Serpent. It also supports the creation of hidden, encrypted volumes within other volumes.
Acquisition Utilities
The acquisition phase of a forensic investigation is perhaps the most critical point in terms of ensuring the admissibility of evidence, analysis, and conclusions in court. This is where you want to slow down, use a checklist, and ensure that you make no mistakes at all, because doing so could possibly invalidate all the work that follows.
Forensic Duplicators
Forensic duplicators are systems that copy data from a source to a destination, while ensuring that not even a single bit gets altered in the process. What sets them apart from other copying utilities is that they do not rely on file system operations, which means they can recover file system artifacts such as the Master File Table (MFT) in Windows systems and the inode table in Linux. This means that a hard drive running the macOS, Windows, or Linux can be copied in the same way using the same utility. Imaging tools usually allow for the entire contents of the drive to be duplicated to a single file in a remote destination. Unlike regular file copies, forensic duplicates also include the file system’s slack and free space, where the remnants of deleted files may reside.
dd Utility
Using the dd utility is just about the easiest way to make a bit-for-bit copy of a hard drive. You can find the program in nearly every Linux distribution as well as in macOS. Its primary purpose is to copy or convert files, and accordingly there are several options for block sizes and image conversion during the imaging process that may assist in follow-on analysis. Because almost everything in the extended file system (ext) used in Linux is a “file” (even network connections and peripheral devices), dd can duplicate data across files, devices, partitions, and volumes. The following command will do a bit-for-bit copy of hard drive hda to a file called case123.img using a block size of 4096 bytes, and it will fill the rest of a block with null symbols if it encounters an error:
dd if=/dev/hda of=case123.img bs=4k conv=noerror,sync
FTK Imager
FTK Imager is a free data preview and imaging tool developed by AccessData. Unlike the dd utility, this imager is a full-featured product that enables you to perform a forensically sound acquisition, verify it by generating MD5 and/or SHA-1 hashes, and even preview the files and folders in a read-only fashion. FTK Imager will also read registry keys from Windows and lets you preview them and their values. It also supports compression, encryption, and multiple output formats, including EnCase evidence file format (E01) and the raw format generated by dd (001).
Password Crackers
It is increasingly common to find encrypted files or drives in everything from mobile devices to back-end servers. If a suspect is unable or unwilling to provide the password, or if there is no suspect to interrogate in the first place, you may have to resort to specialized software that is designed to guess passwords and decrypt the protected resources. A popular commercial solution in this space is Passware Kit Forensic. It can operate on its own or be integrated with EnCase. Passware Kit Forensic can decrypt more than 280 different types of protected files, including BitLocker, FileVault, iCloud, and Dropbox. Additionally, because password cracking can take a very long time, this tool can take advantage of graphics processing units (GPUs) and multiple networked computers to accelerate the process. The two most popular password-cracking tools among security professionals are John the Ripper and Hashcat. Though their feature sets are very similar, there are subtle differences with which you may want to become acquainted.
John the Ripper
John the Ripper is an open source password-cracking tool, initially developed for Unix, that now has variations for many other operating systems. Figure 18-5 shows options for usage with the command-line tool. John runs attacks with wordlists, which reference a precompiled list of possible passwords, or by brute force, which tries many possible combinations in the character space. Additionally, John supports autodetection of password hash types, the protective measure used by operation systems to prevent unauthorized viewing of the password file. The commercial version expands on the already impressive selection of hashes supported.

Figure 18-5 The John the Ripper utility in the command line
Hashcat and oclHashcat
As we covered in Chapter 4, Hashcat and its GPU-optimized variant, oclHashcat, are powerful password-cracking utilities that support a vast number of attack modes, such as brute-force, dictionary, and rule-based. Combined with their ability to target various hash types, databases, and full-disk encryption schemes, these software products have become the go-to for many forensics analysts.
NOTE Password-cracking software has been used successfully for many years, but the trend of increasingly affordable hardware has ushered in the age of hardware-accelerated password cracking. Using “rigs” composed of several GPUs, a user can brute-force passwords orders of magnitude faster than traditional CPU-only methods.
Hashing Utilities
The most popular hashing algorithms for forensic analysis are MD5 and SHA-1, and they are supported by all the popular tools we’ve discussed in this chapter. If you need a standalone hashing utility, these are included by default by many operating systems. The macOS has the md5 tool available from the command line. Linux typically has the md5 tool as well as sha1sum. Finally, Microsoft provides the File Checksum Integrity Verifier (FCIV) command-line tool as a free but unsupported download. FCIV is able to compute both MD5 and SHA-1 hashes, as shown in Figure 18-6.
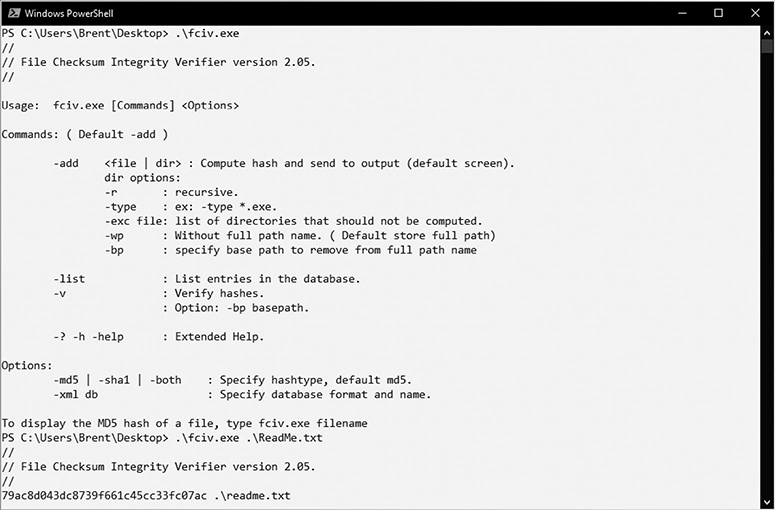
Figure 18-6 The Windows File Checksum Integrity Verifier options and usage
Forensic Suites
Reconstructing what happened after the fact is inherently a difficult task, but we have many tools at our disposal to assist with the entire process, from documentation to reporting. Forensic suites include a range of tools to uncover data thought to be lost, or data that may be lost easily, such as in the case of volatile memory. Because documentation is an important part of forensics, particularly in criminal investigations, some suites automatically document the evidence analysis progression and technical tasks that have been performed by the analyst.
EnCase
The EnCase suite of tools is very popular with law enforcement and government agencies for forensics missions because of its easy-to-use GUI and chain of custody features. The EnCase suite includes tools for forensic acquisition, analysis, and report generation. Its evidence file format (E01) is among the most common types of forensic imaging formats, in part because of its high portability. The imaged volume’s data, metadata, and hashes are all included in a single file.
FTK
AccessData Forensic Toolkit, or FTK, is a popular choice for investigators needing to create forensic images of hard drives. FTK is a favorite for forensics analysis because of its built-in logging features, which make the process of documentation easier for investigators looking to preserve details of the analysis itself. One of the more popular tools included in the FTK suite is the FTK Imager, a data preview and volume imaging tool.
Cellebrite
Cellebrite is a company that developed data transfer solutions for mobile carriers and has since moved into the mobile forensics market. Its flagship product, the Universal Forensic Extraction Device (UFED), is a handheld hardware device primarily marketed to law enforcement and military communities. With the UFED, a user can extract encrypted, deleted, or hidden data from select mobile phones. Cellebrite also provides evidence preservation using techniques such as write blocking during the data extraction procedure.
File Carving
File carving is a technique used to fully recover partially recovered files or those discovered to be damaged. Because carving techniques don’t depend on the file system in use, file carving is a common method for data recovery when all else fails. The basic concept of carving is that specified file types are searched for and extracted from raw binary data by looking at file structure and content without any matching file system metadata.
A popular multiplatform carving utility, PhotoRec, is among the fastest and most reliable free tools available. While originally designed to recover media files from damaged digital camera memory, the program is capable of extracting files, including system files and documents, from hard disks, optical discs, and external media. Figure 18-7 shows the progress screen from a PhotoRec recovery attempt. Notice that the utility lists the types and quantity of the recovered files. It’s able to determine the file type by reading the media block by block, looking for patterns associated with certain document types. JPEG files, for example, can be identified by looking for blocks with any of the following byte sequences:

Figure 18-7 PhotoRec command-line utility actively recovering files from a volume
• 0xff, 0xd8, 0xff, 0xe0
• 0xff, 0xd8, 0xff, 0xe1
• 0xff, 0xd8, 0xff, 0xfe
Chapter Review
Digital forensic investigations require a very high degree of discipline and fixed adherence to established processes. A haphazard approach to these activities can mean the difference between successfully resolving an incident and watching a threat actor get away with criminal behavior. The challenge is in striking the right balance between quick responses to incidents that don’t require this level of effort and identifying those that do require the effort early enough to adjust the team’s approach. Because you may not know which events can escalate to forensic investigations, you should always be ready to perform investigations in a forensically sound way, even if you must conduct the investigation with little or no notice.
The CySA+ exam will require you to be familiar with the techniques associated with seizure, acquisition, analysis, and reporting in digital forensics. For example, you may see questions that present a scenario in which some part of the process has already been completed, and you are asked to decide what should be the next thing to do. This may require familiarity with the way in which you would use some of the most common tools, such as the Linux dd utility. Though you will probably not see questions that require you to issue commands with arguments, you may have to interpret the output of such tools and perform some sort of simple analysis of what may have happened.
Questions
1. In the event of a serious incident, which task is not a critical step to take in controlling the crime scene?
A. Record any interactions with digital systems.
B. Verify roles and training for individuals participating in the investigation.
C. Remove power from currently running systems.
D. Carefully document who enters and leaves the scene.
2. What is the practice of controlling how evidence is handled to ensure its integrity during an investigation called?
A. Chain of control
B. Chain of concern
C. Chain of command
D. Chain of custody
3. As part of the forensic analysis process, what critical activity often includes a graphical representation of process and operating system events?
A. Registry editing
B. Timeline analysis
C. Network mapping
D. Write blocking
4. The practice of modifying details about a file’s creation, access, and modification times is referred to as what?
A. Timestomping
B. Timestamping
C. Timelining
D. Timeshifting
Use the following command-line input to answer Questions 5–7:
dd if=/dev/sda of=/dev/sdc bs=2048 conv=noerror,sync status=progress
5. How many bits of data are read and written at a time?
A. 2048
B. 16384
C. 256
D. 512
6. What is the destination of the dd operation?
A. noerror
B. /dev/sda
C. sync
D. /dev/sdc
7. What is the purpose of the command?
A. To copy the primary partition to an image file
B. To restore the contents of a hard drive from an image file
C. To copy the entire contents of the hard drive to an image file
D. To delete the entire contents of /dev/sda
Use the following scenario to answer Questions 8–10:
You are called to the scene of a high-profile incident and asked to perform forensic acquisition of digital evidence. The primary objective is a Linux server that runs several services for a small company. The former administrator is suspected of running illicit services using company resources and is refusing to provide passwords for access to the system. Additionally, several company-owned mobile phones appear to be functioning and are sitting on the desk beside the servers.
8. What utility will enable you to make a bit-for-bit copy of the hard drive contents?
A. MFT
B. dd
C. MD5
D. GPU
9. What type of specialized software might you use to recover the credentials required to get system access?
A. Forensic duplicator
B. dd
C. Password cracker
D. MD5
10. You want to take the mobile phones back to your lab for further investigation. Which two tools could you use to maintain device integrity as you transport them?
A. Faraday bag and a tamper-evident seal
B. Write blocker and crime scene tape
C. Thumb drive and crime scene tape
D. Forensic toolkit and tamper-evident seal
Answers
1. C. Removing power should not be done unless it’s to preserve life or limb, or for other exigent circumstances. In many cases, it’s possible to recover evidence residing in running memory.
2. D. A chain of custody is a history that shows how evidence was collected, transported, and preserved at every stage of the investigation process.
3. B. Timeline, or timeframe, analysis is the practice of arranging extracted data from a Unix file system, the Windows registry, or a mobile device in chronological order to better understand the circumstances of a suspected incident.
4. A. Timestomping is a technique that attackers use to modify details about a file’s creation, access, and modification times.
5. B. The bs argument indicates the number of bytes transferring during the process. Because there are 8 bits in a byte, you multiply 2048 by 8 to get 16384 bits.
6. D. The of argument indicates /dev/sdc as the the output file, or destination, of the process.
7. C. This command will duplicate the contents of the entire hard drive, indicated by the argument /dev/sda. You should be careful to double-check the spelling of both input and output files to avoid overwriting the incorrect media.
8. B. dd is a common utility included in most Linux-based systems that enables you to make bit-for-bit copies of hard drive contents. It can duplicate data across files, devices, partitions, and volumes.
9. C. Password crackers are specialized software designed to guess passwords and decrypt the protected resources. The software can be very resource intensive since cracking usually requires a lot of processing power or storage capacity.
10. A. A Faraday container will prevent the devices from communicating over radio waves by absorbing and redistributing their RF energy. You should secure the bag with a tamper-evident seal to help you identify whether its contents have been interfered with during transport.