
Chapter 8. Application Security, Access Control, and Personalizing Your Application
Right now, someone using this application would be able to see and edit every ticket in it. While this may be okay for a small company, we need to be able to address security concerns if we’re going to use this technology to develop real-world line of business applications. In this chapter, you will learn about the types of authentication supported by LightSwitch. You will learn to manage roles and rights using the built-in user interface and connect the logged-in user with profile information about your users. Finally, you’ll learn how to add this data to a screen and integrate it into your application.
Let’s start out with a quick discussion about application security basics.
Authentication is the function of validating the identity of a user. This does not inherently provide the user with the ability to do anything within an application; it simply determines the user’s identity.
Authorization is the function of determining access rights to a set of resources.
In order to perform authorization activities, we first need to know the identity of the user—so these functions are typically performed together. Generally, users who are not authenticated are considered anonymous or guests and can be given a limited authorization.
Enabling Authentication: Windows or Forms
Authentication in LightSwitch is disabled by default. In the Solution Explorer, double-click on Properties to launch the Application Designer and select the Access Control tab.
Windows authentication and custom forms authentication are both supported. Windows authentication utilizes a user’s Windows logon information to identify the user. With forms authentication, users are stored in your application or you can implement custom logic to authenticate your users.
When we implement forms authentication in LightSwitch, you might think that you would need to write custom authentication code that plugs into our Silverlight application. The design of forms authentication leverages the fact that LightSwitch services are hosted on a server in the ASP.NET platform. Forms authentication lets you authenticate users by using your own code and then maintaining an authentication token in a cookie or in the page URL. Forms authentication mode in LightSwitch is based on ASP.NET forms authentication and reads in the authenticated user from the server. Specifically, the Silverlight application reads your ASP.NET forms authentication token and honors that identity.
To avoid the complexity of provision test users into an Active Directory domain, we’re going to use forms authentication for our app. Let’s select it on the Access Control tab, as shown in Figure 8-1.
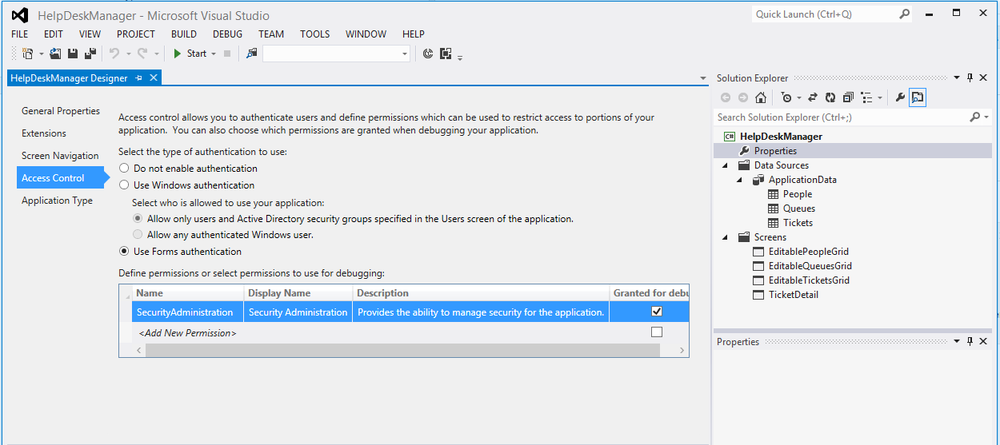
On the configuration screen, you can define which permissions the application will support. When you launch the application in debug mode, you will automatically be logged in as the TestUser account for your convenience. You can check off which permissions the TestUser will have when the application is launched in debug mode.
If you check the SecurityAdministration Granted for Debug checkbox, then additional screens will appear at runtime that allow you to manage users and roles.
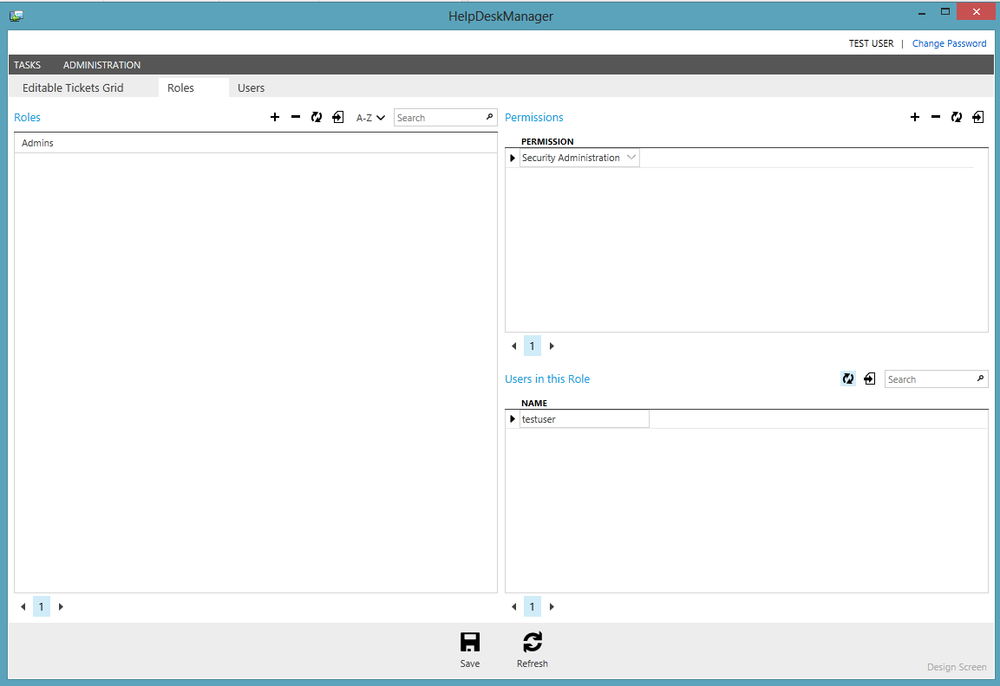
As a user with the SecurityAdministration permission, you can add new roles and then associate defined permissions with these roles on the Roles Admin Screen. Then, from your User Admin Screen, you can add users and associate them with roles (Figure 8-2).
When you deploy your application later, you can automatically add a user with the SecurityAdministration permission to allow you to set up your application once it’s been deployed to the server.
Adding a Welcome Message Using Our ViewModel
Now that we’ve enabled authentication, let’s add a welcome message at the top of the Tickets grid that shows the name of the logged-in user. We’ll learn how to add some static text to a LightSwitch screen and we’ll learn how to access information about logged-in users.
Open the screen designer for the EditableTicketsGrid and hit the Add Data Item button. When we are adding data items to our screen, we are really extending our ViewModel. In MVVM architecture, the data model we created in Chapter 5 forms the model, data items added to our screen from the ViewModel, and will be data-bound to the XAML screen that forms the View. When we add the new data item to our screen, Visual Studio LightSwitch will automatically generate all this code for us.
There are three types of members that we can add as data items to our ViewModel for data binding: a method, a property, or a query.
A method is a piece of code in our application that returns a single value. A property is a variable used to store information. Properties can exist in a variety of data types such as strings or integers. Finally, queries return complex types based on the entities in our solution. Anytime we want to access the data from the entities in our application, we will use a query. An example is a query to return a specific ticket or a query that returns all tickets assigned to me (Figure 8-3).
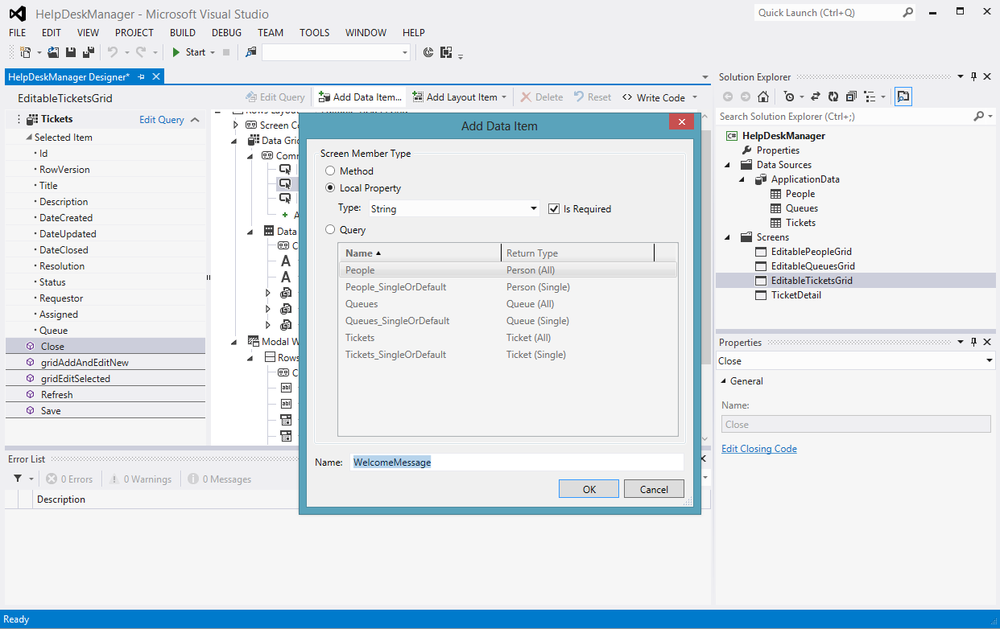
In this case, we’re adding just a property of type String that will allow us to programmatically assign some text and access it for data binding in the screen designer.
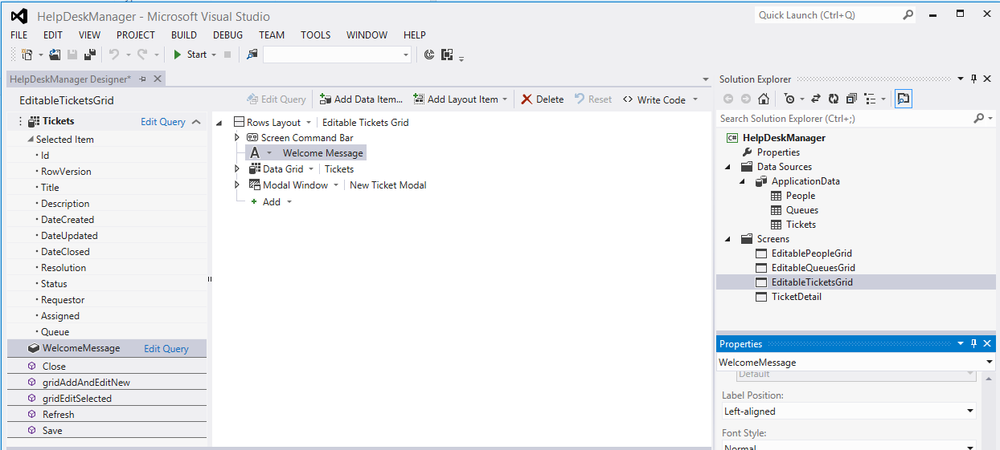
You’ll notice that it was added to the list of data items available on this screen on the left below our dataset. We can take that data item and drag it onto the screen designer above our DataGrid and the binding is automatically generated for us. Then we’ll change the control to a label using the Properties window and set the Label Position to none. This will hide the auto-generated field label that says “Welcome Message.”
After the data item has been added to your screen, we can go ahead and write some code to populate our welcome message. This is the third time we’ve added code to a screen rather than to our entities. The first two times were to overwrite the Add and Edit buttons in order to spawn the modal window. It’s important to think about limiting the amount of logic you place in your screens as this code is specific to each client you create. If, in the future, you write an HTML client or a SharePoint client, you will need to write equivalent client code.
The process to add client-side code is similar to what we did in the
data designer. Click the Write Code drop-down and select the EditableTicketsGrid_Activated event. This event
fires on the client side after the screen is activated before it is
displayed to the user (Figure 8-4).
Just like on the screen designer, our WelcomeMessage property has been made available
for us to access from the screen’s partial class.
partial void EditableTicketsGrid_Activated()
{

WelcomeMessage = String.Format("Welcome {0}! ({1})", Application.User.FullName,
Application.User.Identity.Name);

}
As you can see, this is just a single line of code again. We are
simply assigning a string to our WelcomeMessage property in our ViewModel. If you
aren’t familiar with the String.Format
method, it’s very useful. String.Format
allows you to write a literal string and enclose any parameters in curly
braces. You can see in the example below that parameter 0 is replaced with
UserName and parameter 1 is replaced with
HomeTown. More information on String.Format is available at this msdn Microsoft page.
WelcomeMessage = String.Format("Welcome {0} from {1}.",UserName, HomeTown);This isn’t LightSwitch specific, but it becomes really useful with more complex string manipulation. Let’s go ahead and run our application.
As you can see at the top in Figure 8-5, we’re logged in as Test User with an account name of TestUser. Perfect!

The account information that we see in Figure 8-5 is based on the logged-in user as shown in our authentication system. Often, we may have additional profile information about our users that we wish to leverage in order to tailor our application. We have a People table that contains information about our users in our application. We’ll need to associate the account name that authenticates with our application to a person in our People table if we want to use this information.
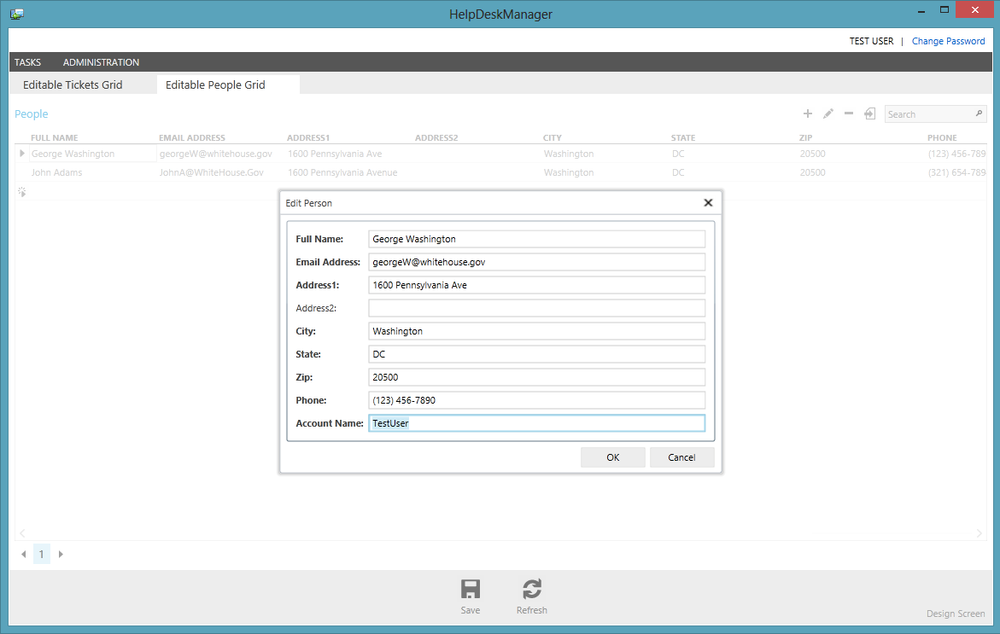
Let’s go ahead and associate our TestUser account with one of the users in our People table. This will allow us to connect our profile and address information with the user’s profile provided by forms authentication. To do this, run the application, open the Editable People Grid, and change the account name on one of our users to TestUser (see Figure 8-6).
In a real-world scenario, you probably don’t want to manually enter every user into your application. If your users exist in another database, you may want to transfer them via SQL Server Integration Services instead.
Our People table in this solution contains profile information about each of the users. To show profile data about a logged-in user, we’ll want to make sure that we have a person record associated with their AccountName. Once we’ve associated a person with the LightSwitch test account, we can modify our application to show more of the profile data stored in the People table.
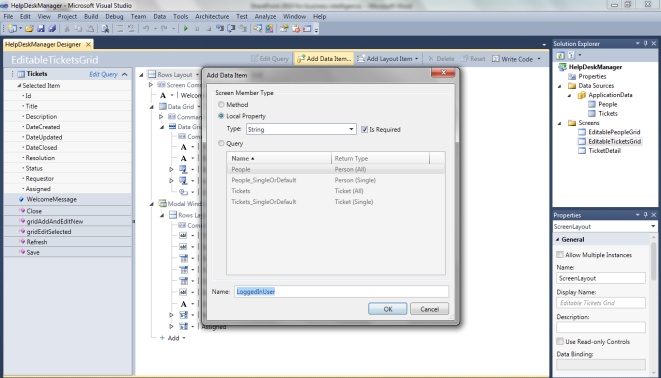
Let’s stop the application, open the screen designer for EditableTicketsGrid, and add another local property called LoggedInUser (Figure 8-7).
Drop down Write Code again and go back to our EditableTicketsGrid_Activated event. We’ll wire
this property up to the logged-in account name. You can see that when
making this change, we also refactored our welcome message to use that
variable as well just to make the code cleaner.
partial void EditableTicketsGrid_Activated()
{

LoggedInUser = Application.User.Identity.Name;

WelcomeMessage = String.Format("Welcome {0}! ({1})",
Application.User.FullName, LoggedInUser);

}
We added the local property and bound the value to that so we can use it for data binding. We want to take advantage of the data in our database to personalize the application based on the logged-in user. An example might be showing something based on someone’s department or based on a flag indicating that they are a manager. To accomplish this, you will write a query to bring back the profile information for a specific account and bind this property to the query.
Adding a Query to the Model
To return data that matches a specific set of criteria, you can create and save queries as a part of your application model. You can then specify your search criteria by using the query designer and can save that for use in the screen. Each query can expose parameters that can be passed in at runtime to vary the results. We’ll start by adding a query to our People entity collection.
Right-click on People and select Add Query.
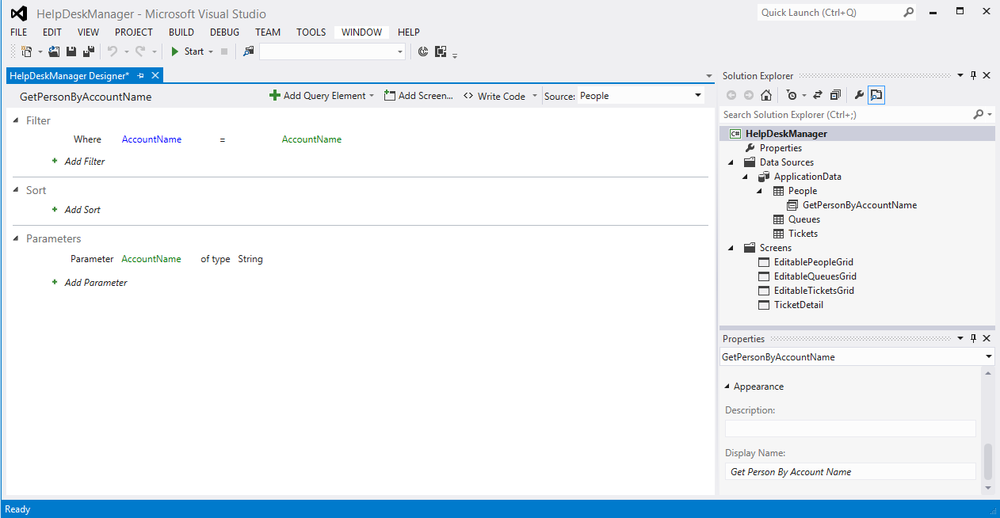
Specify the name of the query in the upper left hand corner; we’ll use GetPersonByAccountName.
Under the Filter heading, click Add Filter.
Configure the filter to specific where account name = a new parameter called AccountName.
First you’ll notice that our named query appears in the Solution Explorer below the entity set. Next, you’ll see that when you specified a new parameter it was automatically added to the Parameters section at the bottom of the query designer. This parameter will be exposed for data binding when we add the query to our screen (Figure 8-8).
If you needed more control over the query, you could write code to
override the PreProcessQuery event
and add additional criteria or logic by extending the LINQ query that
LightSwitch is generating. For this example, the basic query designer is
adequate.
Add the Query to the Screen (ViewModel)
Now that we’ve written our query, let’s go back to the screen designer for the EditableTicketsGrid and add a data item again. This time, we’ll add a query instead of a local property (see Figure 8-9).
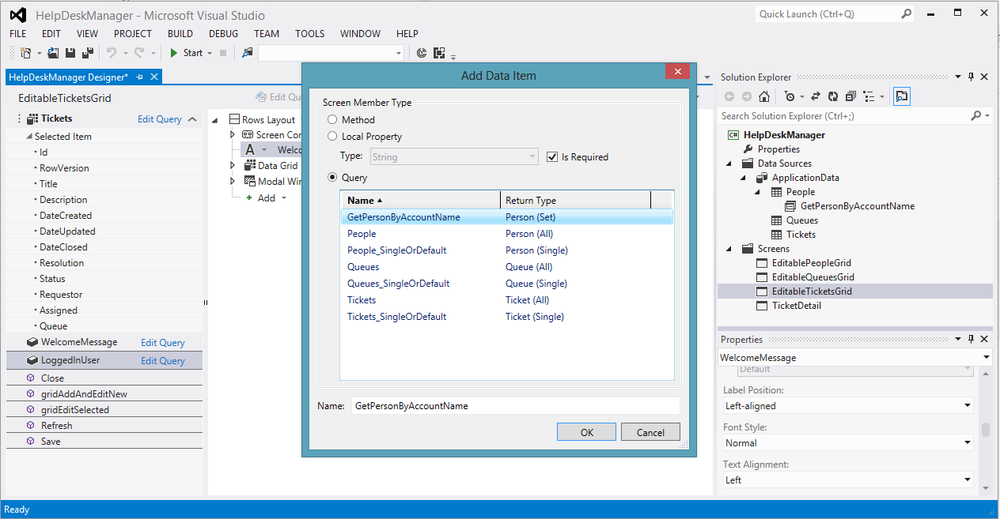
The named query we just created, GetPersonByAccountName, is listed here so go ahead and select it.
Binding to Query Parameters
Once we’ve added the query to the ViewModel on our screen, it’s visible as screen data on the left of our screen designer. At the bottom of that dataset is a section named Query Parameters where our parameter has been exposed for data binding.
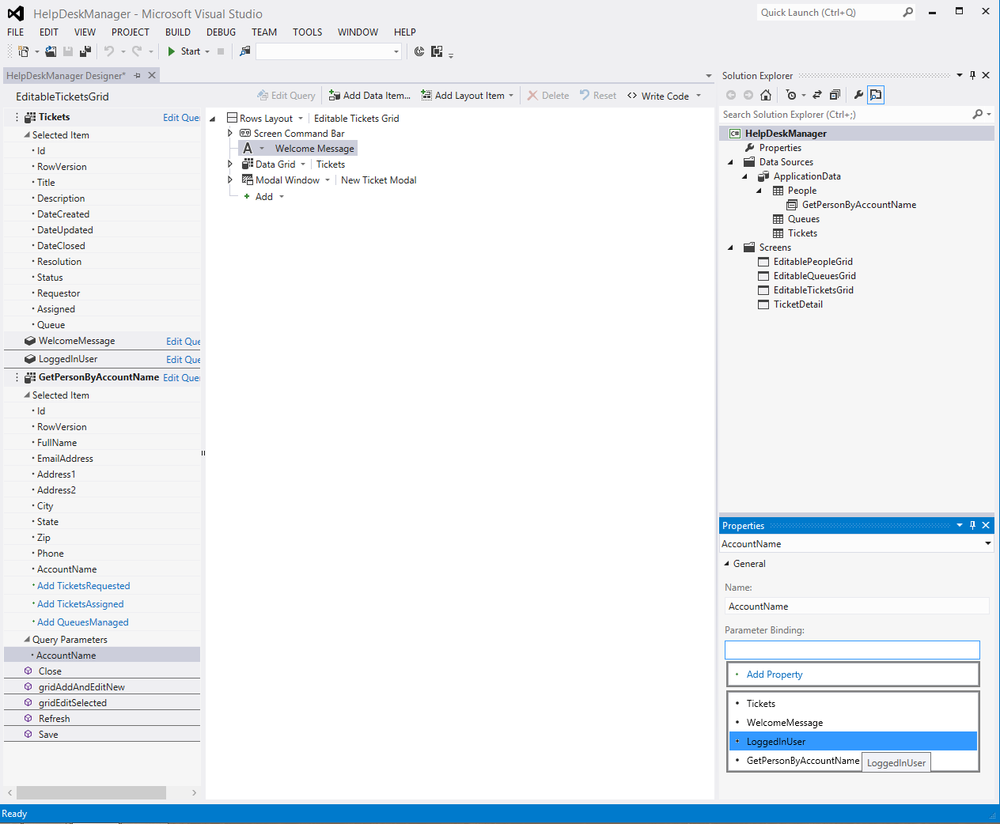
When you select the AccountName parameter from the ViewModel, it
will appear in the Properties window where a drop-down of available
properties appears to graphically data-bind it to our LoggedInUser local property that we created
earlier in our ViewModel. When we create that binding, you’ll notice in
the screen data that an arrow now points from our AccountName parameter
to the LoggedInUser local property to
which it’s bound.
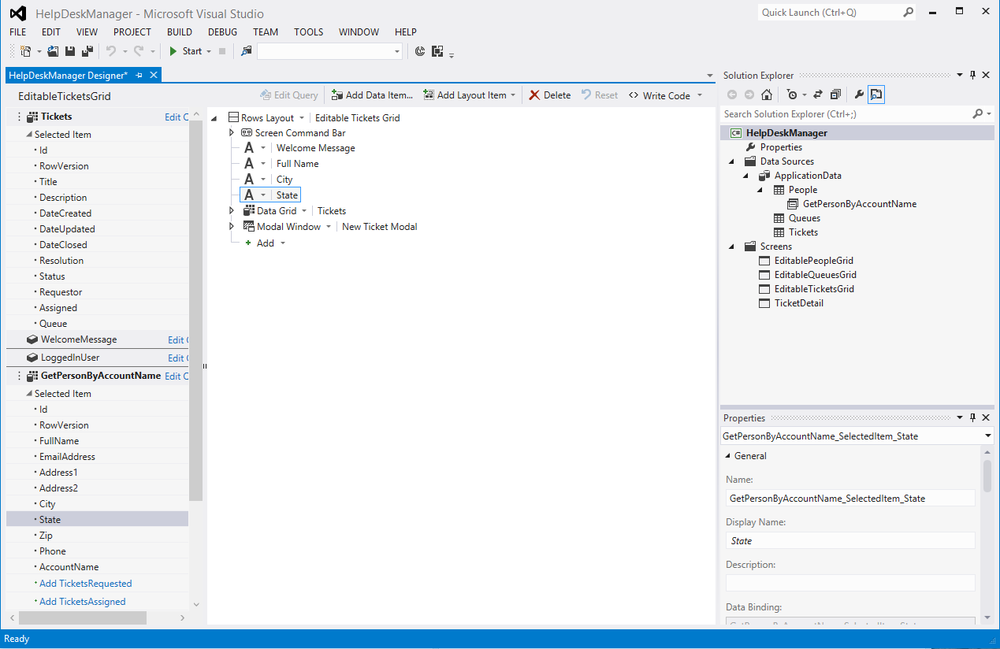
That’s all there is to it! Just drag the properties you’d like on the design surface and set them to use label controls. As you can see for this example in Figure 8-11, we added FullName, City, and State right below our Welcome Message.
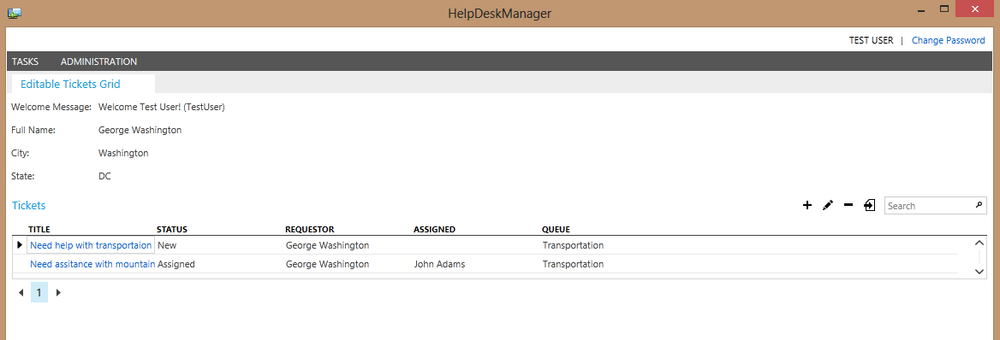
When you run the solution, the logged-in user is cached in the ViewModel and is then reused as a query parameter to query the logged-in user’s profile information and cache that in the ViewModel for data binding in our XAML screen (Figure 8-12). While it’s great to understand how this magic works and the MVVM architecture behind it, it’s even nicer that you didn’t have to write any of this code. It just works!
Summary
In this chapter, we learned about authenticating users with Windows and forms authentication. We learned a bit more about the MVVM architecture that LightSwitch uses. With that understanding, we extended our ViewModel to leverage the logged-in user to filter profile data, and we personalized our application based on our user data. In the next chapter, we will run our application and discuss runtime and debugging characteristics of a LightSwitch application.