
Chapter 11. Deploying Your LightSwitch Application
Congratulations, you’ve built a great application! The application has a normalized database, a business layer with web services, and a highly interactive user interface. It looks like this application is going to be a great success except for one little detail. It only runs on your machine and the only way you can launch it is through Visual Studio. We’ve talked about wanting to use the data from our application to build a business intelligence solution. In order to do that, you’ll need to get this running on a server where your users can access it; you will also need to get the data on a server where you can report from it. In this chapter, we’ll talk about deployment of a LightSwitch application with on-premise IIS and SQL Servers. LightSwitch also supports deployment to Windows Azure using the same application we just built, but in order to take advantage of the SQL Server 2012 business intelligence features, you’re going to deploy to your own servers.
The Application Designer
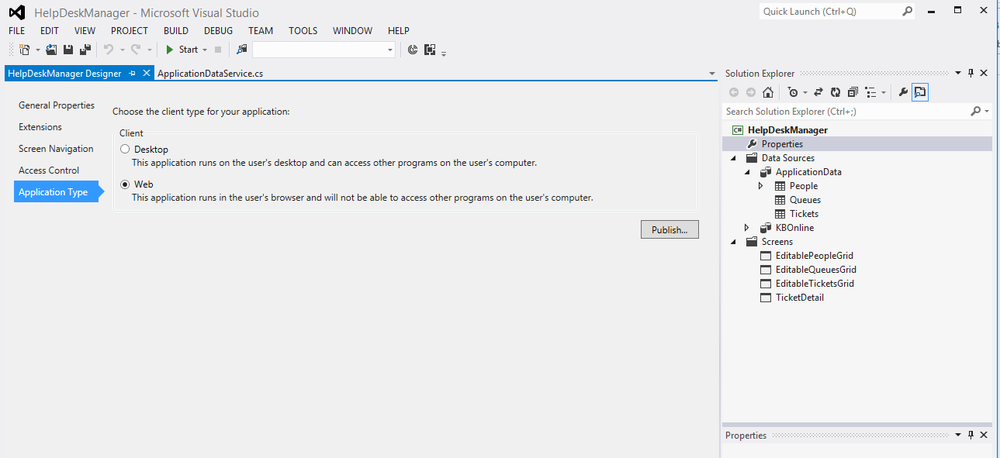
Before we deploy the application to a server, let’s start with a quick review of the application properties for our LightSwitch application. To get to the Application Designer, double-click on Properties in the Solution Explorer window on the right. This will launch the Application Designer. In particular, we’re going to be interested in the bottom tab labeled Application Type.
When we deploy our application, we’re going to expose it within SharePoint so we’ll want to render this as a Web Client, not a Desktop Client. This will allow us to use a Page Viewer Web Part in SharePoint to surface our application. We’ll walk through that later this chapter. If you’ve installed Update 2 to Visual Studio 2012 you will have an additional option to publish using the SharePoint 2013 cloud app model. The approach we use here is compatible with both SharePoint 2010 and SharePoint 2013.
If you remember back to the when we talked about the architecture of LightSwitch, we have a Silverlight user interface talking back to web services. A second configuration option lets us choose where those web services will run. We will choose to host them on an IIS Server. Once your settings screen looks like Figure 11-1, you can click on Publish to start the Publishing Wizard.
The Publishing Wizard
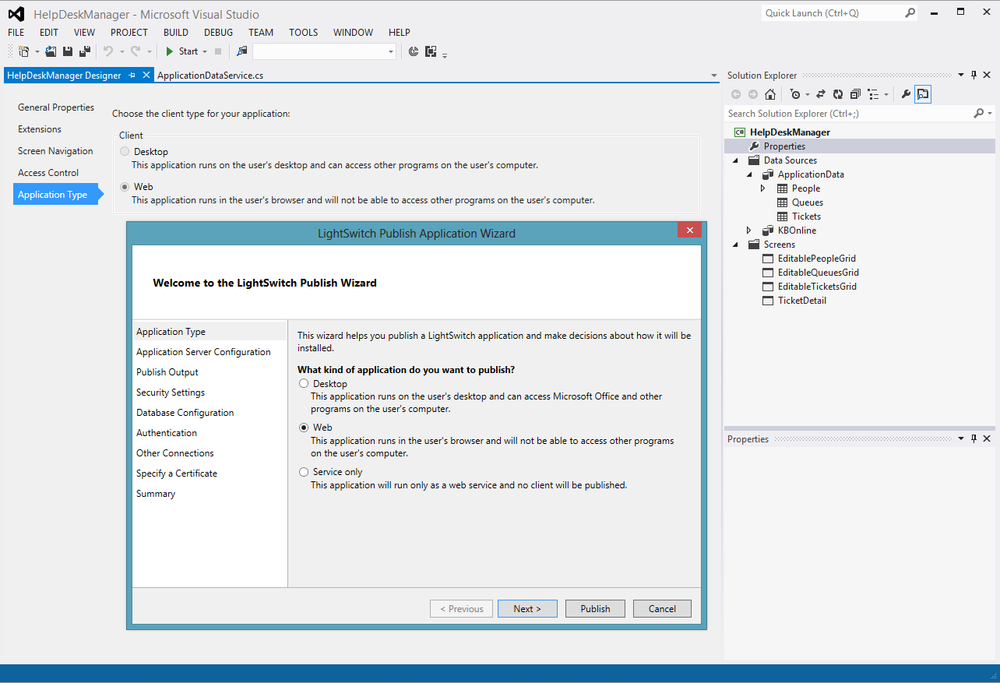
Welcome to the publishing wizard. This wizard will walk you through the process of deploying your LightSwitch application. The screens in this wizard are tailored based on your selection of application type, authentication type, and on-premise versus Windows Azure deployment. We’re going to continue walking through the scenario for an on-premise deployment of a web application using forms-based authentication.
What Kind of Application Do You Want to Deploy?
The first step in the publishing wizard is a simple confirmation that we are going to be deploying as a web application as shown in Figure 11-2. A new feature of Visual Studio 2012 is the option to publish just the service and not the Silverlight client. With LightSwitch now supporting OData, you can use LightSwitch to easily create smart, secure, middle-tier data services that can be called from a variety of clients. If you choose this option, the LightSwitch client will not be published. With the release of the HTML client, you will be able to publish just the services or any of the clients individually that make up your LightSwitch solution.
Where Will the Application’s Services Be Hosted?
Next we confirm that we are going to be using an IIS Server to host our application and that the dependencies for hosting a LightSwitch application have already been installed and configured on our IIS Server (Figure 11-3). More information on preparing your IIS Server to host a LightSwitch application is available in Chapter 34, but let’s detail how to configure this from the LightSwitch side.
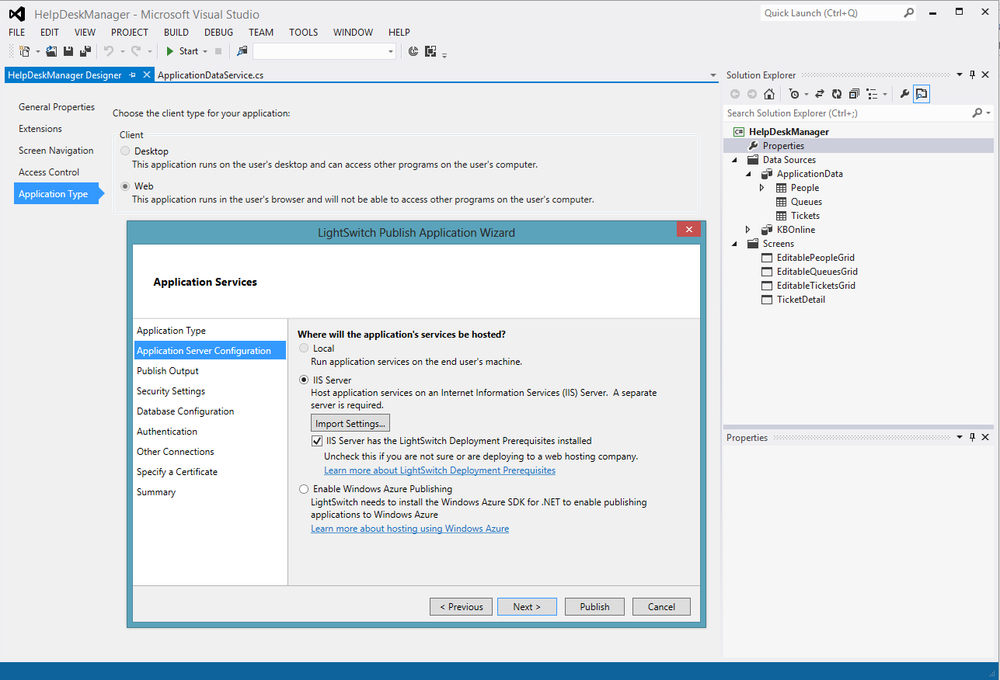
LightSwitch enables you to either create a deployment package for later installation or to directly connect to the server and publish the application from your developer workstation. The latter scenario is very useful when doing iterative style development if you have a development server to which you, as a developer, have administrative rights. More commonly, a developer will create the package and provide that to a server administrator who maintains the server environments. We will choose this option for our example.
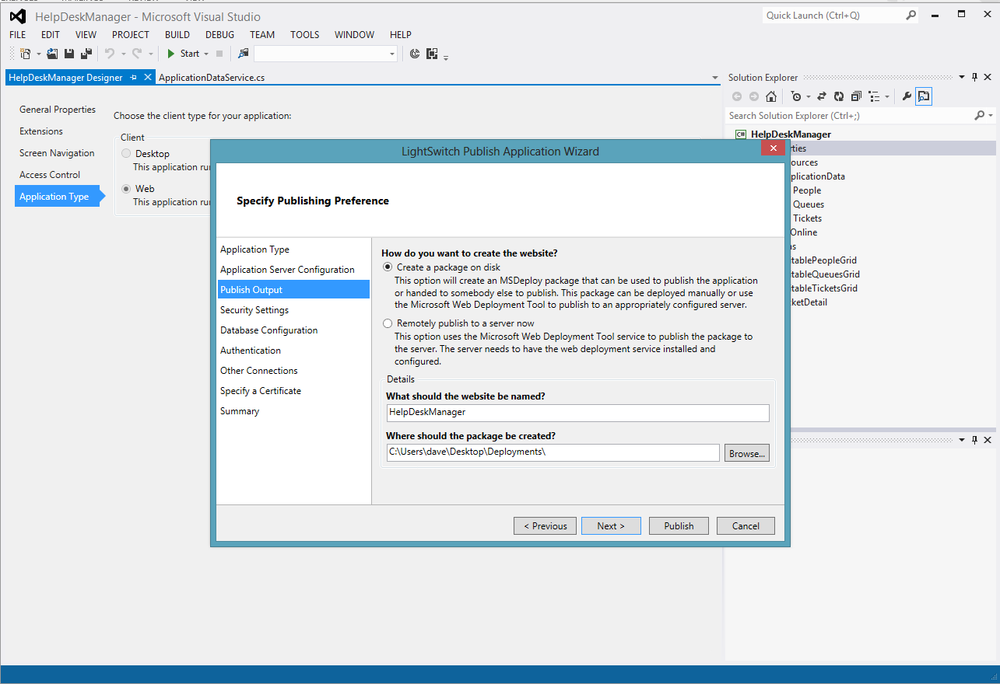
Remotely Publish the App or Just Package It for Now?
In this step of the deployment process, you assign the name for your web application, as shown in . This will be used to name the IIS web application when the package is executed. The final input on this screen prompts you for where you would like the package to be stored. We suggest placing this in an accessible and convenient location such as your desktop, as you will need to transfer this file to the server shortly.
Do You Need an SSL Certificate?
By default, all communication between the client and the server uses the HTTP protocol instead of the HTTPS protocol, which is encrypted to be more secure. Secure Sockets Layer (SSL) encryption helps to protect data sent between your client application and the LightSwitch services running on the server.
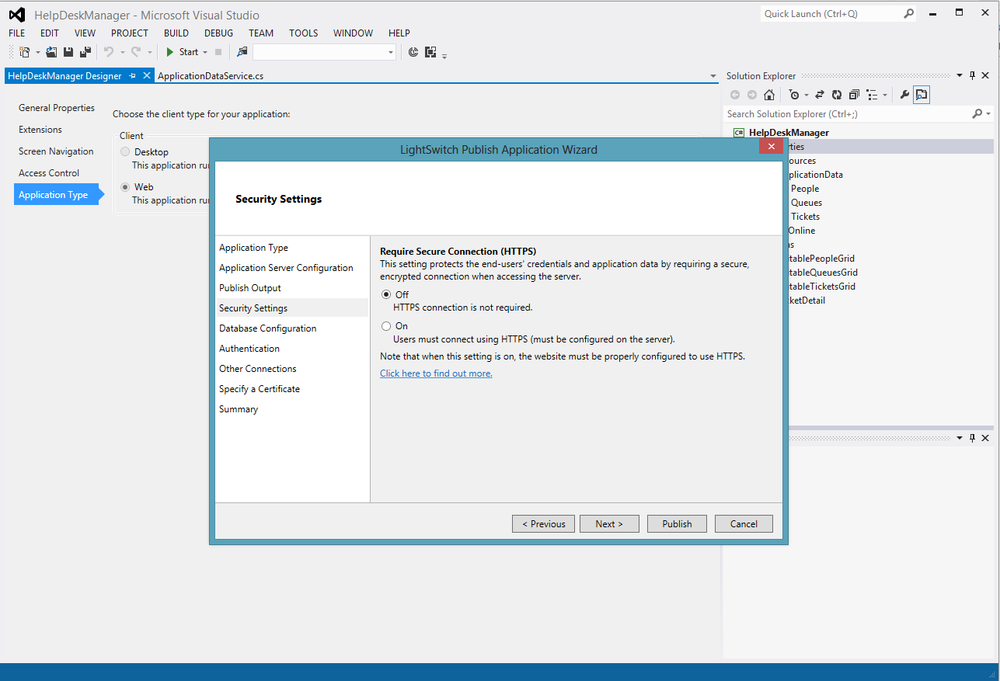
Note
In order to use the Secure Sockets Layer with LightSwitch, your web server will also need to be configured with a certificate to support encryption.
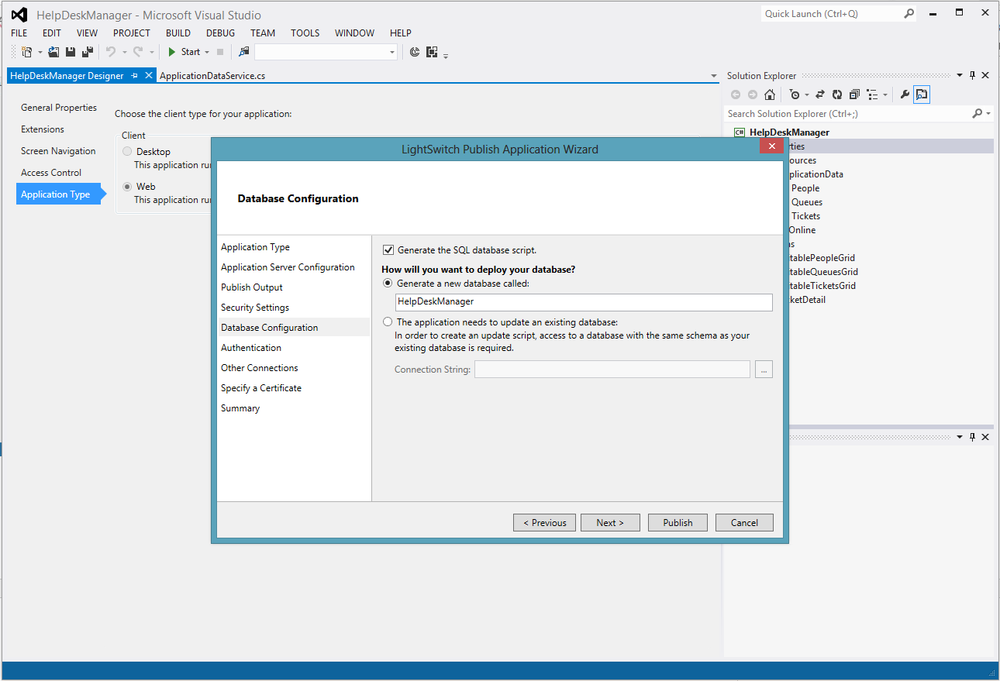
How Will You Deploy Your Database?
The next step in the wizard collects information about the database scripts that we will generate and deploy. If this is the first time you are deploying the application, you will most likely want to create a new database. LightSwitch also has the ability to generate change scripts to modify an existing database. One word of caution here: depending on how significant the changes are to your database schema, you may want to deploy a new database and migrate your data. There are some changes such as renaming a column that can really throw the automatic upgrades for a loop.
This is the first time that we are deploying the application, so simply enter a name for our new application database as shown in Figure 11-6. The database we are deploying to the server was generated by LightSwitch based on the data model we constructed in Chapter 5.
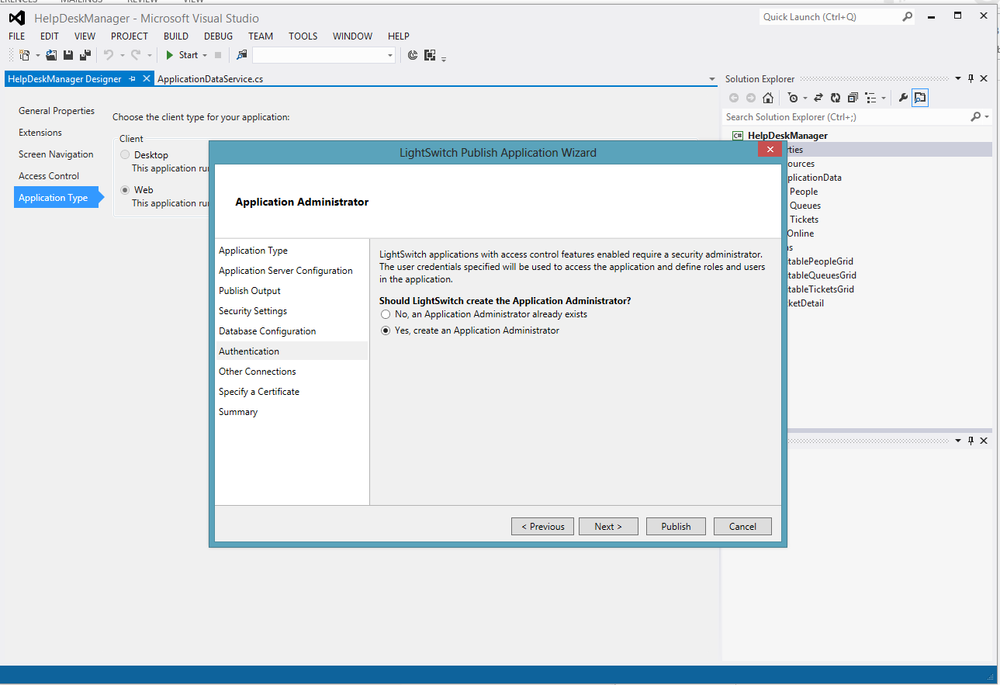
Should LightSwitch Create an Application Administrator Account?
The next step in the process, shown in Figure 11-7, shows the process of adding a new user with administrator rights. In Chapter 10, we configured our application to use forms-based authentication. To make sure that we have a user with rights to administer the application, we’ll tell LightSwitch to create an administrator when this package is executed.
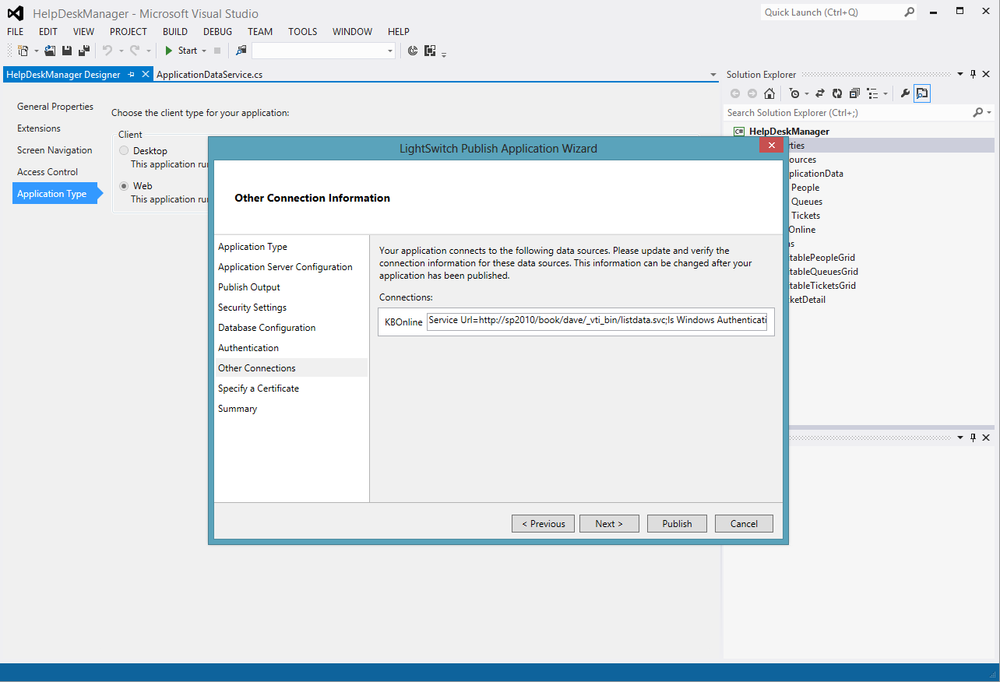
Specify Other Connection Information
At this point in the wizard, LightSwitch gathers connection information about any external data connections used by our project. In Chapter 10, we added a SharePoint data source into our LightSwitch solution. When LightSwitch communicates with SharePoint, it does so via the listdata.svc service built into SharePoint 2010. Figure 11-8 confirms the URL and connection information for our SharePoint list. This information was prepopulated based on what we defined in Chapter 10 during the development process. This option exists to allow you to develop against one SharePoint farm and deploy to another SharePoint site as required.
Signing Your Code
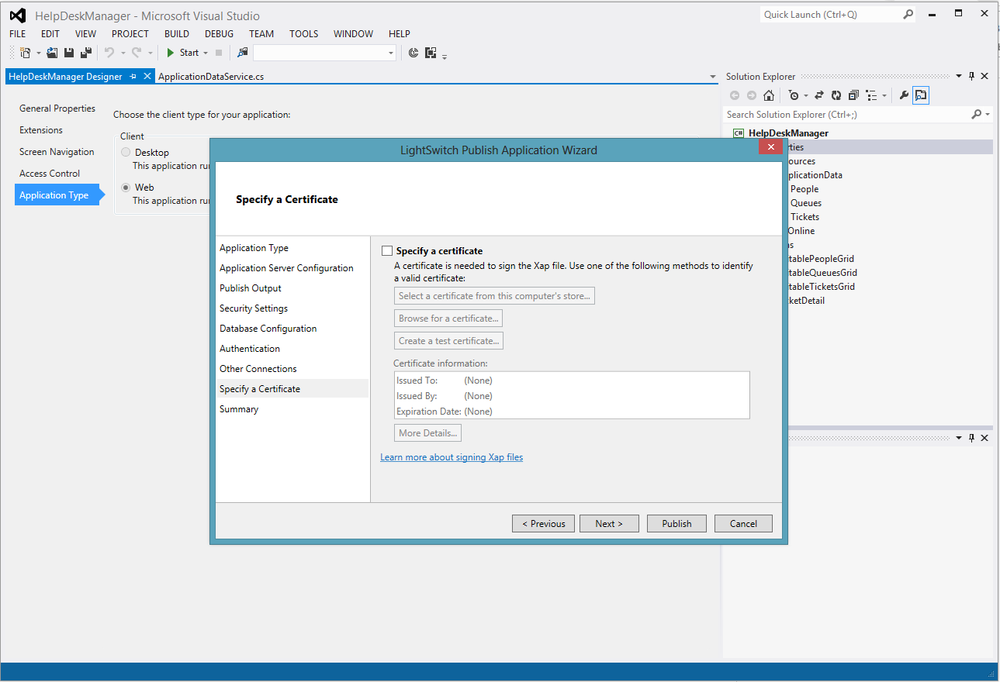
LightSwitch applications are downloaded as XAP files. A XAP file is a compressed file that contains an assembly manifest and one or more assemblies. A XAP file is signed by using a certificate that is digitally signed. A certificate is typically obtained from a system administrator or third-party certificate authority.
To sign an XAP file for your LightSwitch application, assign a certificate on the “Specify a Certificate” page of the LightSwitch Publish Application Wizard shown in Figure 11-9. Certificates can be added from the certificate store on your computer or from a network location that is provided by the network administrator. You can also create a temporary certificate for testing.
Figure 11-9 is a snapshot of the process of code signing your Silverlight XAP file. This is required for Windows Azure but is optional for on-premise deployments. By signing an XAP file for a LightSwitch application, you assure users that the code has not been tampered with.
Ready to Deploy
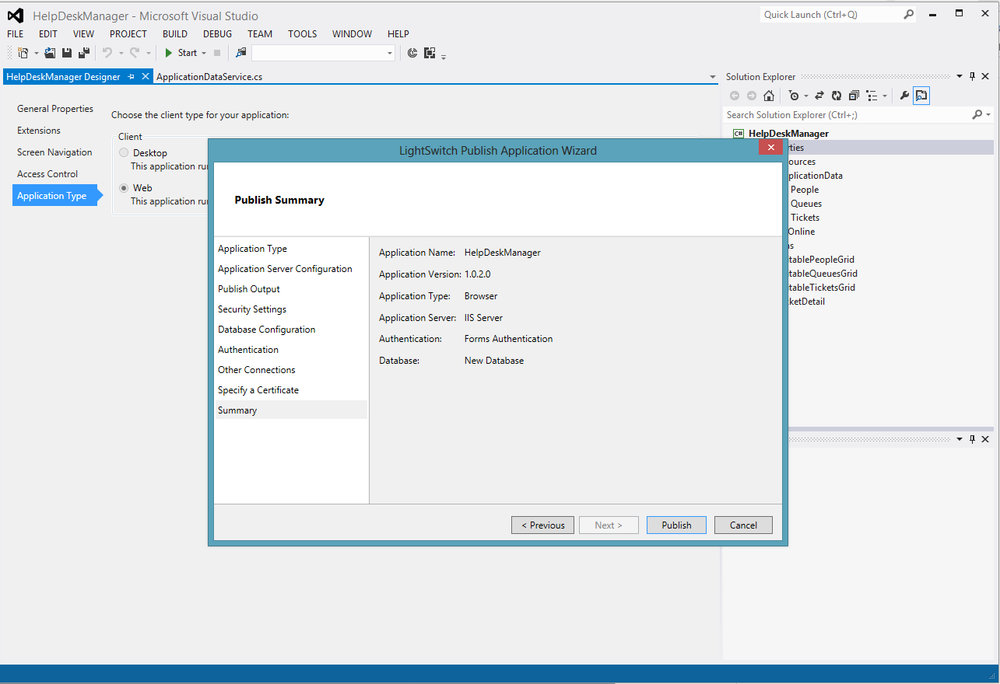
Congratulations, you have completed the questions for the Publish Application Wizard! Next, you’ll see a summary screen that confirms these configuration details. Go ahead and click Publish (see Figure 11-10).
Deploying Your Packages to the Server
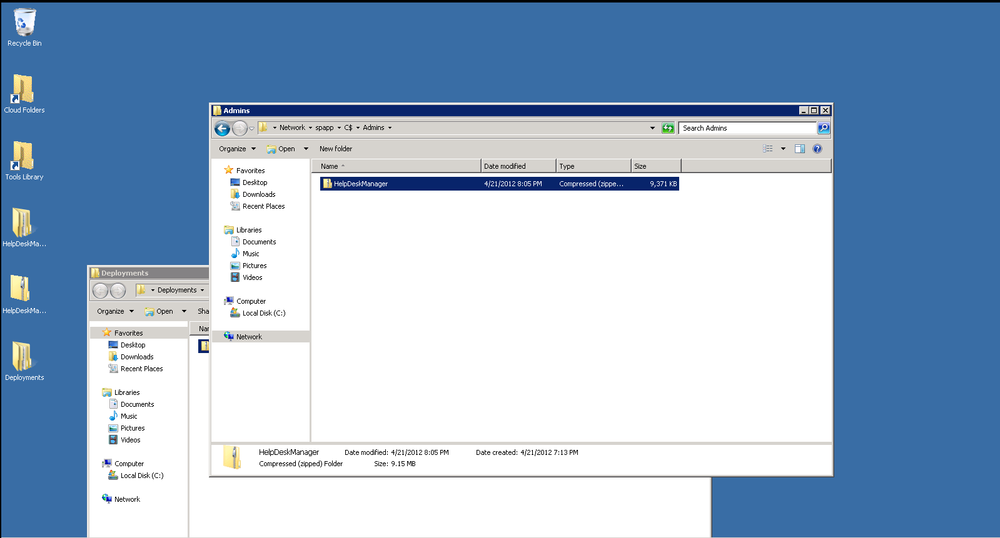
Visual Studio will spend a minute or two creating your deployment package and will drop a ZIP file in the output location you selected earlier in the wizard. After that process has completed, copy the package over to the IIS Server that will host the LightSwitch services. It’s a good idea to create a folder on the application server where you copy packages to make the process easier. In Figure 11-11, you can see that we’ve created a shared folder on our App Server and connected to it from our development environment. This is an easy way to transfer our package to the server.
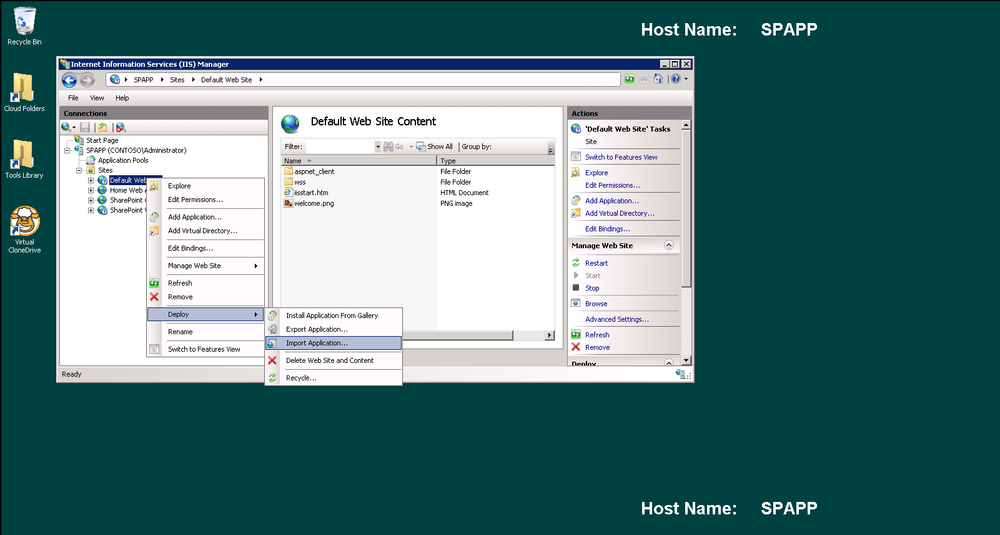
In our environment, we are running our LightSwitch services on a separate IIS website on our SharePoint App Server. Part V of this book will discuss configuration options in depth, but for now, note that this process can be run on any IIS Server that has the LightSwitch dependencies installed.
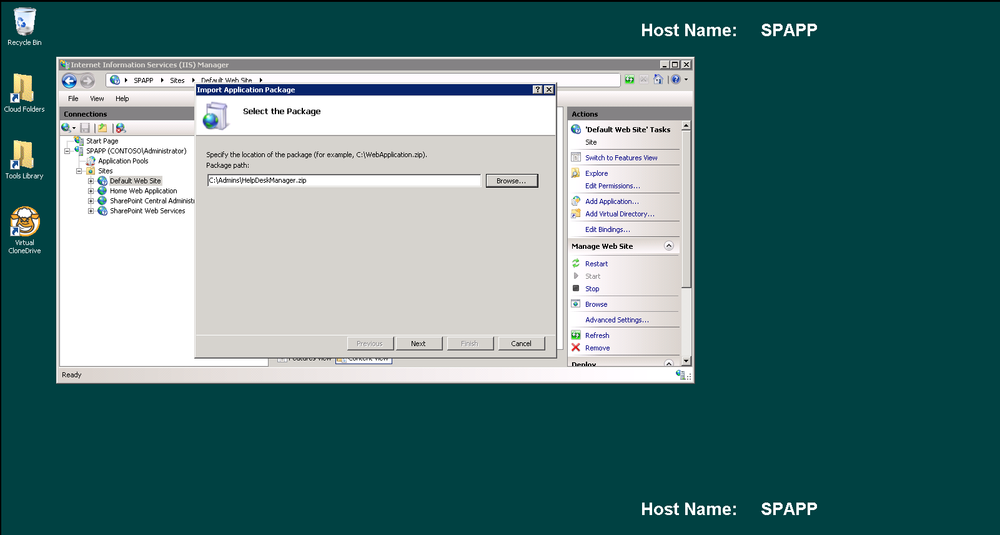
To install a LightSwitch deployment package, open the IIS Manager and navigate to the IIS website on which you’d like to deploy your application. For our example, we will use the Default Web Site in IIS. Right-click on the website and select Deploy → Import application. This will launch the Import Application Package Wizard, which will walk through the process of deploying the application. See Figure 11-12.
The first step in the Import Application Package Wizard allows you to specify the file system path to the application. You can go ahead and browse to the location you copied the package to earlier. See Figure 11-13.
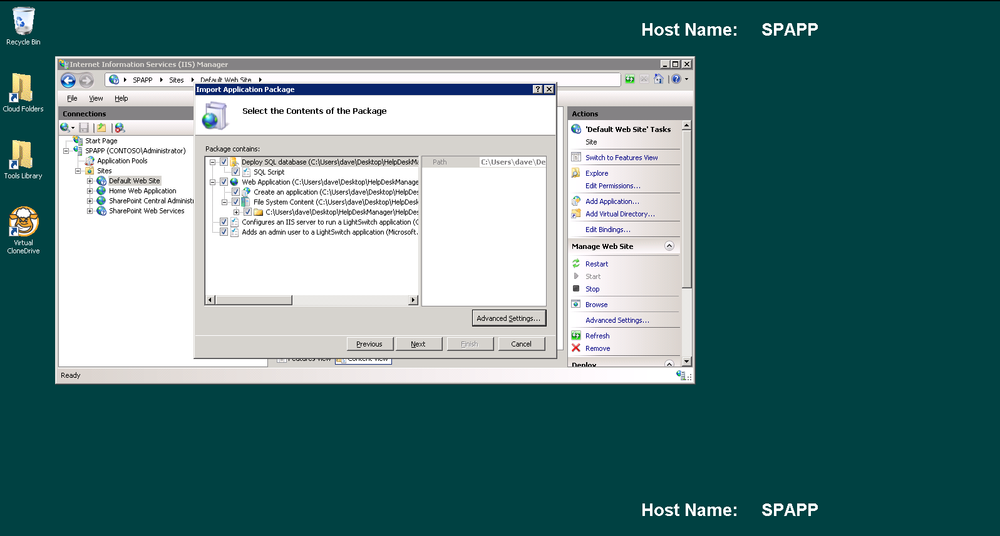
Next, LightSwitch generates a SQL script that will create the database, a web application, configuration scripts to set up IIS, and a script to add the admin user to the LightSwitch database. You can uncheck any items you don’t want to deploy, but we’re going to deploy the entire application. Figure 11-14 shows the contents of the application package.
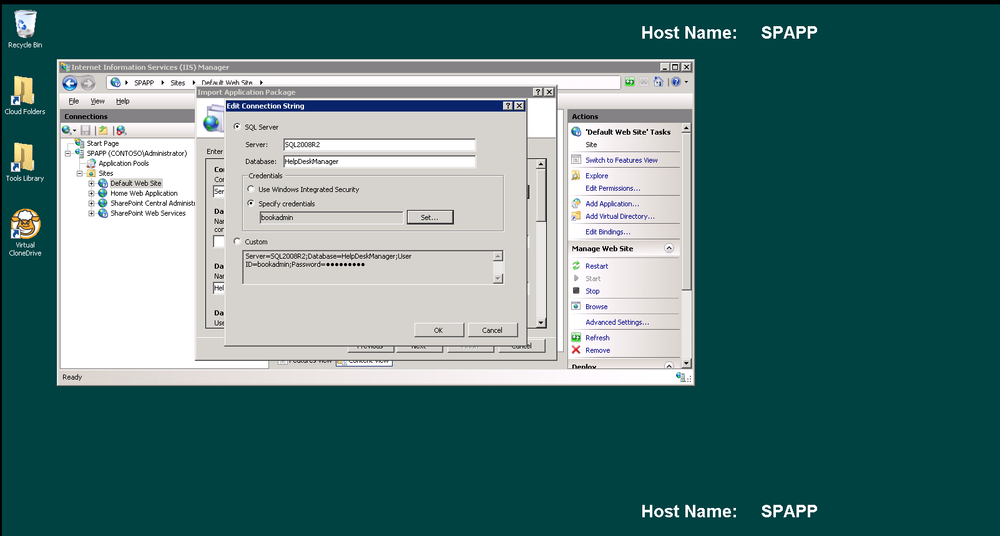
Now we begin to walk through the deployment options. The first section requires information about the database to which we want to deploy. Click on the ellipses next to the connection string line to open the connection string builder (see Figure 11-15.)

Let’s begin by building the connection string, as shown in Figure 11-16. We are using the database server that’s also hosting our SharePoint databases. When specifying the connection string, you’re going to need an account that has sysadmin rights on the database server, as we’re going to be creating a new database. Enter the name of the SQL Server that will host the database and the name of the database we’ll be creating. If you are logged in as a Windows user with sysadmin rights on your database server, you can use integrated security; if not, you can provide a SQL Server user account that has those rights.
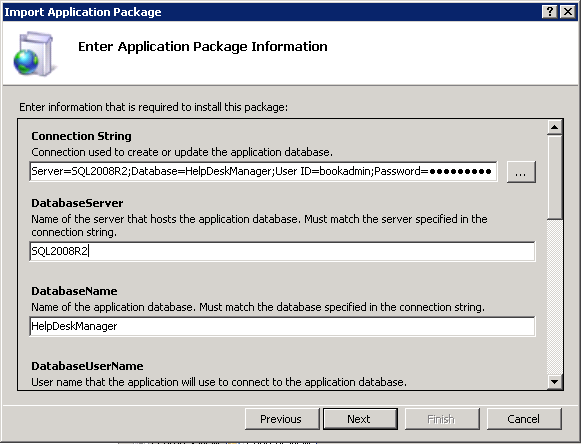
Once you’ve built your connection string, continue filling out the form. Despite the fact that we have just created a connection string to our database, we are still prompted to enter the name of the database server again and the database name (Figure 11-17). Yes, this is really a duplication of the information in the connection string above. Let’s just go with it and continue down the form.
Next, we need to provide the information that our application will use to talk to the database during normal usage scenarios (see Figure 11-18). Unlike the admin credentials we supplied in the previous step, this account only needs the ability to read and write from your database so you may want to use an account just for this application.
The principle of least privilege in information security suggests that a module or program be only able to access information and resources that are necessary for it to complete its desired purpose. Following least privilege principles helps decrease the surface for attack in our application and limit the damage should our application ever be compromised. If you use a dedicated account just for this, such as the HelpDeskManager account we are using in this example, then you can restrict access to only this database and follow the principle of least privilege.
The last input on this section of the form shows us the location of the SharePoint list we are using for our knowledge base. If you have multiple environments for development and production, this gives us the opportunity to change the path. In looking at the URL below, you can see how the connection string is defined:
http://servername/managed path/site collection/_vti_bin/listdata.svc
Every SharePoint Site Collection has a virtual directory at sitecollection/vti_bin that contains the SharePoint extensions including SharePoint’s OData service, listdata.svc.
Note
If you’re curious what vti_bin stands for or you want to win a SharePoint trivia contest, we’ll tell you. It stands for Vermeer Technologies Incorporated binaries. In 1996, Microsoft acquired a product called FrontPage from Vermeer Technologies Incorporated. The FrontPage server extensions evolved into an early version of SharePoint called SharePoint Team Services in 2000 and the FrontPage editor became SharePoint Designer in 2010.

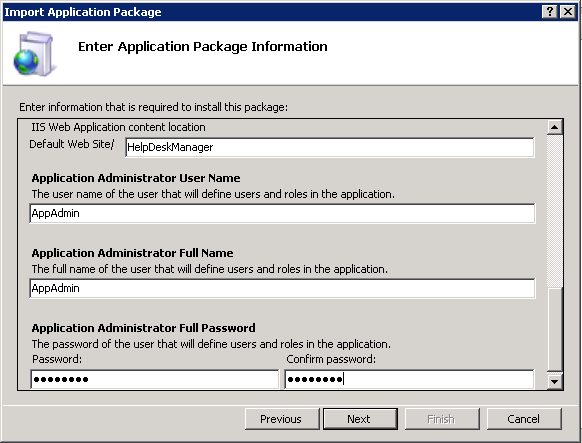
Continuing down the form, we enter the path where we’d like our application to be hosted; in this case, we create a directory called HelpDeskManager off our default website, as shown in Figure 11-19. When we created our deployment package, we checked off that we wanted to add an administrative user. Now at deployment time, we supply the name of the account we’d like created and the password. Because we are using forms authentication, these will be stored in the database with the password encrypted. This screen looks a little different with Windows authentication because we would only provide a username for an existing Active Directory user.
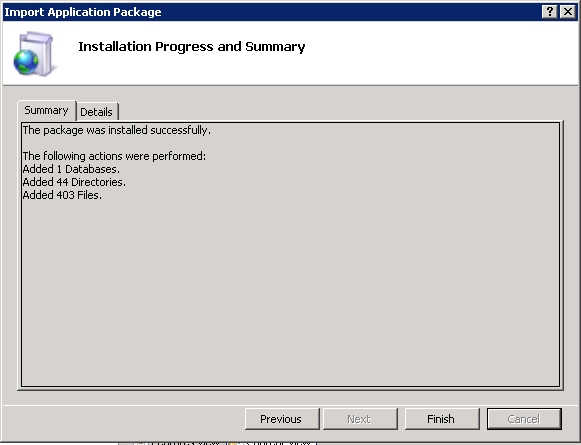
That’s all we need to get the installation process going. The LightSwitch deployment package will now execute all the steps to create our database, create our web application, copy the LightSwitch services and the Silverlight XAP file, and finally add our administrative user account to the database.
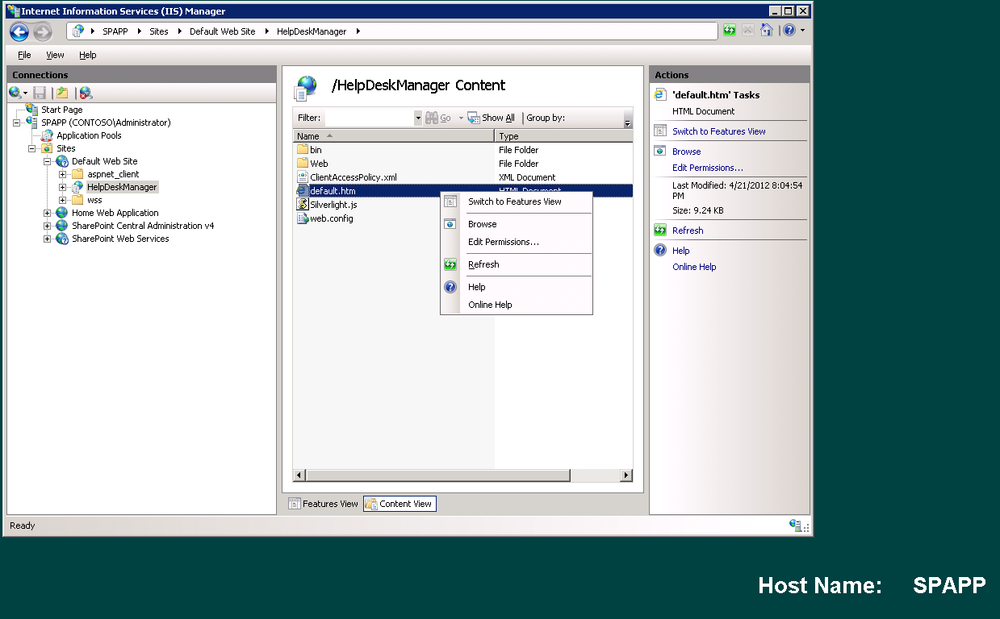
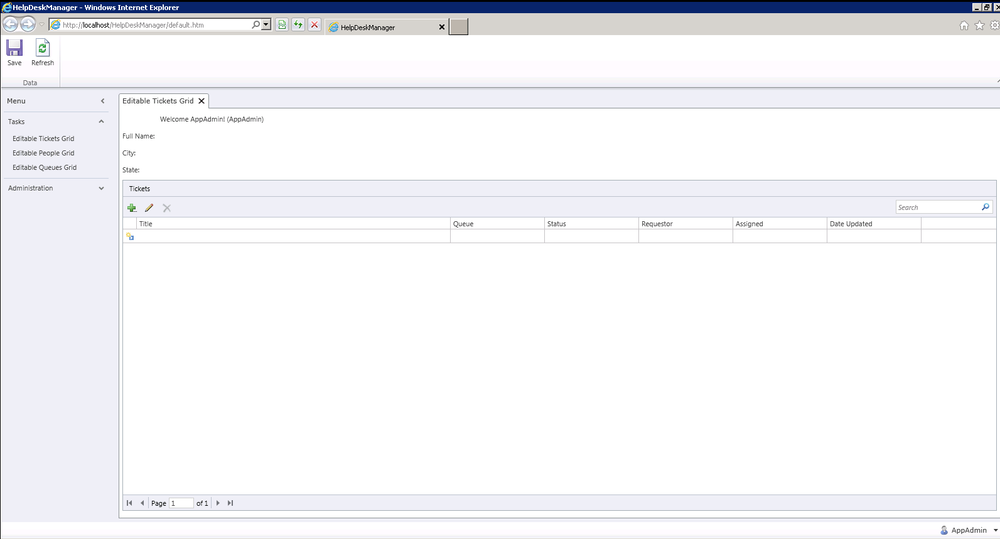
In Figure 11-20, you see the completed installation wizard. Let’s go look at our application and make sure everything works as expected. We have the IIS Manager open from doing the install. In the tree view on the left, you can see that the Help Desk Manager was added below the Default Web Site just as we expected. When we click on that Help Desk Manager node, the Content View on the right displays the files that make up our web application. We can simply right-click on default.htm and click Browse to open the default start page in our browser (see Figure 11-21).
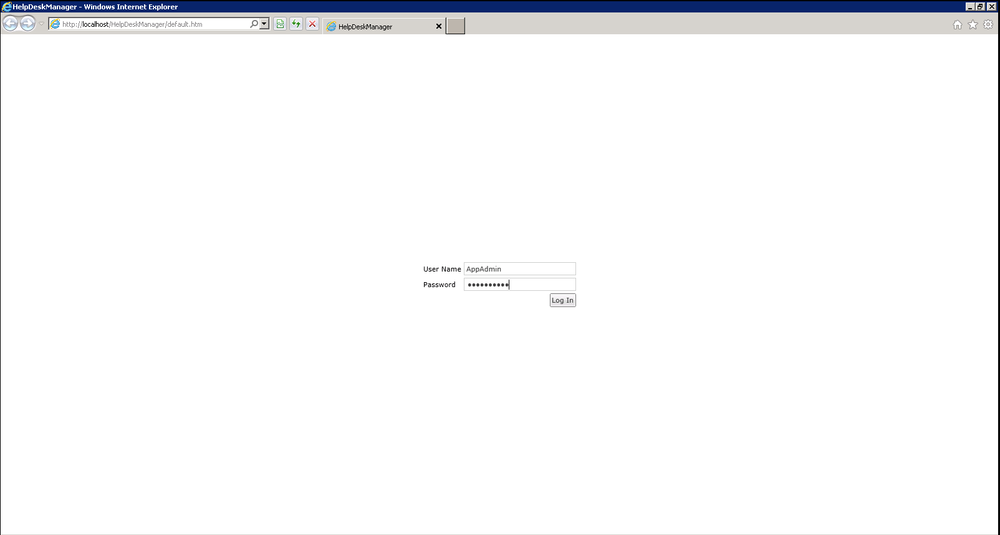
When the application opens (Figure 11-22) we are prompted to log into the application because we are using forms authentication. This is where we will use our newly created admin user account that we created, as seen in Figure 11-18.
If you were using Windows authentication and you were part of a corporate network with an Active Directory domain, then your credentials would be automatically passed to the Silverlight runtime and you wouldn’t see a login page.
Note
Also worth knowing is that the forms-based authentication used by LightSwitch is based on the ASP.NET forms authentication. While it is beyond the scope of this book, you can create a custom ASP.NET membership provider to interface into third-party user stores that may exist in your company such as an LDAP server or other directory. LightSwitch will also respect an ASP.NET forms authentication cookie, allowing you to achieve single sign-on with a little bit of extra coding and some changes to your web.config file. For more information, see the documentation.
After logging in to the app (see Figure 11-22), we will see our working application as it appears in Figure 11-23. Go ahead and test out the application by adding a few tickets. These will be logging the data to our SQL database and updating the knowledge base in SharePoint every time we save.
A First Look at the Database
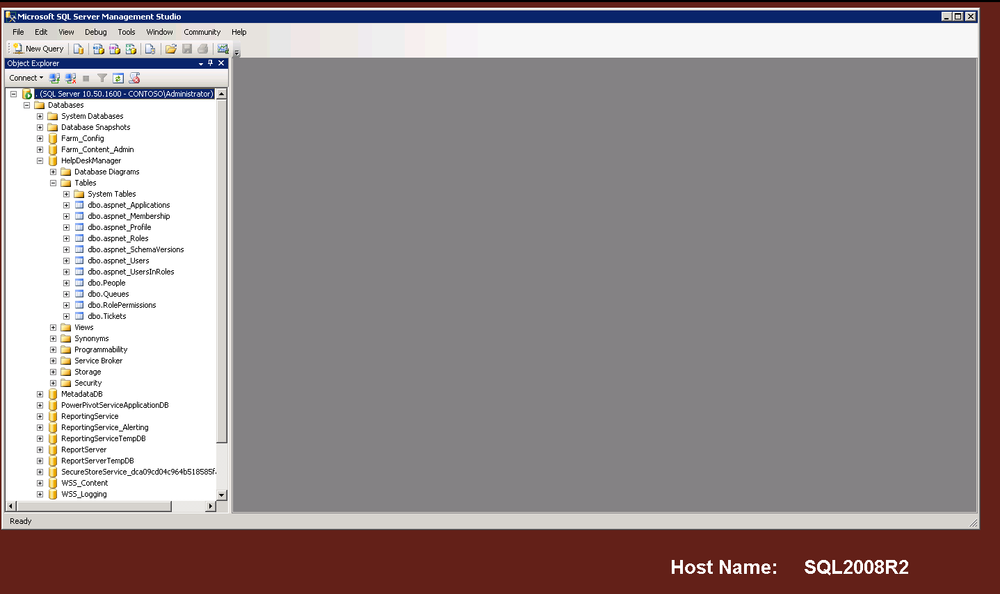
After you’ve had a chance to explore the application a bit, take a look at your database hosted in our SQL Server environment. Open SQL Management Studio and connect to the SQL Server that is hosting the database (Figure 11-24). When you expand the tables node within our database (HelpDeskManager in our case) you’ll see the tables that make up our solution. You will recognize a number of the tables such as People, Queues, and Tickets from the entities we created in LightSwitch. The tables you don’t recognize are part of the authentication and authorization system of LightSwitch including the aspnet_ tables and the RolePermissions table. LightSwitch automatically populates these when you maintain your users and roles via the user interface.
Summary
You have now completed the deployment of your LightSwitch application. In comparison to most other software deployment mechanisms (especially SharePoint), it was pretty simple. One wizard as part of the development process helped you create a deployment package you could give to your server administrators, and a second wizard run on the server guided you through the process of creating the database automatically, creating the IIS Web Application, deploying the code, and adding your first admin user.
In Part III, we’re going to talk about the business intelligence tools in SharePoint 2010 when used in conjunction with SQL Server 2012. You will find that the next section builds on the database we deployed in this chapter so you may want to use the application to provide some sample data to use when reporting.